Migrating from Universal Analytics (GA) to GA4

Standard

Migrating from Universal Analytics (GA) to GA4 involves transitioning from the older, more established web analytics platform to the new and improved version. This process can be a bit complicated, but it’s worth it if you want to stay up-to-date with the latest features and functionality.

To start with the process, you will need to create a new GA4 property. This can be done through the Google Analytics interface by selecting the “Create Property” button and following the prompts. The new property will be separate from your existing Universal Analytics property, and you can have both properties running simultaneously during the migration process.

Once you have set up the new property, you’ll need to install the GA4 tracking code on your website or app. This is done by replacing the old Universal Analytics tracking code with the new GA4 tracking snippet. This code should be placed on every page of your website, and you should test to ensure that it’s working properly.

One of the significant differences between GA4 and Universal Analytics is the way event tracking is handled. In GA4, events are collected using an event-driven data model. This means that events are sent to Google Analytics when they occur, rather than when a page is loaded. As such, you’ll need to update any event tracking you have set up to match the new model. This may require more extensive changes to your tracking setup than a simple upgrade, and you should carefully evaluate your needs and goals before deciding to make the switch.

If you want to compare GA4 data to your existing Universal Analytics data, you can set up data imports to bring your historical data into GA4. This will allow you to see how your website or app has performed in the past and compare it to how it’s performing under the new tracking model.

It’s important to note that GA4 is not a direct replacement for Universal Analytics, and some features and reports may not be available in GA4. Additionally, because GA4 is a newer platform, some of the reports and features are still in beta and may change over time. However, GA4 does offer many new and improved features, including more advanced machine learning capabilities and cross-device tracking, which can help you better understand your audience and improve your marketing efforts.

Finally, once you have migrated to GA4, you will need to create new reports in the GA4 interface to view and analyze your data. The new interface may take some getting used to, but it offers many powerful tools for understanding your website or app’s performance.

Some of the new reports available in GA4 include:

User acquisition: This report shows how users are finding your website or app, including which channels are driving the most traffic and which campaigns are the most effective.

User engagement: This report provides insights into how users are interacting with your website or app, including which pages are the most popular and which actions users are taking.

Retention: This report shows how many users are returning to your website or app over time, and how often they are returning.

Monetization: This report provides insights into how your website or app is generating revenue, including which products or services are the most popular and which users are the most valuable.

In conclusion, migrating from Universal Analytics to GA4 requires some effort, but it’s worth it to take advantage of the new features and capabilities. By following the steps outlined above, you can make the transition smoothly and start benefiting from the new insights and data that GA4 provides.

Warning: If you don’t know about javascript or don’t have developing knowledge then don’t try to Migrating from Universal Analytics (GA) to GA4  that can break your site, Cart and other functionality 

Disclaimer: Google tag manager belongs to Google property 

For Contact: mappchero@gmail.com

I am available for Hire on Freelancer: Freelancer.com

I am available for Hire on Upwork: Upwork.com

I am available for Hire on Peopleperhour: Peopleperhour.com

I am available for Hire on Guru: Guru.com

Migration of websites UA to GA4 and setup of Google Tag Manager

Standard

Migrating from Universal Analytics (UA) to Google Analytics 4 (GA4) involves upgrading your analytics tracking system to the latest version offered by Google Analytics. The migration process can be broken down into two main parts: migrating to GA4 and setting up Google Tag Manager (GTM). In this article, we will discuss the step-by-step process to migrate your website from UA to GA4 and set up GTM.

Migrating to GA4:
The first step in migrating to GA4 is to create a new GA4 property. To create a new property, follow these steps:

  • Log in to your Google Analytics account and navigate to the “Admin” section.
  • Select “Create Property” and choose “Web” as the type of property.
  • Enter a name for your new property and select the appropriate time zone and currency
  • Choose “Create” to create your new property.

Once you have created your new GA4 property, you will be provided with a new Measurement ID. This is a unique identifier for your property that you will need to use to track your website’s activity.

Next, you will need to install the GA4 tracking code on your website. The GA4 tracking code is different from the UA tracking code, so you will need to replace the old code with the new code.

The process for installing the GA4 tracking code is as follows:

  • Go to the “Admin” section of your GA4 property.
  • Select “Data Streams” and then click “Web.”
  • Click “Add Stream” and enter the details for your website, including the website URL and stream name.
  • Click “Create Stream” to create the new stream.
  • Once you have created your new stream, click on “Tagging Instructions” to get the GA4 tracking code.
  • Copy the code and paste it into the header section of your website, just before the closing tag.

Setting up Google Tag Manager:

Google Tag Manager (GTM) is a tool that allows you to manage all of your tracking tags in one place. With GTM, you can easily add and remove tracking tags without having to modify the code on your website. Here is how you can set up GTM:

  • Create a new Google Tag Manager account, if you don’t already have one.
  • Create a new container in GTM and link it to your GA4 property.
  • Once you have created your container, you will be provided with a GTM container code. This code needs to be added to your website, just like the GA4 tracking code.
  • Copy the GTM container code and paste it into the header section of your website, just before the closing tag.
  • Once you have added the GTM container code to your website, you can start adding tracking tags to your container.

Adding Tracking Tags to GTM:
To add a tracking tag to your GTM container, follow these steps:

  • Log in to your GTM account and select the container you want to add a tag to.
  • Select “Tags” from the left-hand menu and then click “New Tag.”
  • Select the type of tag you want to create. For example, if you want to track pageviews, select “Google Analytics: GA4 Pageview” as the tag type.
  • Enter the tag configuration details, such as the Measurement ID for your GA4 property.
  • Save the tag and then click “Submit” to publish the changes to your GTM container.
  • Test the tag to make sure it is working correctly.

Conclusion:
Migrating from UA to GA4 can be a bit tricky, but it’s worth the effort to ensure that you have the latest

Warning: If you don’t know about javascript or don’t have developing knowledge then don’t try to Migration of websites UA to GA4 and setup of Google Tag Manager  that can break your site, Cart and other functionality 

Disclaimer: Google tag manager belongs to Google property 

For Contact: mappchero@gmail.com

I am available for Hire on Freelancer: Freelancer.com

I am available for Hire on Upwork: Upwork.com

I am available for Hire on Peopleperhour: Peopleperhour.com

I am available for Hire on Guru: Guru.com

Commerce7 Google Ads Dynamic Remarketing Tag using Google Tag Manager

Standard

Commerce7 is a powerful platform designed for wineries, breweries, and distilleries. It provides a comprehensive suite of tools to help these businesses manage their online presence, including website design, eCommerce functionality, and marketing automation. One of the most effective marketing tools available on the platform is Google Ads Dynamic Remarketing, which allows businesses to target users who have already interacted with their website with personalized ads. In this article, we will explain the Commerce7 Google Ads Dynamic Remarketing Tag and how it works.

What is Google Ads Dynamic Remarketing?

Google Ads Dynamic Remarketing is a powerful advertising tool that allows businesses to target users who have already visited their website with personalized ads. By leveraging data from Google Analytics and AdWords, businesses can create dynamic ads that are tailored to the specific interests and behaviors of their website visitors. These ads can be displayed on a range of different websites and devices, including desktop and mobile, and can be customized to match the look and feel of the business’s website.

How does Google Ads Dynamic Remarketing work?

Google Ads Dynamic Remarketing works by placing a tracking tag on the business’s website. This tag collects data about the user’s behavior on the site, including the pages they visit, the products they view, and the actions they take. This data is then used to create a profile of the user’s interests and behaviors, which can be used to target them with personalized ads.

Once a user leaves the business’s website, they will begin to see ads that are tailored to their interests and behaviors. For example, if a user visits a winery’s website and views a specific wine, they may see an ad for that wine when they visit another website or social media platform. This ad may include a discount or other promotional offer to encourage the user to return to the winery’s website and make a purchase.

What is the Commerce7 Google Ads Dynamic Remarketing Tag?

The Commerce7 Google Ads Dynamic Remarketing Tag is a specific implementation of the Google Ads Dynamic Remarketing tool that is designed to work with Commerce7 websites. This tag is a small piece of code that is added to the business’s website, which allows Commerce7 to collect data about the user’s behavior on the site. This data is then used to create personalized ads that are displayed to the user after they leave the site.

The Commerce7 Google Ads Dynamic Remarketing Tag is easy to install and can be added to a Commerce7 website in just a few steps. Once the tag is installed, businesses can begin using Google Ads Dynamic Remarketing to target users with personalized ads based on their behavior on the site.

What are the benefits of using the Commerce7 Google Ads Dynamic Remarketing Tag?

There are several benefits to using the Commerce7 Google Ads Dynamic Remarketing Tag:

Increased conversions: By targeting users with personalized ads based on their behavior on the site, businesses can increase the likelihood of those users making a purchase.

Improved ROI: Google Ads Dynamic Remarketing is a cost-effective advertising tool that can provide a high ROI for businesses.

Customized ad messaging: The Commerce7 Google Ads Dynamic Remarketing Tag allows businesses to create customized ad messaging that is tailored to the user’s interests and behaviors.

Greater reach: Google Ads Dynamic Remarketing allows businesses to reach users on a range of different websites and devices, increasing their overall reach and visibility.

Easy to use: The Commerce7 Google Ads Dynamic Remarketing Tag is easy to install and can be set up in just a few steps, making it accessible to businesses of all sizes.

In conclusion, the Commerce7 Google Ads Dynamic Remarketing Tag is a powerful marketing tool that can help wineries, breweries, and distilleries increase their online visibility and drive more sales. By targeting users with personalized ads based on their behavior on the

Commerce7 ga4 eCommerce tracking in Google Tag Manager

Standard

Commerce7 is an ecommerce platform that enables businesses to create online stores and sell their products or services. To track user behavior and website performance, Commerce7 supports Google Analytics 4 (GA4) ecommerce tracking. In this article, I will explain what GA4 ecommerce tracking is and how it can benefit Commerce7 users.

GA4 ecommerce tracking is a feature of Google Analytics that allows online businesses to track their ecommerce transactions, such as purchases, refunds, and add-to-cart events. GA4 ecommerce tracking provides businesses with valuable insights into their customers’ behavior and the performance of their online store. By analyzing these data, businesses can make informed decisions to optimize their marketing strategies, improve customer experience, and increase revenue.

To set up GA4 ecommerce tracking in Commerce7, users first need to create a GA4 property in their Google Analytics account and connect it to their Commerce7 store. Once the integration is complete, Commerce7 will automatically track relevant ecommerce events and send the data to the GA4 property.

The following are some of the benefits of using GA4 ecommerce tracking in Commerce7:

Understand customer behavior: GA4 ecommerce tracking provides detailed information about how customers interact with an online store. It tracks user behavior, such as the products they view, add to cart, and purchase. This information can help businesses to understand their customers’ preferences and identify the most popular products, allowing them to optimize their inventory and marketing strategies.

Monitor sales performance: GA4 ecommerce tracking provides insights into sales performance, such as revenue, average order value, and conversion rate. This data helps businesses to measure the effectiveness of their marketing campaigns and identify opportunities to improve sales.

Track marketing campaigns: GA4 ecommerce tracking allows businesses to track the performance of their marketing campaigns, such as social media ads, email marketing, and Google Ads. By monitoring the success of these campaigns, businesses can make data-driven decisions to optimize their advertising budget and improve their return on investment (ROI).

Identify cart abandonment issues: GA4 ecommerce tracking provides information about the number of customers who add products to their cart but do not complete the purchase. By analyzing this data, businesses can identify potential issues with their checkout process, such as high shipping costs or a complicated payment process, and make changes to reduce cart abandonment rates.

Improve customer experience: GA4 ecommerce tracking can help businesses to improve their customer experience by identifying areas where customers may encounter difficulties, such as slow loading times, broken links, or unclear product descriptions. By improving the user experience, businesses can increase customer satisfaction and loyalty, leading to increased sales and revenue.

In conclusion, GA4 ecommerce tracking is a powerful tool that can provide businesses with valuable insights into their customers’ behavior and the performance of their online store. By using GA4 ecommerce tracking in Commerce7, businesses can make informed decisions to optimize their marketing strategies, improve customer experience, and increase revenue. If you are a Commerce7 user, I highly recommend taking advantage of this feature to gain a competitive advantage in the ecommerce market.

3DCart Google Ads Dynamic Remarketing Tag in Google Tag Manager

Standard

3DCart is an e-commerce platform that enables merchants to create online stores and sell their products through various channels. Google Ads Dynamic Remarketing is a feature of Google Ads that enables advertisers to show personalized ads to users who have previously interacted with their website or app. The 3DCart Google Ads Dynamic Remarketing Tag is a piece of code that enables 3DCart merchants to implement Google Ads Dynamic Remarketing on their website and show personalized ads to their website visitors.

The 3DCart Google Ads Dynamic Remarketing Tag works by placing a cookie on the user’s browser when they visit the merchant’s website. This cookie contains information about the user’s interactions with the website, such as the pages they viewed and the products they added to their cart. This information is used by Google Ads to create personalized ads that are relevant to the user’s interests and behavior.

The 3DCart Google Ads Dynamic Remarketing Tag has several benefits for merchants. Firstly, it enables merchants to show personalized ads to users who have previously interacted with their website. This can increase the likelihood of these users returning to the website and making a purchase. Secondly, it enables merchants to create ads that are relevant to the user’s interests and behavior. This can increase the effectiveness of the ads and improve the ROI of the merchant’s advertising campaigns. Finally, it enables merchants to track the performance of their ads and make data-driven decisions about their advertising strategy.

To implement the 3DCart Google Ads Dynamic Remarketing Tag, merchants need to follow several steps. Firstly, they need to create a Google Ads account and set up a remarketing campaign. This involves creating ads, setting up targeting options, and selecting the audience for the campaign. Secondly, they need to install the Google Ads Remarketing Tag on their website. This involves adding the tag code to the website’s header or footer. Finally, they need to configure the tag by setting up custom parameters that capture the user’s interactions with the website.

The custom parameters that merchants can set up using the 3DCart Google Ads Dynamic Remarketing Tag include:

Page type: This parameter captures the type of page the user visited on the website, such as a product page, a category page, or a checkout page. This enables merchants to create ads that are relevant to the user’s interests and behavior.

Product ID: This parameter captures the ID of the product the user viewed or added to their cart. This enables merchants to create ads that feature the specific products that the user is interested in.

Cart value: This parameter captures the total value of the products in the user’s cart. This enables merchants to create ads that offer discounts or promotions based on the value of the user’s cart.

Purchase ID: This parameter captures the ID of the purchase that the user made on the website. This enables merchants to create ads that feature complementary products or offer discounts on future purchases.

Once the 3DCart Google Ads Dynamic Remarketing Tag is installed and configured, merchants can start creating personalized ads that are tailored to the user’s interests and behavior. They can use a variety of ad formats, including display ads, dynamic ads, and responsive ads, to reach their audience on various channels, such as the Google Display Network, YouTube, and Gmail.

In summary, the 3DCart Google Ads Dynamic Remarketing Tag enables 3DCart merchants to implement Google Ads Dynamic Remarketing on their website and show personalized ads to their website visitors. The tag works by placing a cookie on the user’s browser and capturing information about the user’s interactions with the website. Merchants can set up custom parameters to capture specific information about the user’s behavior, such as the pages they viewed and the products they added to their cart. This enables merchants to create personalized ads

3DCart ga4 eCommerce Tracking using Google Tag Manager

Standard

3DCart is an eCommerce platform that allows online businesses to create and manage their online stores. The platform offers a wide range of features to help businesses sell their products online, and one of those features is the ability to track eCommerce transactions using Google Analytics 4 (GA4). In this article, we’ll take a closer look at how 3DCart GA4 eCommerce tracking works and how businesses can use it to improve their online sales.

GA4 eCommerce tracking is a powerful tool that allows businesses to track their online sales and revenue in Google Analytics. With GA4, businesses can see how their website visitors interact with their online store, from the moment they arrive on the site to the point of purchase. This data can then be used to optimize the online shopping experience, improve conversion rates, and ultimately increase sales.

To set up GA4 eCommerce tracking in 3DCart, you’ll first need to create a GA4 property in your Google Analytics account. Once you’ve created your GA4 property, you’ll need to connect it to your 3DCart store. To do this, go to your 3DCart admin dashboard and click on “Settings” > “General” > “Google Analytics”. Then, enter your GA4 measurement ID in the “Google Analytics GA4 ID” field and click “Save Changes”.

Once you’ve connected your GA4 property to your 3DCart store, you’ll need to set up eCommerce tracking in Google Analytics. To do this, go to your GA4 property and click on “Admin” > “Ecommerce Settings”. Then, toggle on “Enable Enhanced Ecommerce Reporting” and “Enable Ecommerce Reporting”.

With eCommerce tracking enabled, you’ll be able to track a wide range of metrics related to your online sales, including:

Revenue: The total amount of revenue generated from online sales.

Transactions: The total number of completed purchases.

Average order value: The average value of each transaction.

Products: The number of products sold and the revenue generated by each product.

Conversion rate: The percentage of website visitors who make a purchase.

Cart abandonment rate: The percentage of website visitors who add items to their cart but do not complete the purchase.

Sales by traffic source: The revenue generated by each traffic source, such as organic search, paid search, and social media.

Sales by device: The revenue generated by desktop, mobile, and tablet devices.

Customer lifetime value: The total revenue generated by a customer over their lifetime.

By tracking these metrics, businesses can gain valuable insights into their online sales performance and identify areas for improvement. For example, if the cart abandonment rate is high, it may indicate that there are issues with the checkout process that need to be addressed. Similarly, if the conversion rate is low, it may indicate that the website needs to be optimized to improve the overall shopping experience.

To make the most of GA4 eCommerce tracking, businesses should also set up conversion tracking in Google Ads. This allows businesses to track the performance of their Google Ads campaigns and optimize their advertising spend based on actual sales data. To set up conversion tracking, go to your Google Ads account and click on “Tools & Settings” > “Conversions”. Then, select “Website” as the conversion source and follow the instructions to create your conversion action.

In addition to tracking eCommerce transactions, businesses can also use GA4 to track other important metrics related to their online store. For example, businesses can track website engagement metrics such as bounce rate, time on site, and pages per session. These metrics can help businesses understand how visitors are interacting with their website and identify areas for improvement.

Finally, businesses should also use GA4 to track their marketing campaigns and understand which channels are driving the most
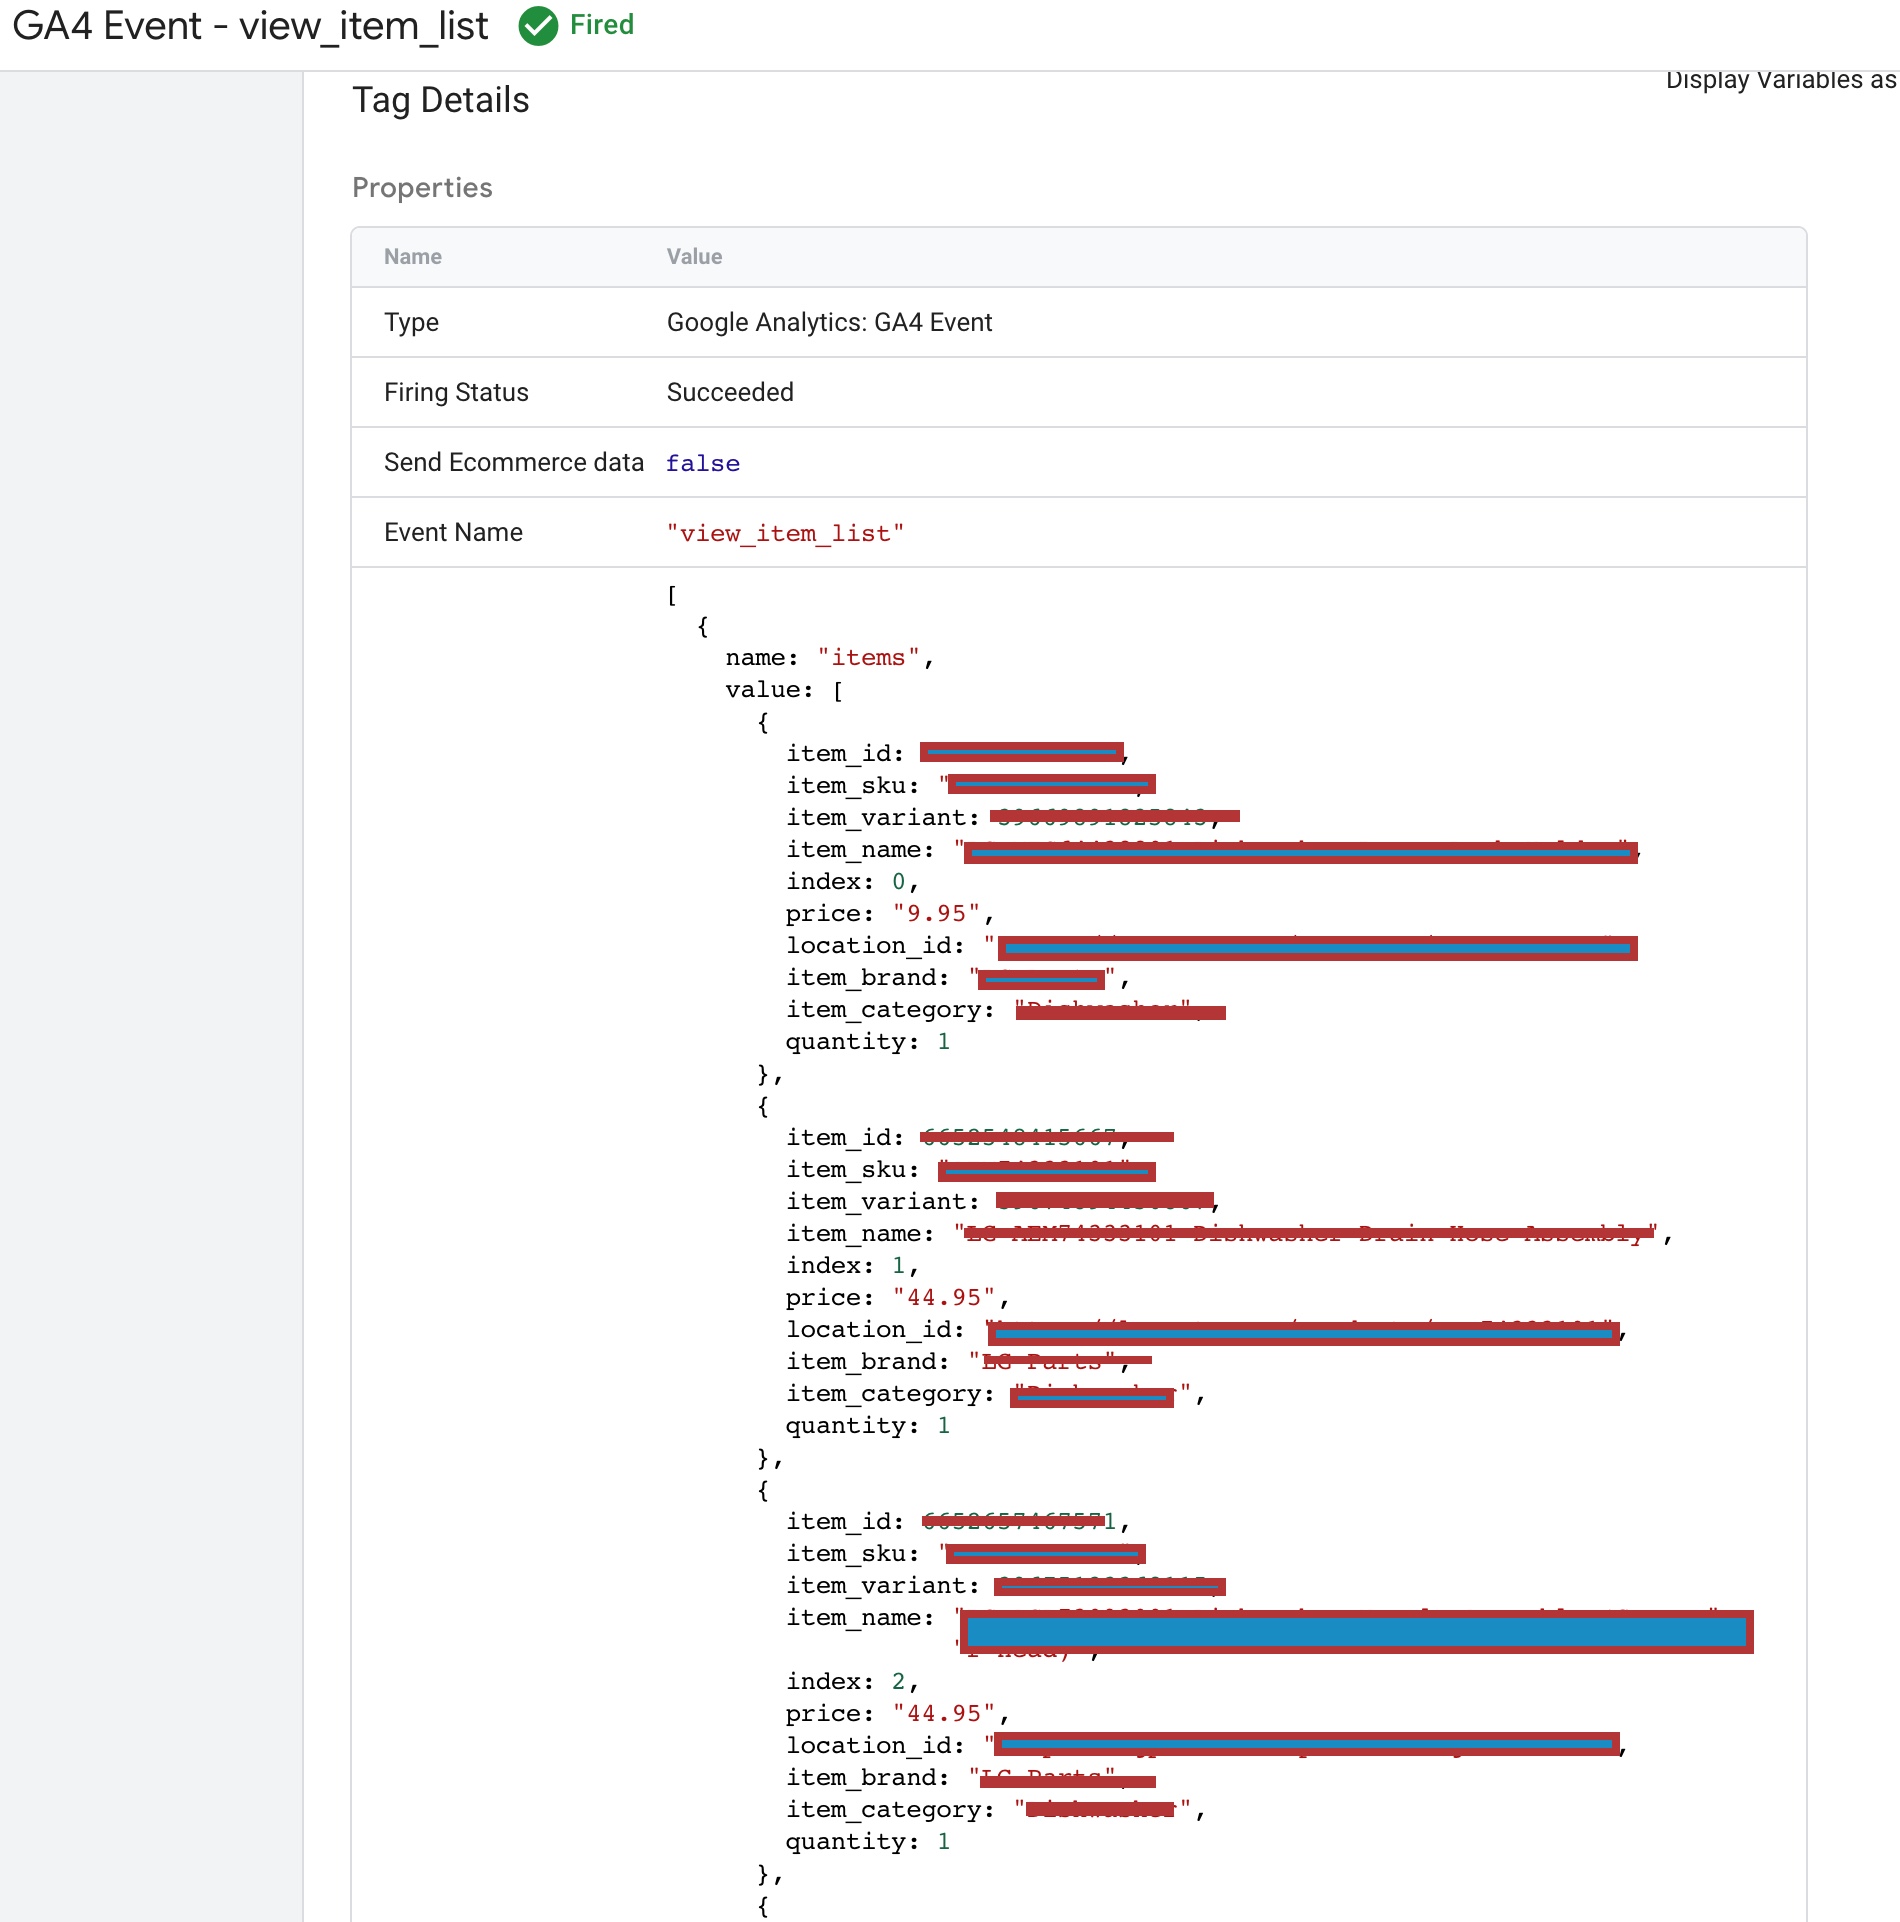
view_item_list” is an event tracking feature in Google Analytics 4 that allows eCommerce websites to track when users view a list of items. For 3DCart users, setting up this event tracking involves creating the event parameters and adding the GA4 tracking code snippet to their website’s header or footer section via the 3DCart dashboard. Once the tracking code is added, GA4 will receive the “view_item_list” event data, enabling businesses to analyze user behavior, including how often users view item lists and which products are viewed most frequently.

Google Analytics 4 (GA4) eCommerce Integration for 3DCart

Setting Up GA4 Enhanced eCommerce Tracking for 3DCart using Google Tag Manager

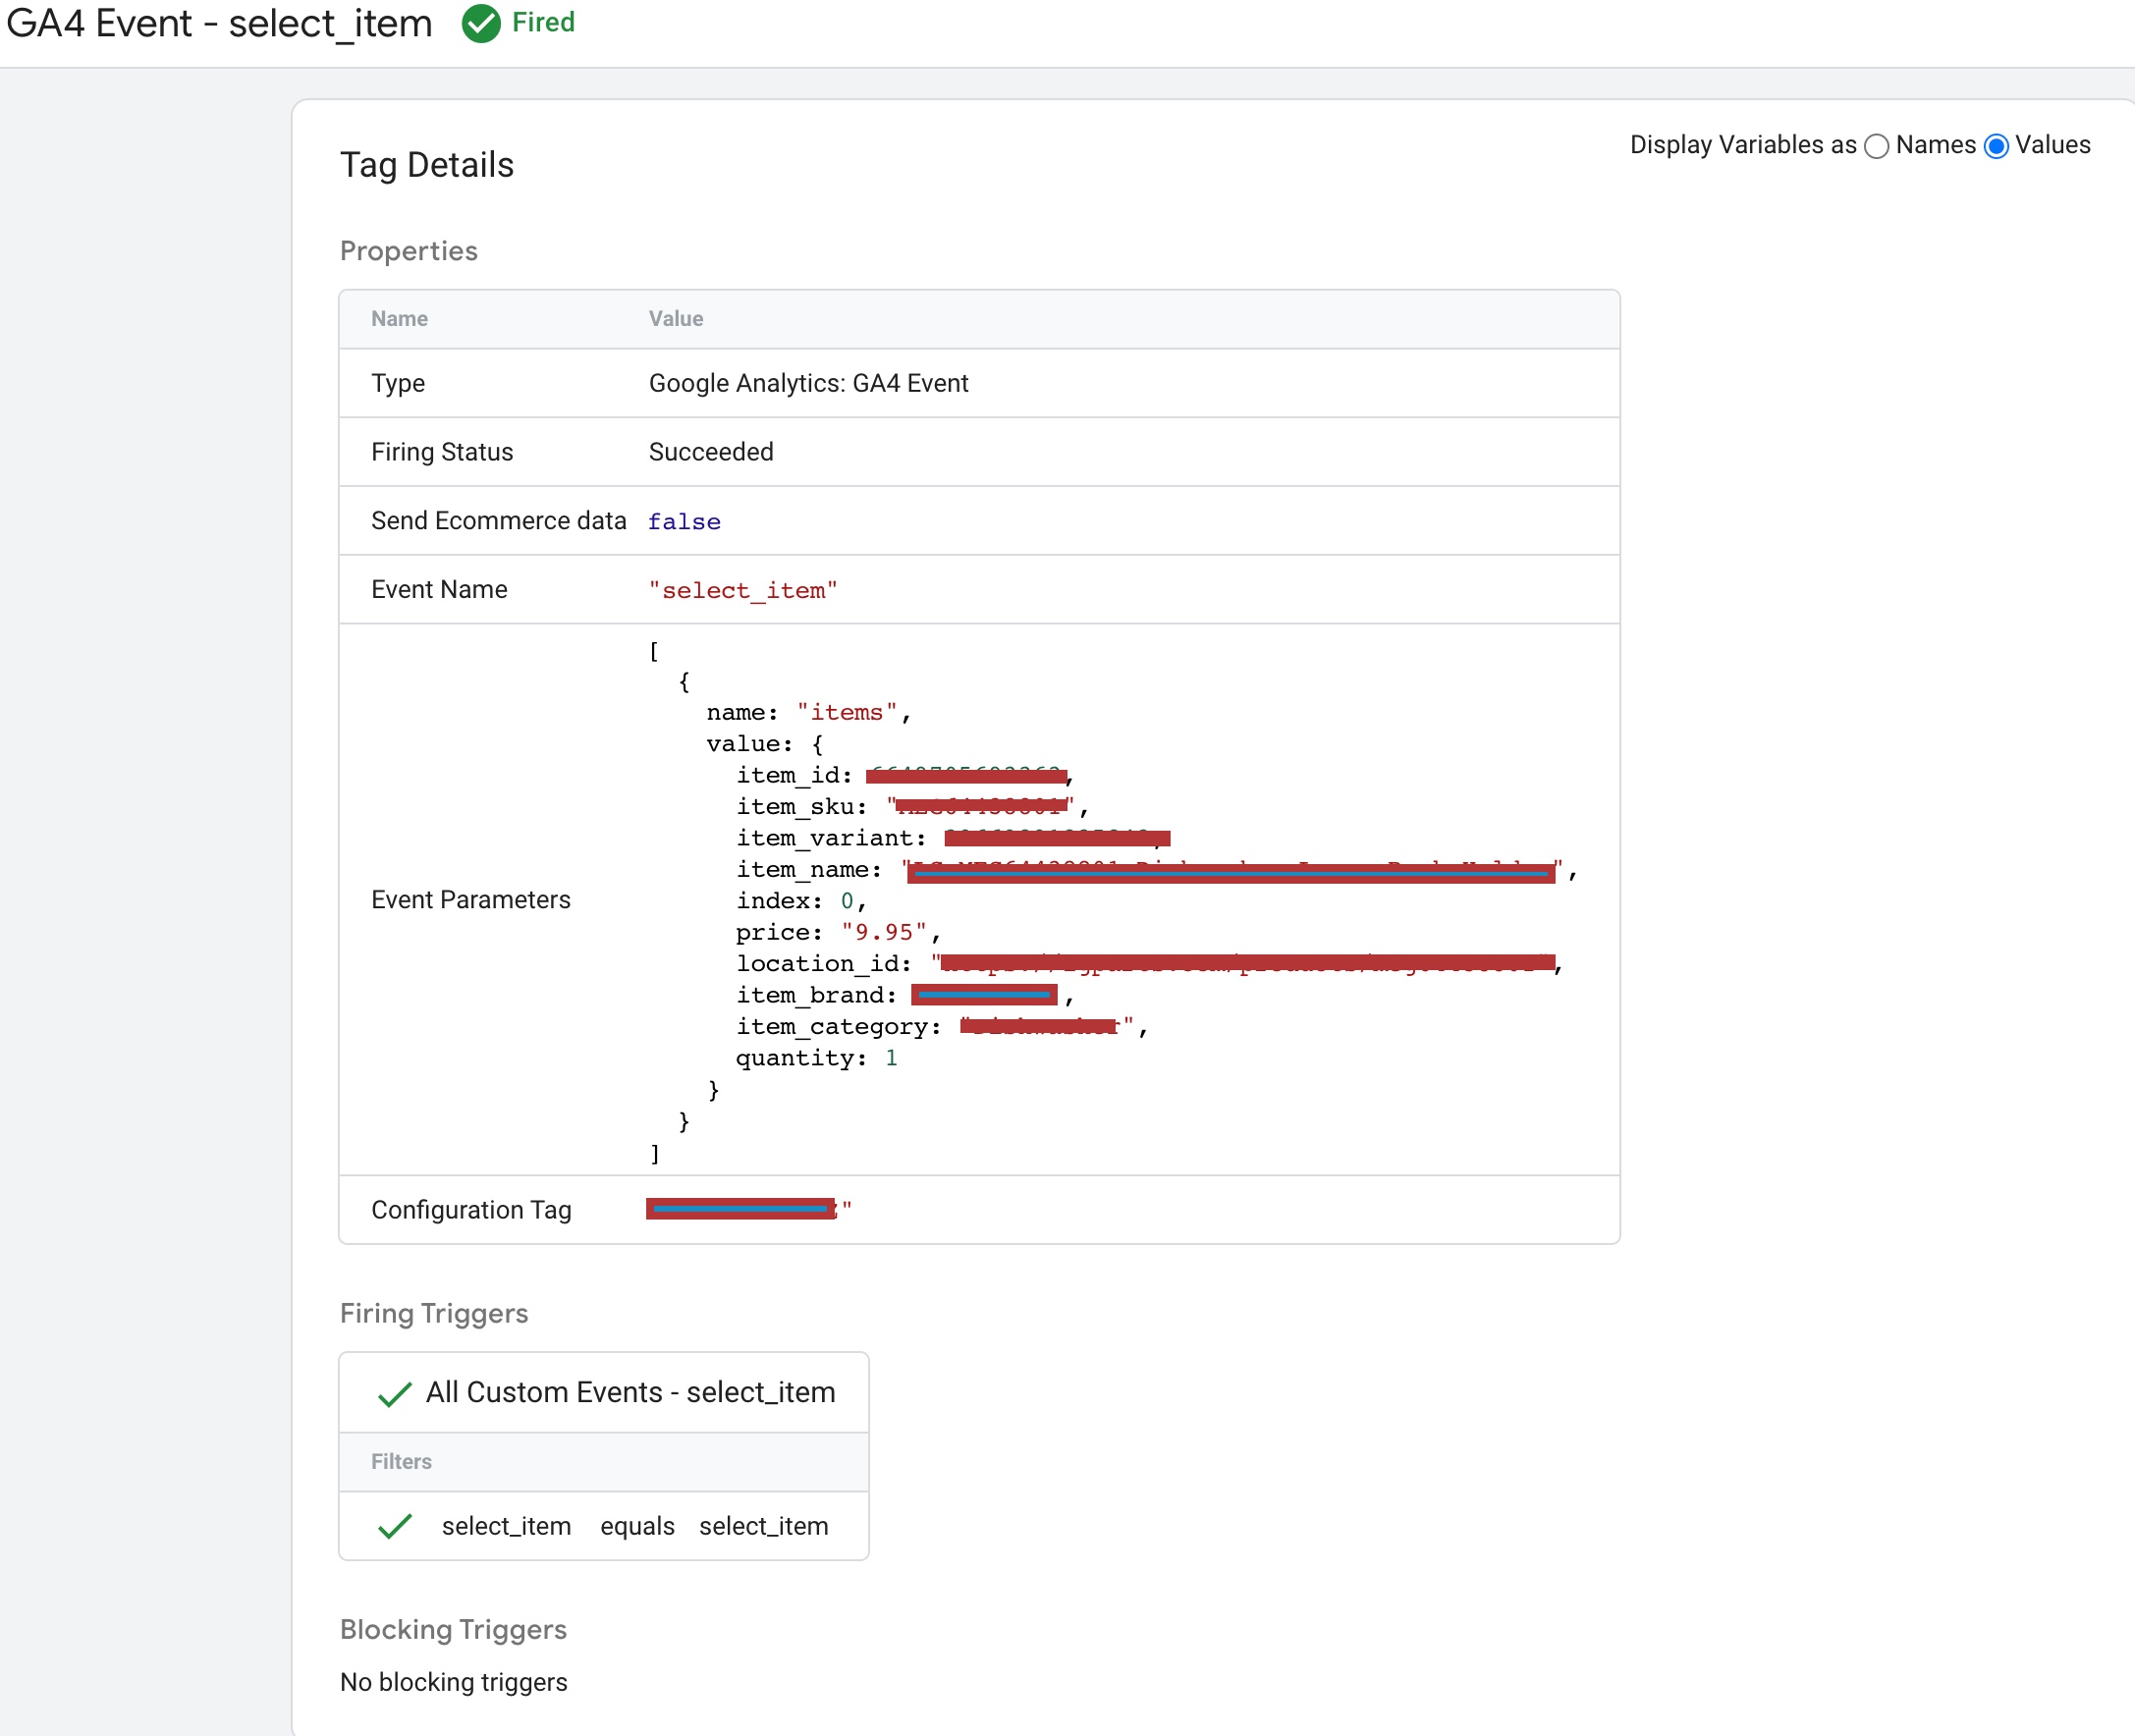
For 3DCart eCommerce websites, setting up “select_item” event tracking in GA4 involves creating the event parameters, such as “event name” as “select_item,” “event parameters” as “items” and “content_type” as “product,” and adding the GA4 tracking code snippet to the website’s header or footer section via the 3DCart dashboard. Once the tracking code is added, GA4 will receive the “select_item” event data, allowing businesses to analyze user behavior, optimize product listings, and improve the overall user experience by making it easier for users to find and select the products they want to purchase.

Install Google Analytics 4 (GA4) on 3DCart

3DCart Google Analytics 4 (GA4) Integration using Google Tag Manager
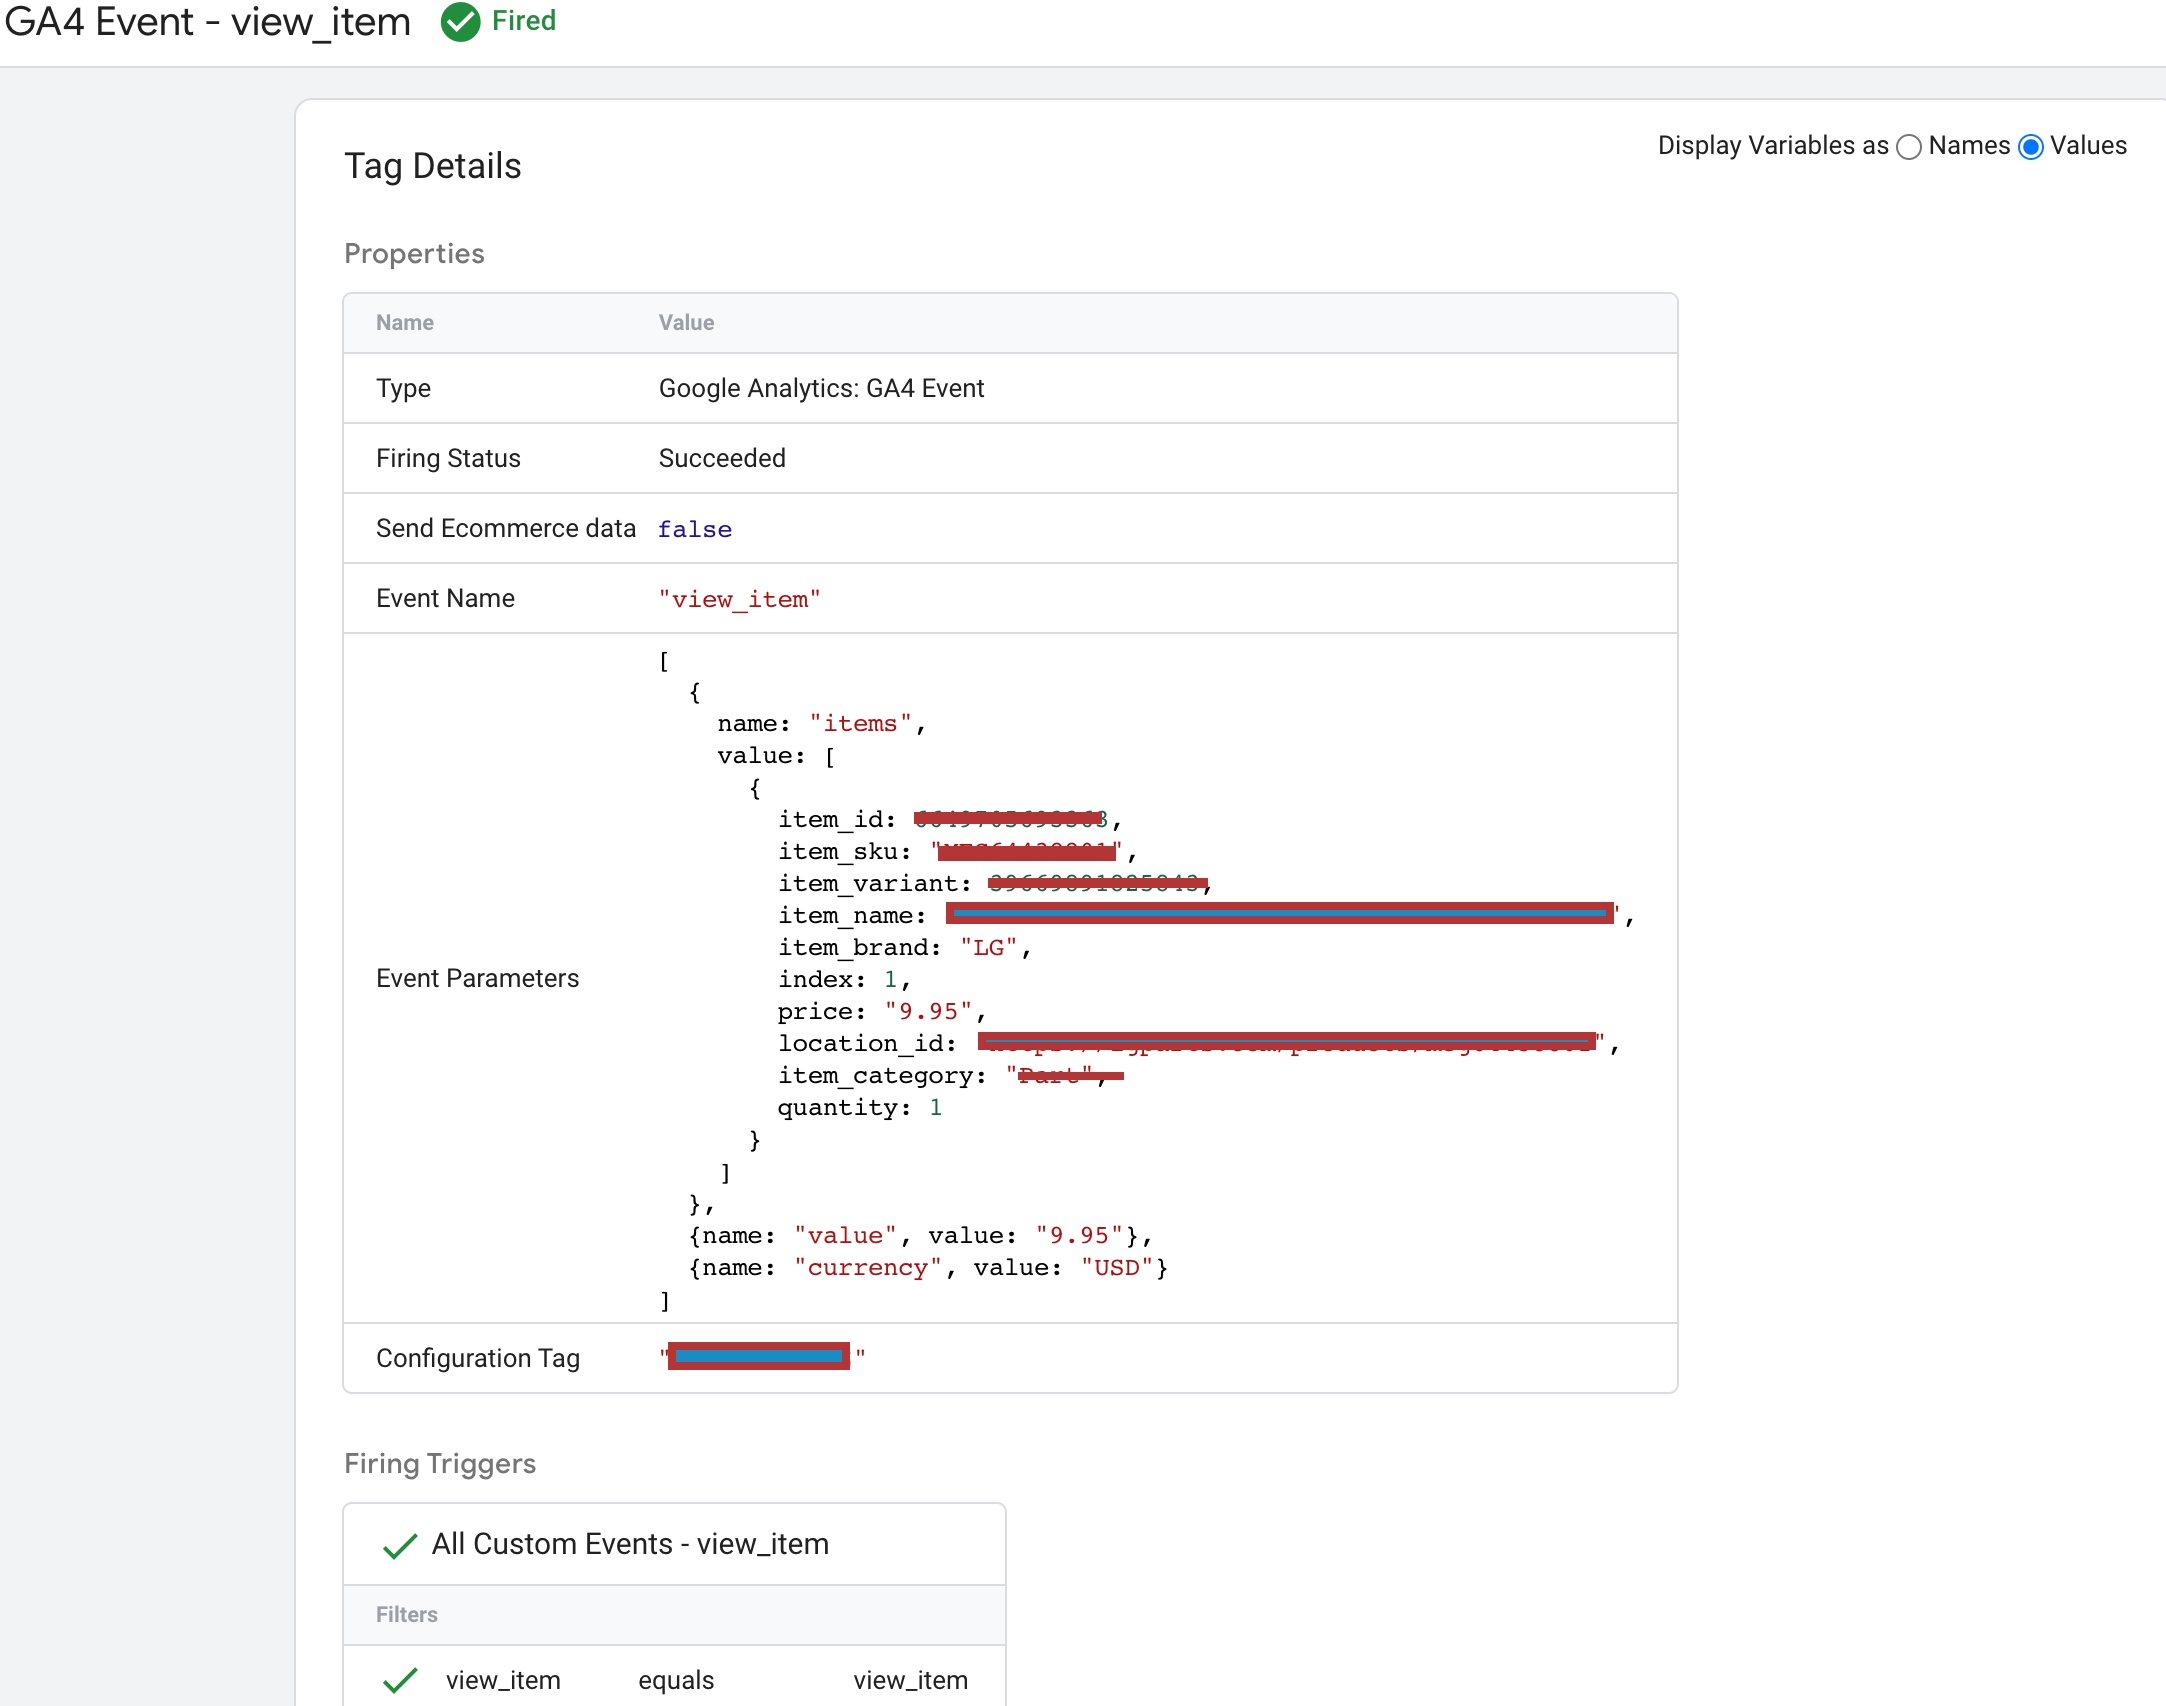
view_item” is an event tracking feature in Google Analytics 4 that allows eCommerce websites to track when a user views a specific product on the website. For 3DCart eCommerce websites, setting up “view_item” event tracking in GA4 involves creating the event parameters, such as “event name” as “view_item,” “event parameters” as “items” and “content_type” as “product,” and adding the GA4 tracking code snippet to the website’s header or footer section via the 3DCart dashboard. Once the tracking code is added, GA4 will receive the “view_item” event data, allowing businesses to analyze user behavior, such as which products are viewed most often and for how long. This data can be used to optimize product listings, improve the user experience, and increase conversions by understanding what products are most appealing to users. Overall, “view_item” event tracking is an essential feature for eCommerce websites to gain valuable insights into user behavior and make data-driven decisions to grow their business.

GA4 Integration For 3DCart

Implementation Google Analytics 4 (GA4) on 3DCart with Google Tag Manager

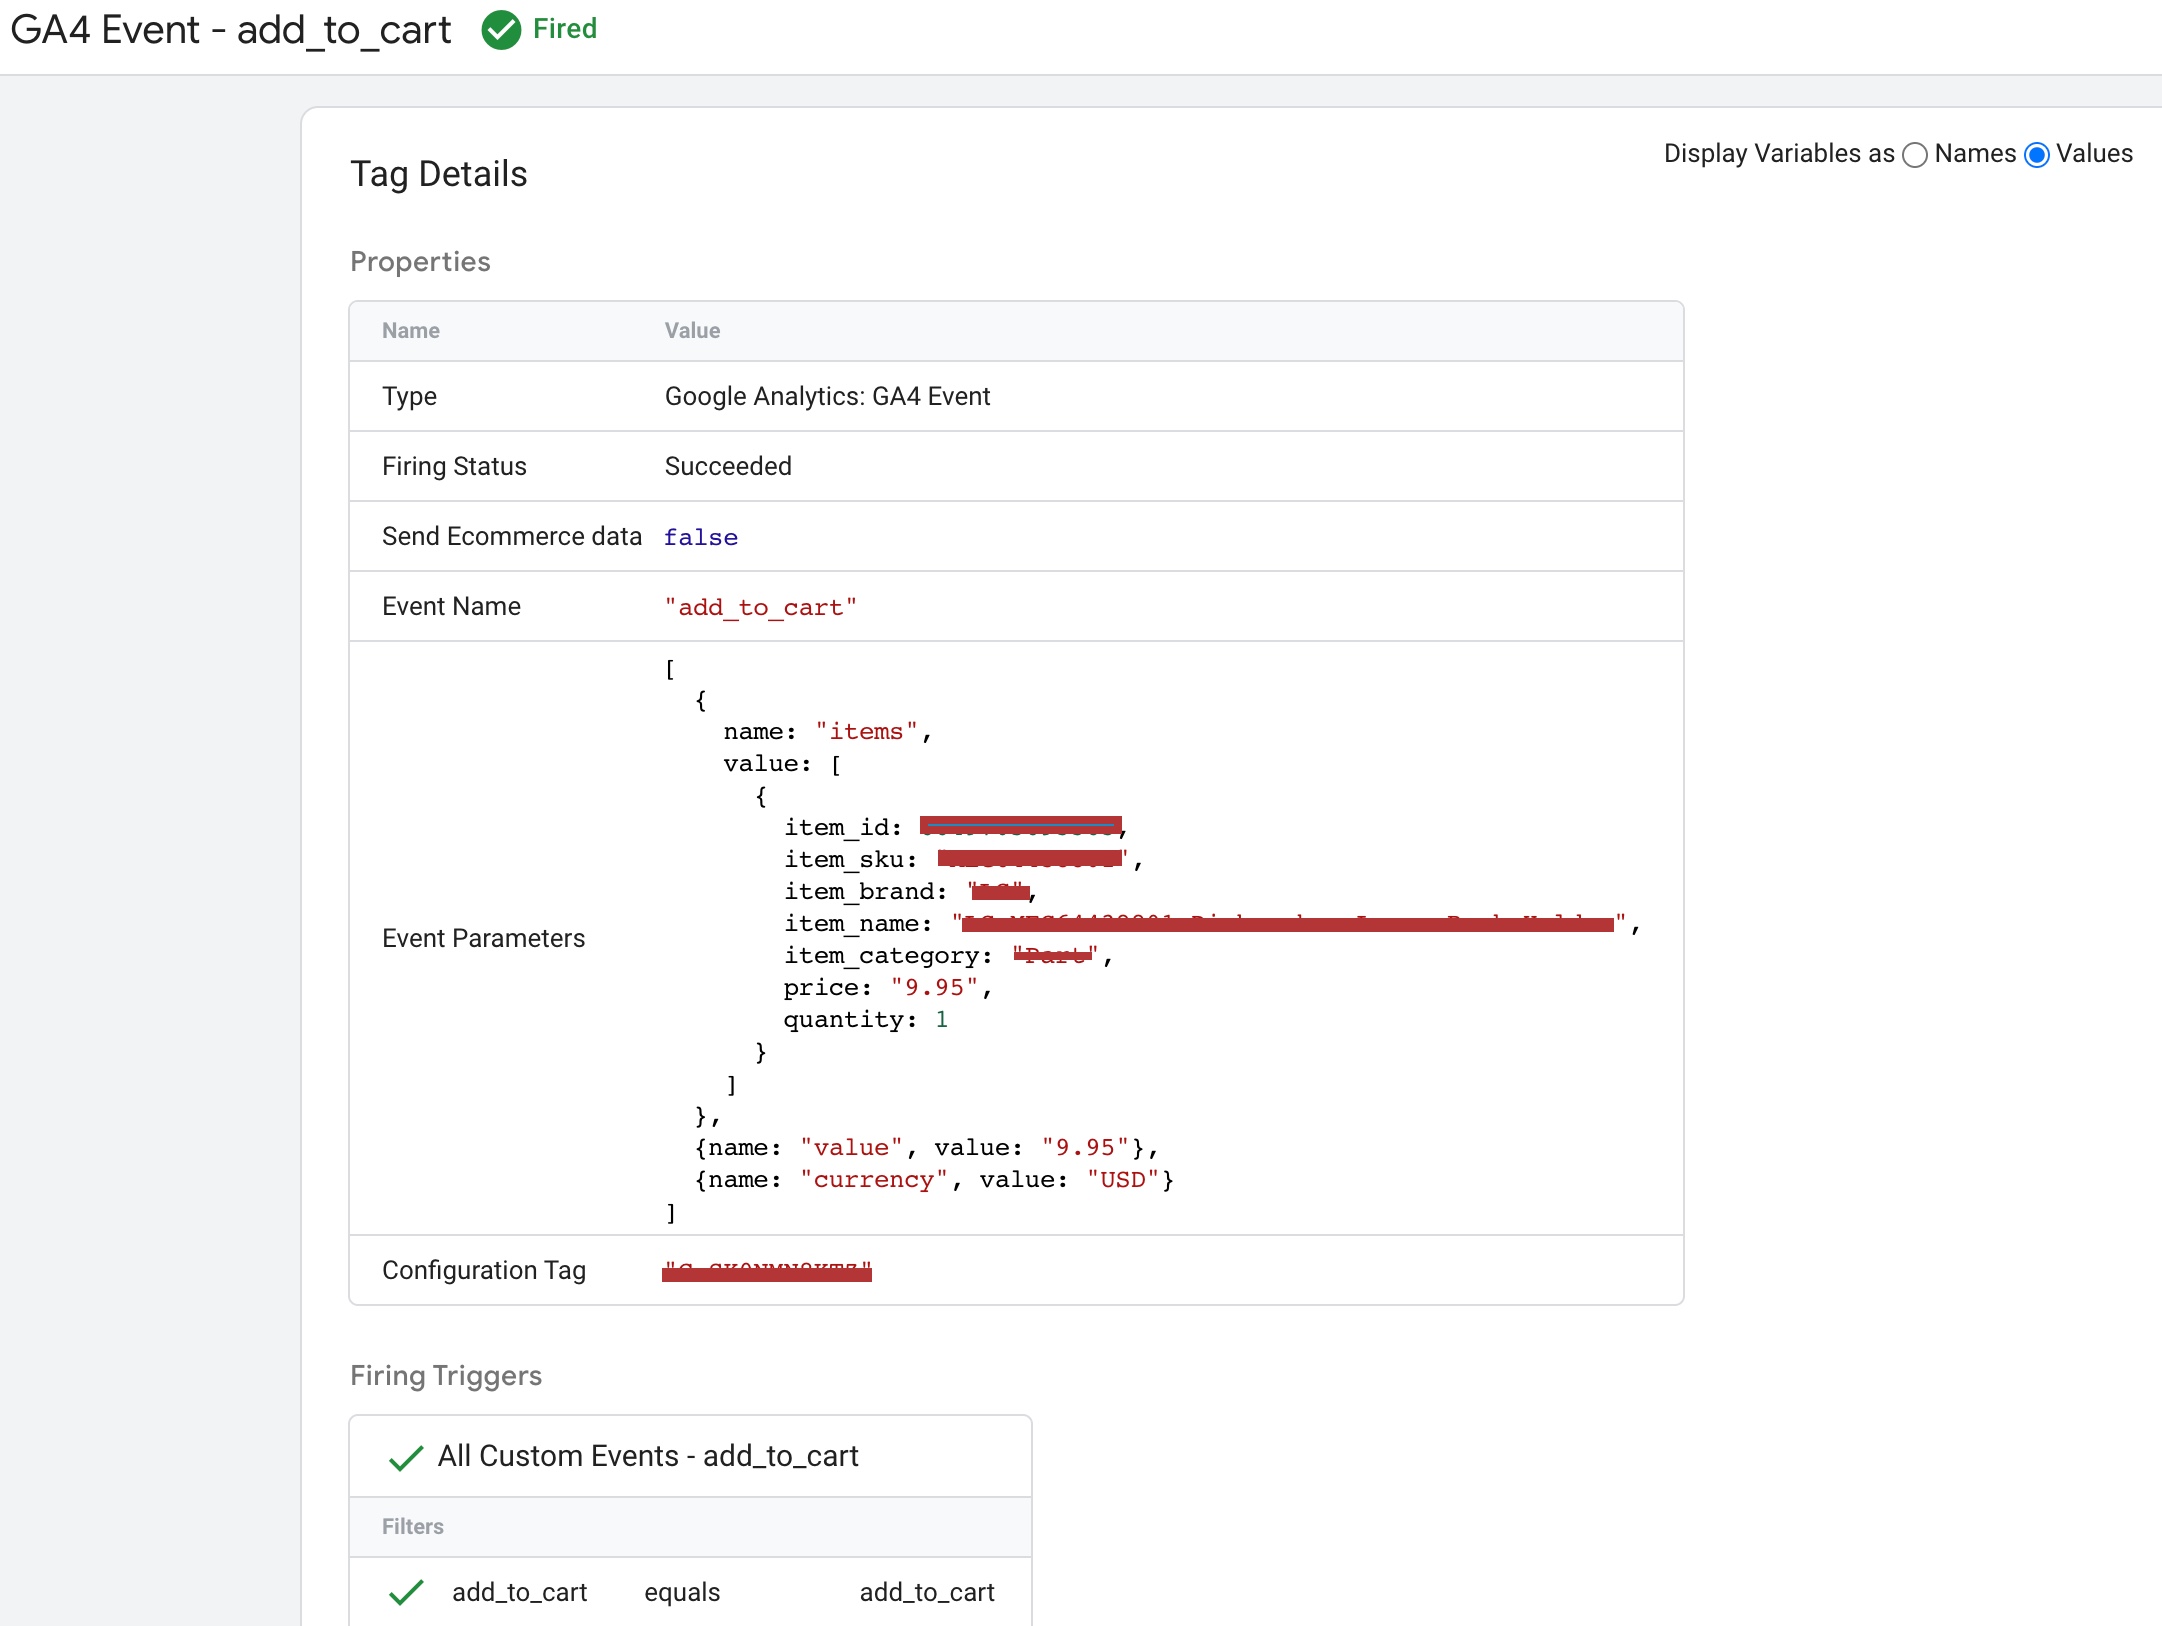
For 3DCart eCommerce websites, setting up “add_to_cart” event tracking in GA4 involves creating the event parameters, such as “event name” as “add_to_cart,” “event parameters” as “items” and “content_type” as “product,” and adding the GA4 tracking code snippet to the website’s header or footer section via the 3DCart dashboard. Once the tracking code is added, GA4 will receive the “add_to_cart” event data, allowing businesses to analyze user behavior, such as which products are most frequently added to carts, the average value of items added to carts, and the cart abandonment rate.

3DCART eCommerce Report in GA4

3DCART Google Analytics 4 (GA4) eCommerce Tracking using Google Tag Manager
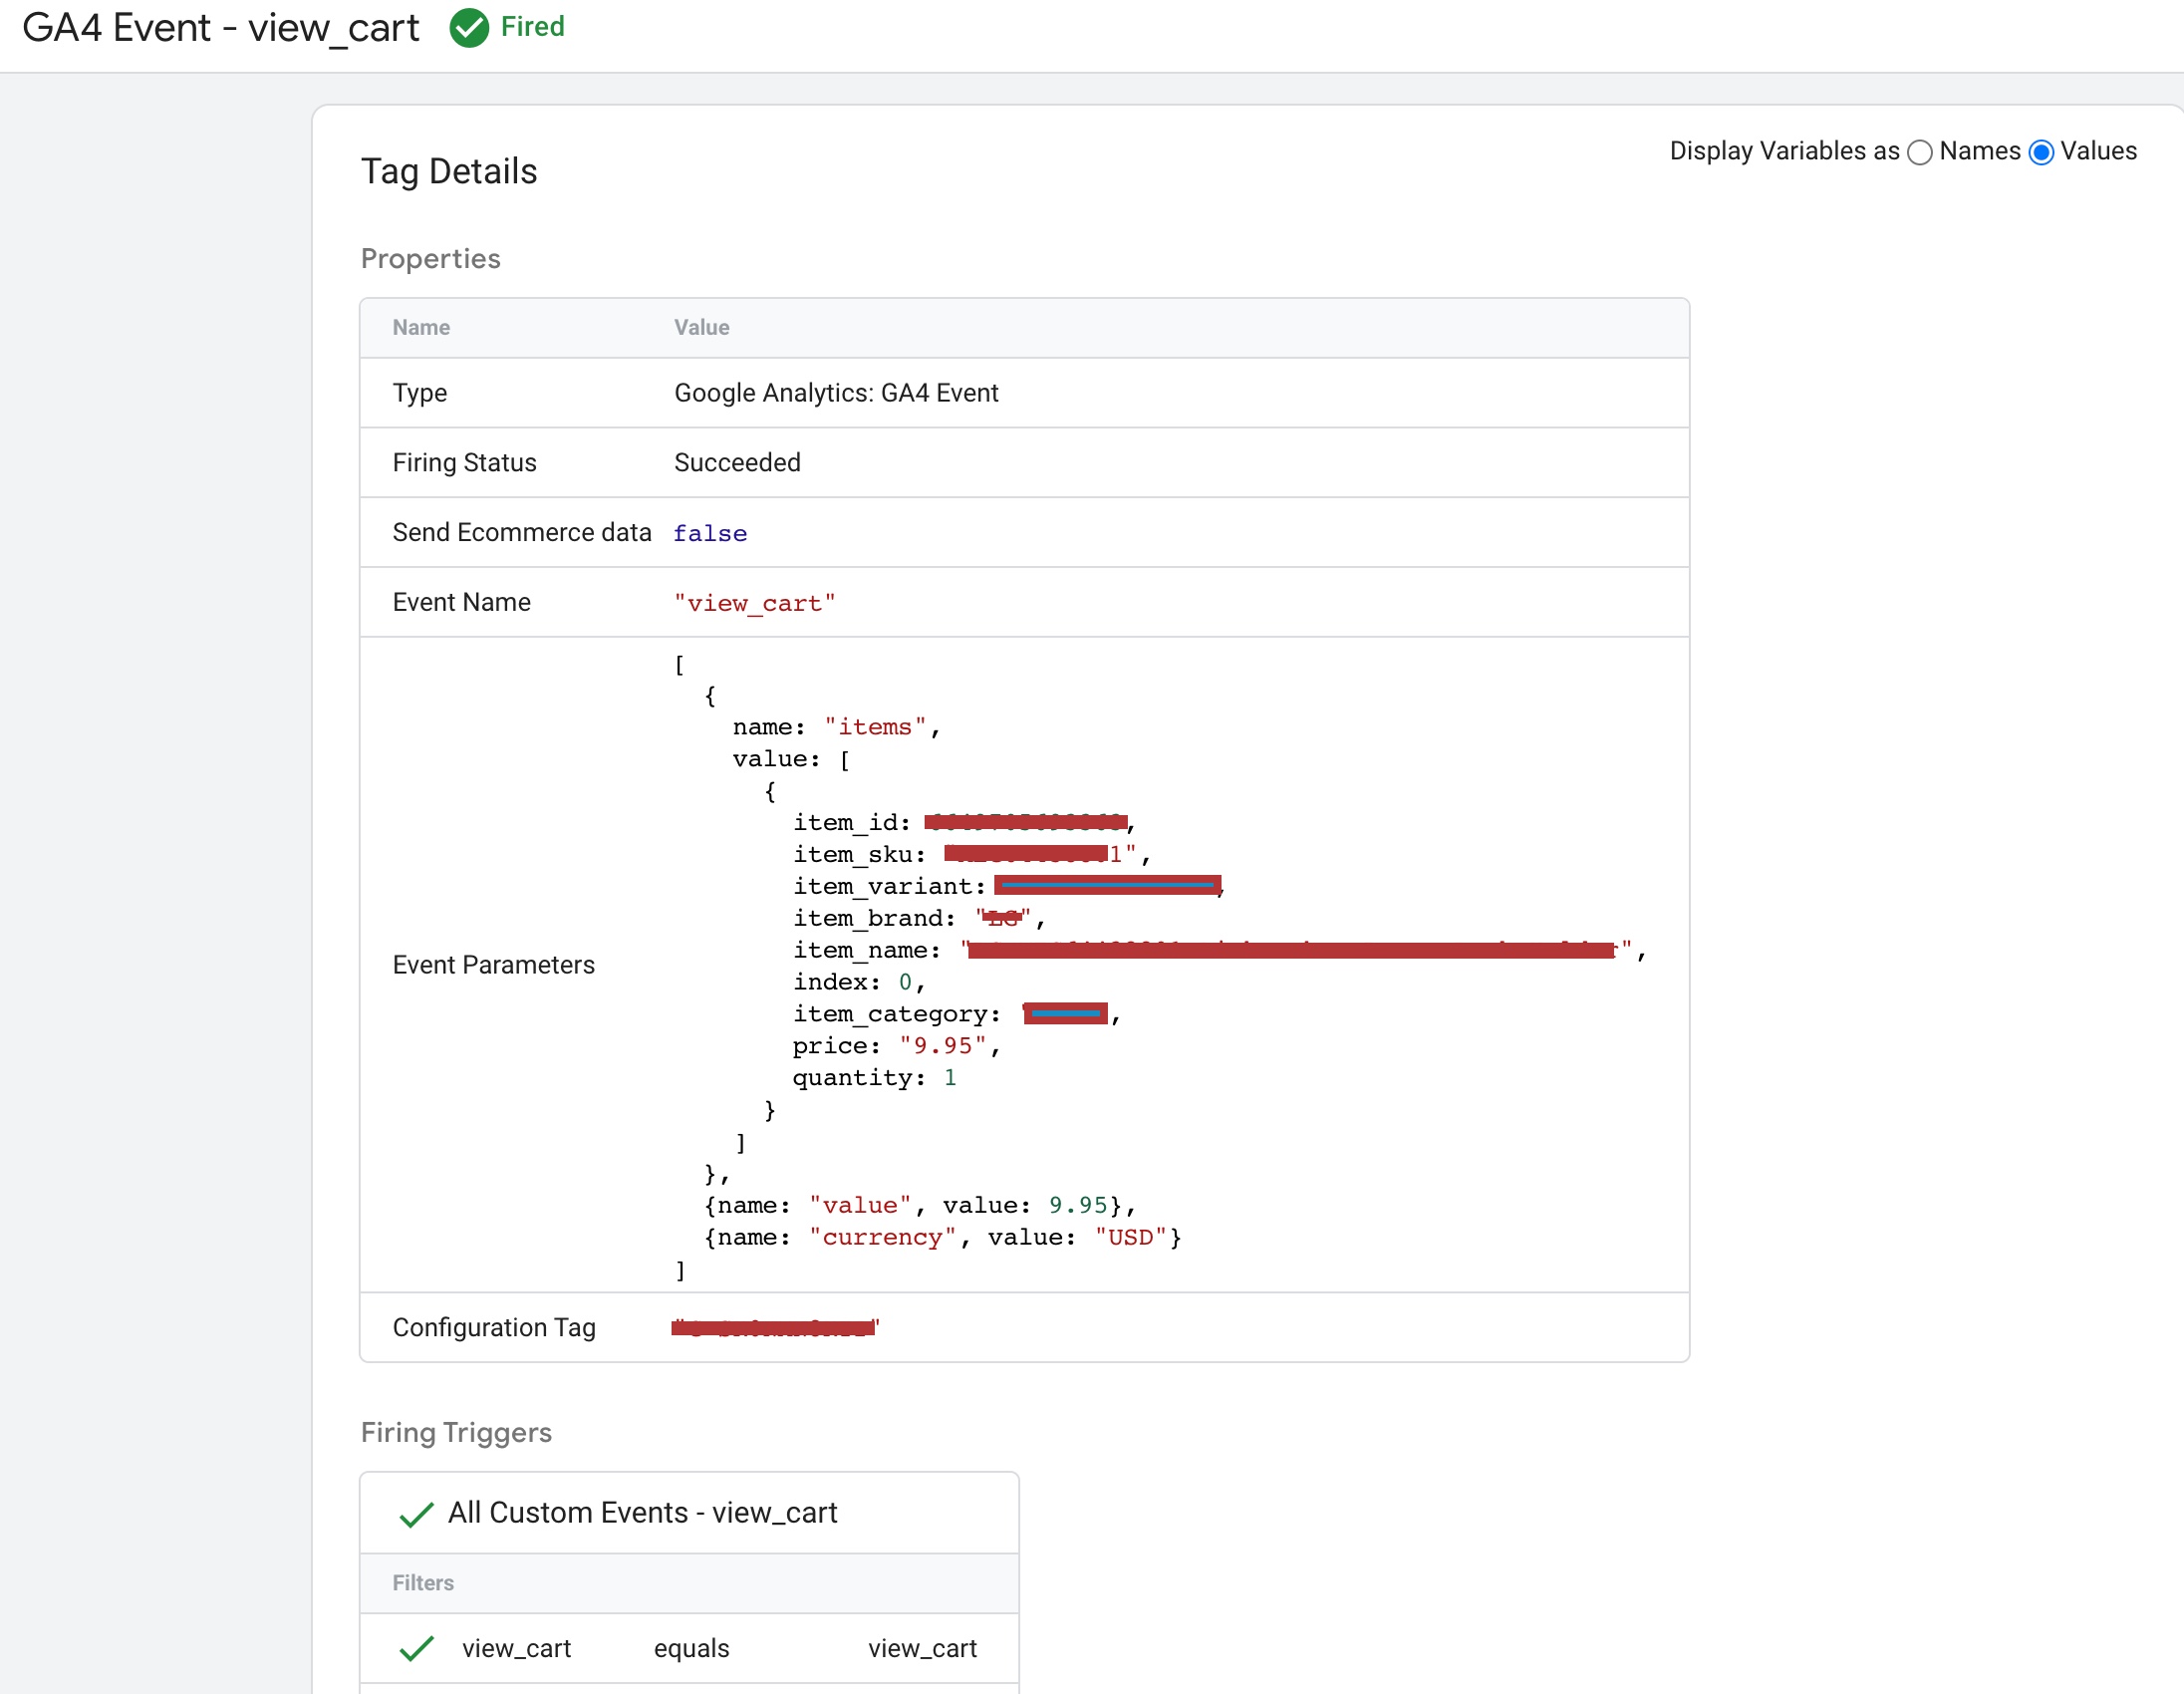
view_cart” is an event tracking feature in eCommerce tracking that allows online stores to track when a user views their cart. For 3DCart eCommerce websites, setting up “view_cart” event tracking involves creating the event parameters, such as “event name” as “view_cart,” and adding the eCommerce tracking code to the website’s header or footer section via the 3DCart dashboard. Once the tracking code is added, the website will receive the “view_cart” event data, which provides valuable insights into user behavior, such as how often users view their cart and how many products are usually in the cart.

Migrating to Google Analytics 4 3DCART

Migrate to 3DCART Google Analytics 4 (GA4) Enhanced eCommerce Tracking using Google Tag Manager
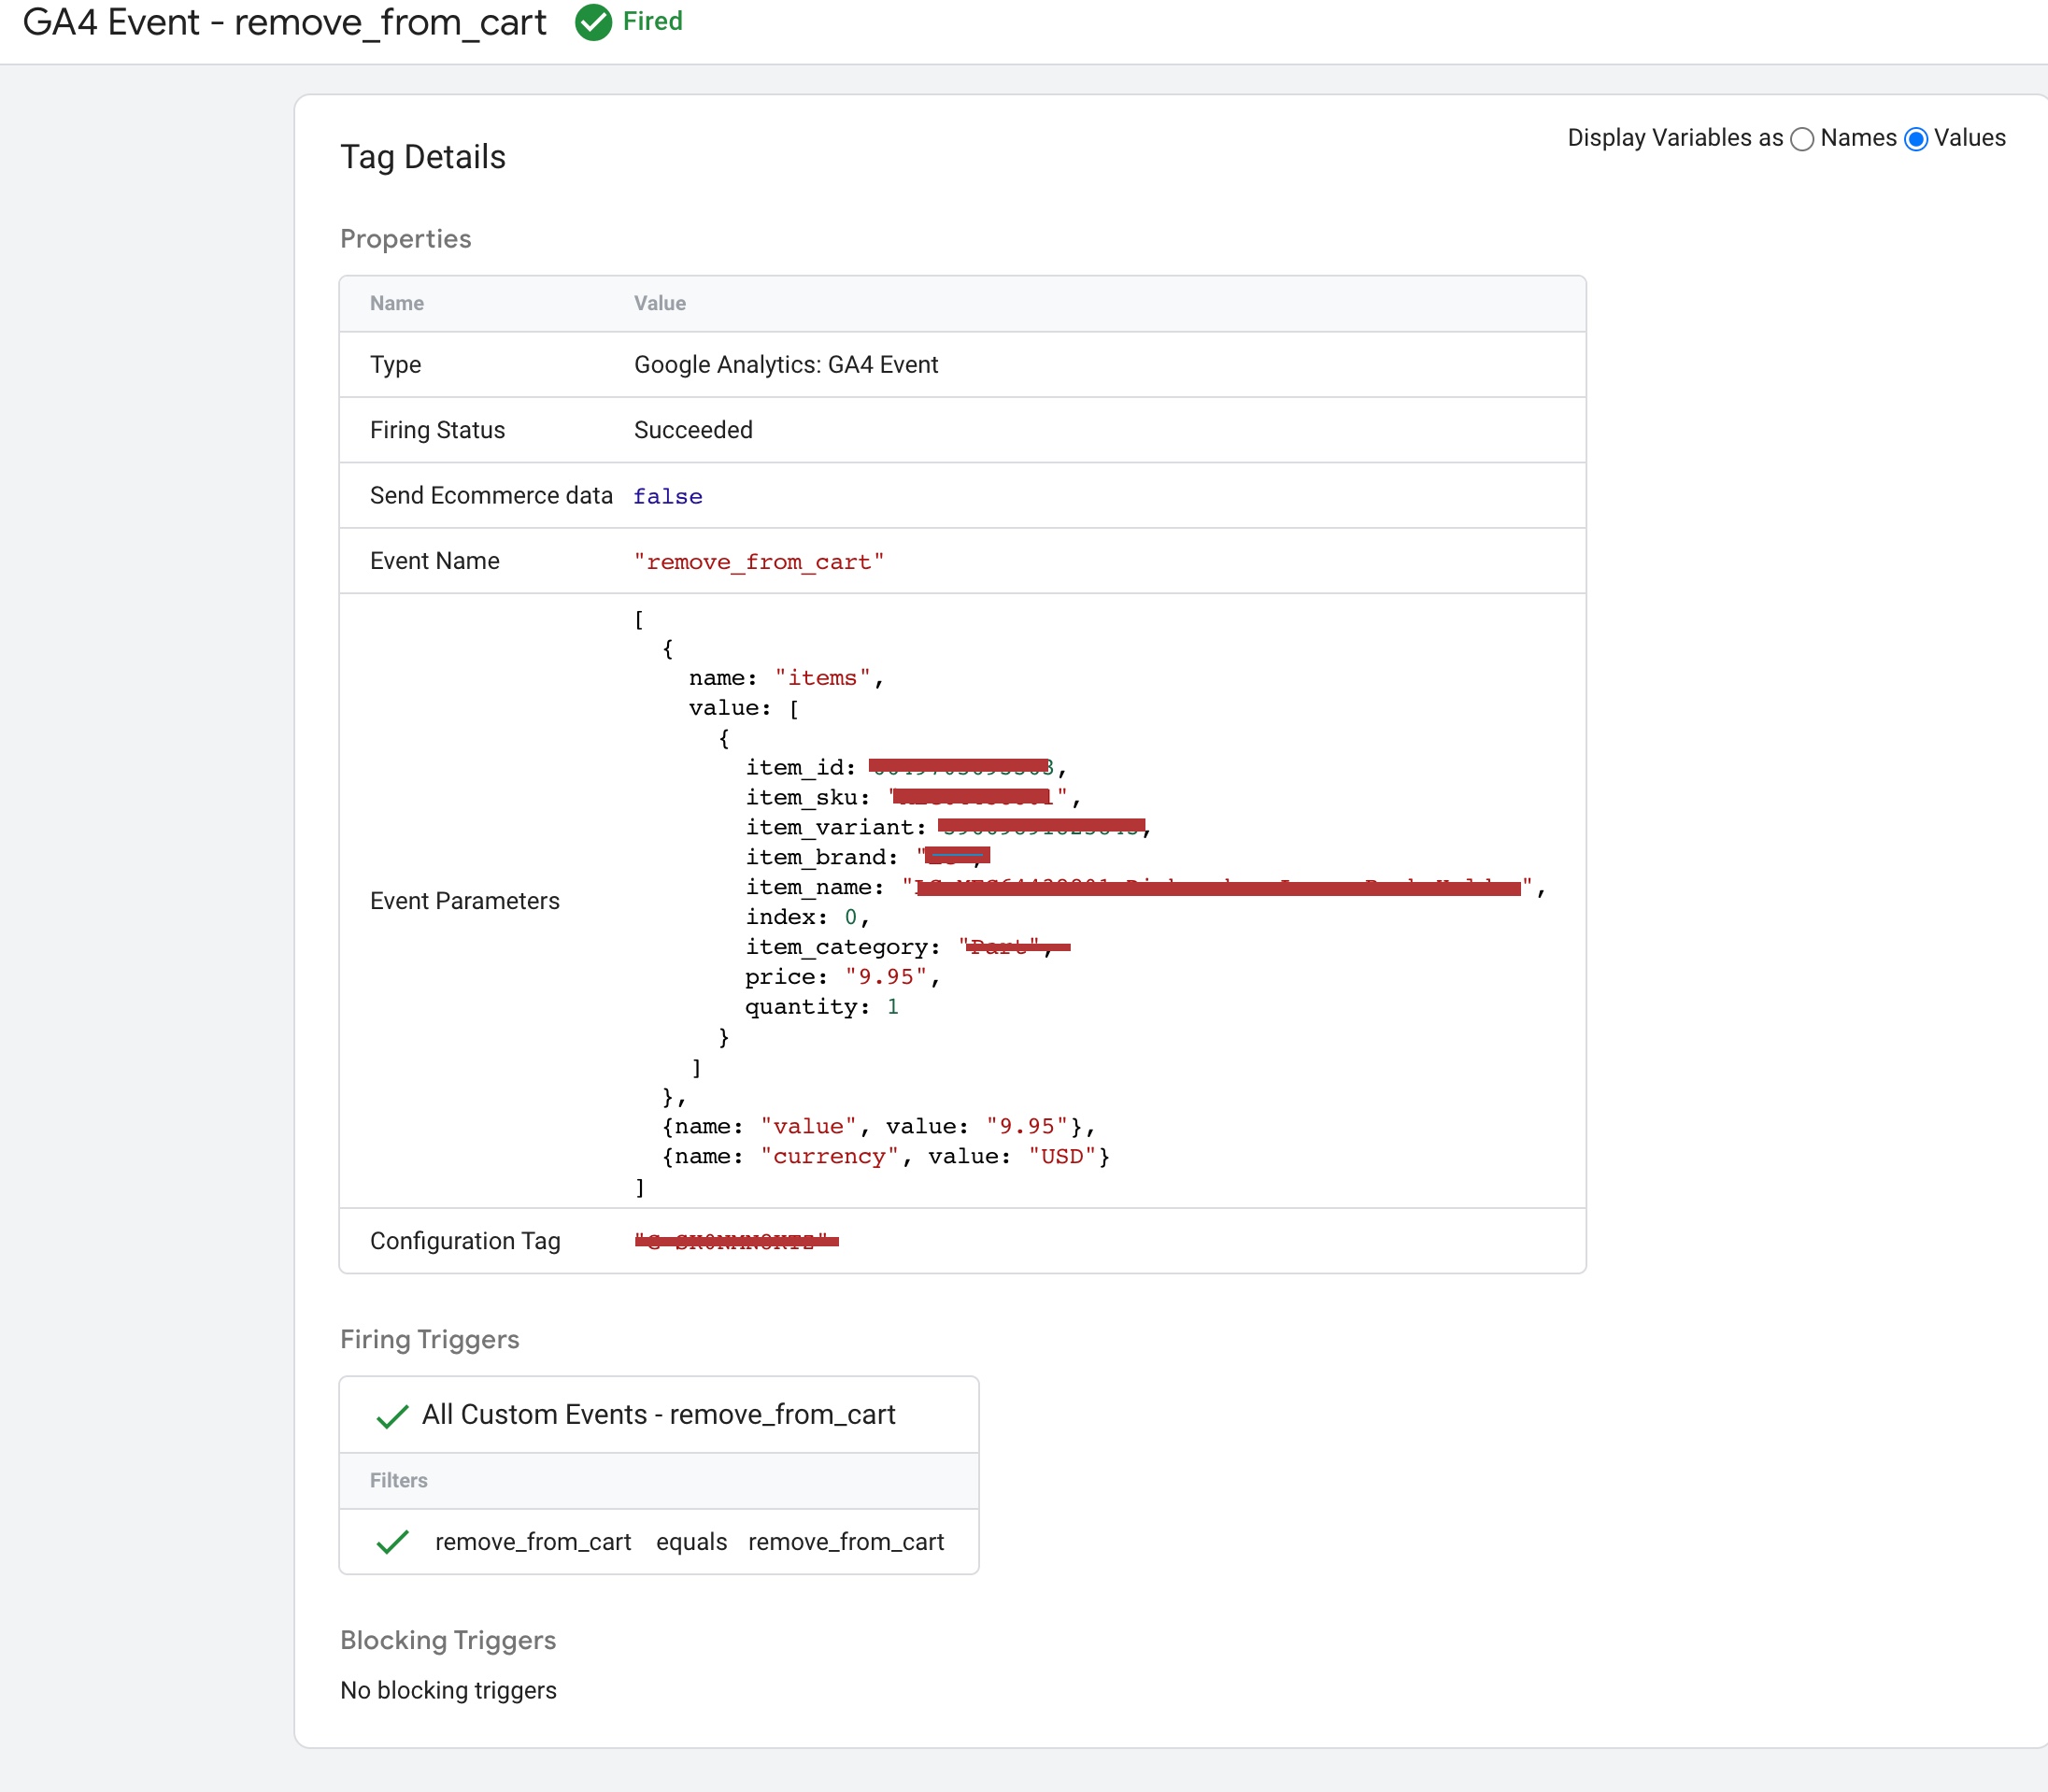
remove_from_cart” is an event tracking feature in eCommerce tracking that allows online stores to track when a user removes a product from their cart. For 3DCart eCommerce websites, setting up “remove_from_cart” event tracking involves creating the event parameters, such as “event name” as “remove_from_cart,” “event parameters” as “items” and “content_type” as “product,” and adding the eCommerce tracking code to the website’s header or footer section via the 3DCart dashboard. Once the tracking code is added, the website will receive the “remove_from_cart” event data, which provides valuable insights into user behavior, such as which products are most frequently removed from carts and why.

GA4 eCommerce Setup for 3DCart

3DCart Migrate from Google Universal Analytics to GA4 eCommerce Tracking using Google Tag Manager
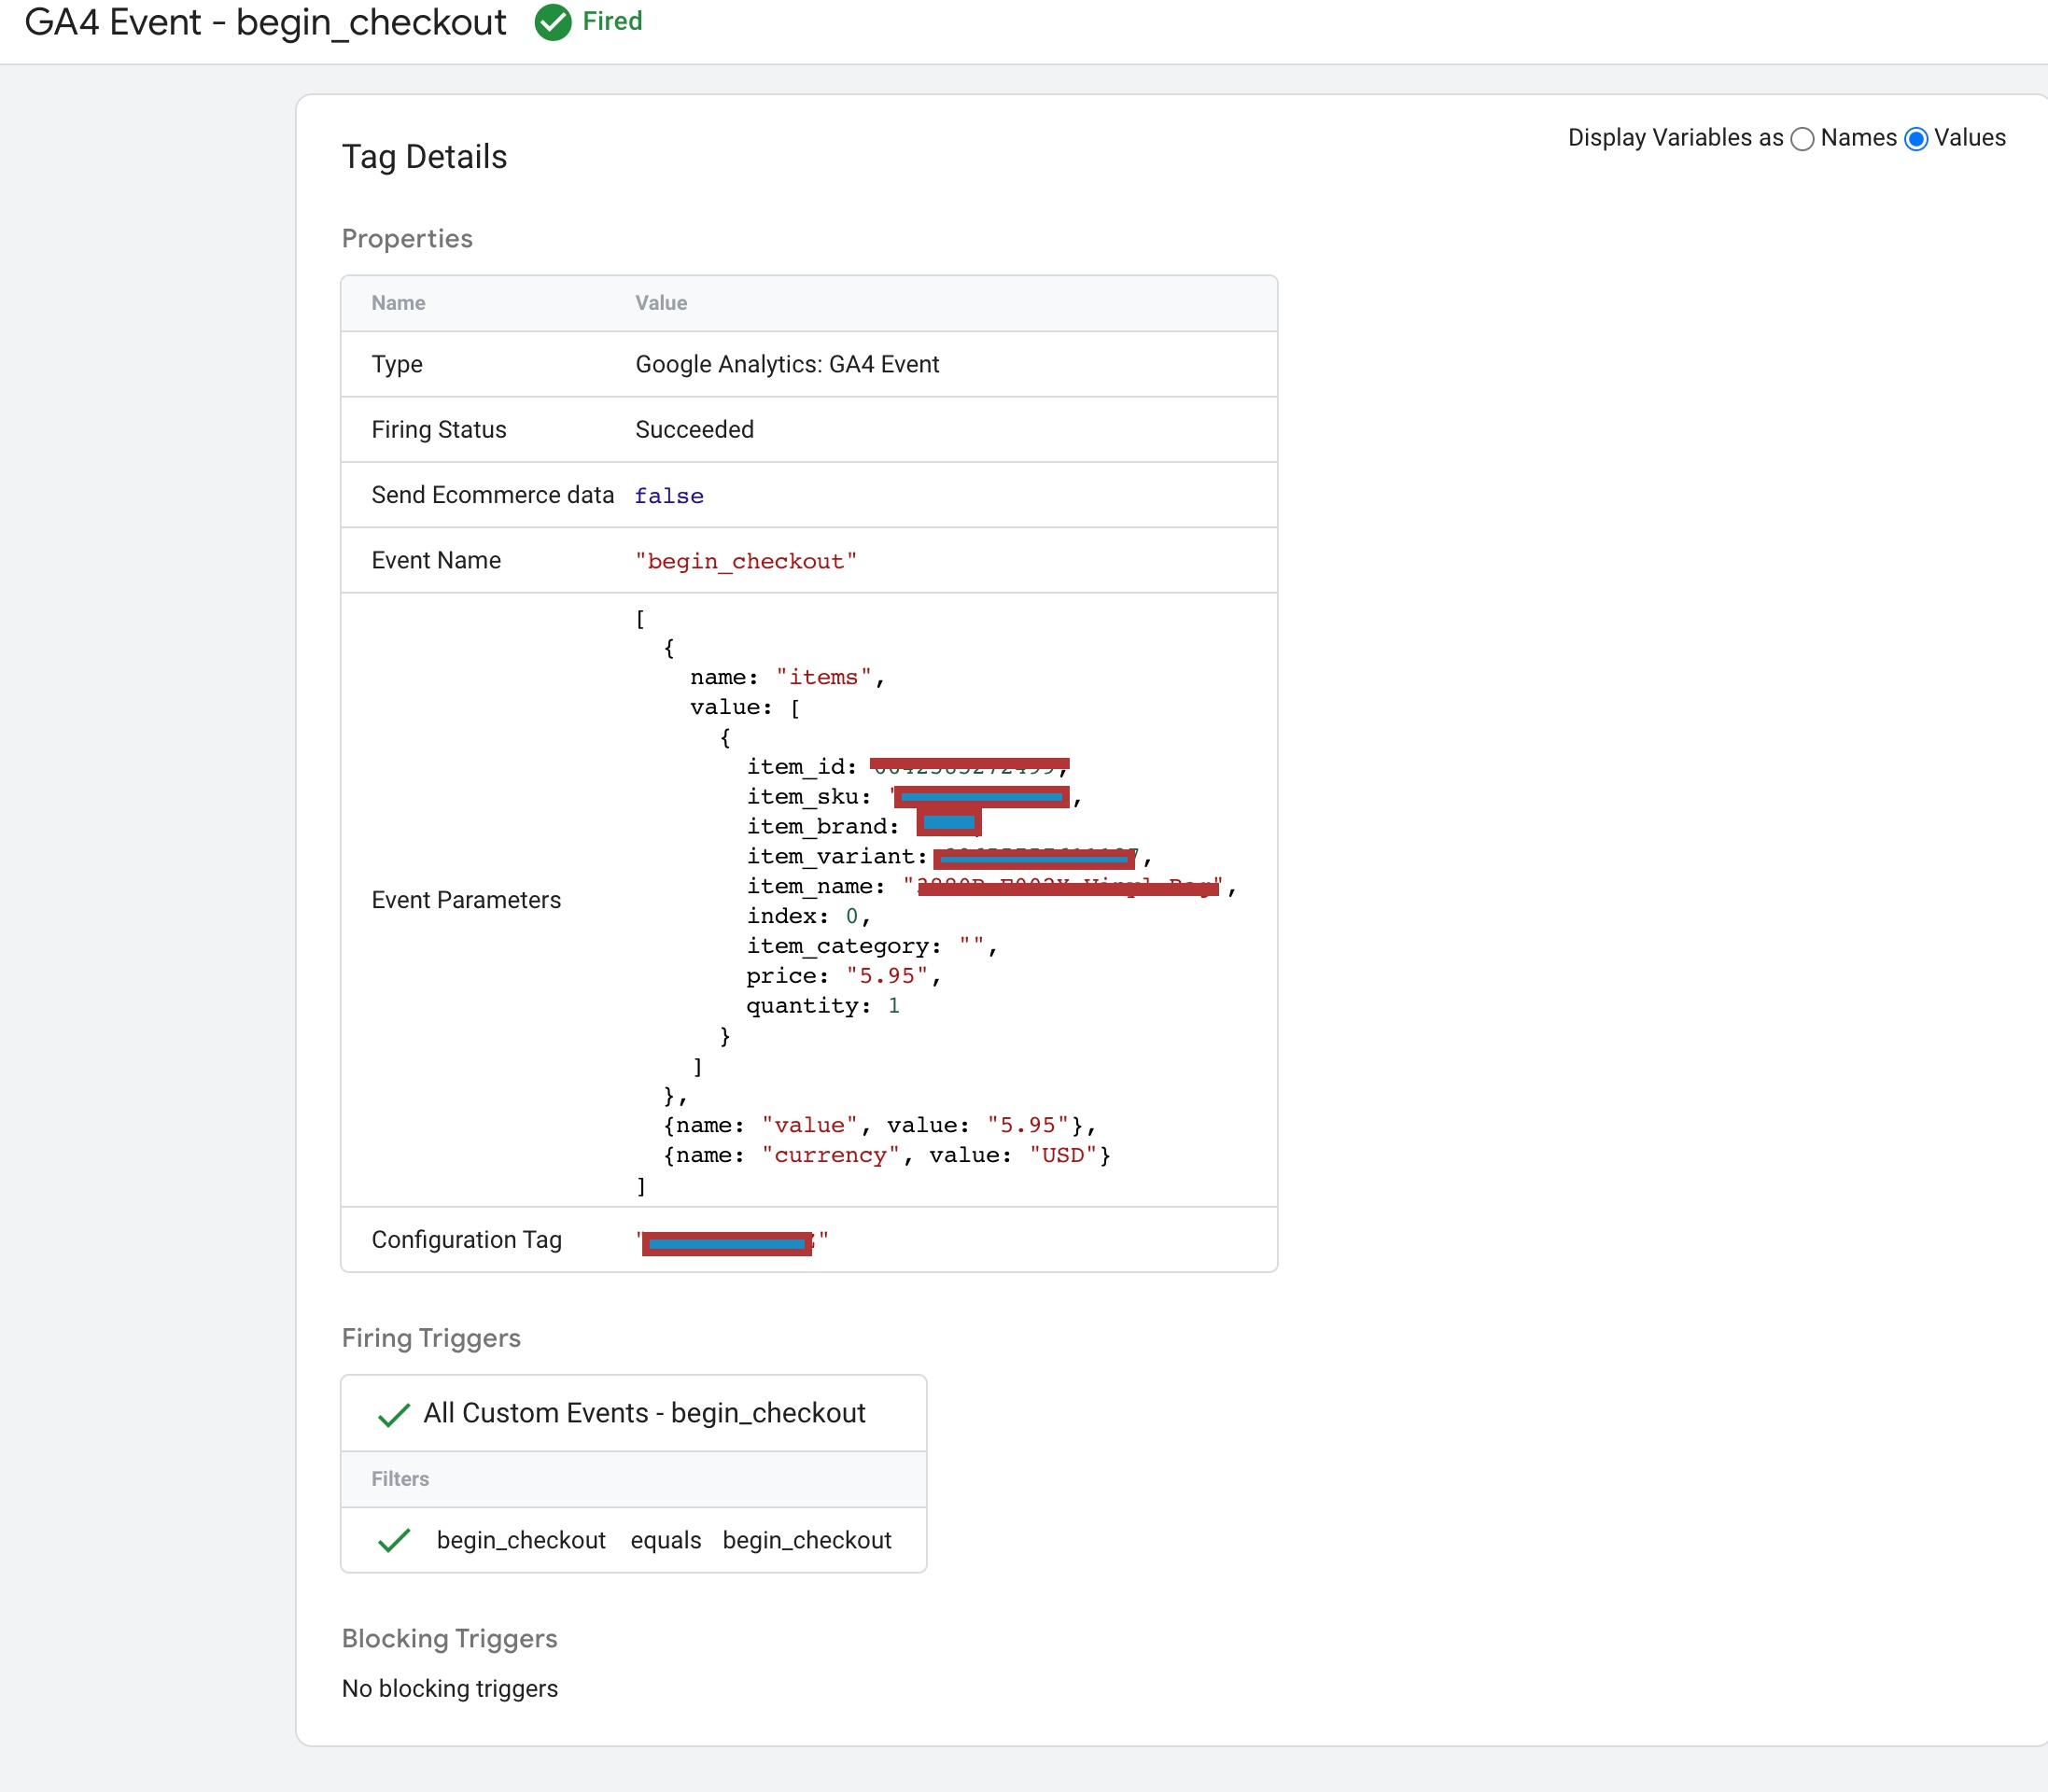
begin_checkout” is an event tracking feature in eCommerce tracking that allows online stores to track when a user begins the checkout process. For 3DCart eCommerce websites, setting up “begin_checkout” event tracking involves creating the event parameters, such as “event name” as “begin_checkout,” and adding the eCommerce tracking code to the website’s header or footer section via the 3DCart dashboard. Once the tracking code is added, the website will receive the “begin_checkout” event data, which provides valuable insights into user behavior, such as how often users start the checkout process, which pages they visit during the checkout process, and how long it takes them to complete the checkout process.

3DCart Googl Analytics 4

Ecommerce Google Analytics 4 for 3DCart using Google Tag Manager
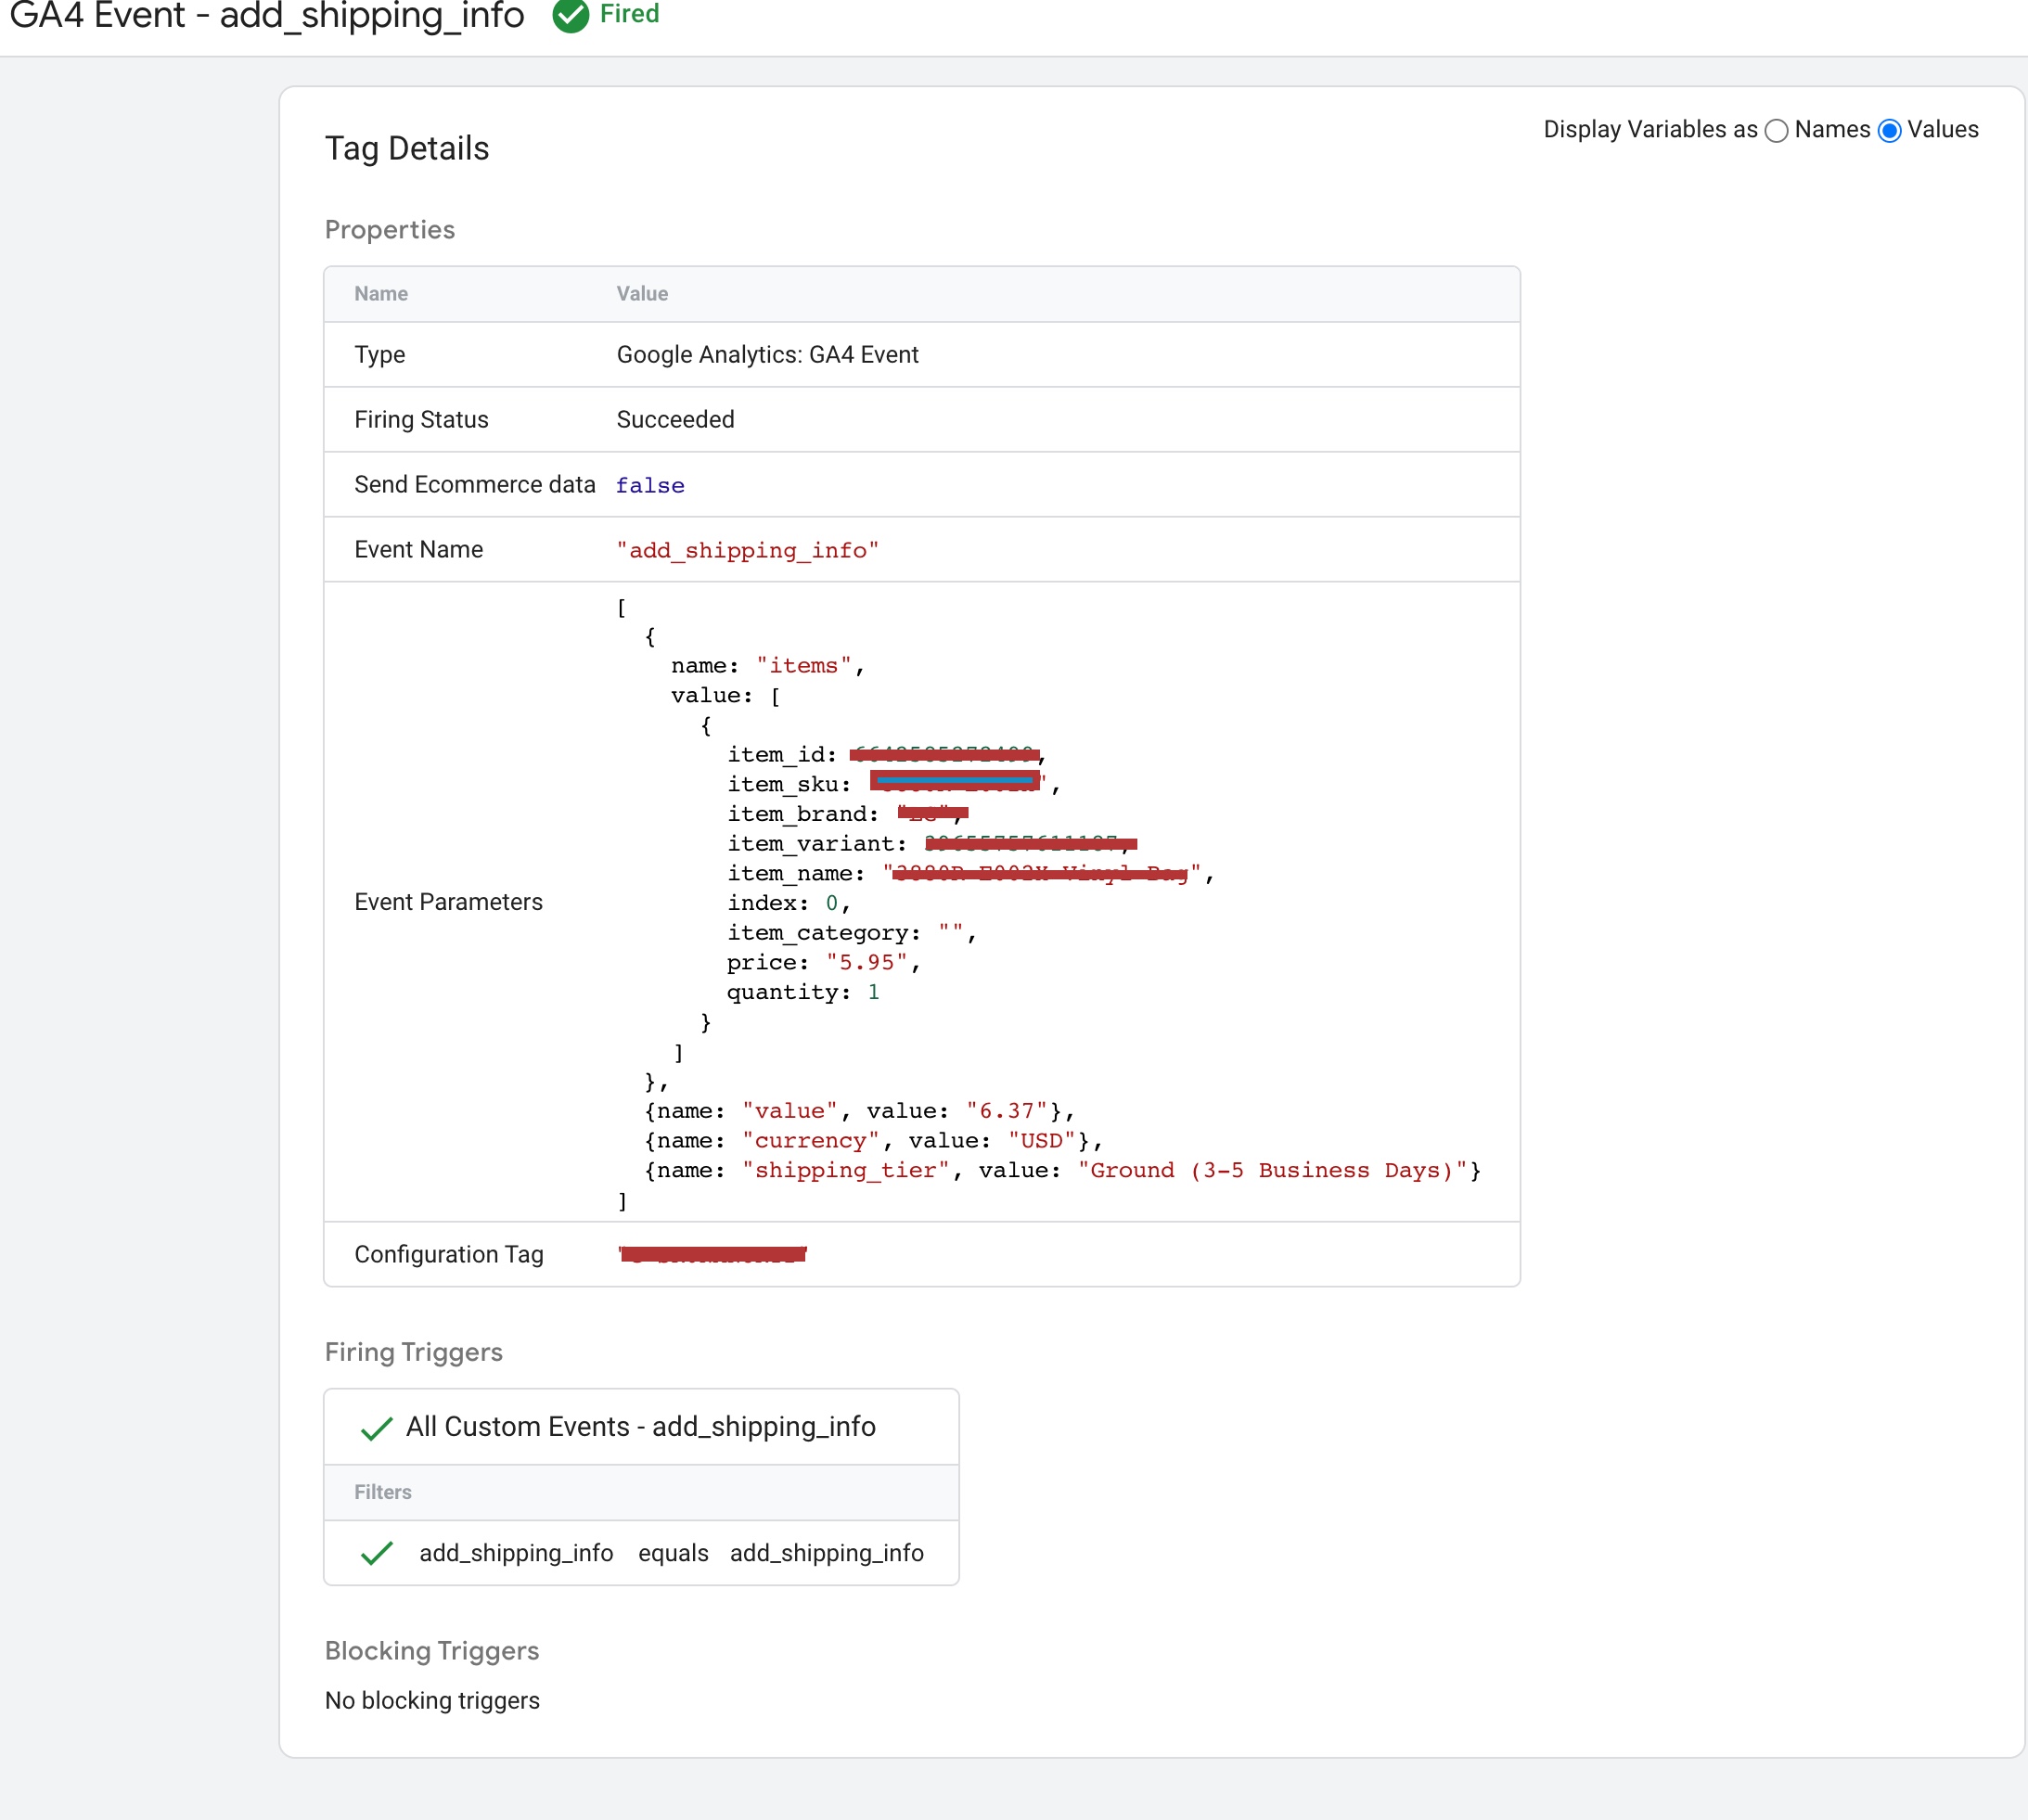
add_shipping_info” is an event tracking feature in eCommerce tracking that allows online stores to track when a user adds their shipping information during the checkout process. For 3DCart eCommerce websites, setting up “add_shipping_info” event tracking involves creating the event parameters, such as “event name” as “add_shipping_info,” and adding the eCommerce tracking code to the website’s header or footer section via the 3DCart dashboard. Once the tracking code is added, the website will receive the “add_shipping_info” event data, which provides valuable insights into user behavior, such as how often users provide their shipping information during checkout, and how many users abandon their cart at this stage.

3DCart GA4 Enhanced Ecommerce Tracking

GA4 Tracking For 3DCart using Google Tag Manager

add_payment_info” is an event tracking feature in eCommerce tracking that allows online stores to track when a user adds their payment information during the checkout process. For 3DCart eCommerce websites, setting up “add_payment_info” event tracking involves creating the event parameters, such as “event name” as “add_payment_info,” and adding the eCommerce tracking code to the website’s header or footer section via the 3DCart dashboard. Once the tracking code is added, the website will receive the “add_payment_info” event data, which provides valuable insights into user behavior, such as how often users provide their payment information during checkout, and how many users abandon their cart at this stage.

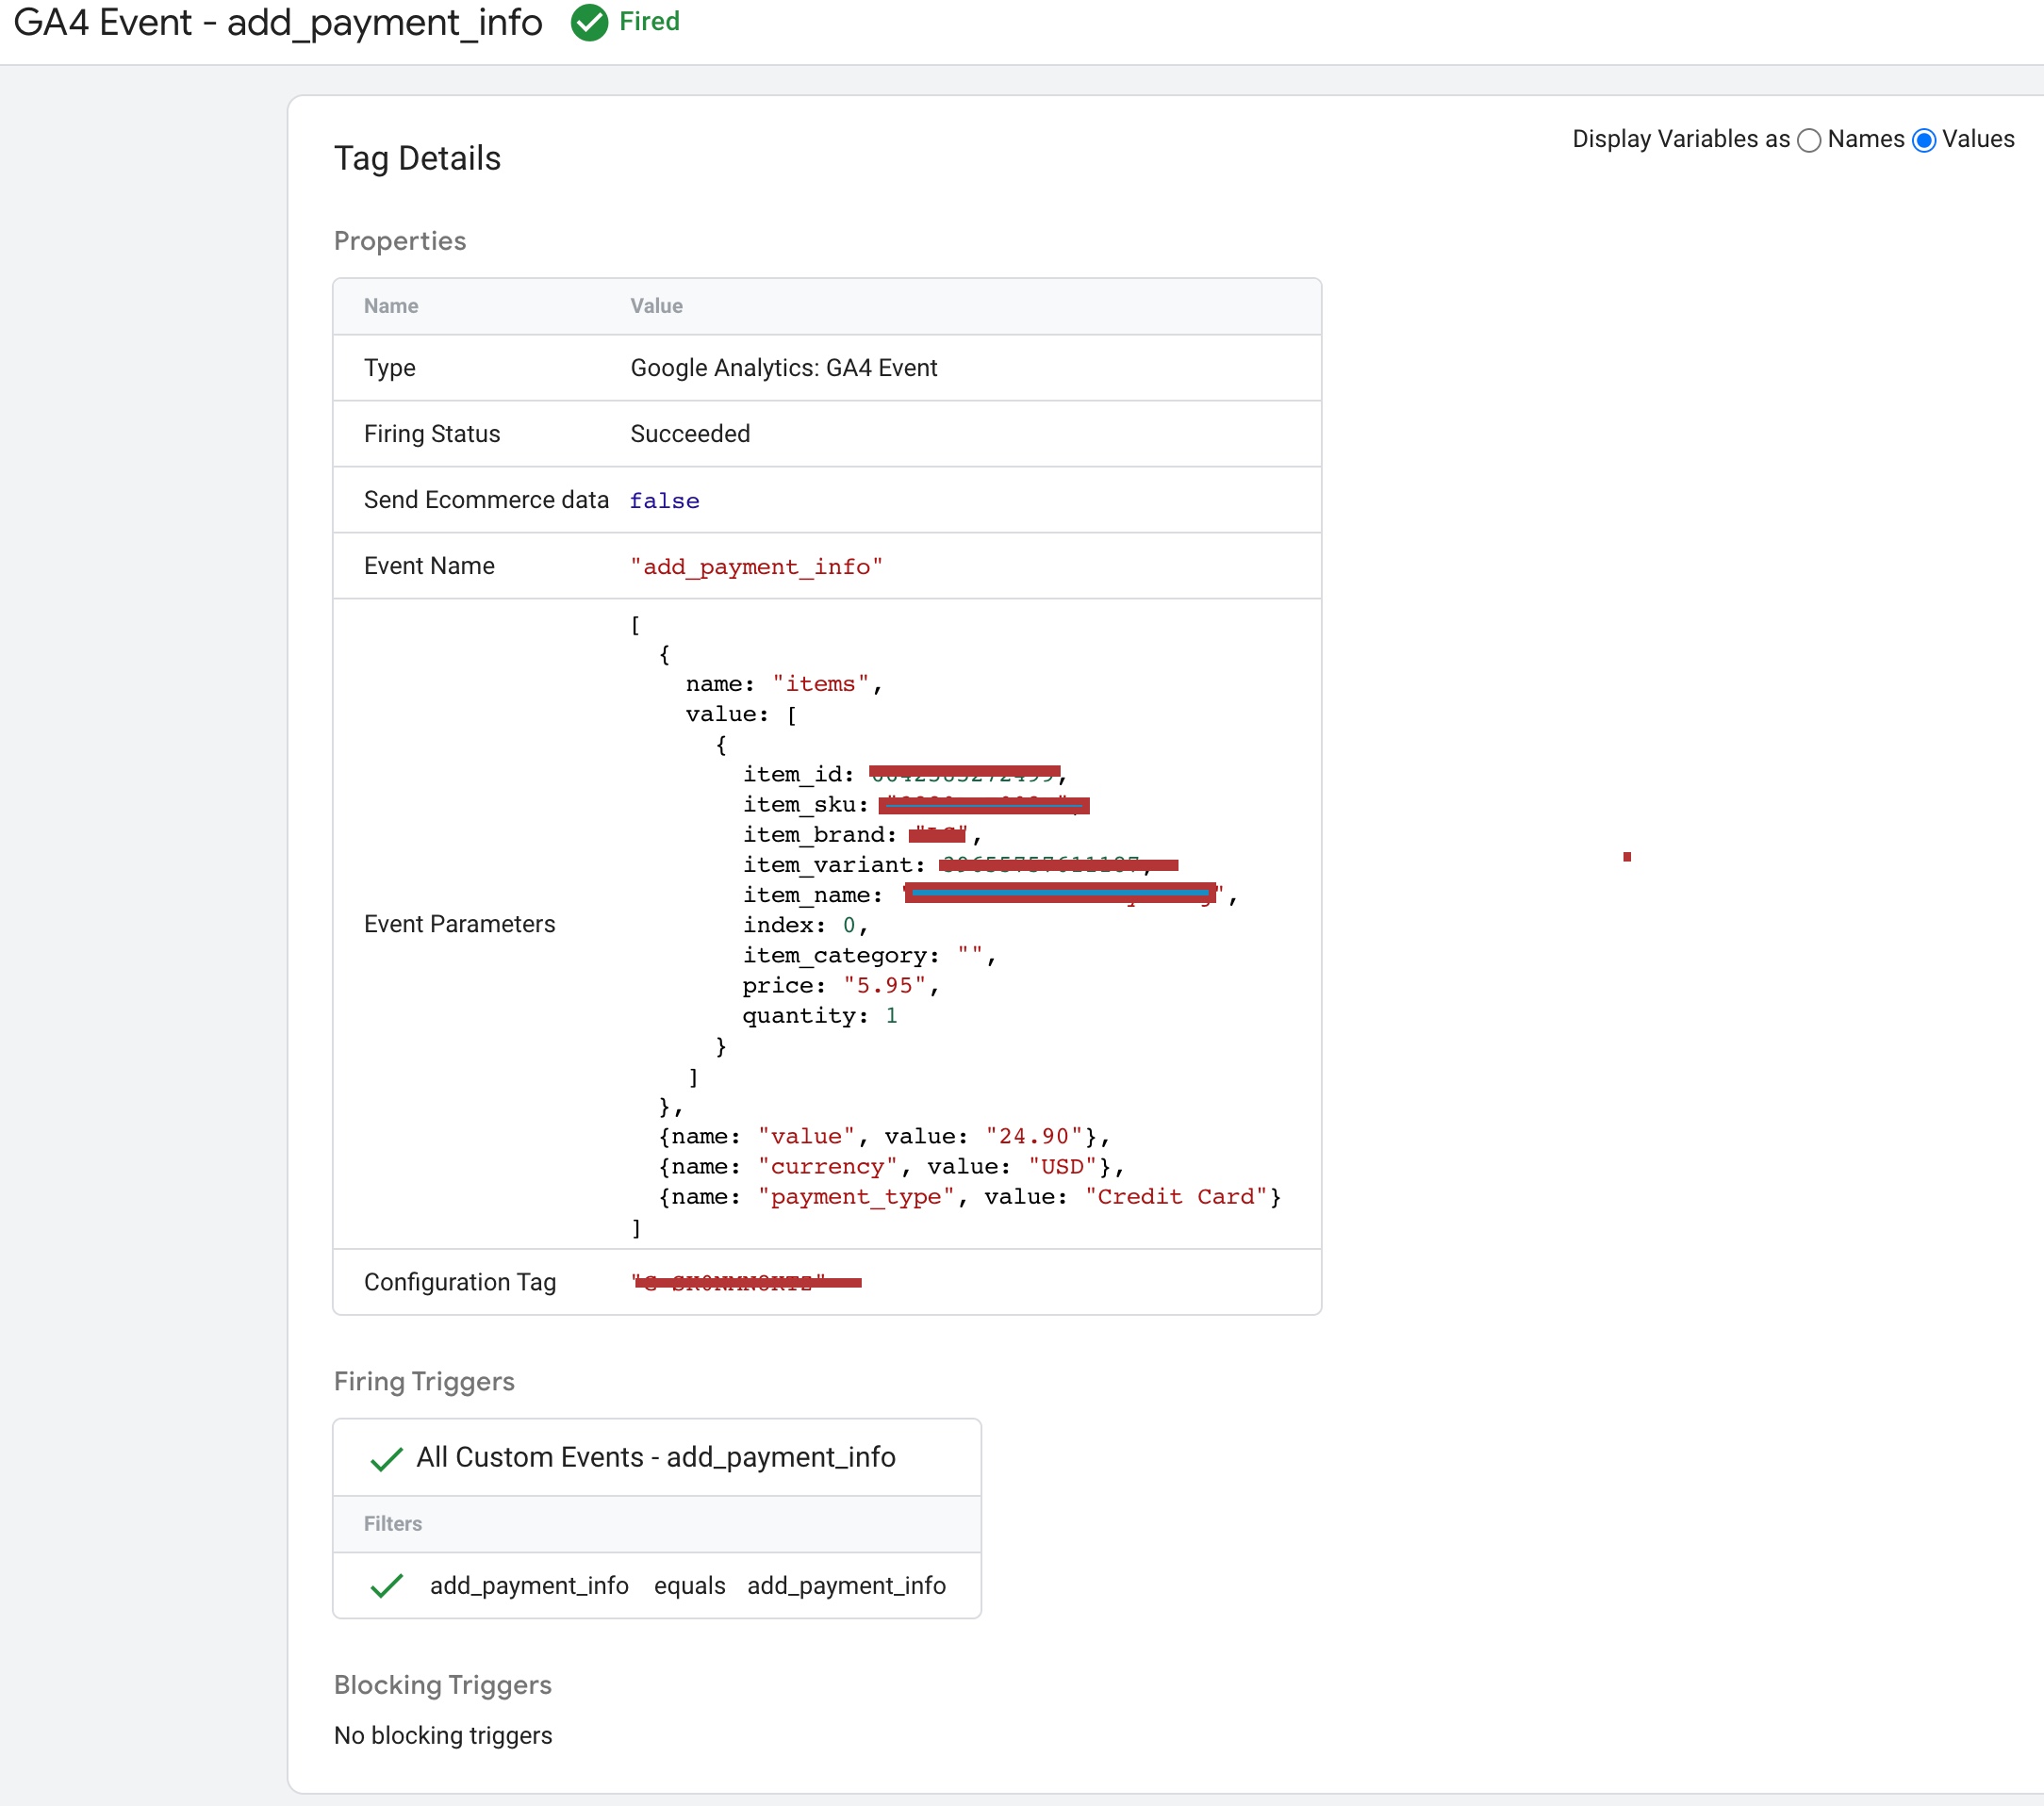
Migrating to Google Analytics 4 Enhanced Ecommerce Tracking for 3DCart using Google Tag Manager

The “purchase” event tracking feature in eCommerce tracking allows online stores to track when a user completes a purchase transaction. For 3DCart eCommerce websites, setting up “purchase” event tracking involves creating the event parameters, such as “event name” as “purchase,” and adding the eCommerce tracking code to the website’s header or footer section via the 3DCart dashboard. Once the tracking code is added, the website will receive the “purchase” event data, which provides valuable insights into user behavior, such as the total revenue generated by the transaction, the number of products purchased, and the average order value.

3DCart Google Analytics 4 Enhanced Ecommerce tracking using Google Tag Manager

The “purchase” event tracking feature in eCommerce tracking allows online stores to track when a user completes a purchase transaction. For 3DCart eCommerce websites, setting up “purchase” event tracking involves creating the event parameters, such as “event name” as “purchase,” and adding the eCommerce tracking code to the website’s header or footer section via the 3DCart dashboard. Once the tracking code is added, the website will receive the “purchase” event data, which provides valuable insights into user behavior, such as the total revenue generated by the transaction, the number of products purchased, and the average order value.

Setting Up Google Analytics 4 for 3DCart

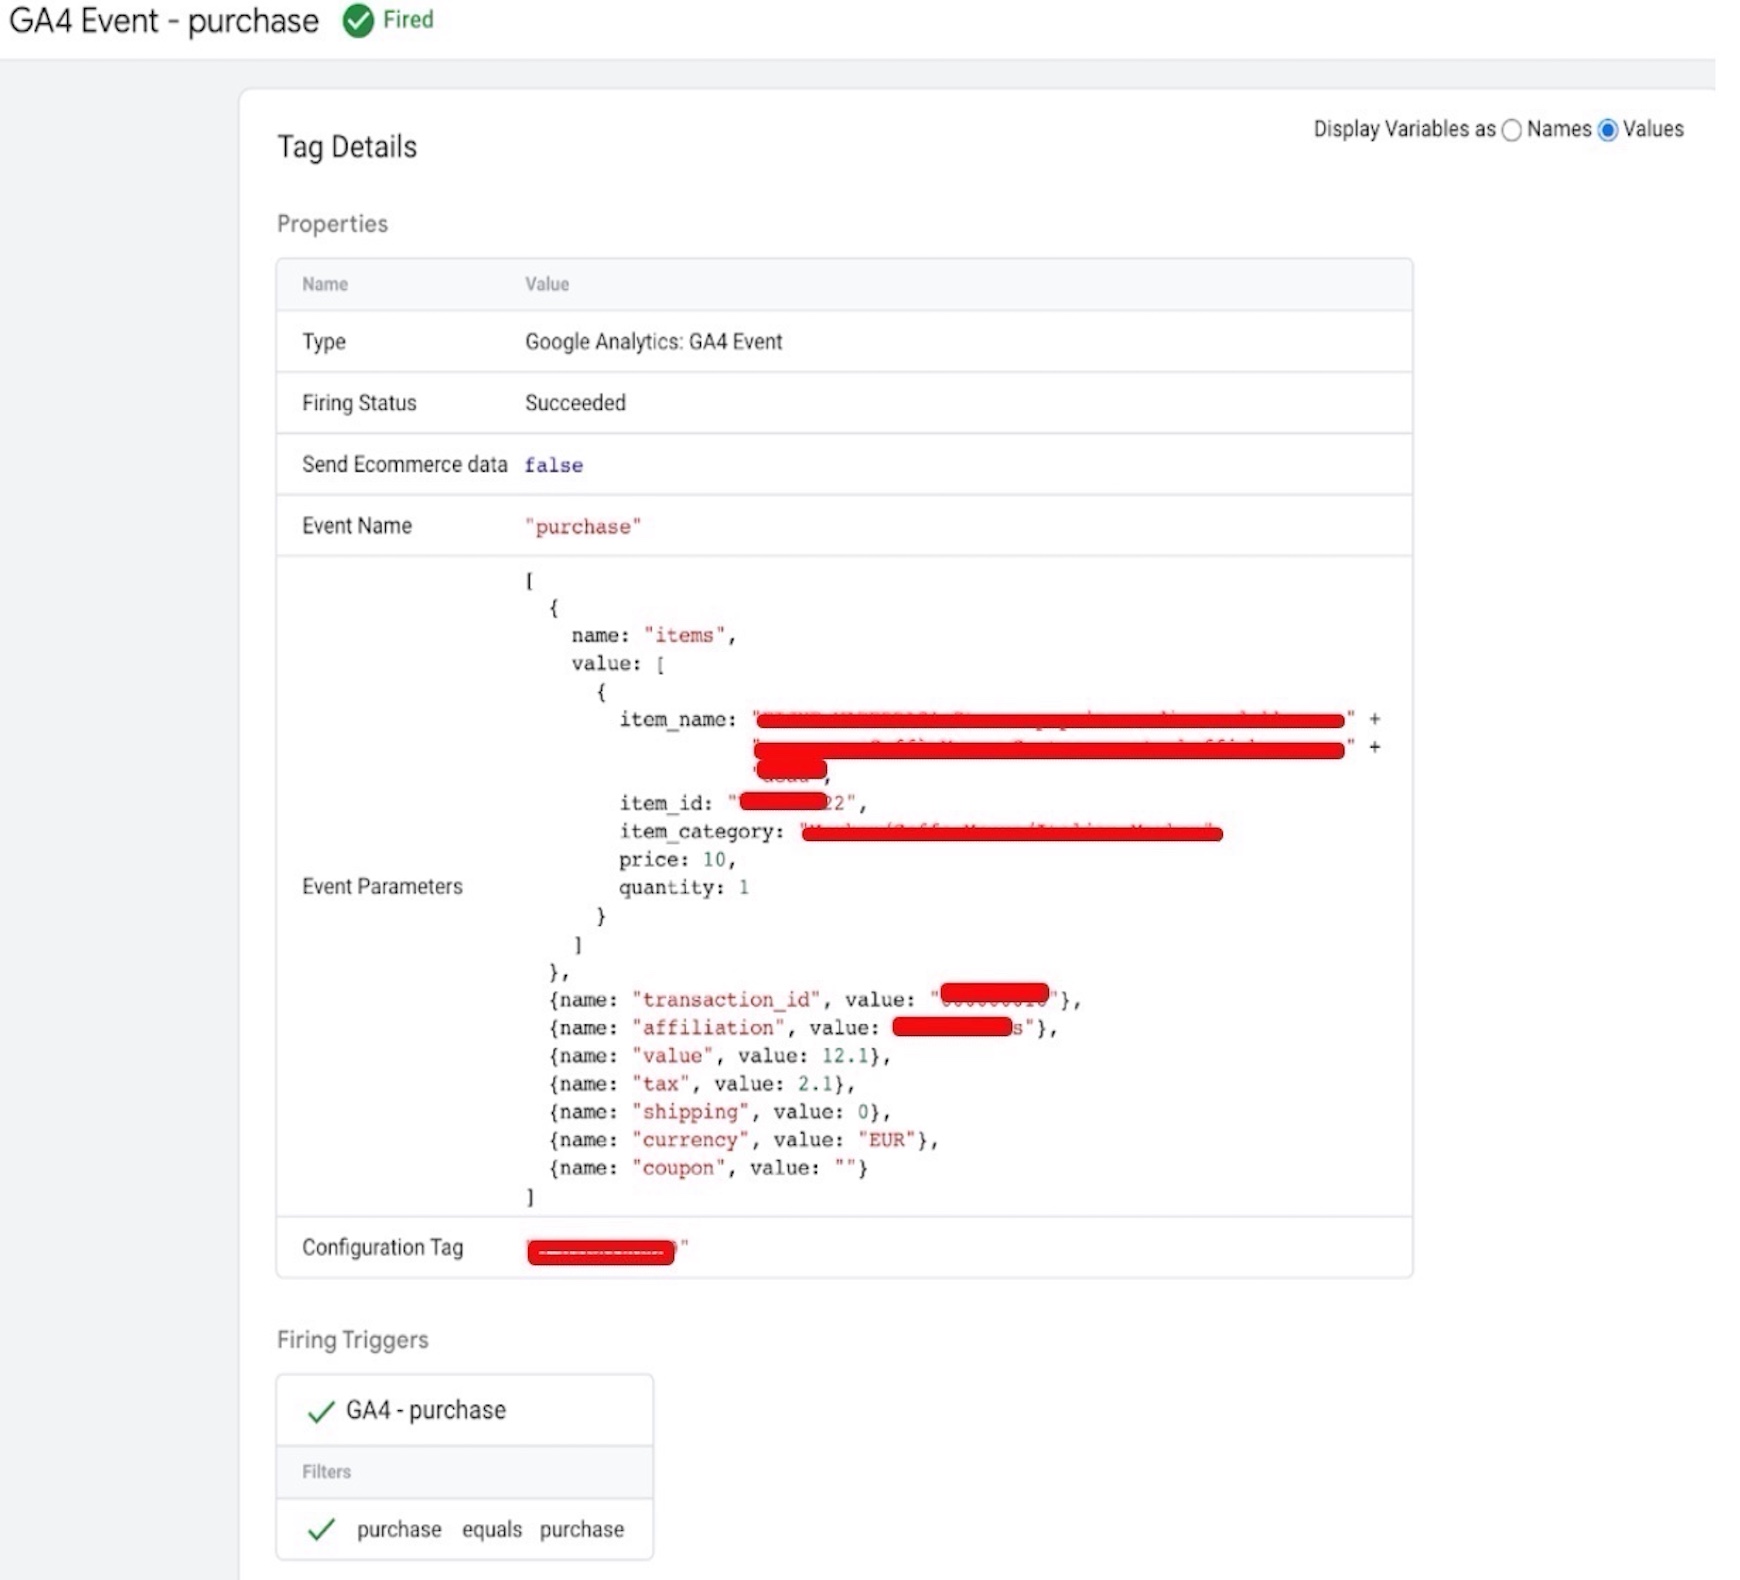
Set up purchase event for 3DCart using Google Tag Manager

Warning: If you don’t know about javascript or don’t have developing knowledge then don’t try to 3DCart ga4 eCommerce Tracking using Google Tag Manager that can break your site, Cart and other functionality 

Disclaimer: Google tag manager belongs to Google property 

For Contact: mappchero@gmail.com

I am available for Hire on Freelancer: Freelancer.com

I am available for Hire on Upwork: Upwork.com

I am available for Hire on Peopleperhour: Peopleperhour.com

I am available for Hire on Guru: Guru.com

WooCommerce Google Ads Dynamic Remarketing Tag in Google Tag Manager

Standard

WooCommerce Google Ads Dynamic Remarketing Tag is a feature that allows online businesses to track and target website visitors who have interacted with their products or services, and show them personalized ads on the Google Display Network.

To set up the WooCommerce Google Ads Dynamic Remarketing Tag, you will need to have a WooCommerce store, a Google Ads account, and a Google Analytics account. You will also need to have the WooCommerce Google Ads integration plugin installed on your WooCommerce store, which will automatically add the necessary code snippets to your website.

The first step in setting up the WooCommerce Google Ads Dynamic Remarketing Tag is to create a Google Ads account and link it to your Google Analytics account. Once you have linked your accounts, you can create a new remarketing tag by navigating to the “Audience Manager” section of your Google Ads account.

To create the remarketing tag, you will need to choose the type of tag you want to use (in this case, the “Google Ads remarketing tag” option), and then select the appropriate settings for your website. You can choose to track specific pages or actions on your website, such as product pages or add-to-cart events.

Once you have created the remarketing tag, you will need to add it to your website by inserting the code snippet into the header of your website. This can be done manually by editing the code of your website, or by using a plugin such as the WooCommerce Google Ads integration plugin.

Once the tag is installed on your website, it will start tracking the behavior of your website visitors who have interacted with your products or services. The tag will place a cookie in the user’s browser, which can be used to track their activity and show them personalized ads on the Google Display Network.

To create a dynamic remarketing campaign, you will need to create a new campaign in your Google Ads account and select the “Dynamic remarketing” option. You will then need to choose the appropriate settings for your campaign, such as the type of ad format and the targeting options.

One of the key benefits of the WooCommerce Google Ads Dynamic Remarketing Tag is that it allows you to show personalized ads to users who have already shown interest in your products or services. For example, if a user visits a specific product page on your website but doesn’t make a purchase, you can show them an ad that features that same product or similar products.

This type of personalized targeting can be very effective in driving conversions and increasing sales on your website. By showing relevant ads to users who have already shown interest in your products, you can increase the likelihood that they will return to your site and make a purchase.

In addition to dynamic remarketing, the WooCommerce Google Ads integration plugin also supports other types of Google Ads campaigns, such as Google Shopping and Google AdWords. This allows you to easily manage all of your Google Ads campaigns from within your WooCommerce store, and track their performance using Google Analytics.

Overall, the WooCommerce Google Ads Dynamic Remarketing Tag is a powerful tool for online businesses that want to increase conversions and drive sales on their website. By tracking and targeting users who have already shown interest in your products or services, you can create personalized ads that are more likely to convert and drive sales.

WooCommerce ga4 eCommerce Tracking using Google Tag Manager

Standard

WooCommerce is a popular e-commerce platform that enables online store owners to manage their business operations, products, orders, and customers. Google Analytics 4 (GA4) is the latest version of Google Analytics, and it provides a more comprehensive view of user behavior across different platforms and devices.

GA4 allows store owners to track customer interactions, product views, and purchases on their WooCommerce stores. This tracking provides valuable insights into customer behavior and can help store owners make informed decisions to improve their marketing strategies and optimize their store’s performance.

To set up GA4 eCommerce tracking on a WooCommerce store, store owners need to follow these steps:

Set up GA4 tracking on your WooCommerce store: Before setting up GA4 eCommerce tracking, you need to set up GA4 tracking on your WooCommerce store. You can do this by creating a new GA4 property in your Google Analytics account and then integrating it with your WooCommerce store using a plugin or by adding the tracking code manually to your website’s header or footer.

Enable Enhanced eCommerce tracking in GA4: Once you have set up GA4 tracking on your WooCommerce store, you need to enable Enhanced eCommerce tracking in GA4. Enhanced eCommerce tracking allows you to track customer behavior on your store, such as product views, add to cart events, and purchases.

Add the GA4 tracking code to your WooCommerce store: You need to add the GA4 tracking code to your WooCommerce store to enable eCommerce tracking. This code should be added to your website’s header or footer.

Enable eCommerce tracking in your WooCommerce store: After adding the GA4 tracking code to your WooCommerce store, you need to enable eCommerce tracking in your store. This can be done using a plugin or by adding the tracking code manually to your website’s header or footer.

Set up conversion tracking in GA4: Conversion tracking allows you to track the number of conversions on your WooCommerce store, such as the number of completed purchases. To set up conversion tracking in GA4, you need to create a conversion event in your GA4 account and then add the event code to your WooCommerce store.

Once you have completed these steps, you can start tracking customer behavior on your WooCommerce store using GA4. Some of the key metrics you can track using GA4 eCommerce tracking include:

Product views: GA4 eCommerce tracking allows you to track the number of times a product has been viewed on your WooCommerce store. This metric can help you understand which products are popular among your customers and which products may need more attention.

Add to cart events: Add to cart events track the number of times a customer has added a product to their cart. This metric can help you understand which products are most likely to be purchased by your customers.

Cart abandonment rate: Cart abandonment rate tracks the number of times a customer has added a product to their cart but did not complete the purchase. This metric can help you identify any potential issues with your checkout process and help you optimize it for better conversions.

Revenue: GA4 eCommerce tracking allows you to track the revenue generated by your WooCommerce store. This metric can help you understand the overall performance of your store and make informed decisions about your marketing and sales strategies.

Customer lifetime value: Customer lifetime value (CLTV) tracks the total amount of revenue generated by a customer over their lifetime on your WooCommerce store. This metric can help you identify your most valuable customers and tailor your marketing strategies to better engage and retain them.

In conclusion, GA4 eCommerce tracking is a powerful tool for online store owners using WooCommerce. By tracking customer behavior on your store, you can gain valuable insights into your customers’ preferences and behavior and use this information to optimize your store’s performance and improve your marketing strategies. With the help of the above-mentioned steps, store owners

Drupal Google Ads Dynamic Remarketing Tag using Google Tag Manager

Standard

The Drupal Google Ads Dynamic Remarketing Tag is a powerful tool that allows Drupal site owners to track visitor behavior and target them with personalized ads based on their actions. This can help to increase conversions and sales, as well as build brand awareness and loyalty. Here’s how it works:

Dynamic remarketing involves placing a cookie in the browser of a visitor to your Drupal site, which allows you to track their behavior and serve them personalized ads later on. This can be done through the Google Ads platform, which provides a remarketing tag code that needs to be added to your Drupal site. Once the tag code is in place, you can begin tracking visitor behavior and targeting them with specific ads that are tailored to their interests and actions on your site.

The first step to setting up the Drupal Google Ads Dynamic Remarketing Tag is to create a Google Ads account if you don’t already have one. Once you have an account, you’ll need to create a dynamic remarketing campaign in Google Ads. This involves selecting the business type and product categories you want to target, as well as setting up your ad groups and targeting options.

Once your campaign is set up, you’ll be provided with a remarketing tag code that needs to be added to your Drupal site. This can be done using a custom module or by editing your Drupal theme’s template files. The tag code should be added to every page of your site that you want to track for dynamic remarketing.

Once you’ve added the Drupal Google Ads Dynamic Remarketing Tag code to your site, you can start tracking visitors and serving up personalized ads on the Google Display Network. Be sure to monitor your campaign performance regularly and make adjustments as needed to optimize your results.

Some tips for using the Drupal Google Ads Dynamic Remarketing Tag effectively include:

  1. Set clear goals and objectives for your campaign. What do you hope to achieve with dynamic remarketing, and how will you measure success?

2. Use segmentation and targeting to personalize your ads. Make sure your ads are relevant and engaging to your target audience.

3. Test and optimize your ad creative and messaging. Experiment with different ad formats, headlines, and calls to action to find what works best.

4. Monitor your campaign performance regularly and adjust as needed. Use data and analytics to track your progress and make informed decisions about how to optimize your campaign.

Overall, the Drupal Google Ads Dynamic Remarketing Tag can be a powerful tool for increasing conversions and sales on your site. By tracking visitor behavior and serving up personalized ads, you can build brand awareness, loyalty, and engagement with your target audience. Just be sure to set clear goals and objectives, use segmentation and targeting to personalize your ads, test and optimize your ad creative and messaging, and monitor your campaign performance regularly

Drupal GA4 eCommerce Tracking using Google Tag Manager

Standard

Drupal is a powerful content management system (CMS) that allows website owners to create and manage their online presence with ease. One important aspect of any website is the ability to track user behavior and gather insights about how visitors interact with the site. This is where Google Analytics comes in, and specifically, GA4 eCommerce tracking. In this article, we will discuss how to set up GA4 eCommerce tracking on a Drupal site in detail.

Step 1: Create a Google Analytics 4 property and obtain your Measurement ID

The first step in setting up GA4 eCommerce tracking is to create a Google Analytics 4 property and obtain your Measurement ID. To do this, go to the Google Analytics website and create a new account if you don’t already have one. Then, navigate to the Admin section and create a new property for your Drupal site. Once you’ve created the property, you’ll be given a Measurement ID, which you’ll need later on.

Step 2: Install the Google Tag Manager (GTM) module on your Drupal site

Next, you’ll need to install the Google Tag Manager (GTM) module on your Drupal site. This module makes it easy to manage your Google Analytics tracking tags and other marketing tags on your site. To install the module, go to the Drupal website and download the GTM module. Then, install and enable the module on your site.

Step 3: Configure the GTM module and add your Measurement ID to it

Once you’ve installed the GTM module, you’ll need to configure it and add your Measurement ID to it. To do this, go to the GTM module configuration page in Drupal and enter your Measurement ID. This will connect your Drupal site to your GA4 property.

Step 4: Create a new GTM container and add the GA4 tracking tag to it

The next step is to create a new GTM container and add the GA4 tracking tag to it. A container is a collection of tags, triggers, and variables that work together to track user behavior on your site. To create a new container, go to the Google Tag Manager website and click on the “Create Account” button. Then, select “Web” as your container type and follow the prompts to set up your container. Once your container is set up, add the GA4 tracking tag to it.

Step 5: Configure the GA4 tracking tag to fire on the pages where you want to track eCommerce transactions

After you’ve added the GA4 tracking tag to your container, you’ll need to configure it to fire on the pages where you want to track eCommerce transactions. To do this, go to the “Tags” section of your container and select the GA4 tracking tag. Then, configure the tag to fire on the relevant pages of your Drupal site.

Step 6: Set up the required eCommerce data layer variables

To capture information about eCommerce transactions on your Drupal site, you’ll need to set up the required eCommerce data layer variables. A data layer is a JavaScript object that contains information about the user’s interaction with your site. To set up the eCommerce data layer variables, you’ll need to add JavaScript code to your site’s header or footer. This code should define the variables that you want to track, such as product ID, name, price, and quantity.

Step 7: Add the eCommerce data layer

Finally, you’ll need to add the eCommerce data layer to your GTM container. To do this, go to the “Variables” section of your container and create a new variable for each eCommerce data layer variable that you want to track. Then, configure these variables to capture the data from your Drupal site’s data layer.

Conclusion:

In conclusion, setting up GA4 eCommerce tracking on your Drupal site requires a bit of technical knowledge,