Prestashop GA4 eCommerce Tracking using Google Tag Manager

Standard

Prestashop GA4 Integration Enhanced Ecommerce Tracking using Google Tag Manager

PrestaShop is a popular e-commerce platform used by many online retailers. If you’re using PrestaShop, it’s important to track your website’s performance to ensure that your business is growing and you’re meeting your goals. One way to do this is by using Google Analytics 4 (GA4) ecommerce tracking. In this article, I will explain what GA4 ecommerce tracking is and how to set it up on your PrestaShop website.

What is GA4 ecommerce tracking?

GA4 ecommerce tracking is a way to track e-commerce transactions on your website using Google Analytics 4. With GA4 ecommerce tracking, you can see how many sales you’re making, how much revenue you’re generating, and which products are the most popular. You can also see where your customers are coming from, which pages they’re visiting, and how they’re interacting with your website.

Setting up GA4 ecommerce tracking on PrestaShop

To set up GA4 ecommerce tracking on PrestaShop, you’ll need to follow these steps:

Step 1: Create a GA4 property
The first step is to create a GA4 property in your Google Analytics account. To do this, go to the Admin section of your Google Analytics account, select “Create Property,” and then select “GA4.” Follow the prompts to set up your property.

Step 2: Install the GA4 tracking code
Next, you’ll need to install the GA4 tracking code on your PrestaShop website. You can do this by adding the code to your website’s header or footer. To do this, go to your PrestaShop dashboard, select “Preferences,” and then select “Google Analytics.” Paste your GA4 tracking code into the “Google Analytics tracking code” field.

Step 3: Set up ecommerce tracking
Once you’ve installed the GA4 tracking code, you’ll need to set up ecommerce tracking. To do this, go to your Google Analytics account, select your GA4 property, and then select “Ecommerce Settings” under “Data Streams.” Turn on “Enable Enhanced Ecommerce Reporting” and “Enable Ecommerce Reporting.”

Step 4: Add ecommerce tracking to your website
Finally, you’ll need to add ecommerce tracking to your website. This involves adding code to your website’s product pages, cart pages, and confirmation pages. You can use the GA4 ecommerce tracking plugin for PrestaShop to make this process easier.

Benefits of using GA4 ecommerce tracking on PrestaShop

There are several benefits to using GA4 ecommerce tracking on PrestaShop:

  1. You can see which products are the most popular and adjust your inventory accordingly.
  2. You can track your revenue and see how much money you’re making from your online store.
  3. You can see where your customers are coming from and adjust your marketing efforts accordingly.
  4. You can see which pages on your website are performing the best and optimize your website for better performance.

Conclusion

GA4 ecommerce tracking is an essential tool for any online retailer using PrestaShop. By setting up GA4 ecommerce tracking, you can track your website’s performance, see where your customers are coming from, and adjust your marketing efforts accordingly. With the benefits of GA4 ecommerce tracking, you can optimize your website and grow your online business.

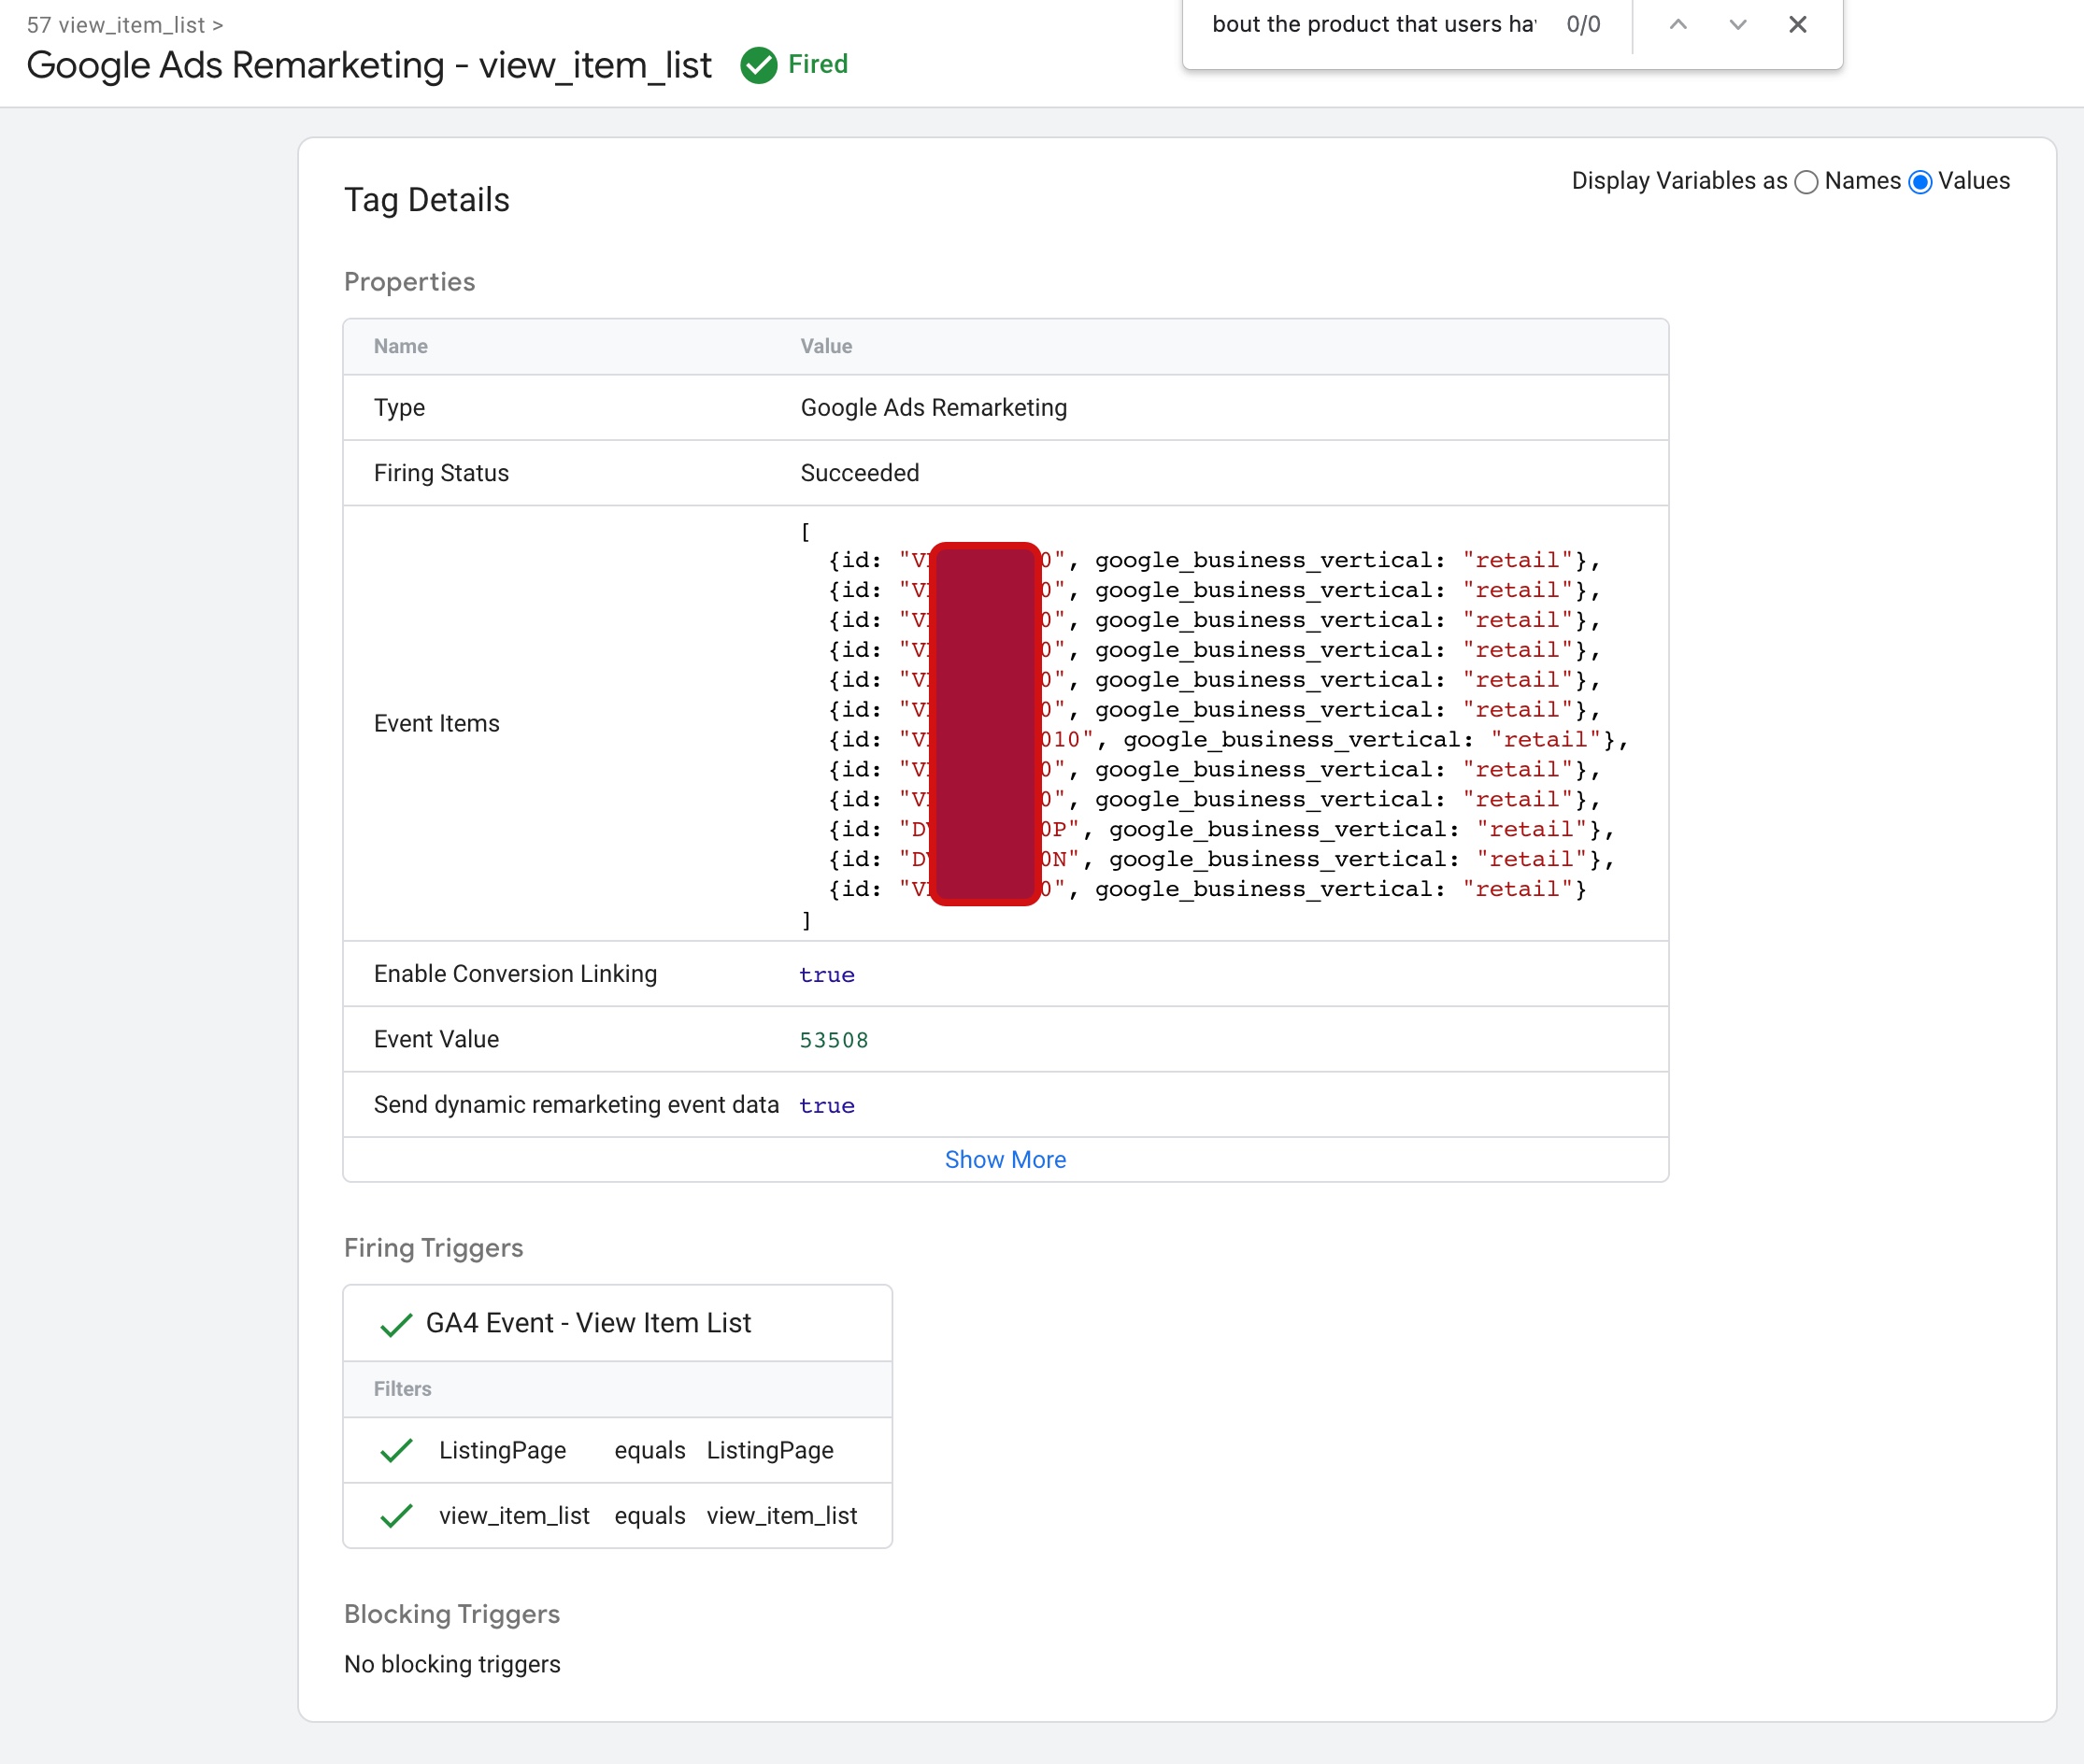
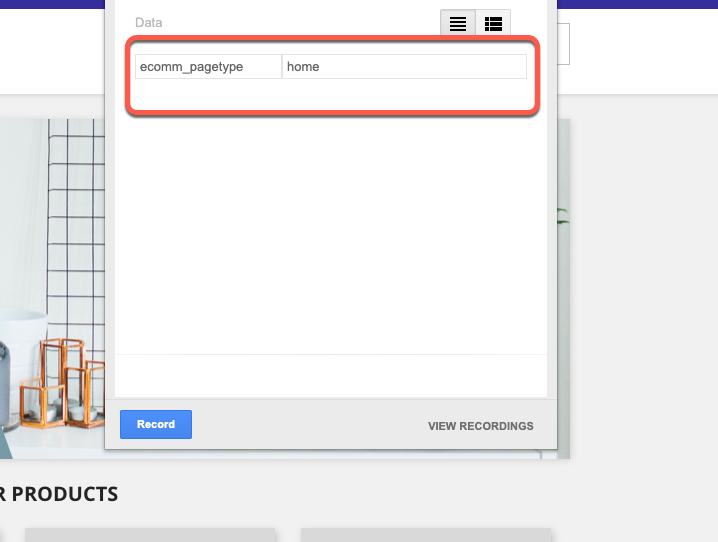
The “view_item_list” event in GA4 ecommerce tracking is used to track when a user views a list of items on your website. This can include category pages, search results pages, or any other page that displays a list of products.

Prestashop GA4 integration

Prestashop Google Tag Manager for GA4 eCommerce Tracking

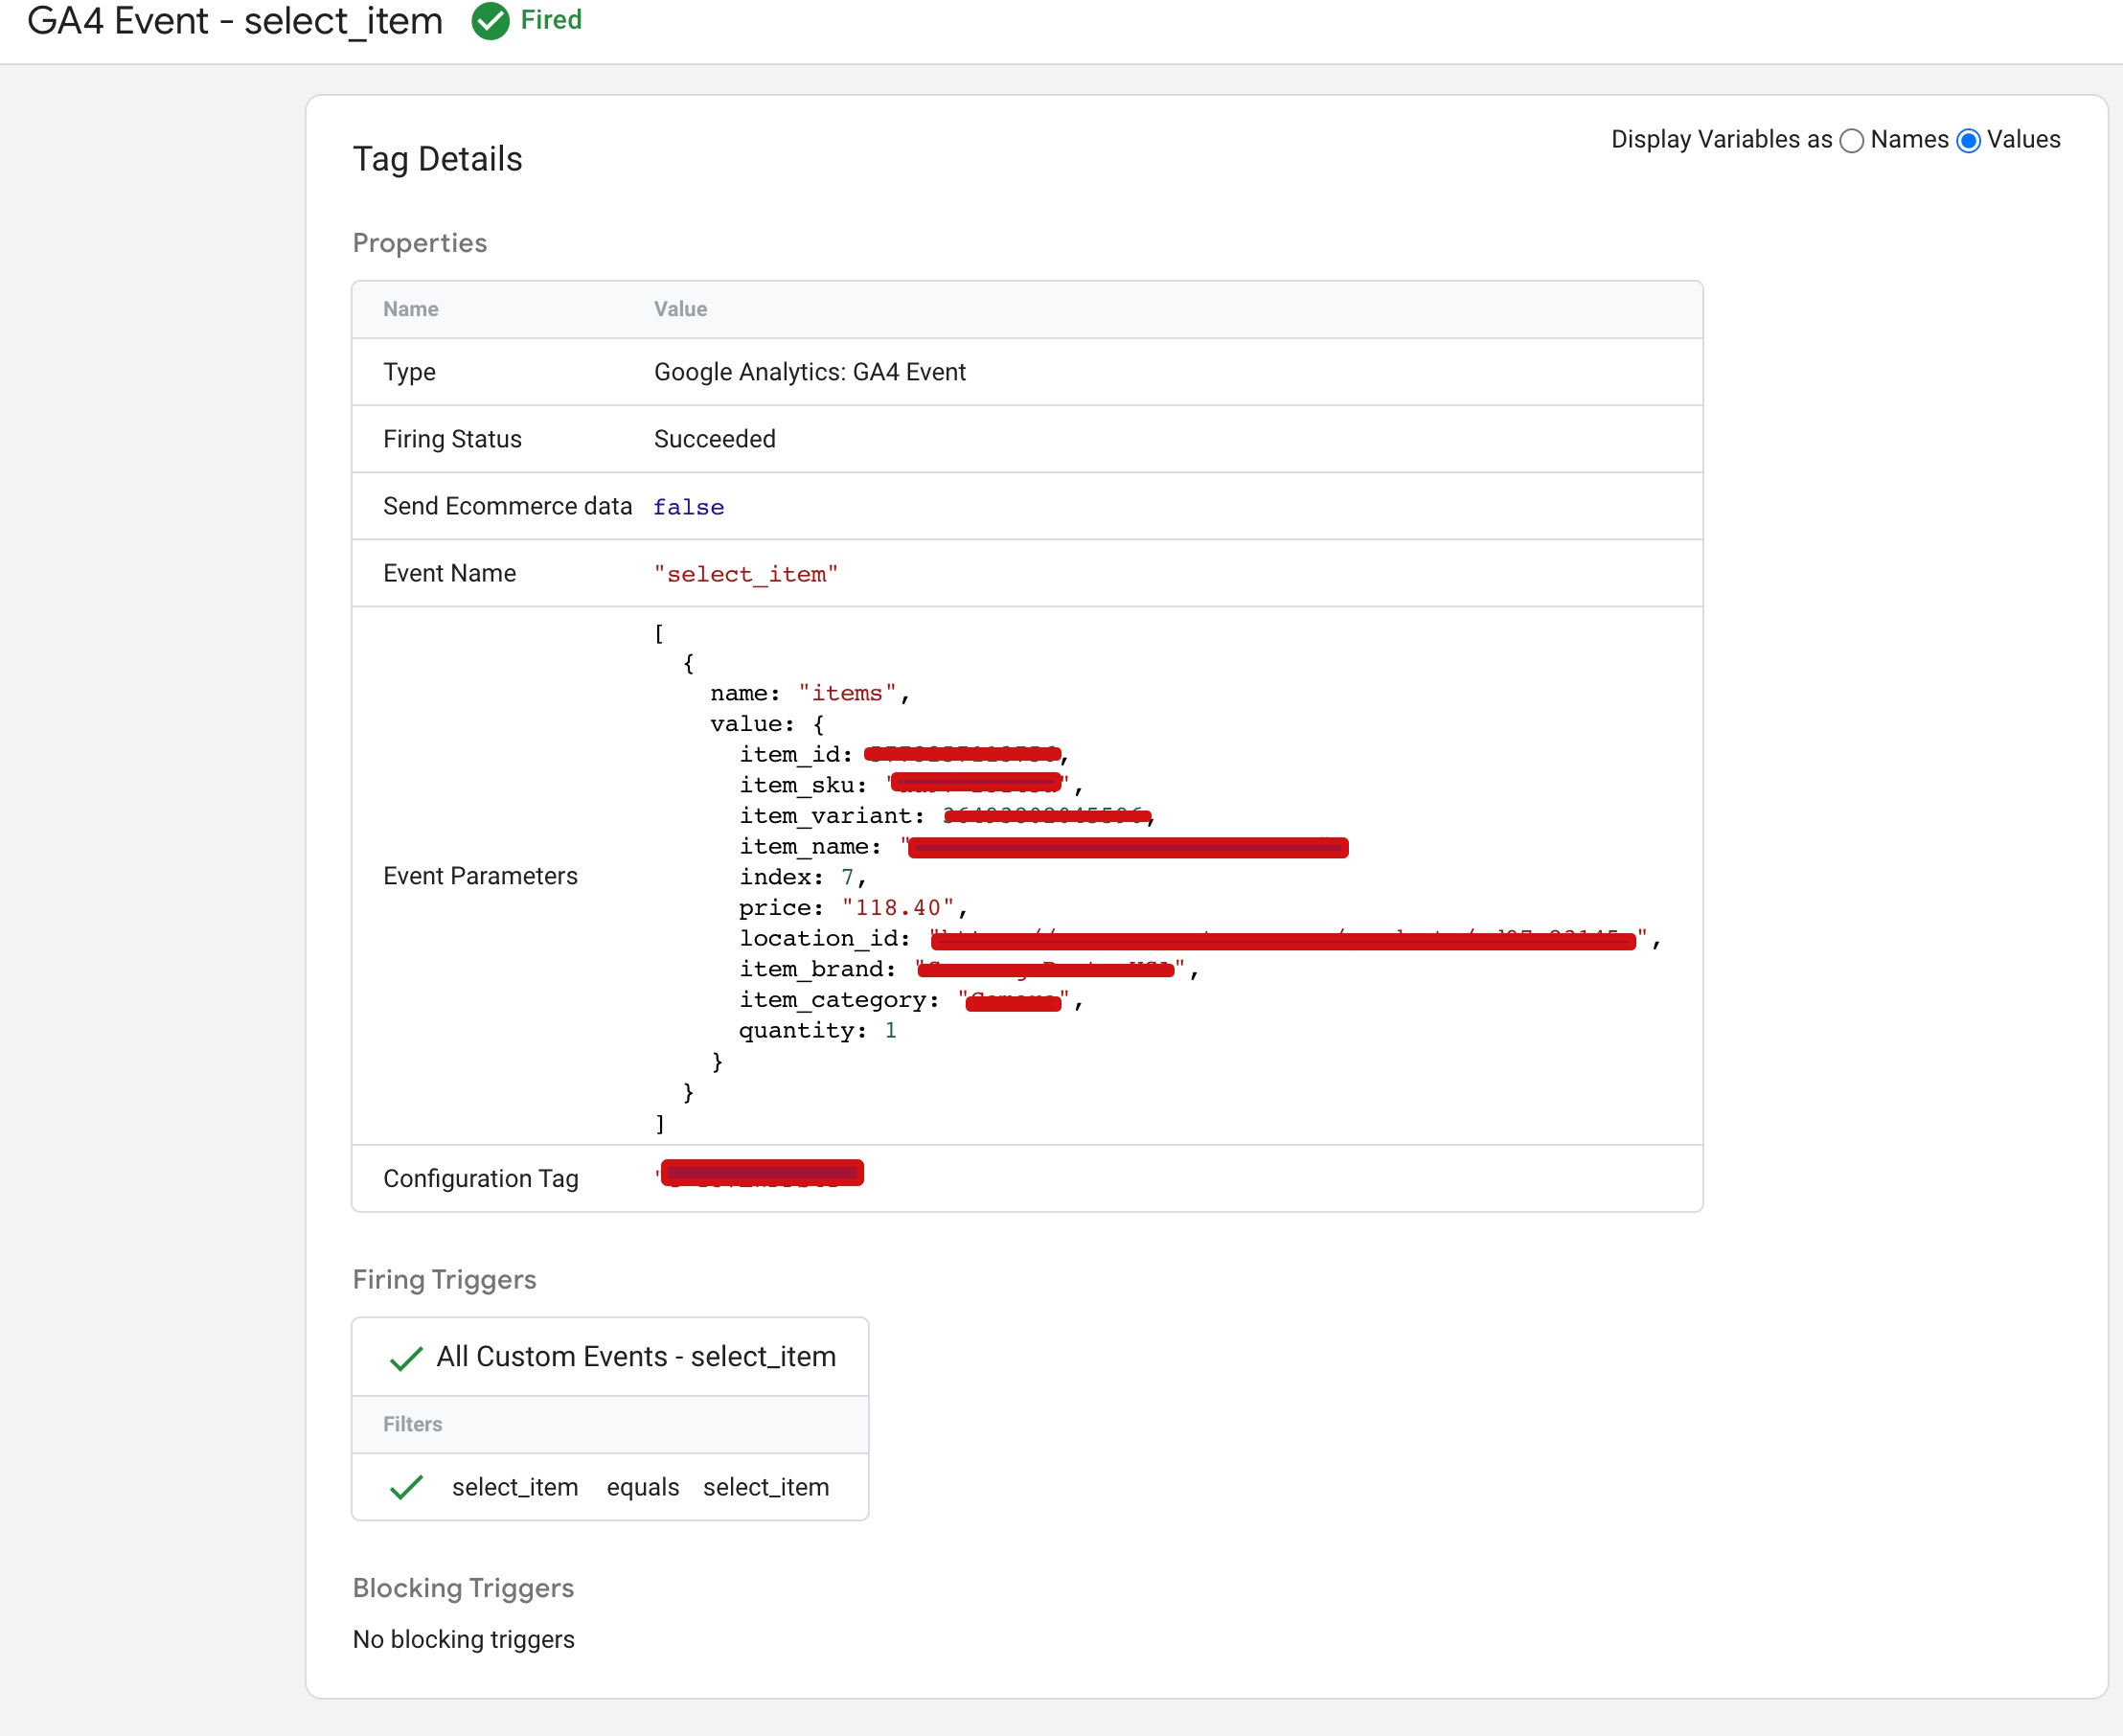
The “select_item” event in GA4 ecommerce tracking is used to track when a user selects a specific product or item on your website. This event is typically triggered when a user clicks on a product image or title to view the product details or add the item to their cart.

Google Analytics 4 (GA4) with PrestaShop

Implement Google Analytics 4 (GA4) on Prestashop using Google Tag Manager

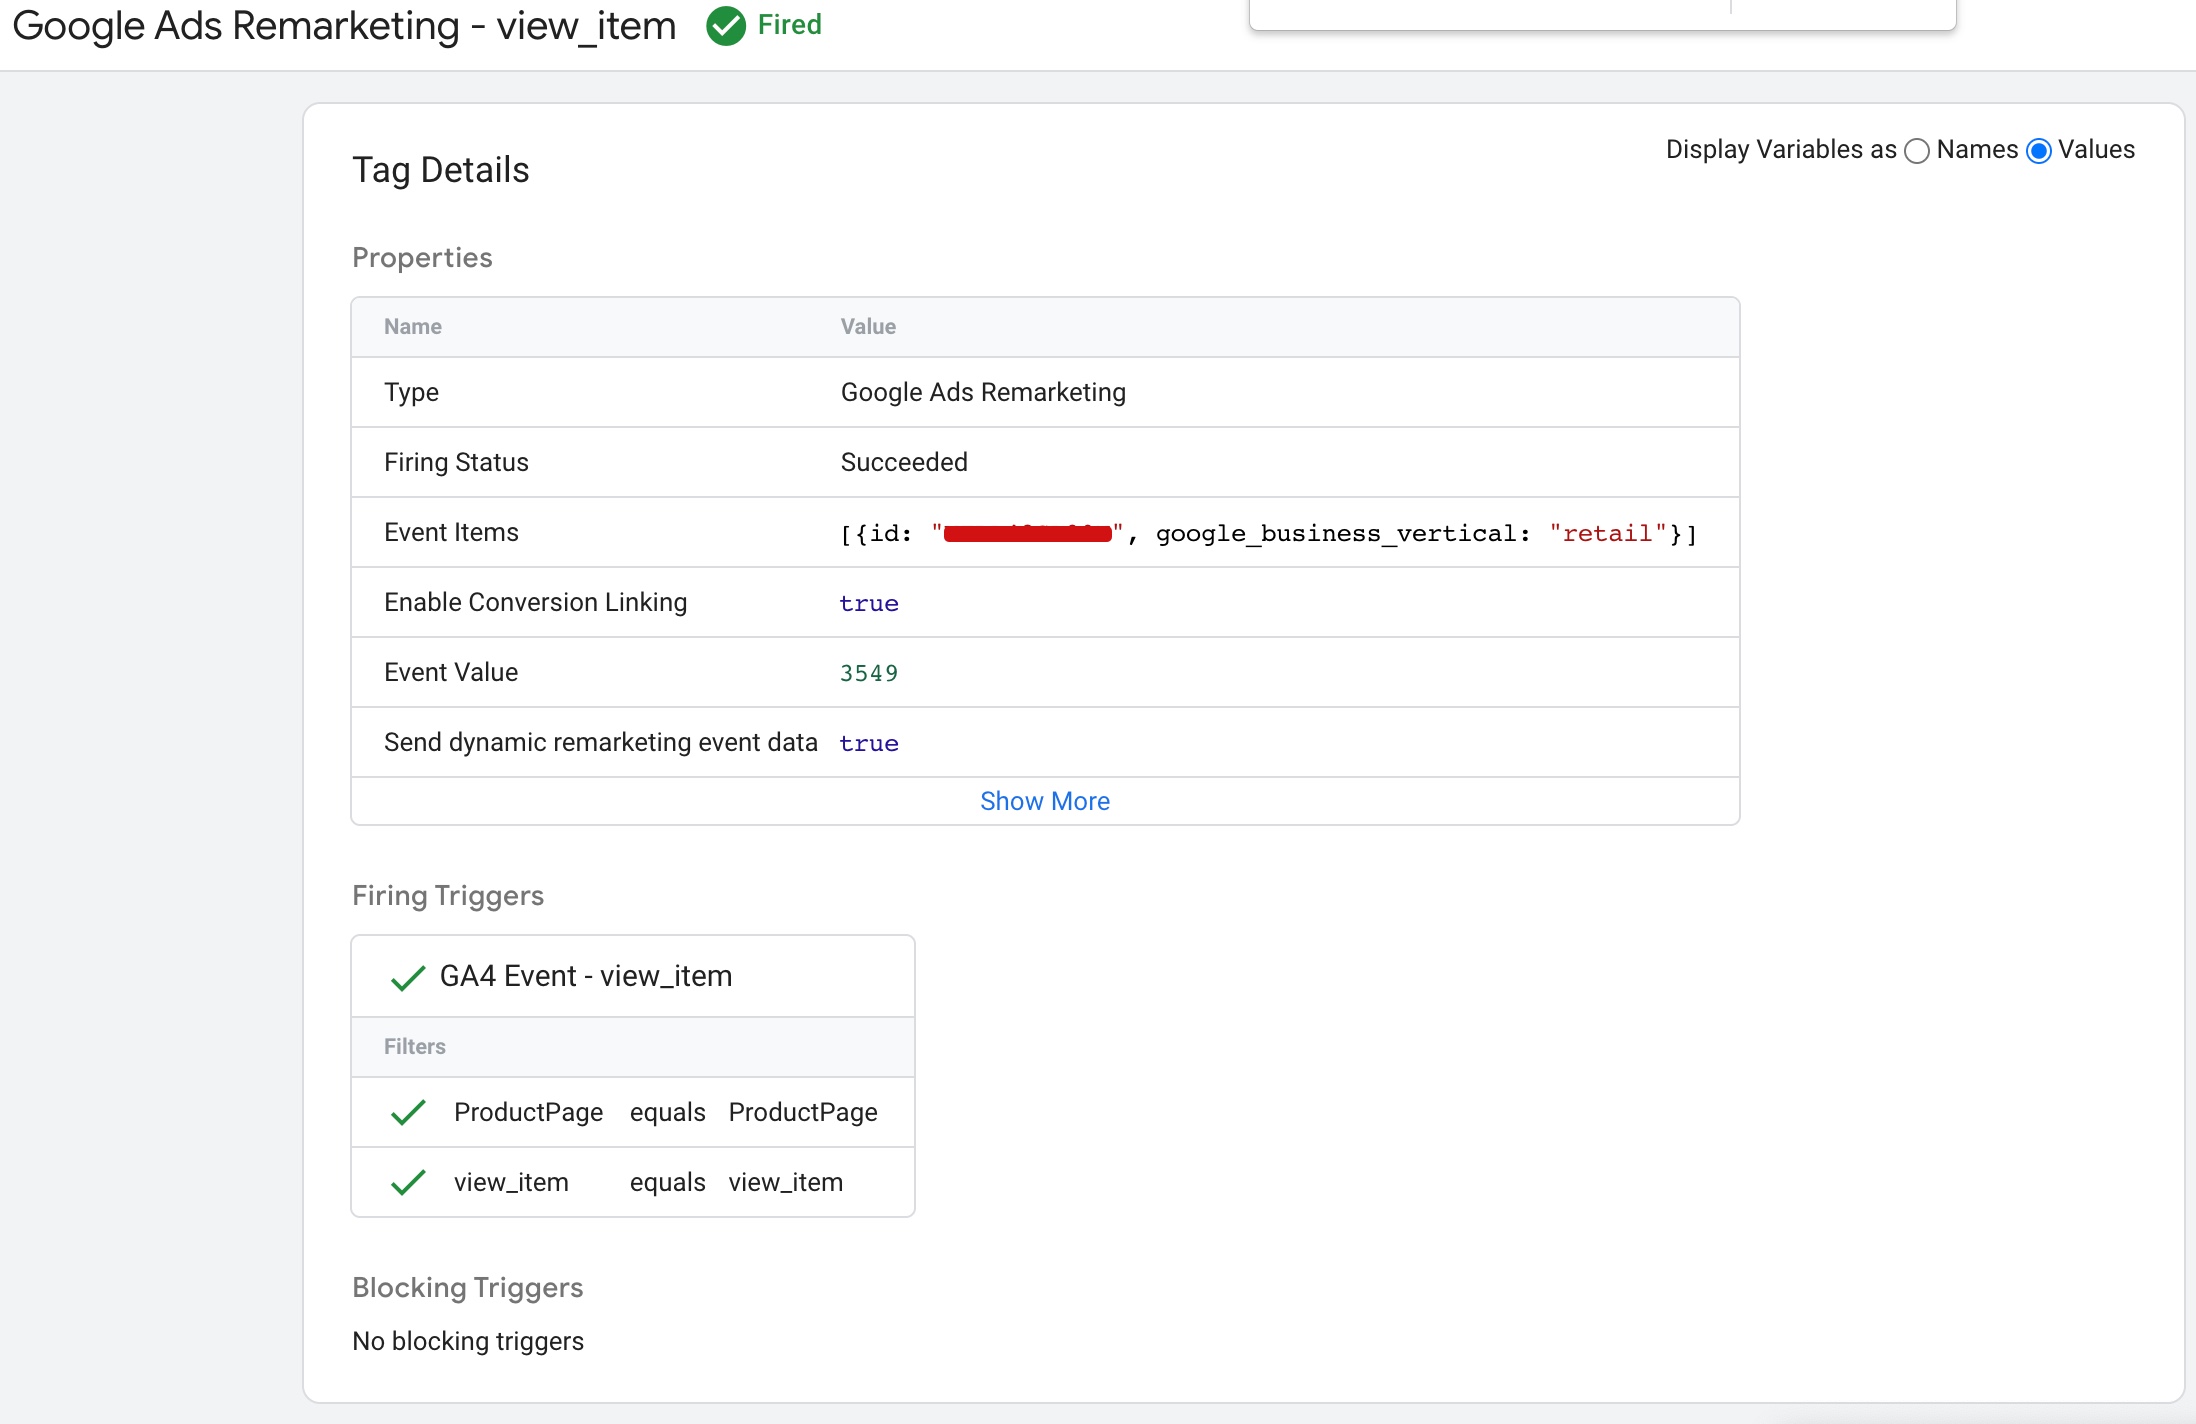
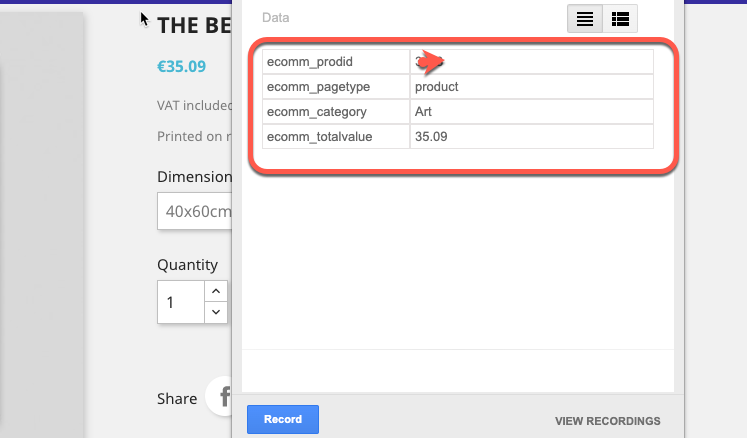
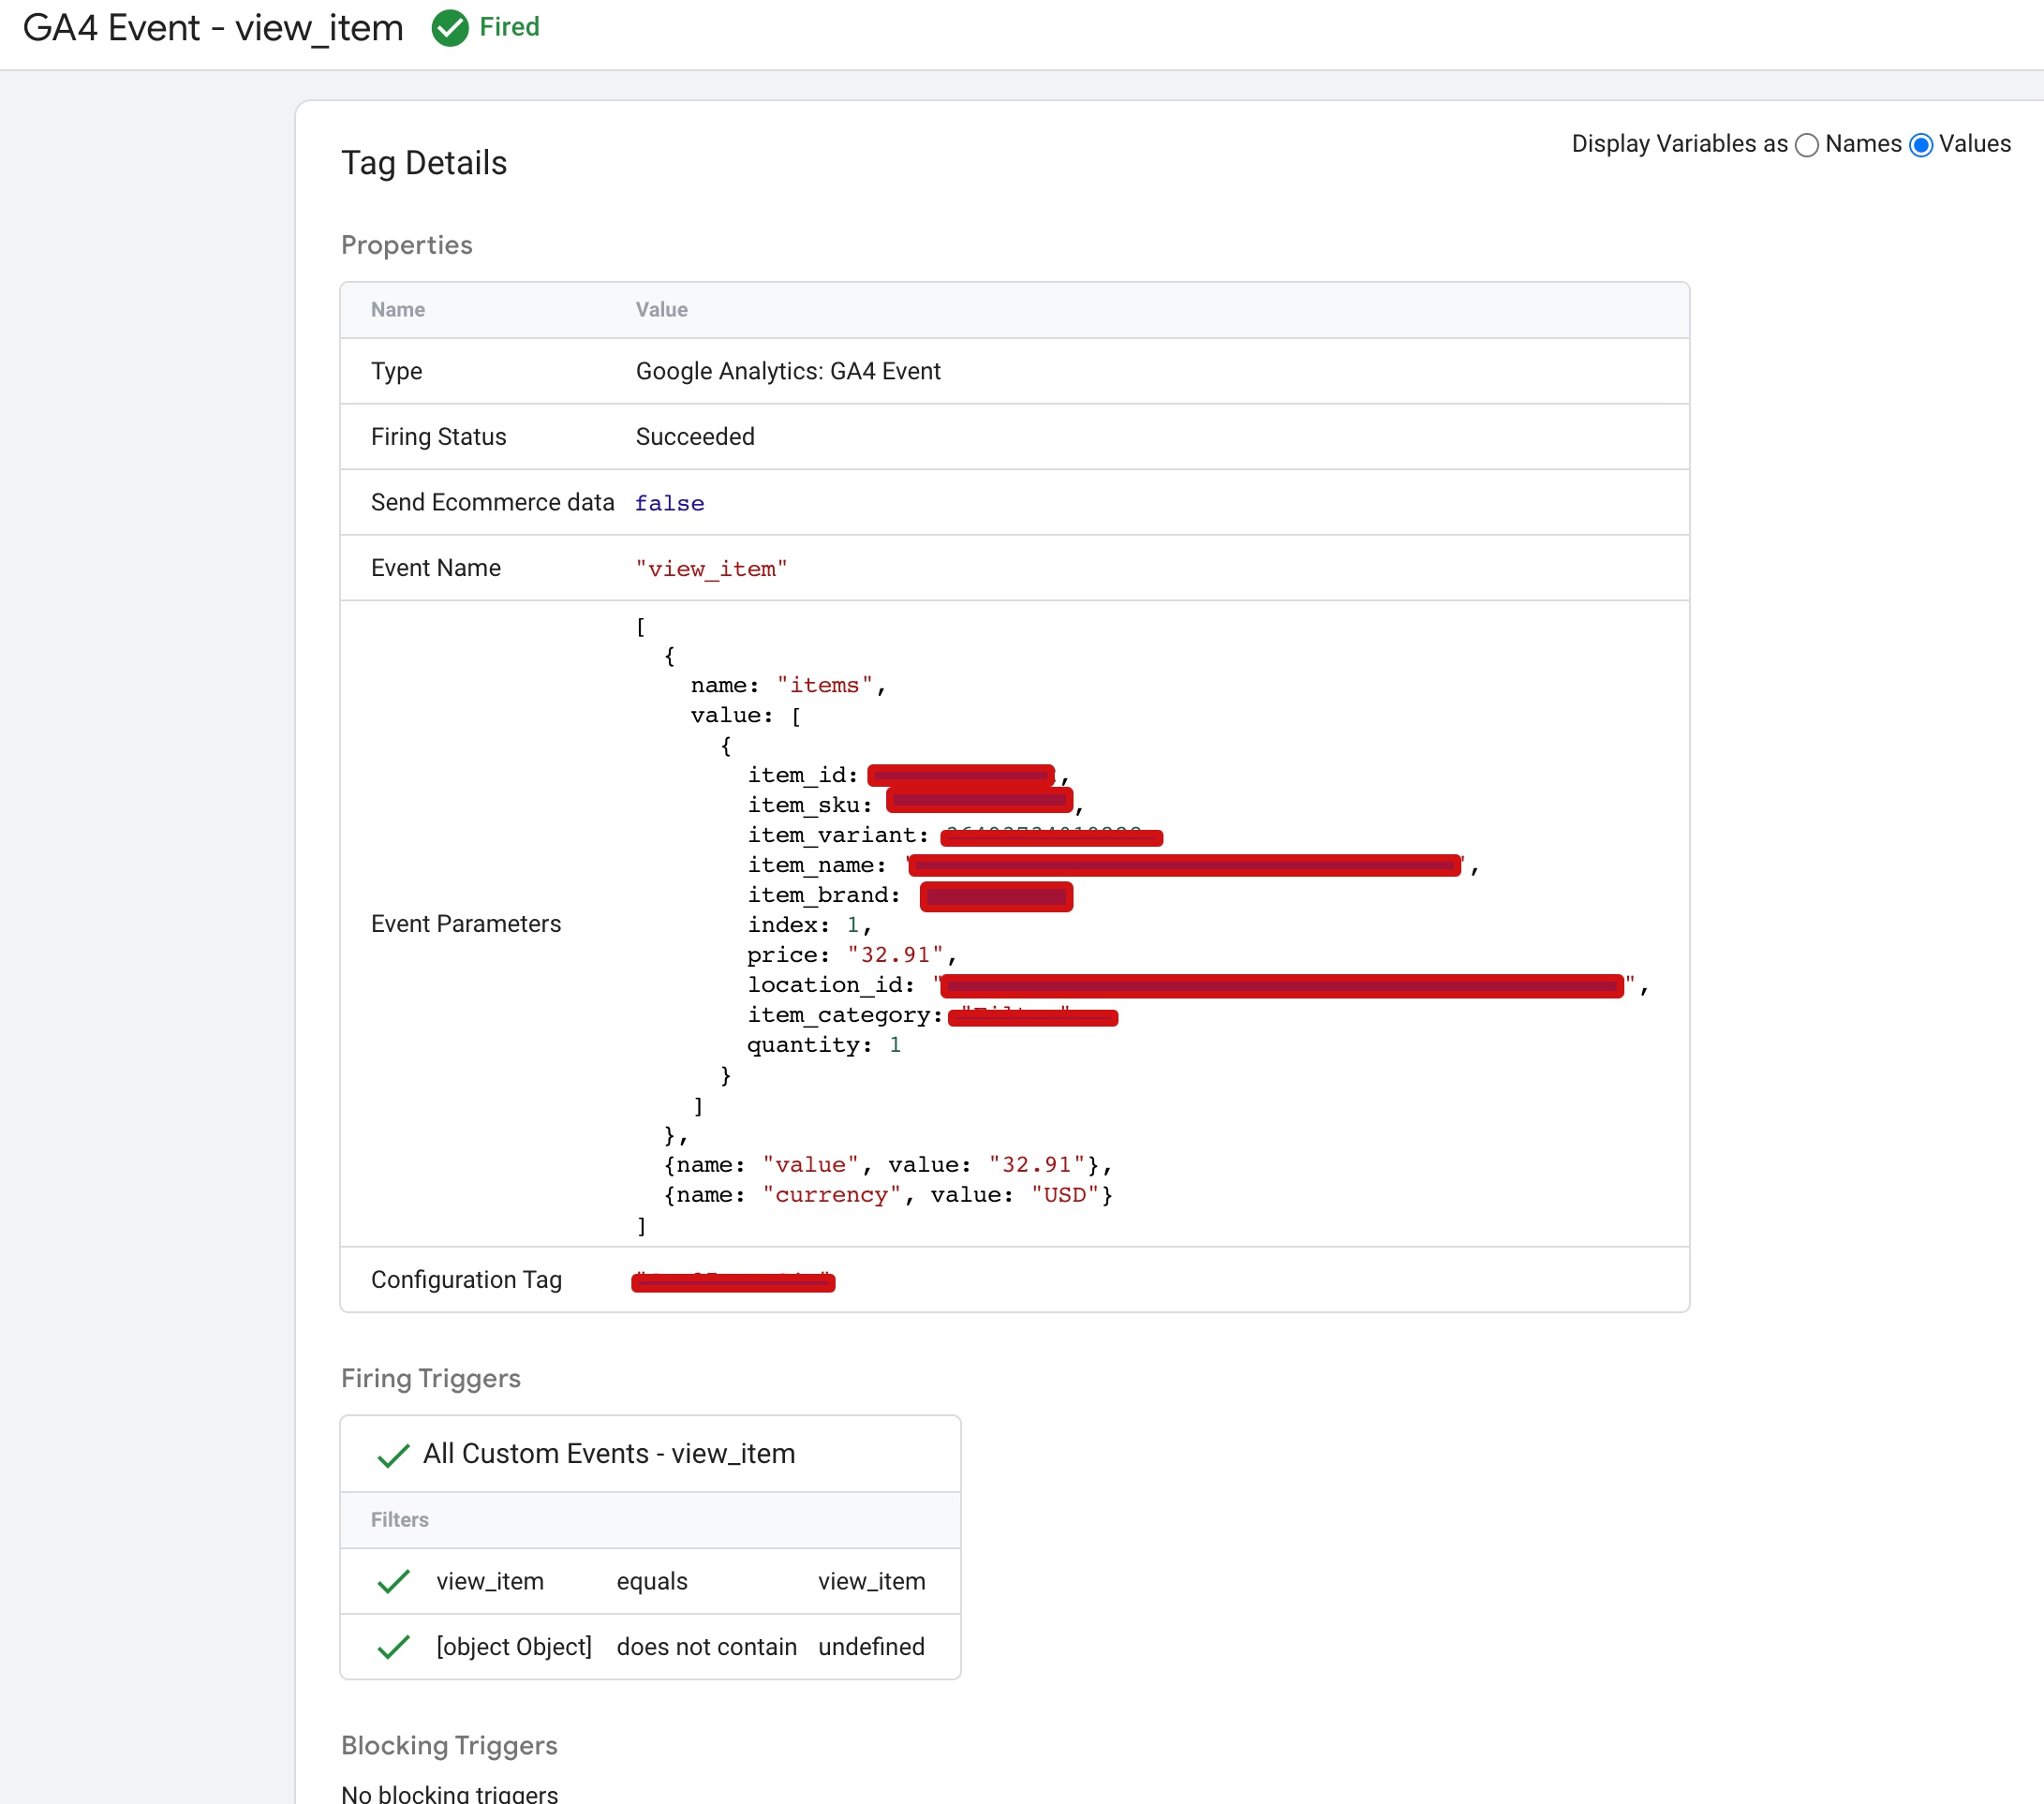
The “view_item” event in GA4 ecommerce tracking is used to track when a user views a specific product or item on your website. This event is typically triggered when a user lands on a product details page or clicks on a product from a list of items.

Prestashop GA4 Data layer Tracking

Set Up Google Analytics 4 (GA4) on PrestaShop using Google Tag Manager

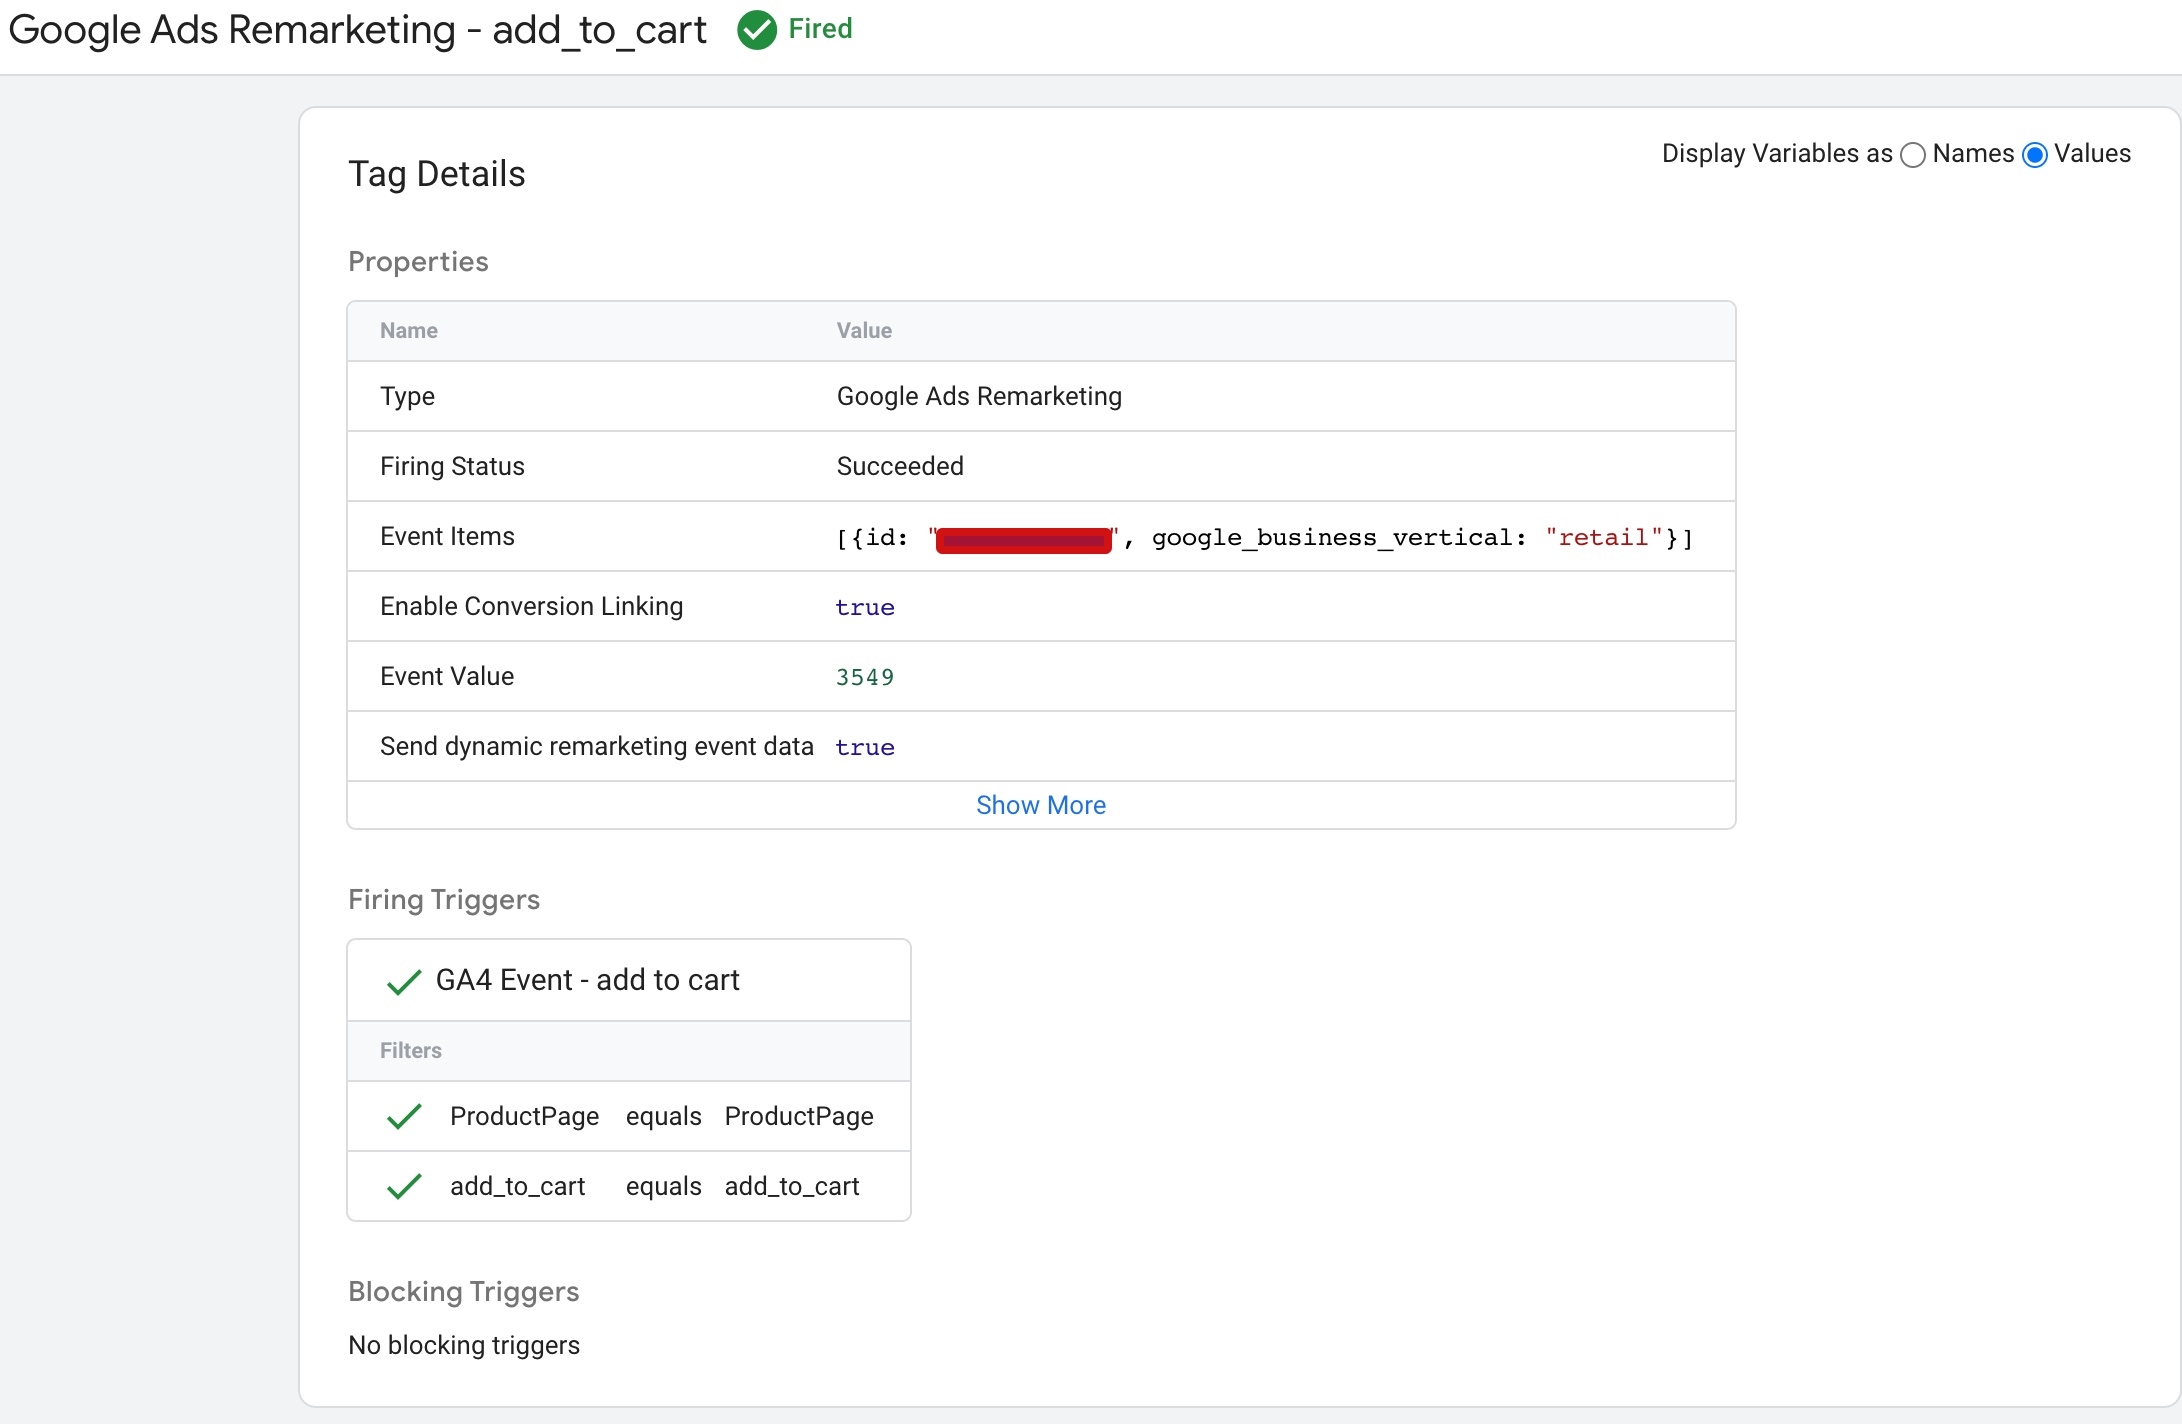
The “add_to_cart” event in GA4 ecommerce tracking is used to track when a user adds a product to their shopping cart on your website. This event is typically triggered when a user clicks on the “Add to Cart” button for a specific product.

Prestashop GA4 Google Analytics 4

Google Tag Manager GA4 Revenue eCommerce Tracking in PrestaShop

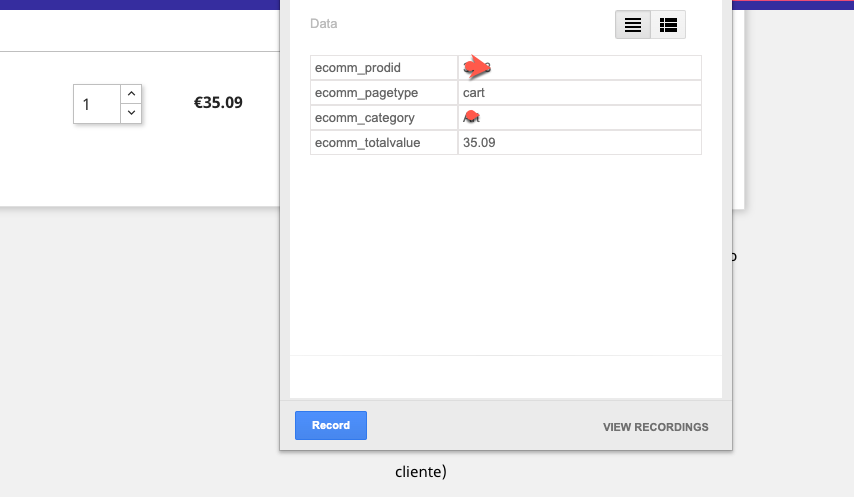
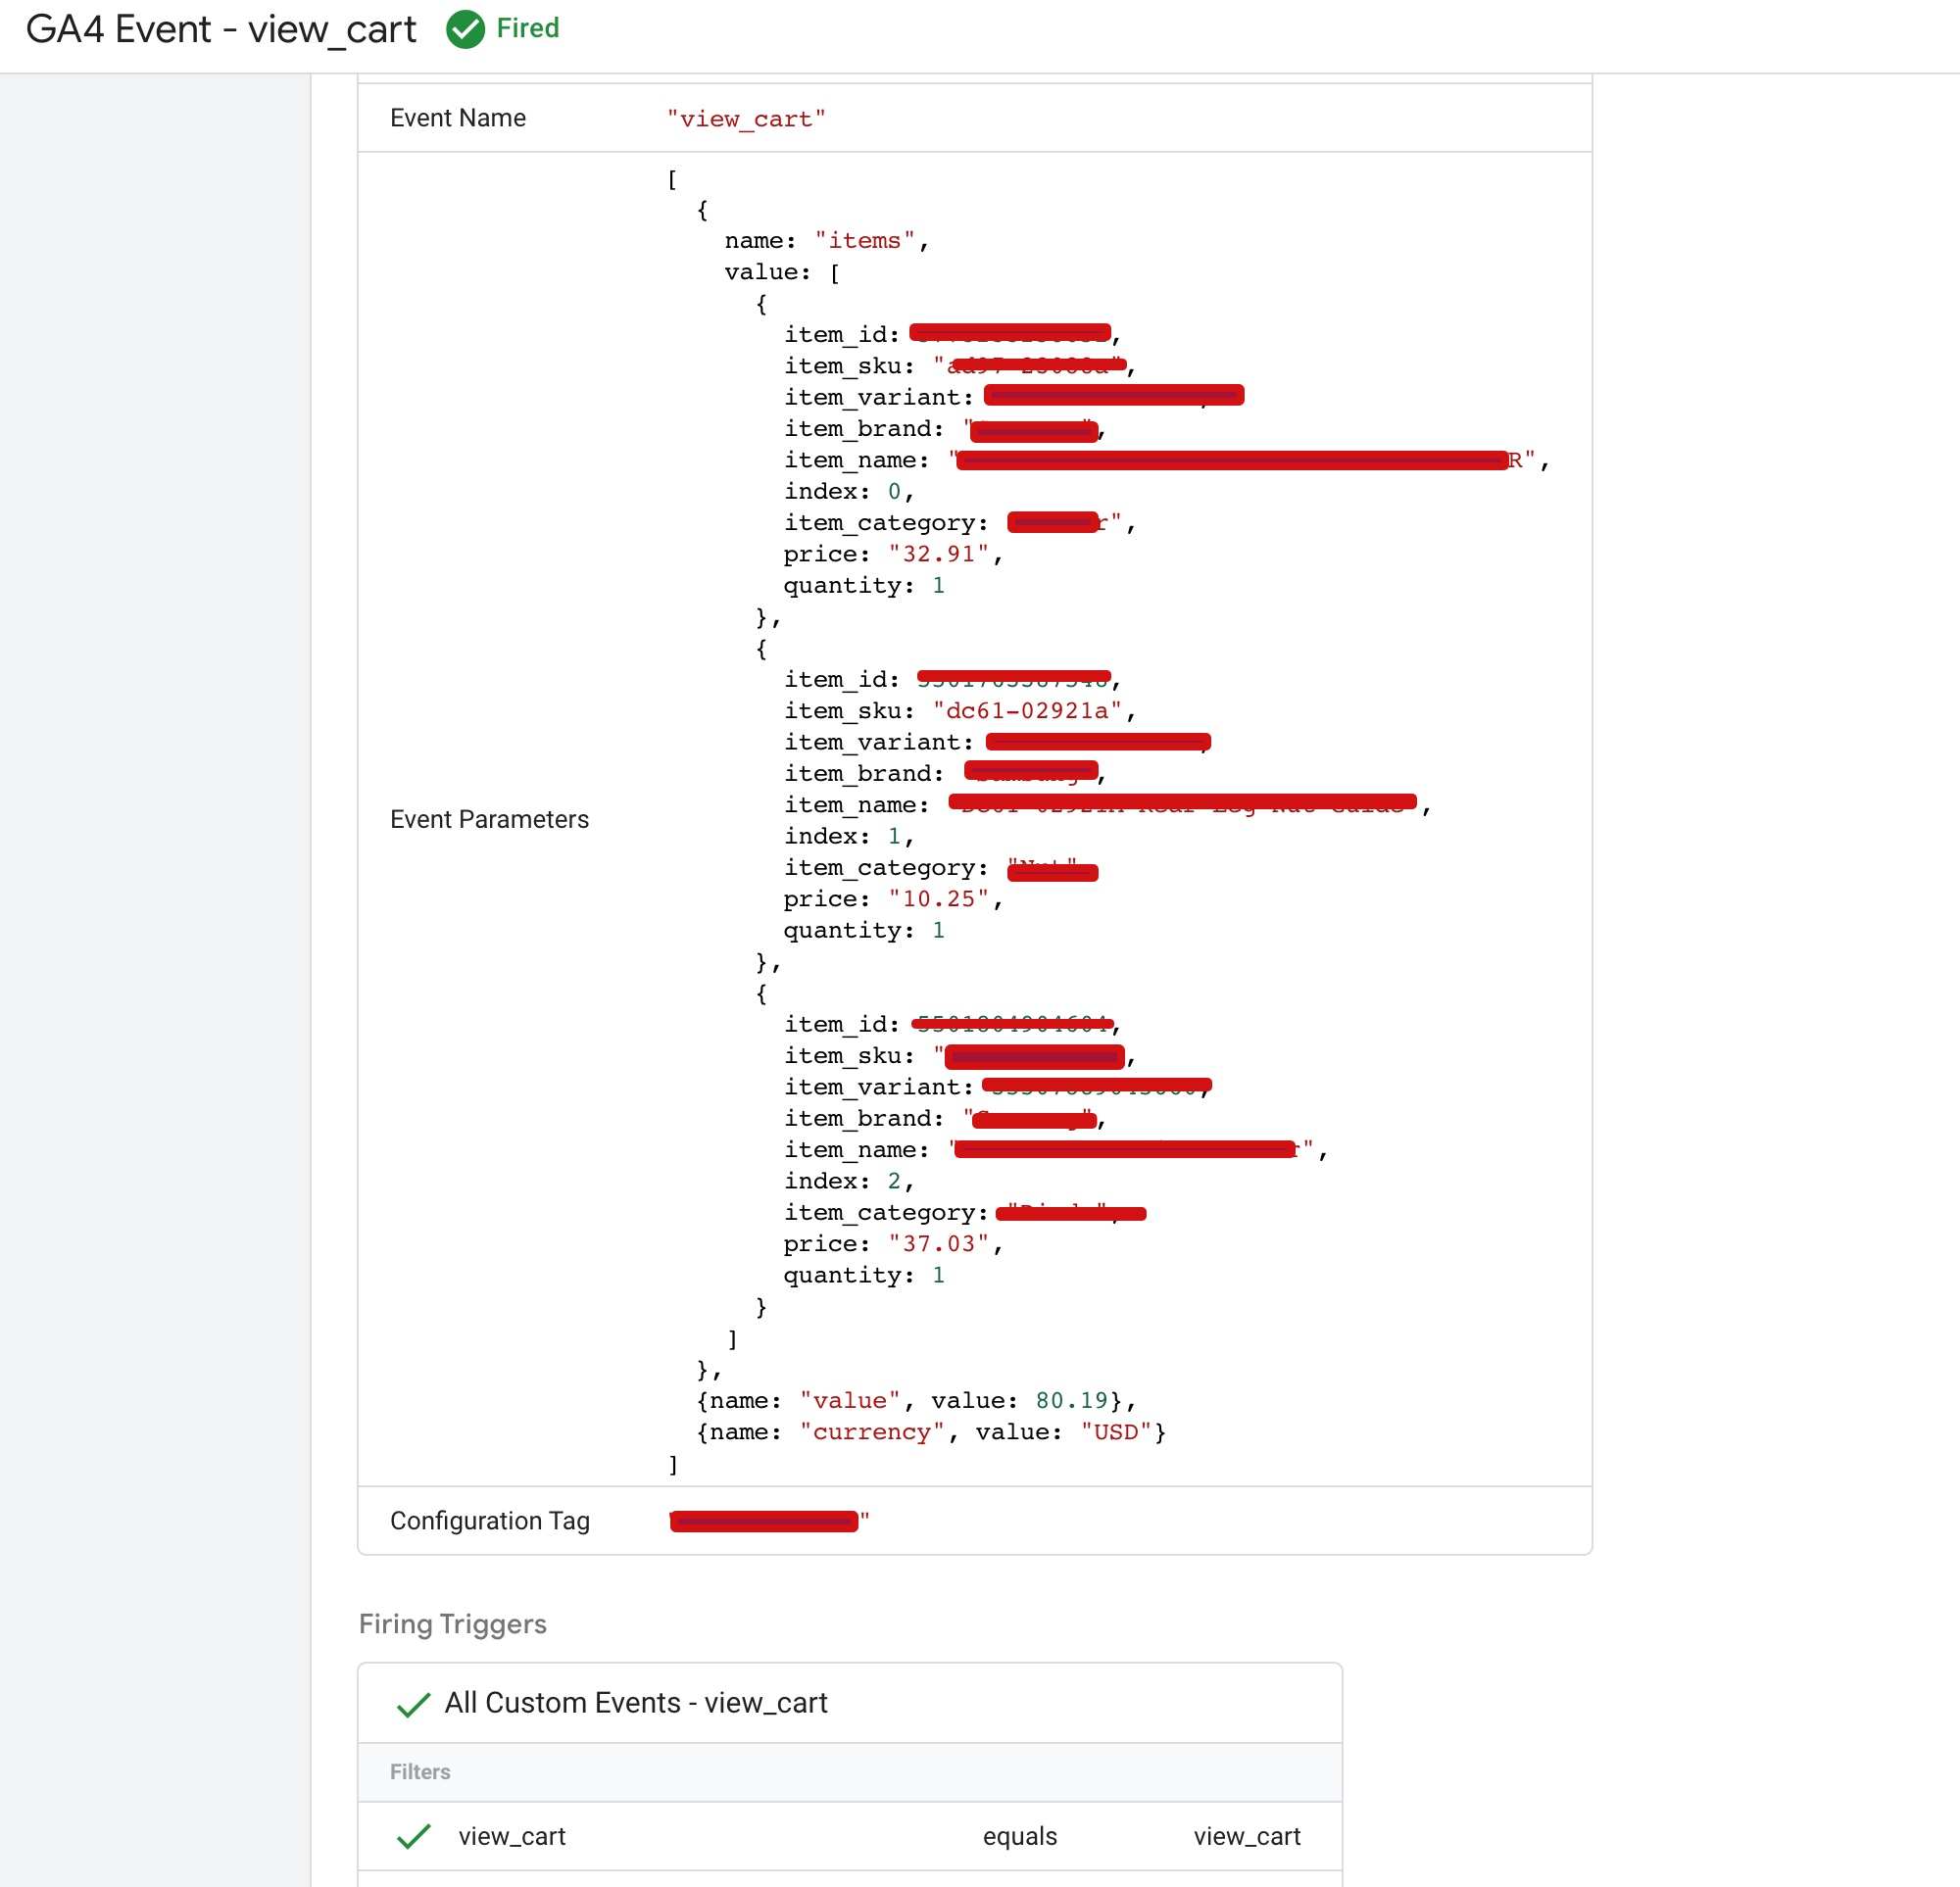
The “view_cart” event in GA4 ecommerce tracking is used to track when a user views their shopping cart on your website. This event is typically triggered when a user clicks on the shopping cart icon or navigates to the cart page.

Prestashop (GA4) eCommerce Tracking

Google Tag Manager Prestashop (GA4) Enhanced Ecommerce for GA4

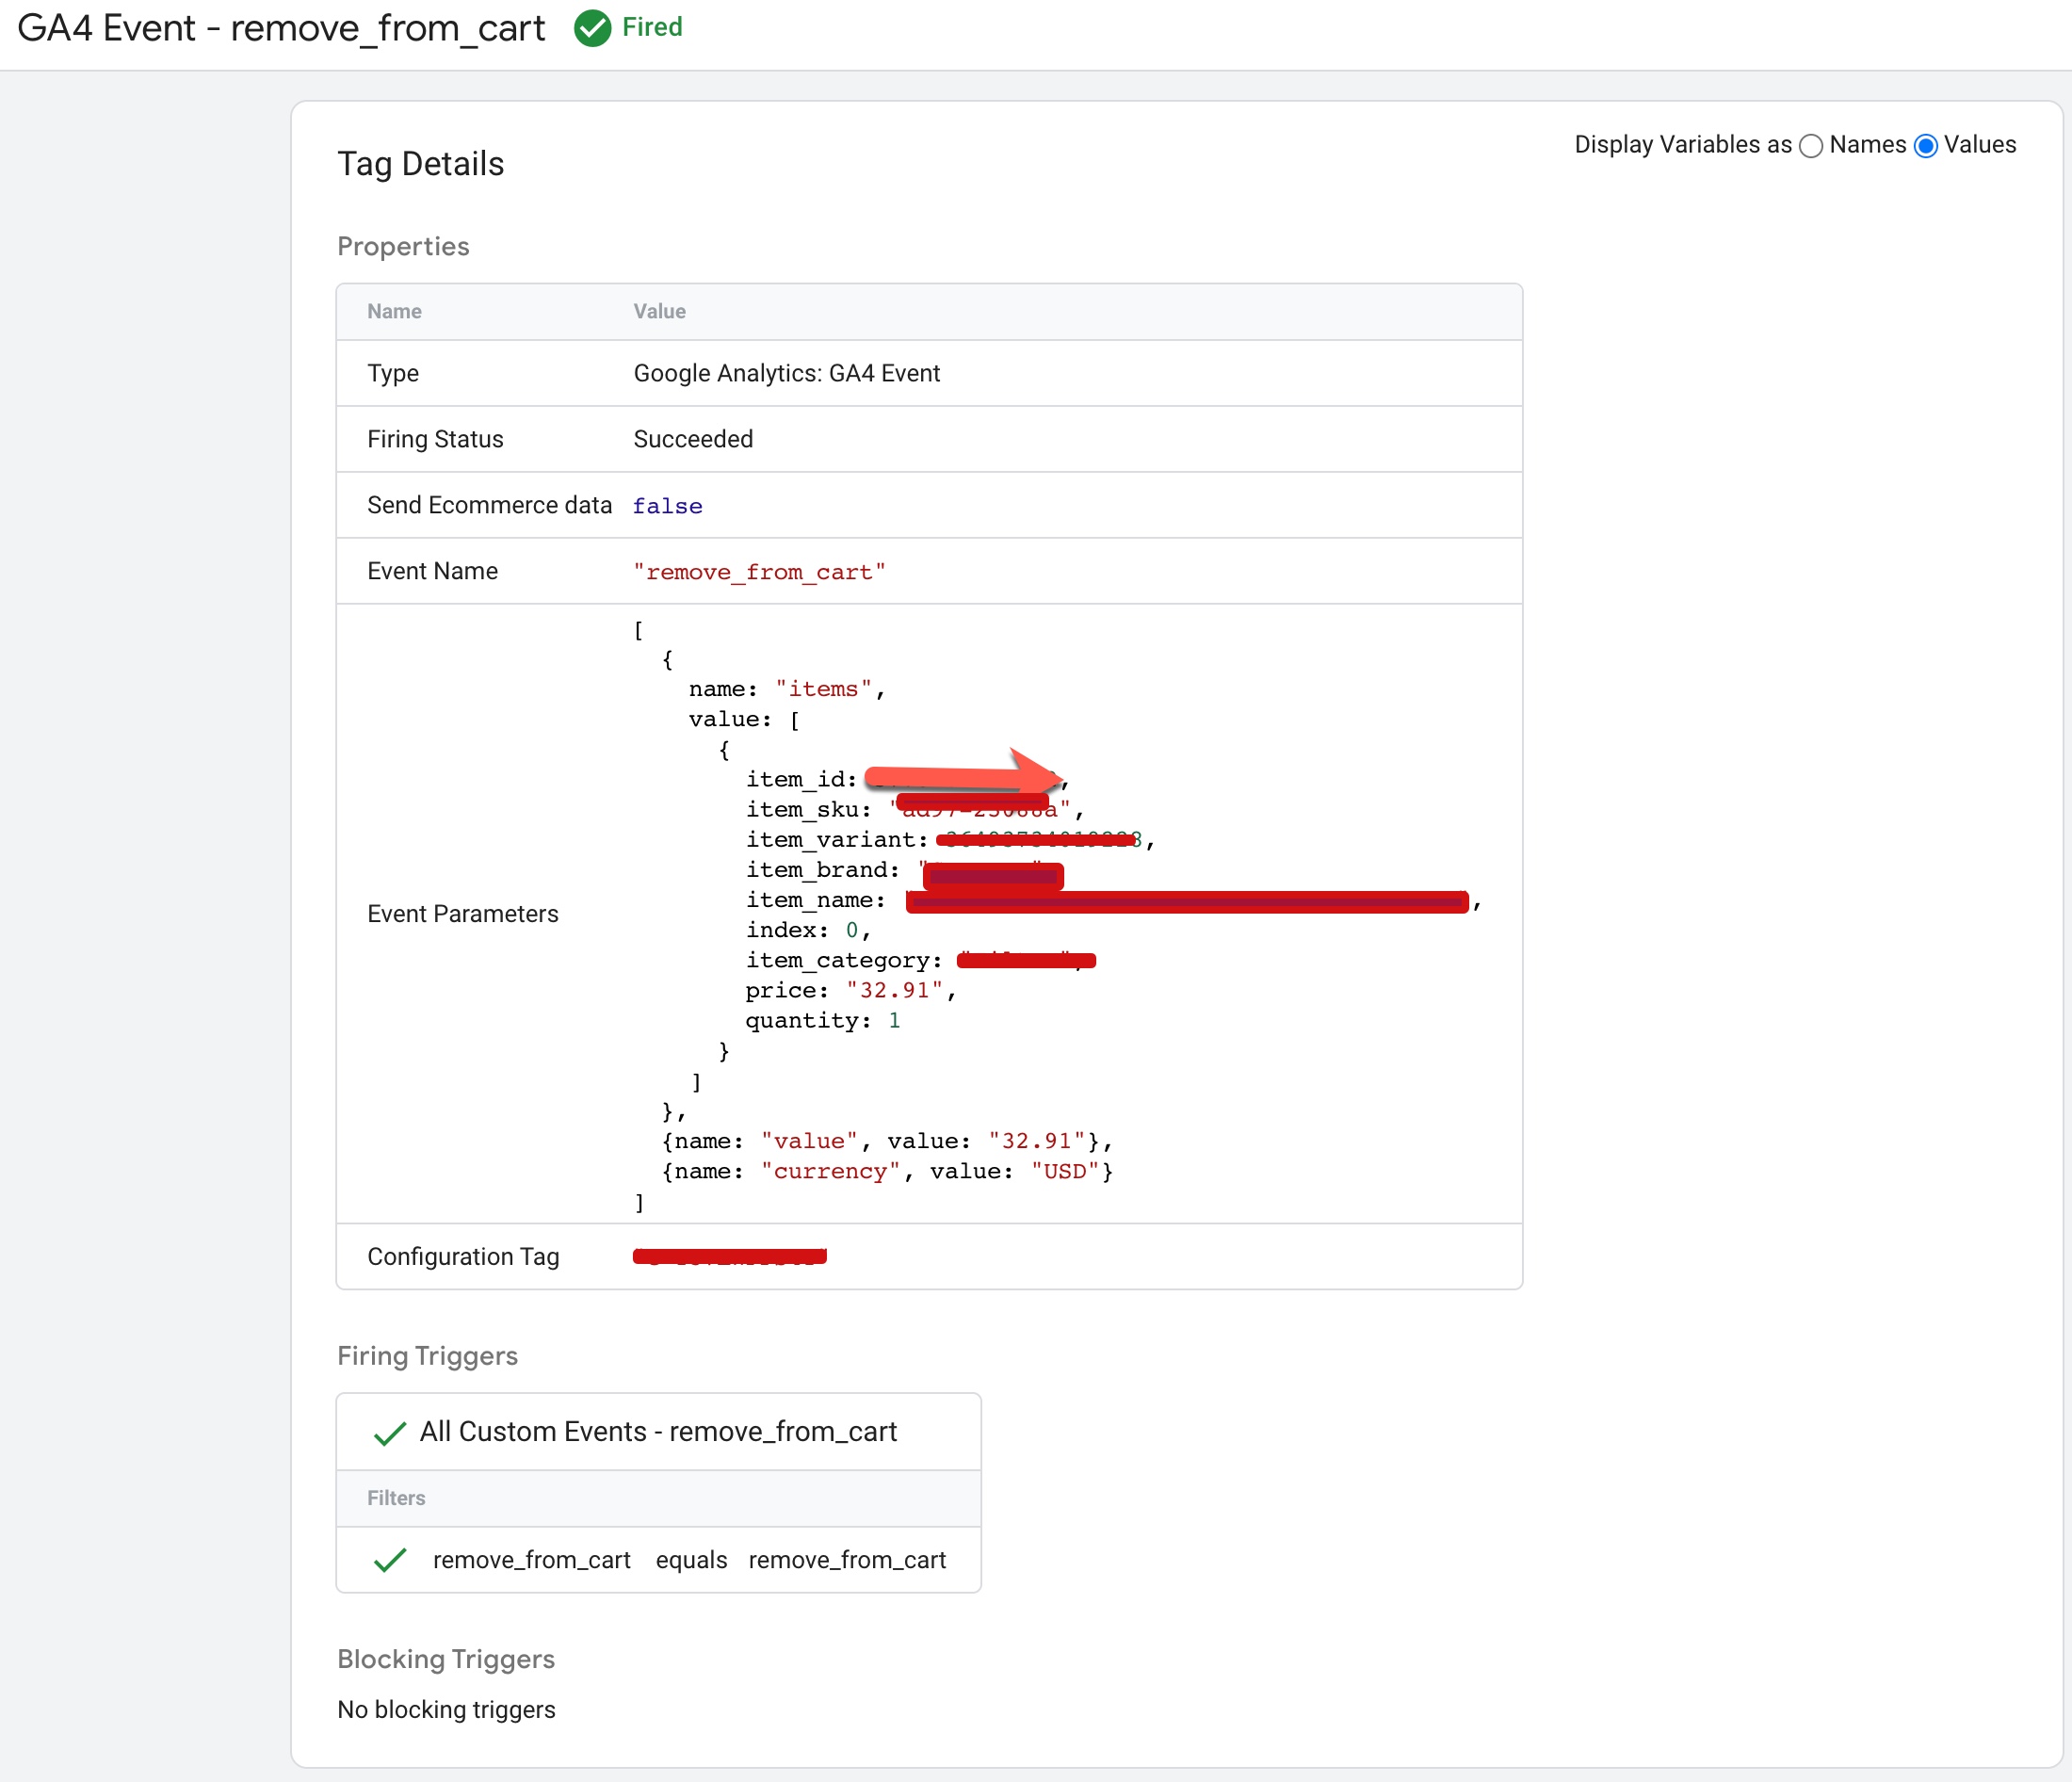
The “remove_from_cart” event in GA4 ecommerce tracking is used to track when a user removes an item from their shopping cart on your website. This event is typically triggered when a user clicks on the “remove” button next to an item in their cart.

GA4 Prestashop Google Tag Manager

PrestaShop Enhanced eCommerce for Advanced Google Analytics 4 (GA4) using Google Tag Manager

The “begin_checkout” event in GA4 ecommerce tracking is used to track when a user begins the checkout process on your website. This event is triggered when a user clicks on the “checkout” button on your website’s shopping cart or basket page.

Google Analytics 4 Migration Prestashop

Google Analytics 4 (GA4) With Google Tag Manager For Prestashop

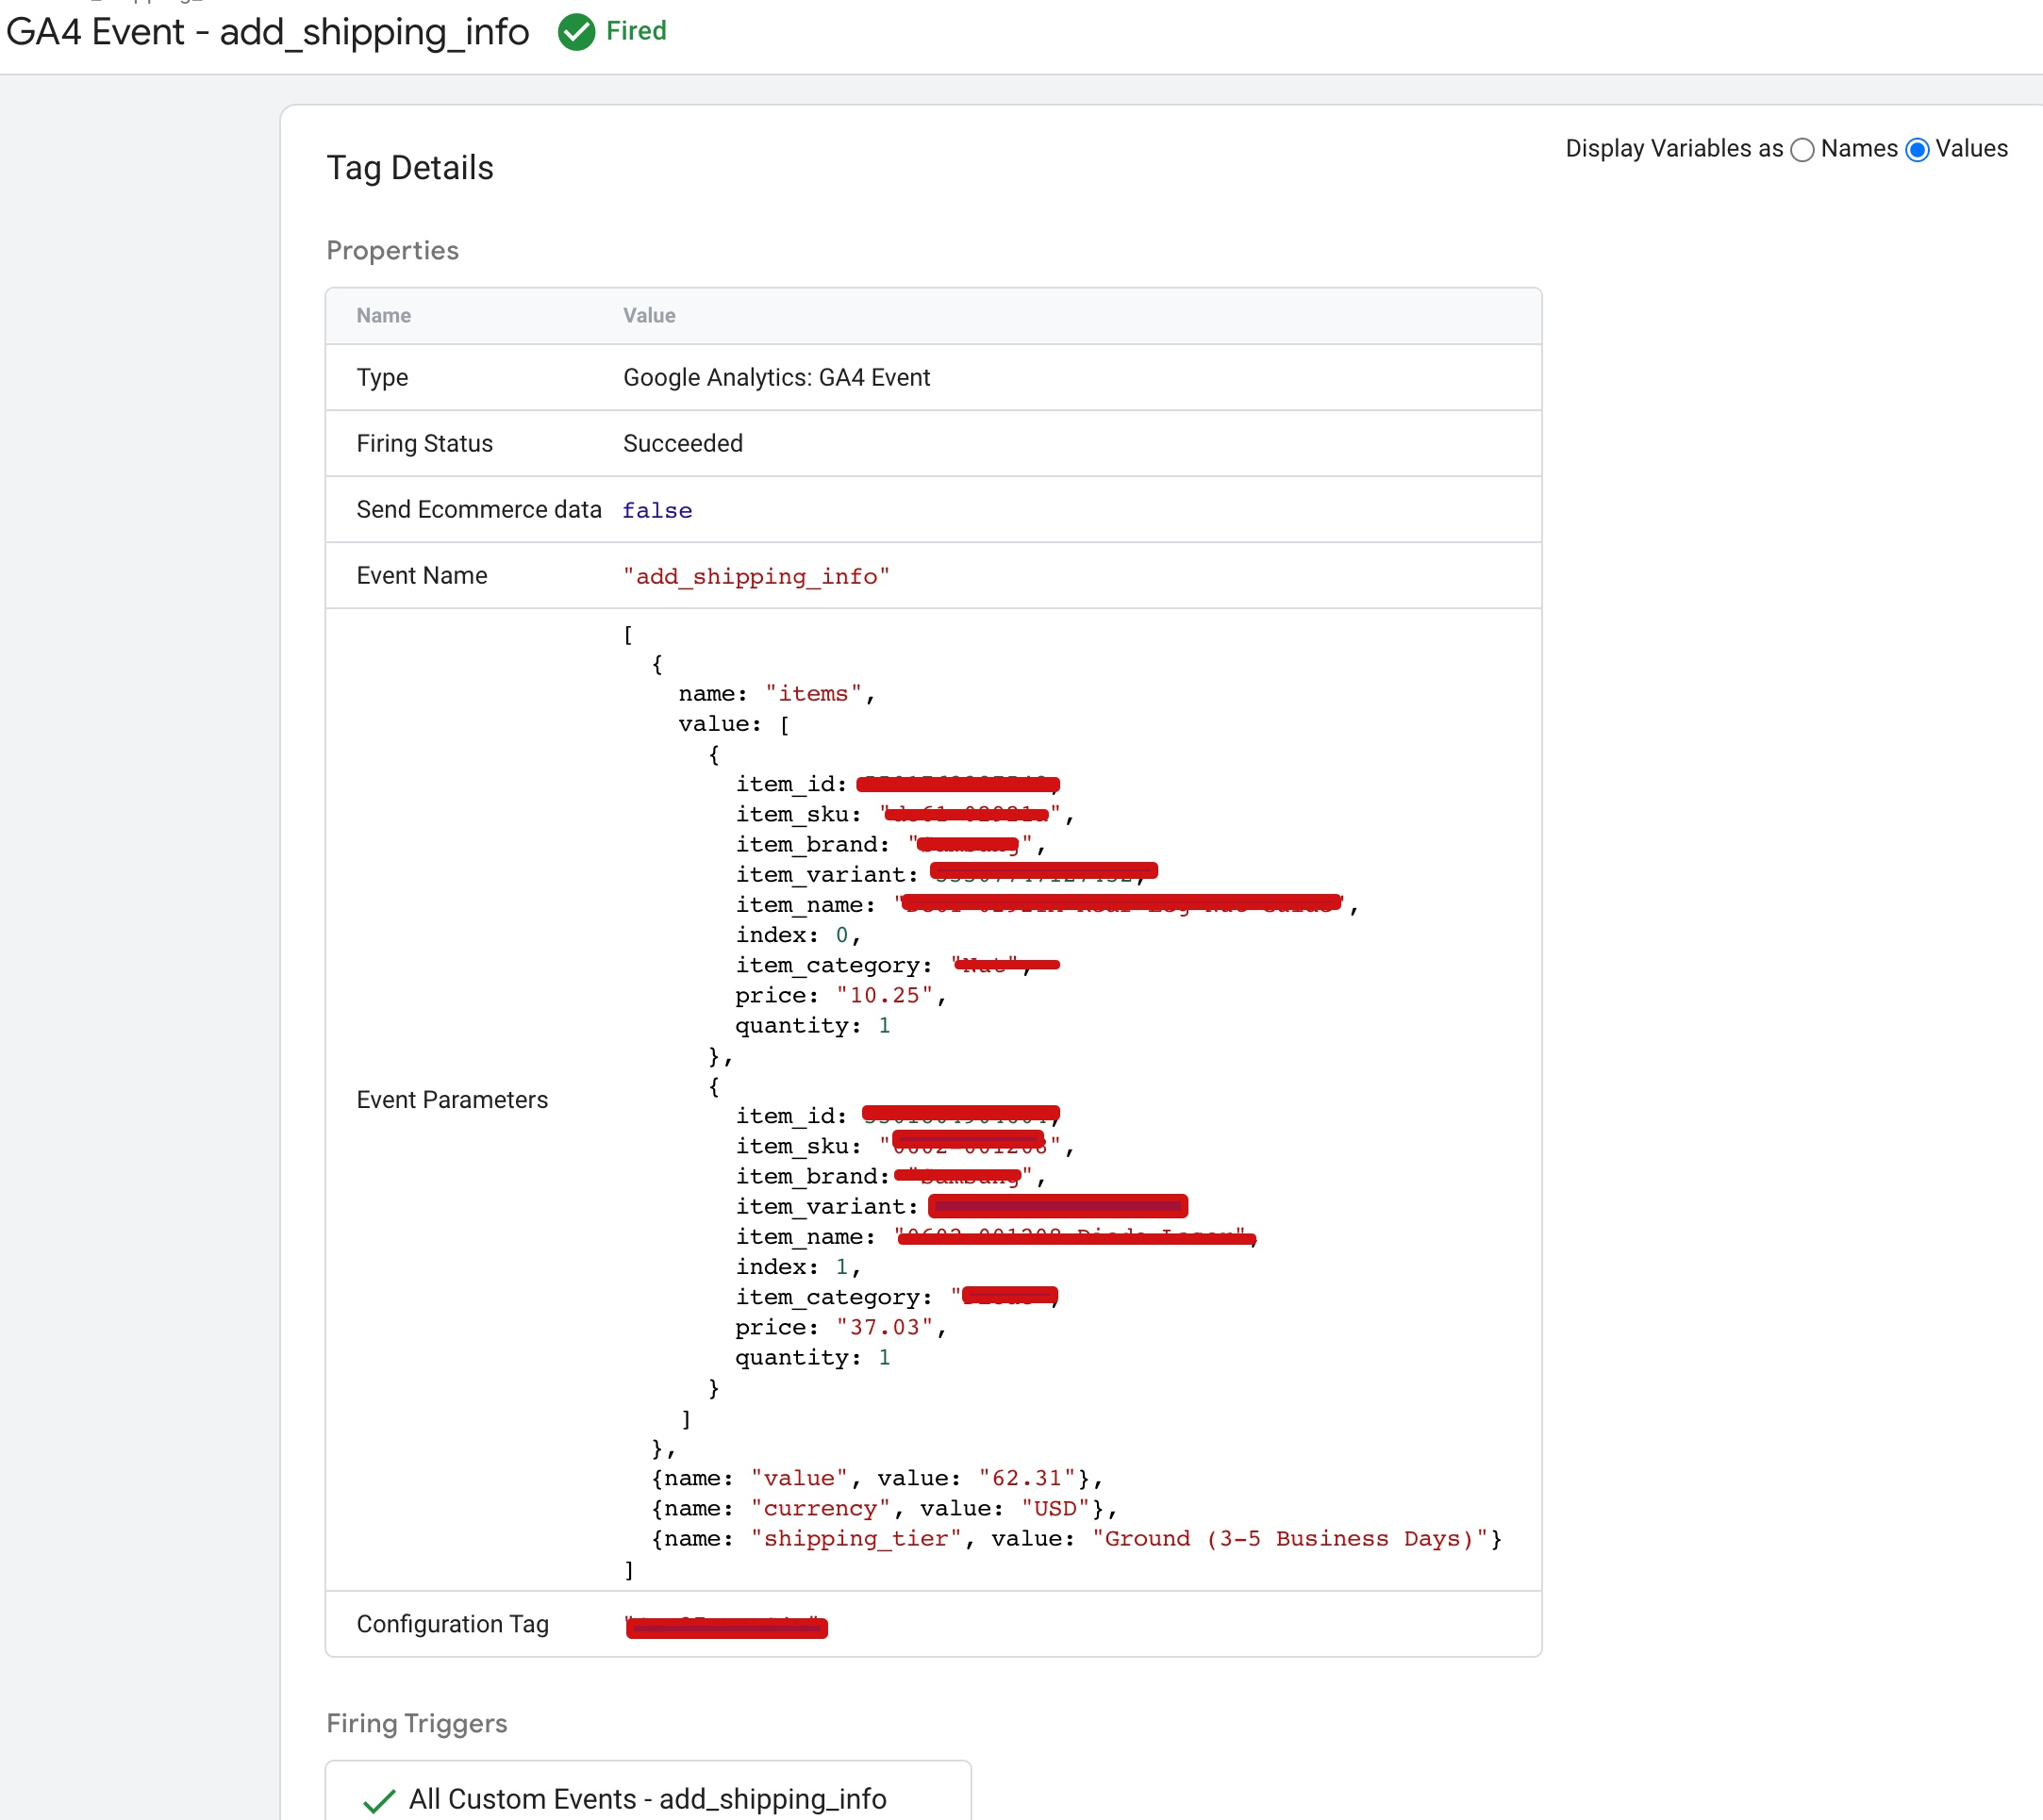
The “add_shipping_info” event in GA4 ecommerce tracking is used to track when a user enters their shipping information during the checkout process on your website. This event is triggered when a user fills in the shipping address and other relevant details on the shipping information page.

Setup PrestaShop GA4 (Google Analytics 4)

Connect Google Analytics 4 (GA4) to PrestaShop eCommerce Tracking

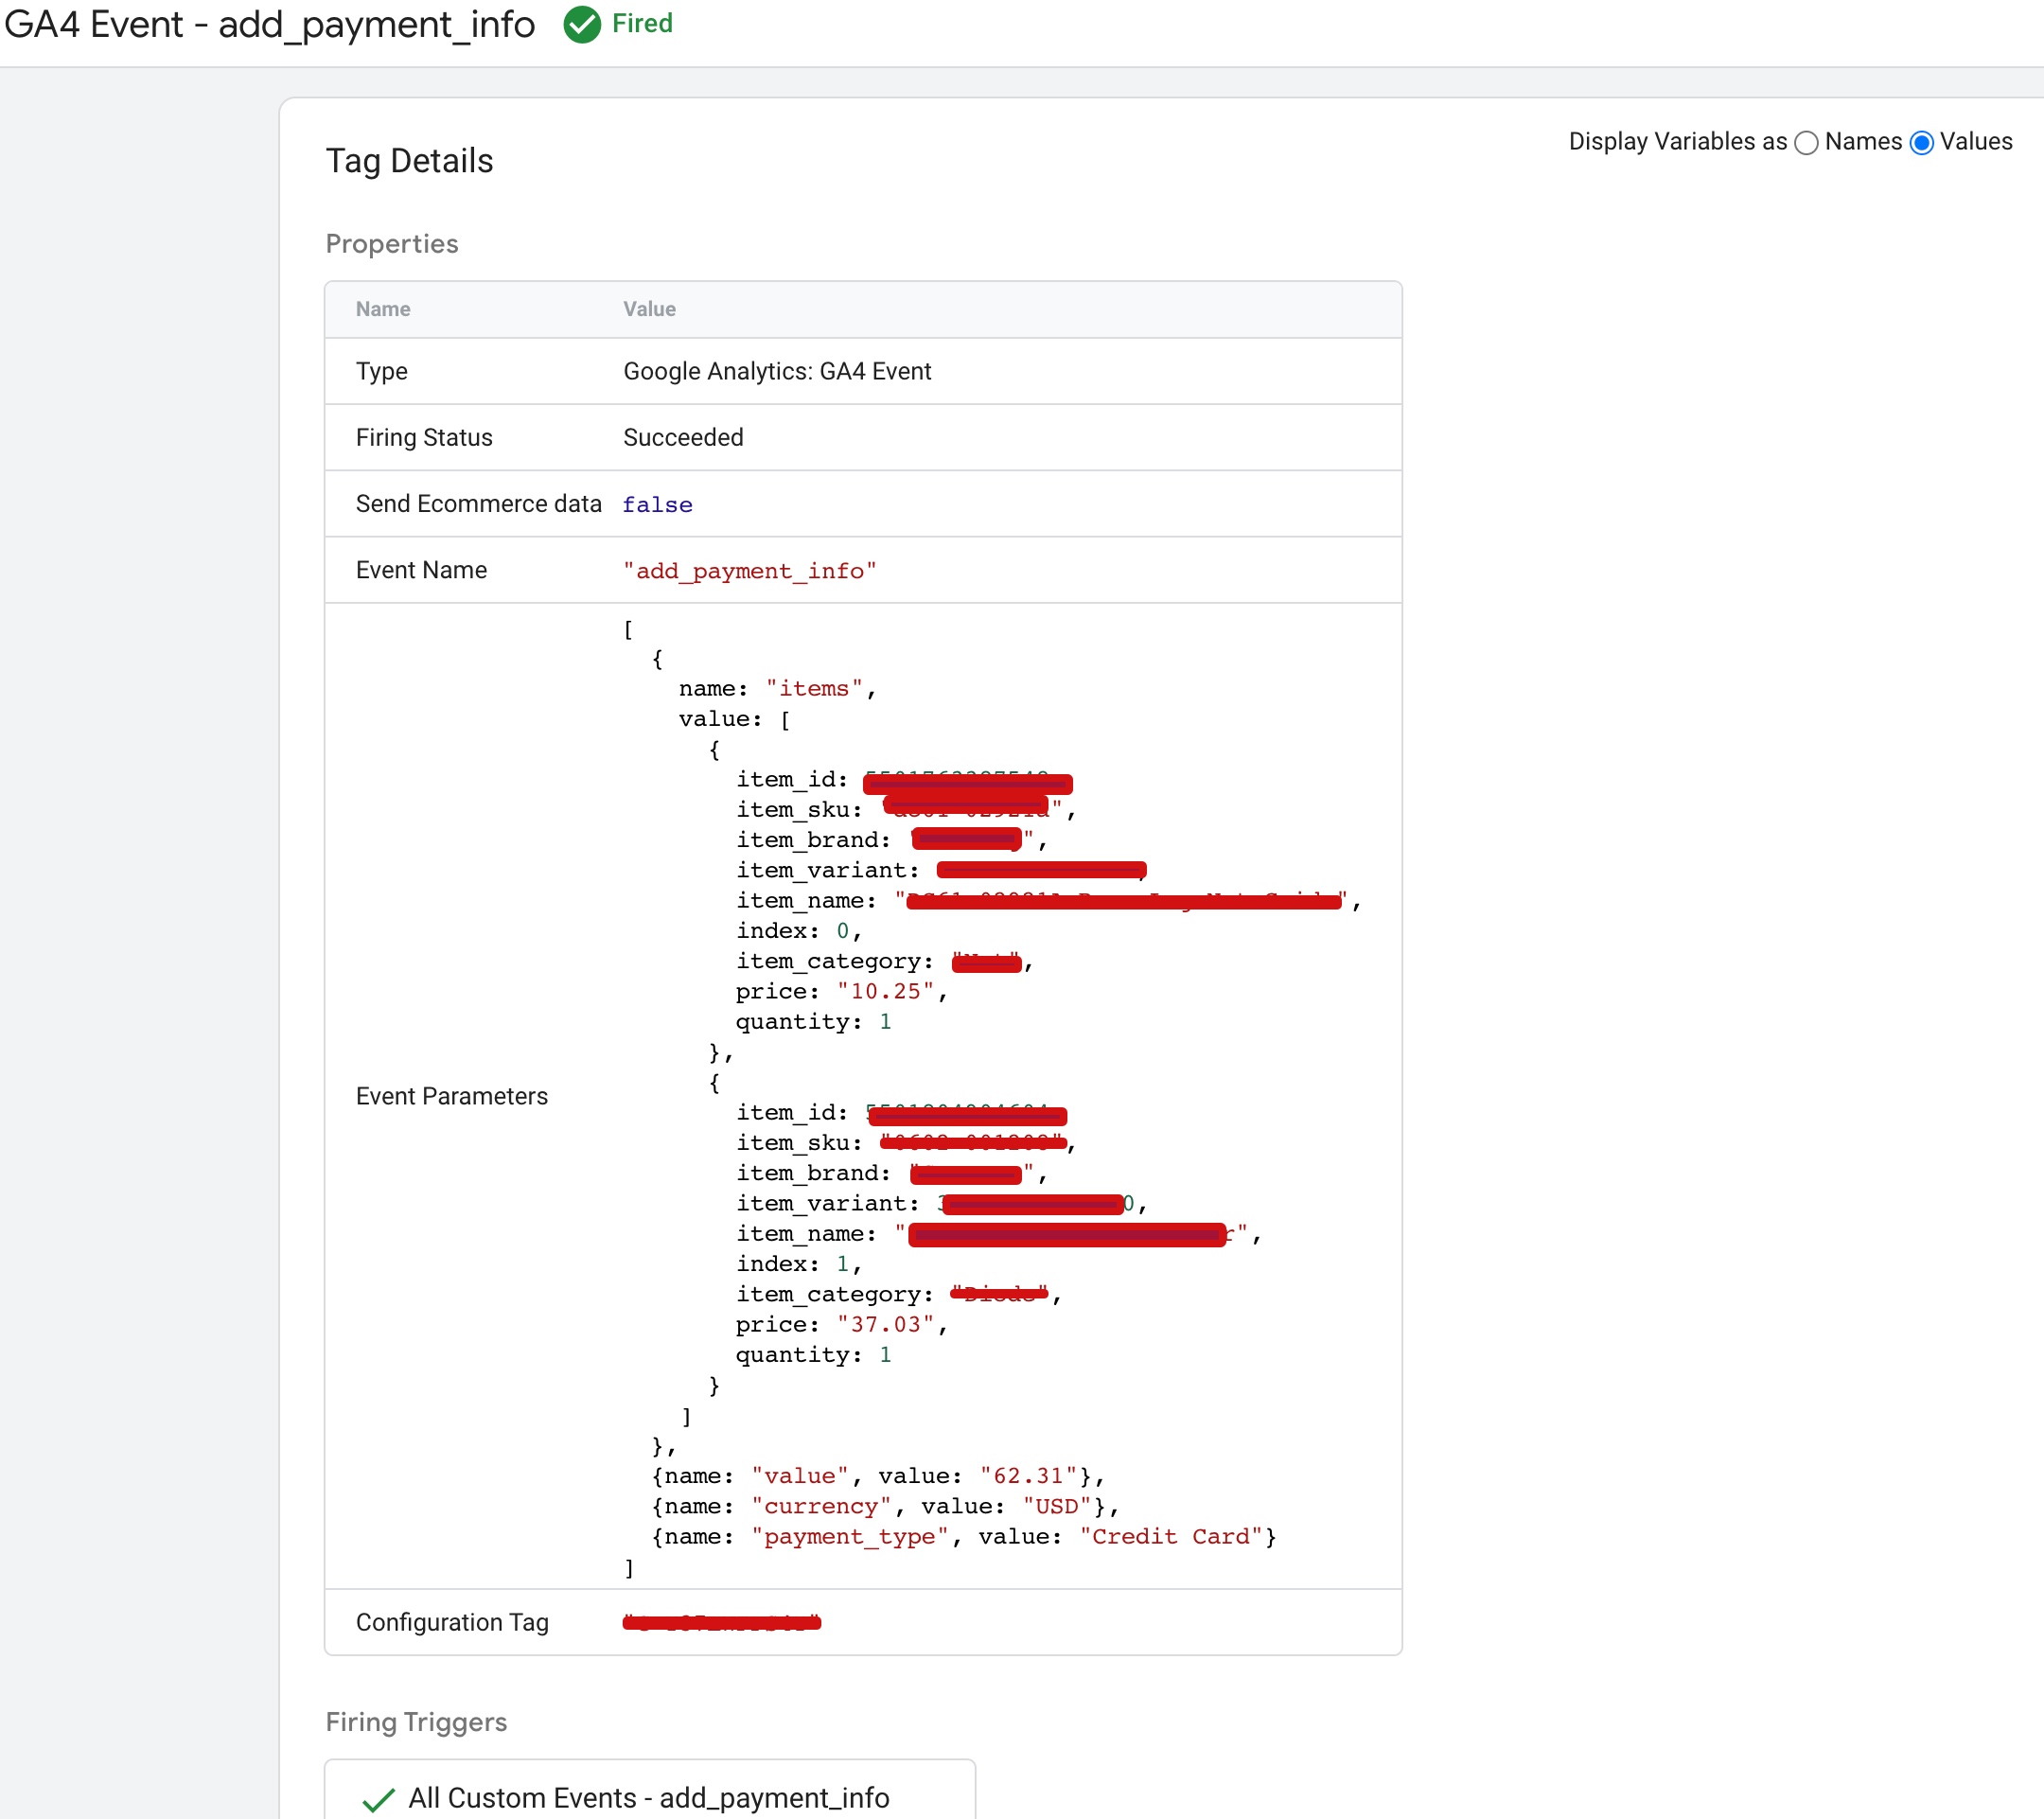
The “add_payment_info” event in GA4 ecommerce tracking is used to track when a user enters their payment information during the checkout process on your website. This event is triggered when a user fills in their payment details on the payment information page.

Integrate GA4 with Your PrestaShop

Google Analytics (GA4) Integration with PrestaShop using Google Tag Manager

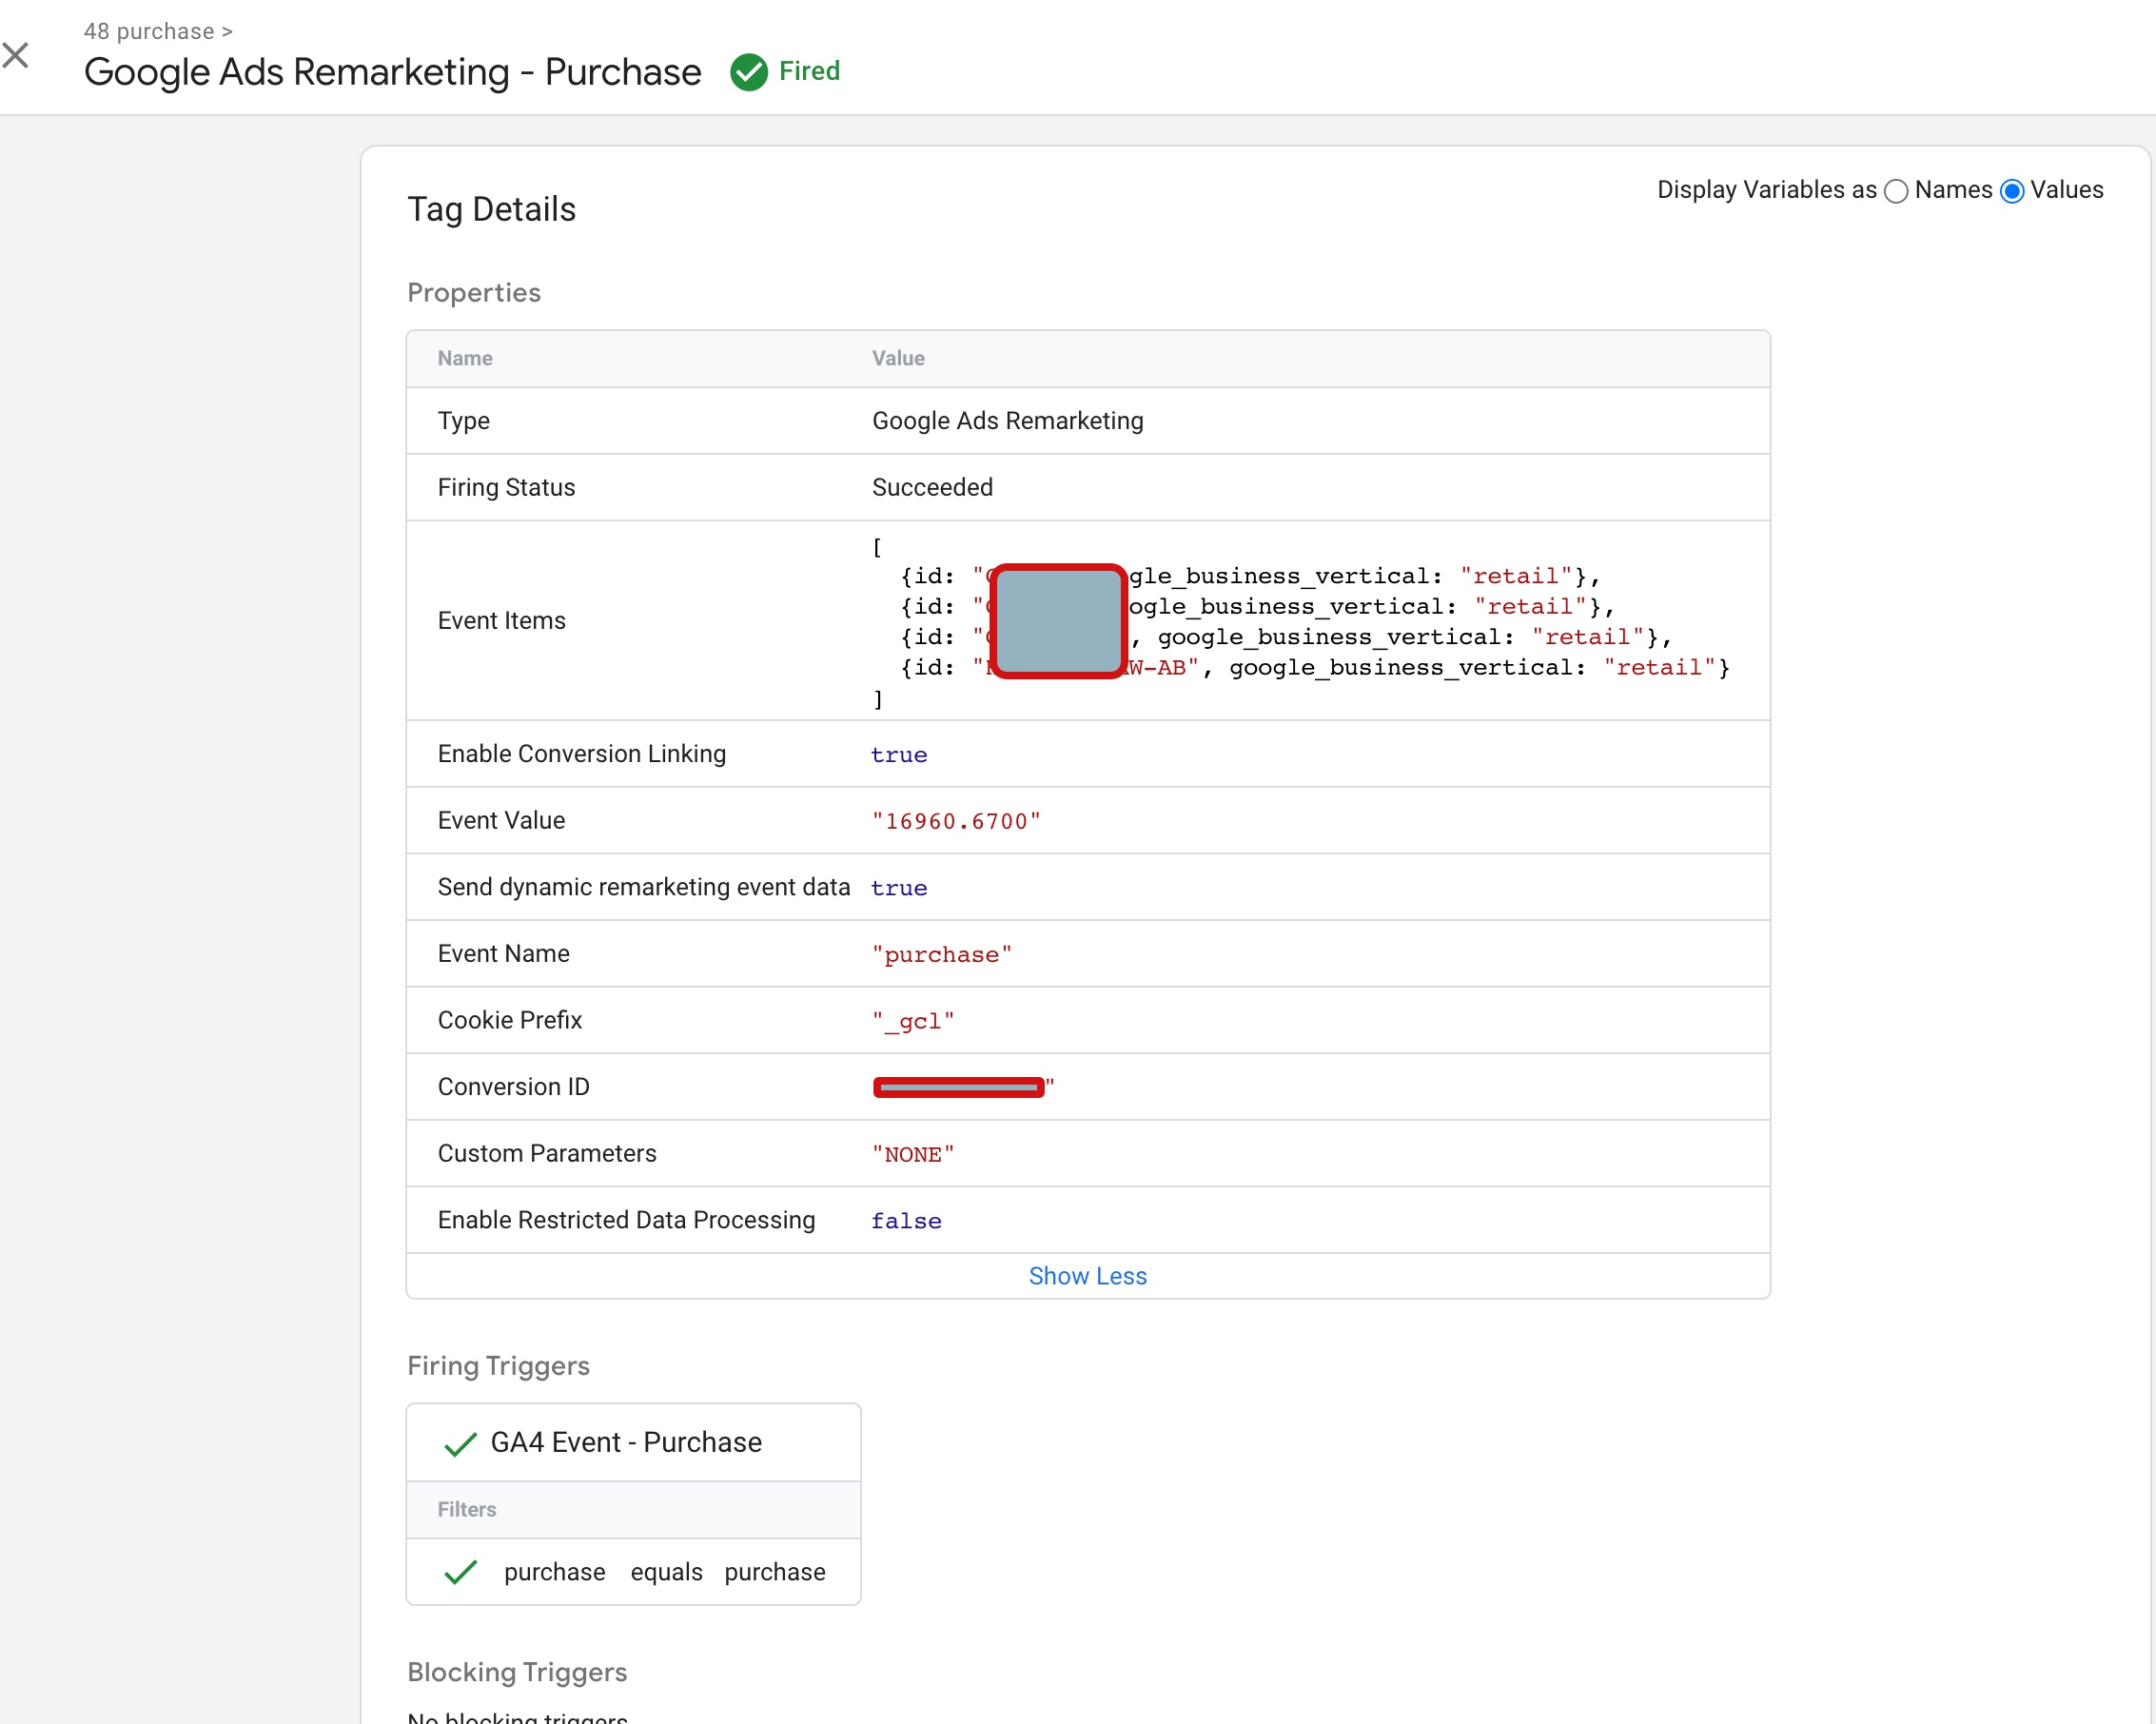
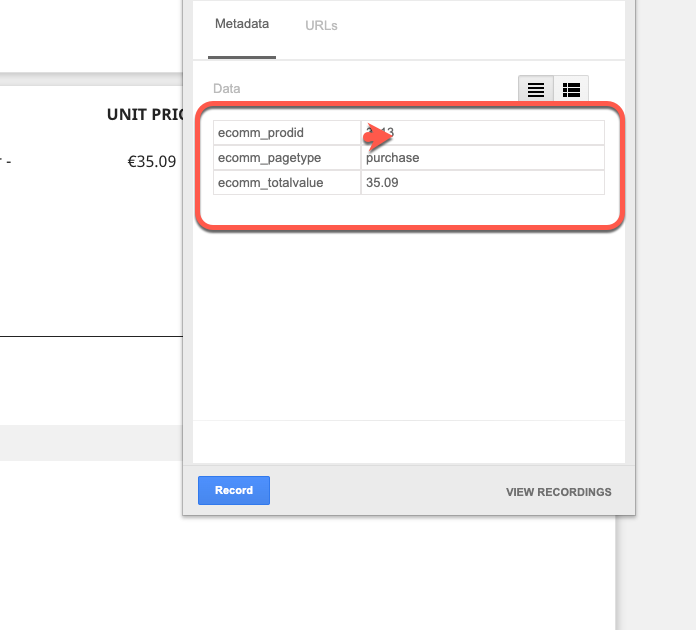
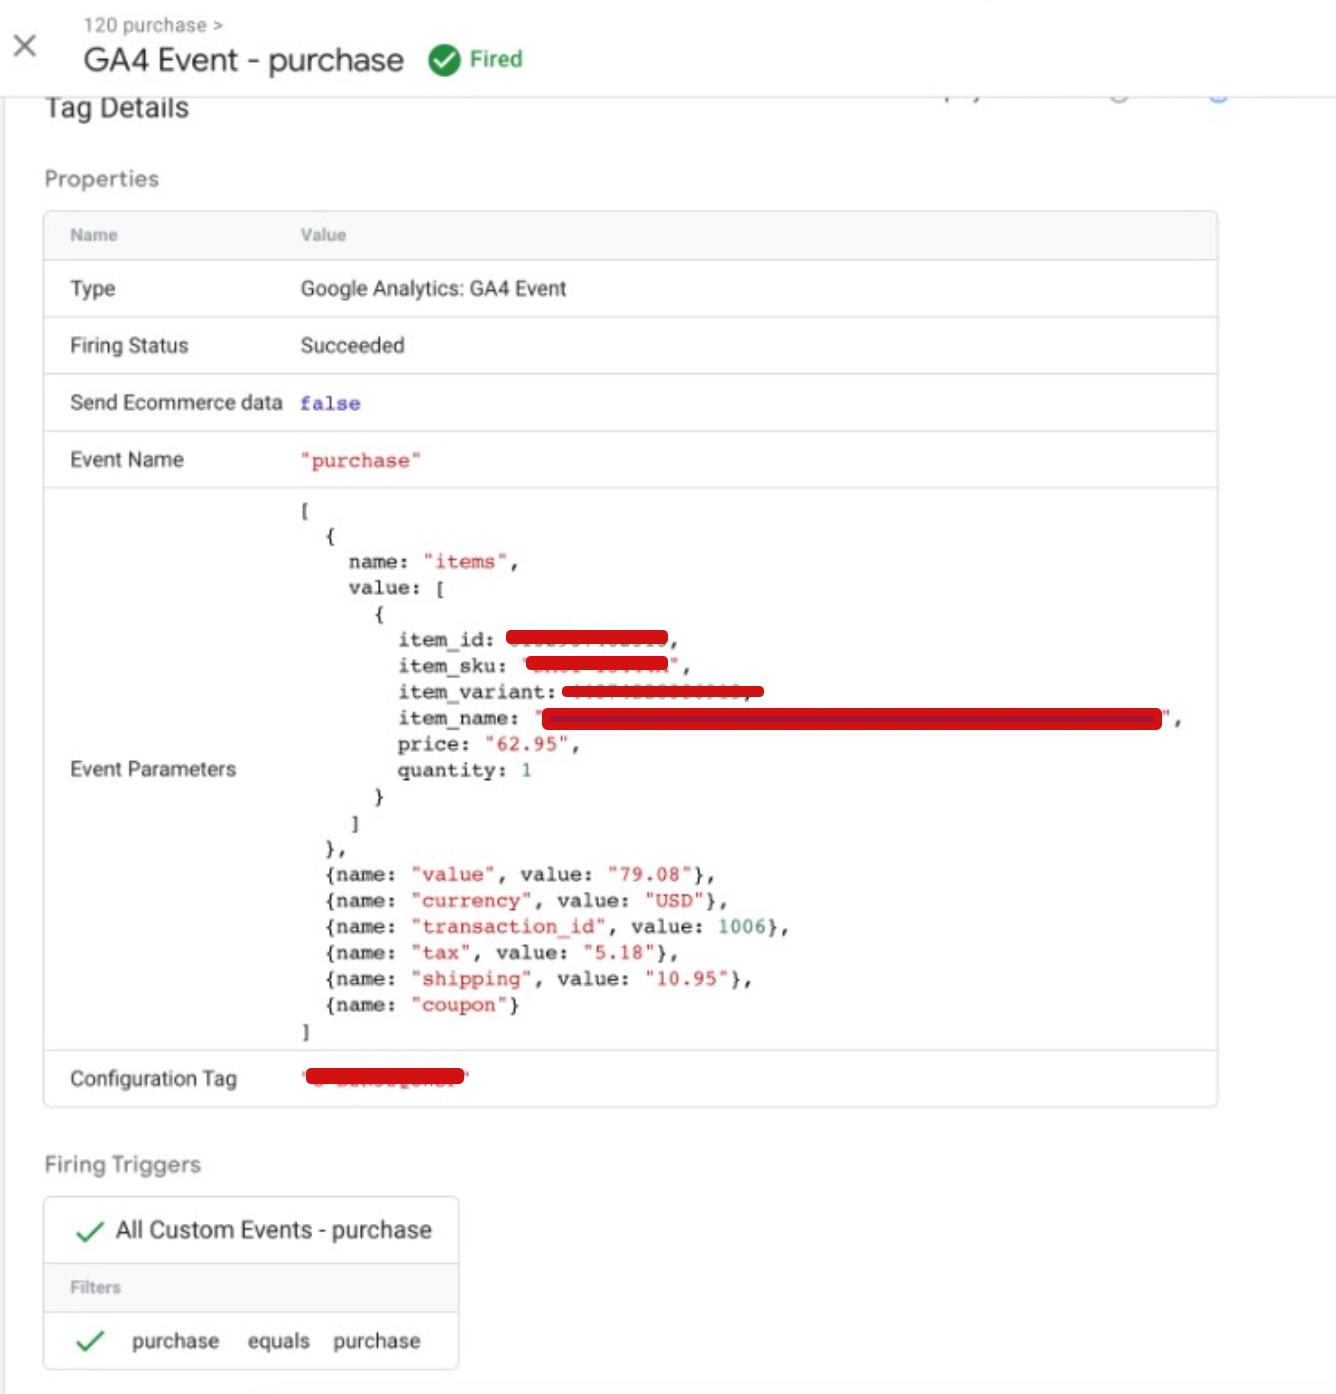
The “purchase” event in GA4 ecommerce tracking is used to track when a user completes a purchase on your website. This event is triggered when the user has successfully submitted payment for their order.

Google Analytics 4 (GA4) Setup for PrestaShop

Tracking Prestashop with Google Analytics 4 (GA4) Enhanced Ecommerce using Google Tag Manager

Warning: If you don’t know about javascript or don’t have developing knowledge then don’t try to Prestashop Google Analytic 4 (GA4) eCommerce Tracking using Google Tag Manager that can break your site, Cart and other functionality 

Disclaimer: Google tag manager belongs to Google property 

For Contact: mappchero@gmail.com

I am available for Hire on Freelancer: Freelancer.com

I am available for Hire on Upwork: Upwork.com

I am available for Hire on Peopleperhour: Peopleperhour.com

I am available for Hire on Guru: Guru.com

Pestashop Google Ads Dynamic Remarketing Tags

Standard

Prestashop is an open-source e-commerce platform that allows businesses to create and manage an online store. It is a popular platform that is used by many businesses to sell their products online. Google Ads is an advertising platform that allows businesses to create and display ads on Google’s search engine and partner sites. Dynamic remarketing is a feature in Google Ads that allows businesses to show personalized ads to people who have previously visited their website or app.

Prestashop Google Ads Dynamic Remarketing Tags are a set of code snippets that need to be added to the Prestashop store’s pages in order to enable dynamic remarketing with Google Ads. These tags allow Google Ads to collect data about the products that people are viewing on the Prestashop store and use this data to show personalized ads to them on the Google Display Network.

The process of setting up Prestashop Google Ads Dynamic Remarketing Tags involves a few steps. First, the business needs to have a Google Ads account set up and linked to their Prestashop store. They also need to have enabled the Google Ads dynamic remarketing feature. Once these prerequisites are met, they can proceed with the following steps.

Install the Google Ads remarketing tag: The first step is to install the Google Ads remarketing tag on the Prestashop store. This involves copying the code provided by Google Ads and pasting it into the Prestashop store’s header section. The remarketing tag is a piece of JavaScript code that allows Google Ads to track the people who visit the store.

Add the product ID to the tag: The next step is to modify the Google Ads remarketing tag to include the product ID of the products that people view on the store. This is important because it allows Google Ads to collect data about the products that people are interested in and use this data to show personalized ads to them.

Add the product details to the tag: In addition to the product ID, businesses can also add other product details such as the product name, category, and price to the Google Ads remarketing tag. This information is useful for creating more personalized ads.

Configure the Google Ads campaign: Once the Google Ads remarketing tag is set up on the Prestashop store, the business needs to configure the Google Ads campaign. This involves setting up the targeting options, ad format, and ad content. The ads can be customized to show the products that people have viewed on the Prestashop store, as well as other related products.

By using dynamic remarketing with Google Ads, businesses can show highly relevant ads to people who have already shown an interest in their products. This can help increase conversions and drive more sales for the business. The personalized nature of the ads can also help build brand loyalty and keep people coming back to the store.

In addition to the benefits mentioned above, Prestashop Google Ads Dynamic Remarketing Tags offer several other advantages. For example:

Easy to set up: Setting up the Google Ads remarketing tag on a Prestashop store is relatively easy and can be done by anyone with basic technical knowledge.

Cost-effective: Dynamic remarketing with Google Ads can be a cost-effective way to drive more sales for the business. Since the ads are only shown to people who have already shown an interest in the products, the likelihood of conversion is higher.

Customizable: The ads can be customized to show the products that people have viewed on the Prestashop store, as well as other related products. This allows businesses to tailor the ads to the interests of the people who are most likely to convert.

In conclusion, Prestashop Google Ads Dynamic Remarketing Tags are an important tool for businesses that want to increase sales and build brand loyalty. By using dynamic remarketing with Google Ads, businesses

The Prestashop Dynamic Remarketing Tag view_item_list is a code snippet that can be added to a Prestashop store to track when a user views a list of products on a page. This tag is used in dynamic remarketing campaigns to collect data about the products that users have viewed and use this data to show personalized ads to them on the Google Display Network.

Dynamic Remarketing Google Ads

Google Dynamic Remarketing for PrestaShop using Google Tag Manager

The Prestashop Dynamic Remarketing Tag view_item is a code snippet that can be added to a Prestashop store to track when a user views a specific product on a page. 

Google Dynamic Remarketing Tag for Prestashop

Prestashop Google Ads Dynamic Remarketing Tag Implementation using Google Tag Manager

The Prestashop Dynamic Remarketing Tag add_to_cart is a code snippet that can be added to a Prestashop store to track when a user adds a product to their cart.

PrestaShop Dynamic Remarketing Google Ads

Google Dynamic Remarketing Tag for PrestaShop using Google Tag Manager

The Prestashop Dynamic Remarketing Tag purchase is a code snippet that can be added to a Prestashop store to track when a user makes a purchase.

Warning: If you don’t know about javascript or don’t have developing knowledge then don’t try to Pestashop Google Ads Dynamic Remarketing Tags using Google Tag Manager that can break your site, Cart and other functionality 

Disclaimer: Google tag manager belongs to Google property 

For Contact: mappchero@gmail.com

I am available for Hire on Freelancer: Freelancer.com

I am available for Hire on Upwork: Upwork.com

I am available for Hire on Peopleperhour: Peopleperhour.com

I am available for Hire on Guru: Guru.com

Prestashop Google Analytics 4 (GA4) eCommerce Tracking without addons/Modules/Plug in

Standard

Prestashop eCommerce Tracking in Google Analytics 4 (GA4) without addons using Google Tag Manager

To track Prestashop eCommerce events in Google Analytics 4 using data layer variables and Google Tag Manager (GTM) without using modules or plugins, you can set up a custom GTM container that captures data layer variables from your Prestashop site and uses them to send relevant events to GA4 using the dataLayer.push() method.

You will need to create data layer variables for capturing information on product details, add-to-cart actions, and purchase transactions, and use them in your GTM tags to send the appropriate events and parameters to GA4. Make sure to include your GA4 Measurement ID in your GTM container to ensure that your events are sent to the correct property.

You can then set up triggers to fire your tags on relevant eCommerce events, such as clicks on product detail pages, add-to-cart button clicks, and successful purchases. By setting up your tracking with data layer variables and GTM, you can more easily customize and adjust your tracking without needing to modify your Prestashop theme’s code.

Here are the steps to set up Google Analytics 4 (GA4) Prestashop eCommerce Tracking without using modules or plugins, and with data layer variables and Google Tag Manager (GTM):

  1. Create a GA4 property and obtain your Measurement ID.

2. Create a custom GTM container for your Prestashop site.

3. Set up data layer variables in your Prestashop site for capturing information on product details, add-to-cart actions, and purchase transactions.

4. Add your data layer variables to your GTM container.

5. Set up tags in your GTM container to send the appropriate eCommerce events and parameters to GA4 using the dataLayer.push() method. Use your data layer variables in your tags to capture the relevant information.

6. Create triggers in your GTM container to fire your tags on relevant eCommerce events, such as clicks on product detail pages, add-to-cart button clicks, and successful purchases.

7. Publish your GTM container and verify that your eCommerce tracking is working correctly in GA4.
Customize and adjust your tracking as needed by modifying your data layer variables and GTM tags.

Google Analytics 4 (GA4) with PrestaShop

Prestashop without Addon Google Analytics 4 (GA4) eCommerce Tracking using Google Tag Manager

Warning: If you do n’t know about javascript or do n’t have developing knowledge then do n’t try to Prestashop Google Analytics 4 (GA4) eCommerce Tracking without addons that can broke your site, Cart and other functionality 

Disclaimer: Google tag manager belongs to Google property 

For Contact: mappchero@gmail.com

I am available for Hire on Freelancer: Freelancer.com

I am available for Hire on Upwork: Upwork.com

I am available for Hire on Peopleperhour: Peopleperhour.com

I am available for Hire on Guru: Guru.com

Advance Facebook Conversion Tracking for PrestaShop using Google Tag Manager

Standard

Advance Facebook Conversion Tracking for PrestaShop using Google Tag Manager without any plugins

Recently, one of client as me to implement Standard Advance Facebook Conversion pixel for PrestaShop to run dynamic ads using Google Tag Manager without any plugins, To Work Facebook Dynamic Ads to pass custom dynamic parameters match to work dynamic Facebook based content_id.

content_category —–>String —–>Category of the page/product for PrestaShop

content_name —–>String —–> Name of the page of product for PrestaShop

content_type —–>String —–> It should be product for PrestaShop

currency —–>String —–> value of Currency of PrestaShop

value —–>Integer or float —–> Amount of product , Cart and Purchase order confirmation for PrestaShop

Step 1: Install Google Tag Manager on Advance Facebook Conversion Tracking for PrestaShop using Google Tag Manager without any plugins

Paste this code as high in the <head> of the page as possible:
<!– Google Tag Manager –>
<script>(function(w,d,s,l,i){w[l]=w[l]||[];w[l].push({‘gtm.start’:
new Date().getTime(),event:’gtm.js’});var f=d.getElementsByTagName(s)[0],
j=d.createElement(s),dl=l!=’dataLayer’?’&l=’+l:”;j.async=true;j.src=
‘https://www.googletagmanager.com/gtm.js?id=’+i+dl;f.parentNode.insertBefore(j,f);
})(window,document,’script’,’dataLayer’,’GTM-XXXX’);</script>
<!– End Google Tag Manager –>
Additionally, paste this code immediately after the opening <body> tag:
<!– Google Tag Manager (noscript) –>
<noscript><iframe src=”https://www.googletagmanager.com/ns.html?id=GTM-XXXX”
height=”0″ width=”0″ style=”display:none;visibility:hidden”></iframe></noscript>
<!– End Google Tag Manager (noscript) –>

Note: Make you will replace GTM Tracking Code with your GTM ID XXXXX

Step 2Facebook ViewContent Pixel for PrestaShop – When users entered to view a product page for PrestaShop Facebook Conversion Tracking using Google Tag Manager without any plugins 

Facebook Conversion Tracking for PrestaShop

PrestaShop Facebook Event Tracking using Google Tag Manager without any plugins

Step 3 – Facebook AddtoCart Pixel for PrestaShop – When User added to product in Basket in PrestaShop Facebook Pixel using Google Tag Manager without any plugins

Facebook Pixel for Prestashop

Facebook Pixel Prestashop using Google Tag Manager without any plugins

Step 4Facebook InitiateCheckout Pixel for PrestaShop –  When user started process order and entered in InitiateCheckout Process for PrestaShop Facebook Conversion Tracking using Google Tag Manager without any plugins 

Facebook Conversion Tracking Pixel for Prestashop

Facebook Pixel Setup without Addon using Google Tag Manager without any plugins 

Step 5Facebook Purchase Pixel for PrestaShop –   When users completed purchased from Facebook Campaign,  Facebook Conversion for PrestaShop using Google Tag Manager without any Plugins

Facebook Retargeting Campaign Setup for Prestashop

Facebook Purchase Conversion Tracking using Google Tag Manager without any plugins for pestahsop

Warning: If you do n’t know about javascript or do n’t have developing knowledge then do n’t try to Setup Facebook Conversion Tracking for PrestaShop using Google Tag Manager for Dynamic Ads without Any Plugins  using Google Tag Manager that can broke your site, Cart and other functionality 

Disclaimer: Google tag manager belongs to Google property 

For Contact: mappchero@gmail.com

I am available for Hire on Freelancer: Freelancer.com

I am available for Hire on Upwork: Upwork.com

I am available for Hire on Peopleperhour: Peopleperhour.com

I am available for Hire on Guru: Guru.com

Google Analytics Enhanced Ecommerce for Prestashop using Google Tag Manager

Standard

Google Analytics Enhanced Ecommerce for Prestashop using Google Tag Manager using Google Tag Manager without any plugins

Recently once client asks me to integrate Enhanced eCommerce tracking for PrestaShop using Google Tag Manager without any plugins, Once I looked website, I asked to client, I require a test order see possibility with Google Tag Manager or not, Once I placed an order on the website, I see the possibility of tracking enhanced eCommerce without touching of the website Code or any plugins.

Step 1: Install Google Tag Manager on Google Analytics Enhanced Ecommerce for Prestashop using Google Tag Manager  without any plugins 

Paste this code as high in the <head> of the page as possible:
<!– Google Tag Manager –>
<script>(function(w,d,s,l,i){w[l]=w[l]||[];w[l].push({‘gtm.start’:
new Date().getTime(),event:’gtm.js’});var f=d.getElementsByTagName(s)[0],
j=d.createElement(s),dl=l!=’dataLayer’?’&l=’+l:”;j.async=true;j.src=
‘https://www.googletagmanager.com/gtm.js?id=’+i+dl;f.parentNode.insertBefore(j,f);
})(window,document,’script’,’dataLayer’,’GTM-XXXX’);</script>
<!– End Google Tag Manager –>
Additionally, paste this code immediately after the opening <body> tag:
<!– Google Tag Manager (noscript) –>
<noscript><iframe src=”https://www.googletagmanager.com/ns.html?id=GTM-XXXX”
height=”0″ width=”0″ style=”display:none;visibility:hidden”></iframe></noscript>
<!– End Google Tag Manager (noscript) –>

Note: Make you will replace GTM Tracking Code with your GTM ID XXXXX

After putting a code Google Tag Manager and Started writing a data layer in Google Tag Manager and Completed data layer in Google Tag Manager then Started Tracking enhanced Ecommerce Tracking in Prestashop using Google Tag Manager without any plugins.

Google Analytics Enhanced Ecommerce for Prestashop

Prestashop Google Enhanced Ecommerce Tracking using Google Tag Manager without any plugins

Warning: If you do n’t know about javascript or do n’t have developing knowledge then do n’t try to Google Analytics Enhanced Ecommerce for Prestashop using Google Tag Manager without any plugins that can broke your site, Cart and other functionality 

Disclaimer: Google tag manager belongs to Google property 

For Contact: mappchero@gmail.com

I am available for Hire on Freelancer: Freelancer.com

I am available for Hire on Upwork: Upwork.com

I am available for Hire on Peopleperhour: Peopleperhour.com

I am available for Hire on Guru: Guru.com

Dynamic Google AdWords Conversion Tracking for PrestaShop using Google Tag Manager

Standard

Dynamic Google AdWords Conversion Tracking for PrestaShop using Google Tag Manager without any plugins

Recently one client asks me to integrate Dynamic Google Ads/Adwords Conversion Tracking for PrestaShop using Google Tag Manager without any plugins. Dynamic value of transaction total from order confirmation Page, It will send a dynamic transaction amount for each order came from Adward that will report in the Adword as Conversion Column of Campaign, So that you will know, How revenue generated from Google Ads Campaign, that will help you calculate actual ROI generated from Google Ads.

Step 1: Install Google Tag Manager on Dynamic Google AdWords Conversion Tracking for PrestaShop using Google Tag Manager without any plugins

Paste this code as high in the <head> of the page as possible:
<!– Google Tag Manager –>
<script>(function(w,d,s,l,i){w[l]=w[l]||[];w[l].push({‘gtm.start’:
new Date().getTime(),event:’gtm.js’});var f=d.getElementsByTagName(s)[0],
j=d.createElement(s),dl=l!=’dataLayer’?’&l=’+l:”;j.async=true;j.src=
‘https://www.googletagmanager.com/gtm.js?id=’+i+dl;f.parentNode.insertBefore(j,f);
})(window,document,’script’,’dataLayer’,’GTM-XXXX’);</script>
<!– End Google Tag Manager –>
Additionally, paste this code immediately after the opening <body> tag:
<!– Google Tag Manager (noscript) –>
<noscript><iframe src=”https://www.googletagmanager.com/ns.html?id=GTM-XXXX”
height=”0″ width=”0″ style=”display:none;visibility:hidden”></iframe></noscript>
<!– End Google Tag Manager (noscript) –>

Note: Make you will replace GTM Tracking Code with your GTM ID XXXXX

It’s time to verify Get value of Dynamic Google AdWords Conversion Tracking for PrestaShop using Google Tag Manager without any plugins and help you measure Google Ads Campaign

Dynamic Google AdWords Conversion Tracking for PrestaShop

Dynamic Google Ads Conversion Tracking Tracking for PrestaShop using Google Tag Manager without Plugins

Warning: If you do n’t know about javascript or do n’t have developing knowledge then do n’t try to Setup Dynamic Google Ads Conversion Tracking Tracking for PrestaShop using Google Tag Manager that can broke your site, Cart and other functionality 

Disclaimer: Google tag manager belongs to Google property 

For Contact: mappchero@gmail.com

I am available for Hire on Freelancer: Freelancer.com

I am available for Hire on Upwork: Upwork.com

I am available for Hire on Peopleperhour: Peopleperhour.com

I am available for Hire on Guru: Guru.com

Google Dynamic Remarketing Tag for PrestaShop using Google Tag Manager

Standard

Google Dynamic Remarketing Tag for PrestaShop using Google Tag Manager using Google Tag Manager without any plugins

Recently one client asks me to implement Google Dynamic Remarketing Tag for PrestaShop using Google Tag Manager using Google Tag Manager without any plugins, To Implement Dynamic Remarketing Tag into PrestaShop to custom parameters ecomm_prodid, ecomm_pagetype and ecomm_totalvalue, All of these value should changes for every product and should match these id with product feed in Google Shopping then it will run dynamic remarketing and retargeting ads .

  • ecomm_prodid: “REPLACE_WITH_STRING_VALUE“,
  • ecomm_pagetype: “REPLACE_WITH_STRING_VALUE“,
  • ecomm_totalvalue: “REPLACE_WITH_STRING_VALUE”

Step 1: Install Google Tag Manager on Google Dynamic Remarketing Tag for PrestaShop using Google Tag Manager without any plugins

Paste this code as high in the <head> of the page as possible:
<!– Google Tag Manager –>
<script>(function(w,d,s,l,i){w[l]=w[l]||[];w[l].push({‘gtm.start’:
new Date().getTime(),event:’gtm.js’});var f=d.getElementsByTagName(s)[0],
j=d.createElement(s),dl=l!=’dataLayer’?’&l=’+l:”;j.async=true;j.src=
‘https://www.googletagmanager.com/gtm.js?id=’+i+dl;f.parentNode.insertBefore(j,f);
})(window,document,’script’,’dataLayer’,’GTM-XXXX’);</script>
<!– End Google Tag Manager –>
Additionally, paste this code immediately after the opening <body> tag:
<!– Google Tag Manager (noscript) –>
<noscript><iframe src=”https://www.googletagmanager.com/ns.html?id=GTM-XXXX”
height=”0″ width=”0″ style=”display:none;visibility:hidden”></iframe></noscript>
<!– End Google Tag Manager (noscript) –>

Note: Make you will replace GTM Tracking Code with your GTM ID XXXXX

Step 2 – Home Page – Google Dynamic Remarketing Tag for PrestaShop using Google Tag Manager

Google Dynamic Remarketing Tag for PrestaShop

Google Shopping Dynamic Remarketing using Google Tag Manager without any plugins

Step 3Product Page – When user entered to product pages then based on that dynamic remarketing pixel work for retargeted using Google Dynamic Remarketing Pixel for PrestaShop using Google Tag Manager

Google Dynamic Remarketing Tag

Dynamic Ads Google Dynamic Remarketing Pixel PrestaShop using Google Tag Manager

Step 4 – Cart Page –  When user went to Cart Pages to Google Dynamic Remarketing Tag for PrestaShop using Google Tag Manager without any plugins

Dynamic Remarketing Tag in Prestashop

Dynamic Remarketing on Prestashop using Google Tag Manager without any plugins

Step 5 – Purchase – When user place an order in Pestashop that will not retargeted because use already converted into sales Google Dynamic Remarketing Tag for PrestaShop using Google Tag Manager without using any plugins

 Google Dynamic Remarketing for PrestaShop

Integrate the Google Dynamic Remarketing Tag into Prestashop using Google Tag Manager

Warning: If you do n’t know about javascript or do n’t have developing knowledge then do n’t try to Google Dynamic Remarketing Tag for PrestaShop using Google Tag Manager that can broke your site, Cart and other functionality 

Disclaimer: Google tag manager belongs to Google property 

For Contact: mappchero@gmail.com

I am available for Hire on Freelancer: Freelancer.com

I am available for Hire on Upwork: Upwork.com

I am available for Hire on Peopleperhour: Peopleperhour.com

I am available for Hire on Guru: Guru.com