Google Ads Conversion Tracking (for multi-tier form) on Website

Standard

Google Ads Conversion Tracking is a tool that allows advertisers to track and analyze the actions of users who interact with their ads. By implementing Conversion Tracking, you can gain insights into how many clicks on your ads resulted in valuable actions, such as sign-ups or purchases, on your website. In this article, we will focus specifically on how to set up Conversion Tracking for multi-tier forms on your website.

What is a multi-tier form?

A multi-tier form is a form that requires users to complete several steps or pages before submitting their information. This type of form is commonly used for lead generation, where businesses want to collect as much information as possible about potential customers. Multi-tier forms can be effective in capturing high-quality leads, but they also present a challenge for Conversion Tracking. Because users may leave the form before completing all of the steps, it can be difficult to determine which actions should be counted as conversions.

How to set up Conversion Tracking for multi-tier forms

Step 1: Create a Conversion Action

The first step in setting up Conversion Tracking for multi-tier forms is to create a Conversion Action. A Conversion Action is a specific action that you want to track, such as a sign-up or purchase. To create a Conversion Action, follow these steps:

  • Sign in to your Google Ads account and click on “Tools & Settings” in the upper right corner.
  • Under “Measurement”, click on “Conversions”.
  • Click on the blue plus sign to create a new Conversion Action.
  • Choose “Website” as the source of your conversions.
  • Enter a name for your Conversion Action and select the type of action you want to track.
  • Configure the settings for your Conversion Action, such as the value and the conversion window.
  • Click “Create and Continue” to finish creating your Conversion Action.

Step 2: Set up your multi-tier form

Once you have created your Conversion Action, you need to set up your multi-tier form to track the actions that you want to count as conversions. The exact steps for setting up your form will depend on the platform you are using, but in general, you will need to do the following:

Determine which actions you want to track as conversions.

  • For example, you may want to track when users complete each step of the form, or only when they submit the final page.
  • Set up a thank-you page or confirmation page that users will see after completing the desired action(s).
  • This page should include a conversion tracking code snippet that you will use to track the action(s).
  • Add the conversion tracking code snippet to each page of your multi-tier form where you want to track actions. This code should be placed in the HTML of your page, usually in the header or footer section.

Step 3: Verify your conversion tracking setup

After you have set up your Conversion Action and your multi-tier form, you should verify that your conversion tracking is working correctly. To do this, follow these steps:

  • Go to the “Conversions” page in your Google Ads account.
  • Find the Conversion Action you created and click on “Settings” next to it.
  • Click on “Tag setup” and select “Website tag” from the dropdown menu.
  • Click on “Test” to open the Google Tag Assistant in a new tab.
  • Navigate to the page(s) of your multi-tier form where you have placed the conversion tracking code.
  • Check the Google Tag Assistant to see if the conversion tracking code is firing correctly on each page.

If the conversion tracking code is firing correctly, you should see a green checkmark next to the Google Ads tag in the Google Tag Assistant. If you see a red “X” or a warning message, you may need to troubleshoot your conversion tracking code

Warning: If you don’t know about javascript or don’t have developing knowledge then don’t try to Google Ads Conversion Tracking (for multi-tier form) on Website Conversions that can break your site, Cart and other functionality 

Disclaimer: Google tag manager belongs to Google property 

For Contact: mappchero@gmail.com

I am available for Hire on Freelancer: Freelancer.com

I am available for Hire on Upwork: Upwork.com

I am available for Hire on Peopleperhour: Peopleperhour.com

I am available for Hire on Guru: Guru.com

Google Ads Enhanced Conversions Tracking For Shopify using Google Tag Manager

Standard

Set Up Google Ads Enhanced Conversions Tracking For Shopify Using Google Tag Manager

Google Ads Enhanced Conversions is a feature within Google Ads that allows you to track and measure the conversion actions that occur on your website after someone clicks on your Google Ads ad. This information can be used to optimize your campaigns and improve their performance over time.

The Enhanced Conversions feature in Google Ads is a way to set up conversion tracking for your Shopify store without having to add any code to your website. With Enhanced Conversions, you can track important events such as “Purchase” and see how they are impacting your Google Ads campaigns.

Once you have set up Enhanced Conversions, you can view conversion data in your Google Ads account and use it to optimize your campaigns for the highest return on investment. By tracking conversions, you can see which ads are performing well and which need to be adjusted, and you can make data-driven decisions to improve your campaigns over time.

  1. Choose the conversion events to track: In Google Ads, go to the “Conversions” section and click on “Enhanced conversions.” Choose the conversion events that you want to track, such as  “Purchase,” and set the conversion values for each event.

2. Install the Google Ads Conversion Tracking code: To track conversions, you need to have the Google Ads Conversion Tracking code installed on your website. You can do this either by adding the code to your website directly or by using Google Tag Manager.

3. Verify that the tracking is working: Once you have installed the code, go back to the Google Ads “Conversions” section and check that the conversions are being recorded. If everything is set up correctly, you should see the conversion data in your account within a few hours.

Google Ads Enhanced Conversion Tracking

Google Ads Enhanced Conversion Setup on Shopify using Google Tag Manager

Warning: If you do n’t know about javascript or do n’t have developing knowledge then do n’t try to Google Ads Enhanced Conversions Tracking For Shopify using Google Tag Manager without module that can broke your site, Cart and other functionality 

Disclaimer: Google tag manager belongs to Google property 

For Contact: mappchero@gmail.com

I am available for Hire on Freelancer: Freelancer.com

I am available for Hire on Upwork: Upwork.com

I am available for Hire on Peopleperhour: Peopleperhour.com

I am available for Hire on Guru: Guru.com
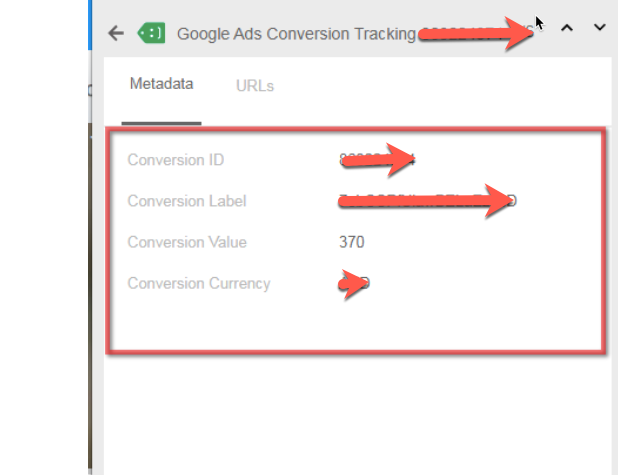
 

Dynamic Google Ads Conversion Value Tracking with Google Tag Manager

Standard

Google Tag Manager (GTM) allows you to track conversions on your website dynamically, without having to manually add tracking code to each page. With GTM, you can create a conversion tracking tag and then use triggers to fire the tag on specific pages or when certain events occur. This allows you to track conversions for specific forms, button clicks, or other actions on your website without having to manually add tracking code for each one. To set up dynamic conversion tracking with GTM, you’ll need to have a Google Ads account and have GTM installed on your website. You can then create a conversion tracking tag in GTM and set up triggers to fire the tag on the appropriate pages or events.

Dynamic Google Ads conversion value tracking with Google Tag Manager (GTM) allows you to track the monetary value of a conversion, rather than just tracking the number of conversions. This can be useful for tracking conversions such as purchases or lead forms where the value of the conversion is different for each one. To set up dynamic conversion value tracking with GTM, you’ll need to have a Google Ads account and have GTM installed on your website.

Here are the steps to set up dynamic Google Ads conversion value tracking:

  1. In GTM, create a new tag for conversion tracking and set the “Track Type” to “Value”.
  2. Create a variable in GTM to store the value of the conversion. This can be done by creating a “Data Layer Variable” or “JavaScript Variable” depending on how the value is being passed to GTM.
  3. In the conversion tracking tag, set the “Value” field to the variable you created in step 2.
  4. Create a trigger in GTM to fire the conversion tracking tag on the appropriate pages or events.
  5. Publish the container.

You can set the value dynamically by passing the variable to GTM via the dataLayer or through Javascript

Dynamic Conversion Values in Google Tag Manager

Setup Google Ads Dynamic Conversion Tracking with Data Layer using Google Tag Manager

Please note that : You need to make sure that the variable you are passing to GTM is in the correct format, such as a numeric value and not a string.

Warning: If you do n’t know about javascript or do n’t have developing knowledge then do n’t try to Dynamic Google Ads Conversion Value Tracking with Google Tag Manager without Plugin that can broke your site, Cart and other functionality 

Disclaimer: Google tag manager belongs to Google property 

For Contact: mappchero@gmail.com

I am available for Hire on Freelancer: Freelancer.com

I am available for Hire on Upwork: Upwork.com

I am available for Hire on Peopleperhour: Peopleperhour.com

I am available for Hire on Guru: Guru.com

Google Ads Conversion Tracking with Server-Side using Google Tag Manager

Standard

Server-side Conversion Tracking with Google Ads using Google Tag Manager without touching Code

Recently, one of Client asks me to implement Server Side Google Ads Conversion tracking using Google Tag Manager for Ecommerce Tracking and other CMS, I created a server in Google Cloud then I started implemented server Side Google Ads Conversion tracking

Server-side Tag for Google Ads conversions using Google Tag Manager

Server Side Google Ads Conversion Tracking using Google Tag Manager 

Paste this code as high in the <head> of the page as possible:

<!– Google Tag Manager –>

<script>(function(w,d,s,l,i){w[l]=w[l]||[];w[l].push({‘gtm.start’:
new Date().getTime(),event:’gtm.js’});var f=d.getElementsByTagName(s)[0],
j=d.createElement(s),dl=l!=’dataLayer’?’&l=’+l:”;j.async=true;j.src=
‘https://www.googletagmanager.com/gtm.js?id=’+i+dl;f.parentNode.insertBefore(j,f);
})(window,document,’script’,’dataLayer’,’GTM-XXXX’);</script>
<!– End Google Tag Manager –>

Additionally, paste this code immediately after the opening <body> tag:
<!– Google Tag Manager (noscript) –>
<noscript><iframe src=”https://www.googletagmanager.com/ns.html?id=GTM-XXXX”
height=”0″ width=”0″ style=”display:none;visibility:hidden”></iframe></noscript>
<!– End Google Tag Manager (noscript) –>

Note: Make you will replace GTM Tracking Code with your GTM ID XXXXX

Google Ads Server-side conversion Tag

Google Ads Conversion Tracking With Server-side Tag using Google Tag Manager

Warning: If you do n’t know about javascript or do n’t have developing knowledge then do n’t try to Server-side Tag for Google Ads conversions using Google Tag Manager using Google Tag Manager that can broke your site, Cart and other functionality 

Disclaimer: Google tag manager belongs to Google property 

For Contact: mappchero@gmail.com

I am available for Hire on Freelancer: Freelancer.com

I am available for Hire on Upwork: Upwork.com

I am available for Hire on Peopleperhour: Peopleperhour.com

I am available for Hire on Guru: Guru.com

Dynamic Google Ads Conversion tracking for Ruby on Rails using Google Tag Manager

Standard

Dynamic Google Ads Conversion Tracking for Ruby on Rails using Google Tag Manager without Any Plugins

Recently once of client ask me to implement Dynamic Ads Conversion Tracking on Ruby on Rails using Google Tag Manager without Any Plugins. Once I looked the Ruby on Rails and asked to client need to place a test, To see the possibility of Dynamic Google Ads Conversion tracking for Ruby, Once I placed a test order, then I saw the possibility of Dynamic Ads Conversion Tracking, For Google Ad Conversion Tracking you need pass dynamic value of the transaction total and Transaction Id for avoid duplicate transaction.

Step 1: Install Google Tag Manager on Dynamic Google Ads Conversion tracking for Ruby on Rails using Google Tag Manager without any plugins

Paste this code as high in the <head> of the page as possible:
<!– Google Tag Manager –>
<script>(function(w,d,s,l,i){w[l]=w[l]||[];w[l].push({‘gtm.start’:
new Date().getTime(),event:’gtm.js’});var f=d.getElementsByTagName(s)[0],
j=d.createElement(s),dl=l!=’dataLayer’?’&l=’+l:”;j.async=true;j.src=
‘https://www.googletagmanager.com/gtm.js?id=’+i+dl;f.parentNode.insertBefore(j,f);
})(window,document,’script’,’dataLayer’,’GTM-XXXX’);</script>
<!– End Google Tag Manager –>
Additionally, paste this code immediately after the opening <body> tag:
<!– Google Tag Manager (noscript) –>
<noscript><iframe src=”https://www.googletagmanager.com/ns.html?id=GTM-XXXX”
height=”0″ width=”0″ style=”display:none;visibility:hidden”></iframe></noscript>
<!– End Google Tag Manager (noscript) –>

Note: Make you will replace GTM Tracking Code with your GTM ID XXXXX

It’s time to verify Get value of Dynamic Google Ads Conversion tracking for Ruby on Rails using Google Tag Manager without any plugins

Dynamic Google Ads Conversion tracking for Ruby on Rails

Get Dynamic Values in Dynamic Google Ads Conversion tracking for Ruby on Rails using Google Tag Manager without any plugins

Warning: If you do n’t know about javascript or do n’t have developing knowledge then do n’t try to Setup Dynamic Google Ads Conversion tracking for Ruby on Rails using Google Tag Manager that can broke your site, Cart and other functionality 

Disclaimer: Google tag manager belongs to Google property 

For Contact: mappchero@gmail.com

I am available for Hire on Freelancer: Freelancer.com

I am available for Hire on Upwork: Upwork.com

I am available for Hire on Peopleperhour: Peopleperhour.com

I am available for Hire on Guru: Guru.com


Dynamic Google AdWords Conversion Tracking for PrestaShop using Google Tag Manager

Standard

Dynamic Google AdWords Conversion Tracking for PrestaShop using Google Tag Manager without any plugins

Recently one client asks me to integrate Dynamic Google Ads/Adwords Conversion Tracking for PrestaShop using Google Tag Manager without any plugins. Dynamic value of transaction total from order confirmation Page, It will send a dynamic transaction amount for each order came from Adward that will report in the Adword as Conversion Column of Campaign, So that you will know, How revenue generated from Google Ads Campaign, that will help you calculate actual ROI generated from Google Ads.

Step 1: Install Google Tag Manager on Dynamic Google AdWords Conversion Tracking for PrestaShop using Google Tag Manager without any plugins

Paste this code as high in the <head> of the page as possible:
<!– Google Tag Manager –>
<script>(function(w,d,s,l,i){w[l]=w[l]||[];w[l].push({‘gtm.start’:
new Date().getTime(),event:’gtm.js’});var f=d.getElementsByTagName(s)[0],
j=d.createElement(s),dl=l!=’dataLayer’?’&l=’+l:”;j.async=true;j.src=
‘https://www.googletagmanager.com/gtm.js?id=’+i+dl;f.parentNode.insertBefore(j,f);
})(window,document,’script’,’dataLayer’,’GTM-XXXX’);</script>
<!– End Google Tag Manager –>
Additionally, paste this code immediately after the opening <body> tag:
<!– Google Tag Manager (noscript) –>
<noscript><iframe src=”https://www.googletagmanager.com/ns.html?id=GTM-XXXX”
height=”0″ width=”0″ style=”display:none;visibility:hidden”></iframe></noscript>
<!– End Google Tag Manager (noscript) –>

Note: Make you will replace GTM Tracking Code with your GTM ID XXXXX

It’s time to verify Get value of Dynamic Google AdWords Conversion Tracking for PrestaShop using Google Tag Manager without any plugins and help you measure Google Ads Campaign

Dynamic Google AdWords Conversion Tracking for PrestaShop

Dynamic Google Ads Conversion Tracking Tracking for PrestaShop using Google Tag Manager without Plugins

Warning: If you do n’t know about javascript or do n’t have developing knowledge then do n’t try to Setup Dynamic Google Ads Conversion Tracking Tracking for PrestaShop using Google Tag Manager that can broke your site, Cart and other functionality 

Disclaimer: Google tag manager belongs to Google property 

For Contact: mappchero@gmail.com

I am available for Hire on Freelancer: Freelancer.com

I am available for Hire on Upwork: Upwork.com

I am available for Hire on Peopleperhour: Peopleperhour.com

I am available for Hire on Guru: Guru.com

Setup Dynamic Google Adwords Conversion Tracking in Magento 2

Standard

Setup Dynamic Google Adwords Conversion Tracking in Magento/Magento 2 using Google Tag Manager without any plugins

Recently one client asks me to implement dynamic google ads conversion tracking in Magneto/Magento 2 using Google Tag Manager without any plugins, In Magento, the Order confirmation page you will not see any amount, you will see only order id, I used another technique to use get the total amount from order confirmation Magneto / Magento 2 using Google Tag Manager without any plugins, Get total amount of transaction from Order confirmation page of Magento / Magento 2 using Google Tag Manager to pass dynamically pass total revenue.

Step 1: Install Google Tag Manager on Magento / Magento 2 using Google Tag Manager to setup dynamic adword conversion tracking without any plugins 

Paste this code as high in the <head> of the page as possible:
<!– Google Tag Manager –>
<script>(function(w,d,s,l,i){w[l]=w[l]||[];w[l].push({‘gtm.start’:
new Date().getTime(),event:’gtm.js’});var f=d.getElementsByTagName(s)[0],
j=d.createElement(s),dl=l!=’dataLayer’?’&l=’+l:”;j.async=true;j.src=
‘https://www.googletagmanager.com/gtm.js?id=’+i+dl;f.parentNode.insertBefore(j,f);
})(window,document,’script’,’dataLayer’,’GTM-XXXX’);</script>
<!– End Google Tag Manager –>
Additionally, paste this code immediately after the opening <body> tag:
<!– Google Tag Manager (noscript) –>
<noscript><iframe src=”https://www.googletagmanager.com/ns.html?id=GTM-XXXX”
height=”0″ width=”0″ style=”display:none;visibility:hidden”></iframe></noscript>
<!– End Google Tag Manager (noscript) –>

Note: Make you will replace GTM Tracking Code with your GTM ID XXXXX

It’s time to verify Get value of Dynamic adword/ Ads conversion tracking in Magento / Magento 2 using Google Tag Manager without any plugins 

Adwords Conversion Tracking in Magento

Get Dynamic Values in AdWords Conversion Tracking in Magento / Magento 2 using Google Tag Manager without any plugins

Warning: If you do n’t know about javascript or do n’t have developing knowledge then do n’t try to Setup Dynamic Google Adwords Conversion Tracking in Magento 2 that can broke your site, Cart and other functionality 

Disclaimer: Google tag manager belongs to Google property 

For Contact: mappchero@gmail.com

I am available for Hire on Freelancer: Freelancer.com

I am available for Hire on Upwork: Upwork.com

I am available for Hire on Peopleperhour: Peopleperhour.com

I am available for Hire on Guru: Guru.com

Dynamic Google AdWords Conversion Tracking on Drupal

Standard

Get Dynamic Google AdWords Conversion Value Tracking on Drupal using Google Tag Manager without touching Code

Recently, one of the client has asked me to implement to track transaction-specific conversion values on Drupal using Google Tag Manager, Once I will look the Drupal and ask to client allow a test order on the Drupal, Once I place a test order, then I see possibilities without touch code of the website and pass Dynamic value of Specific transaction using Google Tag Manager, Once I will write pieces of code in Google Tag Manager then it’s work without touching code of Drupal.

Step 1: Install Google Tag Manager on Drupal, To Set Up Dynamic Google Adword ConversionTracking on Drupal using Google Tag Manager without touching Code of Drual 

Paste this code as high in the <head> of the page as possible:
<!– Google Tag Manager –>
<script>(function(w,d,s,l,i){w[l]=w[l]||[];w[l].push({‘gtm.start’:
new Date().getTime(),event:’gtm.js’});var f=d.getElementsByTagName(s)[0],
j=d.createElement(s),dl=l!=’dataLayer’?’&l=’+l:”;j.async=true;j.src=
‘https://www.googletagmanager.com/gtm.js?id=’+i+dl;f.parentNode.insertBefore(j,f);
})(window,document,’script’,’dataLayer’,’GTM-XXXX’);</script>
<!– End Google Tag Manager –>
Additionally, paste this code immediately after the opening <body> tag:
<!– Google Tag Manager (noscript) –>
<noscript><iframe src=”https://www.googletagmanager.com/ns.html?id=GTM-XXXX”
height=”0″ width=”0″ style=”display:none;visibility:hidden”></iframe></noscript>
<!– End Google Tag Manager (noscript) –>

Note: Make you will replace GTM Tracking Code with your GTM ID XXXXX

Once look order confirmation and written piece of Javascript to get value of total amount and Track transaction-specific conversion values using Google Tag Manager

Dynamic Google AdWords Conversion Tracking on Drupal

Google AdWords Conversion Tracking Drupal

Warning: If you do n’t know about javascript or do n’t have developing knowledge then do n’t try to Drupal Dynamic Google AdWords Conversion Tracking  using Google Tag Manager without touching website Code that can broke your site, Cart and other functionality 

Disclaimer: Google tag manager belongs to Google property 

For Contact: mappchero@gmail.com

I am available for Hire on Freelancer: Freelancer.com

I am available for Hire on Upwork: Upwork.com

I am available for Hire on Peopleperhour: Peopleperhour.com

I am available for Hire on Guru: Guru.com

Google Dynamic Adwords Conversion for HikaShop using Google Tag Manager

Standard

Setup Dynamic Adwords Conversion Tracking and Facebook Purchase Conversion Pixel for HikaShop (Joomla) using Google Tag Manager 

Recently on client ask me to dynamic adword conversion tracking using Google Tag Manager for HikaShop (Joomla), Once you will look HikaShop (Joomla) that’s bit complected to track dynamic Adword Conversion tracking using Google Tag Manager for HikaShop (Joomla), Once I asked to client to give access of FTP, look back-end code and found two ways to tracking Dynamic Adword Conversion Tracking, Either Write a data layer  to pass value total transaction amount for HikaShop (Joomla) Dynamic Adwords Conversion tracking or Need to write a cookie collect total amount value using Google Tag Manager to work Dynamic Adword Conversion tracking for HikaShop (Joomla).

Putted custom Data layer on Joomla HikaShop written a separate script for Pass data layer on Order Confirmation Pages to Dynamic Google Adword Conversion Tracking for HikaShop (Joomla).

Are you looking Ecommerce Tracking for Joomla Hikashop

  • First Install Google Tag Manager on Joomla (Hikashop) for Google Tag Manager for HikaShop for Dynamic Adword Conversion Tracking
  • Paste this code as high in the <head> of the page as possible:
<!– Google Tag Manager –> <script>(function(w,d,s,l,i){w[l]=w[l]||[];w[l].push({‘gtm.start’: new Date().getTime(),event:’gtm.js’});var f=d.getElementsByTagName(s)[0], j=d.createElement(s),dl=l!=’dataLayer’?’&l=’+l:”;j.async=true;j.src= ‘https://www.googletagmanager.com/gtm.js?id=’+i+dl;f.parentNode.insertBefore(j,f); })(window,document,’script’,’dataLayer’,’GTM-XXXX’);</script>
<!– End Google Tag Manager –>
Additionally, paste this code immediately after the opening <body> tag:
<!– Google Tag Manager (noscript) –> <noscript><iframe src=”https://www.googletagmanager.com/ns.html?id=GTM-XXXX” height=”0″ width=”0″ style=”display:none;visibility:hidden”></iframe></noscript>
<!– End Google Tag Manager (noscript) ->

Note: Make you will replace GTM Tracking Code with your GTM ID XXXXX

Written Data Layer Script on Order Confirmation page on Hikashop for Google Dynamic Adwords Conversion Tracking to get total Order value of Total Amount using Google Tag Manager

Google Adwords Conversion for HikaShop

Setup Dynamic Adwords Conversion Tracking HikaShop (Joomla)

Warning:if you do n’t know about javascript/ Datalayer/Jquery or do n’t have developing knowledge then do n’t try Joomla Hikashop Google Tag Manager Dynamic Adwords Conversion for HikaShop without touching Codea custom javascript without using Any plugin that can broke your site, Cart and other functionality 

Disclaimer: Google tag manager belongs to Google property 

For Contact: mappchero@gmail.com

I am available for Hire on Freelancer: Freelancer.com

I am available for Hire on Upwork: Upwork.com

I am available for Hire on Peopleperhour: Peopleperhour.com

I am available for Hire on Guru: Guru.com

Dynamic Adword Conversion Tracking Code in Oscommerce using Google Tag Manager

Standard

Track transaction-specific conversion values in Oscommerce (gtag.js)

Recently one of client ask me to implement dynamic adword conversion on directly putting code  or also using Google Tag Manager on Oscommerce with (gtag.js), Once I looked Oscommerce asked to make test order once I place a tested then I told it’s possible implemented directly (gtag.js) and also using Google Tag Manager.

Just written a Custom PHP Code with (gtag.js) that will help you track dynamic adword Conversion tracking using (gtag.js) for Oscommerce

<script>
gtag(‘event’, ‘conversion’, {
‘send_to’: ‘AW-xxxxx/xxxxxxxxxxx’,
‘value’: xxxxxxxxxxxxxxxxxxxxxxxxxx,
‘currency’: ‘AUD’,
‘transaction_id’: ‘xxxxxxxxxxxxxxx’
});
</script>

First you need write a custom php on Success Pages on Oscommerce (gtag.js) to track dynamic Adword conversion tracking for Oscommerce

Like that 

<?php
if ((basename($PHP_SELF) == FILENAME_CHECKOUT_SUCCESS)

Warning:if you do n’t know about javascript/ Custom PHP Code or do n’t have developing knowledge then do n’t try to Dynamic Adword Conversion Tracking Code in Oscommerce a custom javascript/ Custom PHP without using Any plugin that can broke your site, Cart and other functionality 

Disclaimer: Google tag manager belongs to Google property 

For Contact: mappchero@gmail.com

I am available for Hire on Freelancer: Freelancer.com

I am available for Hire on Upwork: Upwork.com

I am available for Hire on Peopleperhour: Peopleperhour.com

I am available for Hire on Guru: Guru.com

No Fields Found.