Server-side Google Ads Conversion Tracking

Standard

In the digital marketing world, accurate tracking of conversions is crucial for understanding the effectiveness of online advertising campaigns. Traditional client-side tracking methods, while useful, often face challenges like browser restrictions and ad blockers. To address these issues, server-side tracking offers a robust and reliable alternative.

Google Ads is a powerful tool for advertisers, but its effectiveness hinges on accurate and efficient tracking. This is where server-side tracking through Google Tag Manager (GTM) comes into the picture, providing a more robust, secure, and faster data processing method than traditional client-side tracking.

Understanding Server-side Tracking

Before diving into the implementation, it’s important to understand what server-side tracking entails. Unlike client-side tracking, where data collection occurs in the user’s browser, server-side tracking shifts this process to the server. This method enhances data accuracy, improves loading times, and offers better control over data privacy.

Why Choose Server-side Tracking for Google Ads

  1. Improved Data Accuracy: With browser limitations and increasing use of ad blockers, server-side tracking ensures more accurate data collection.
  2. Enhanced Privacy Compliance: It offers better compliance with data privacy regulations like GDPR and CCPA.
  3. Reduced Page Load Time: By minimizing the reliance on client-side scripts, it contributes to faster page load times, enhancing user experience.

Setting Up Server-side Tracking with GTM

Step 1: Setting Up a Server Container in GTM

  1. Log in to your GTM account and create a new container.
  2. Select “Server” as the container type.
  3. Follow the setup wizard to configure your server container environment.

Step 2: Configuring the Server Environment

  1. Choose a cloud provider (Google Cloud, AWS, etc.) to host your server.
  2. Deploy the GTM server container on the chosen cloud environment.
  3. Ensure that the server environment is correctly linked to your GTM account.

Step 3: Setting Up Google Ads Conversion Linker

  1. In your server container, add a new tag for the Google Ads Conversion Linker.
  2. Configure the tag to trigger on all page views or specific events, as required.

Step 4: Implementing Google Ads Conversion Tracking

  1. Create a new tag for Google Ads conversion tracking.
  2. Input your Google Ads conversion ID and conversion label.
  3. Set the trigger for the tag based on the specific conversion actions (e.g., form submissions, product purchases).

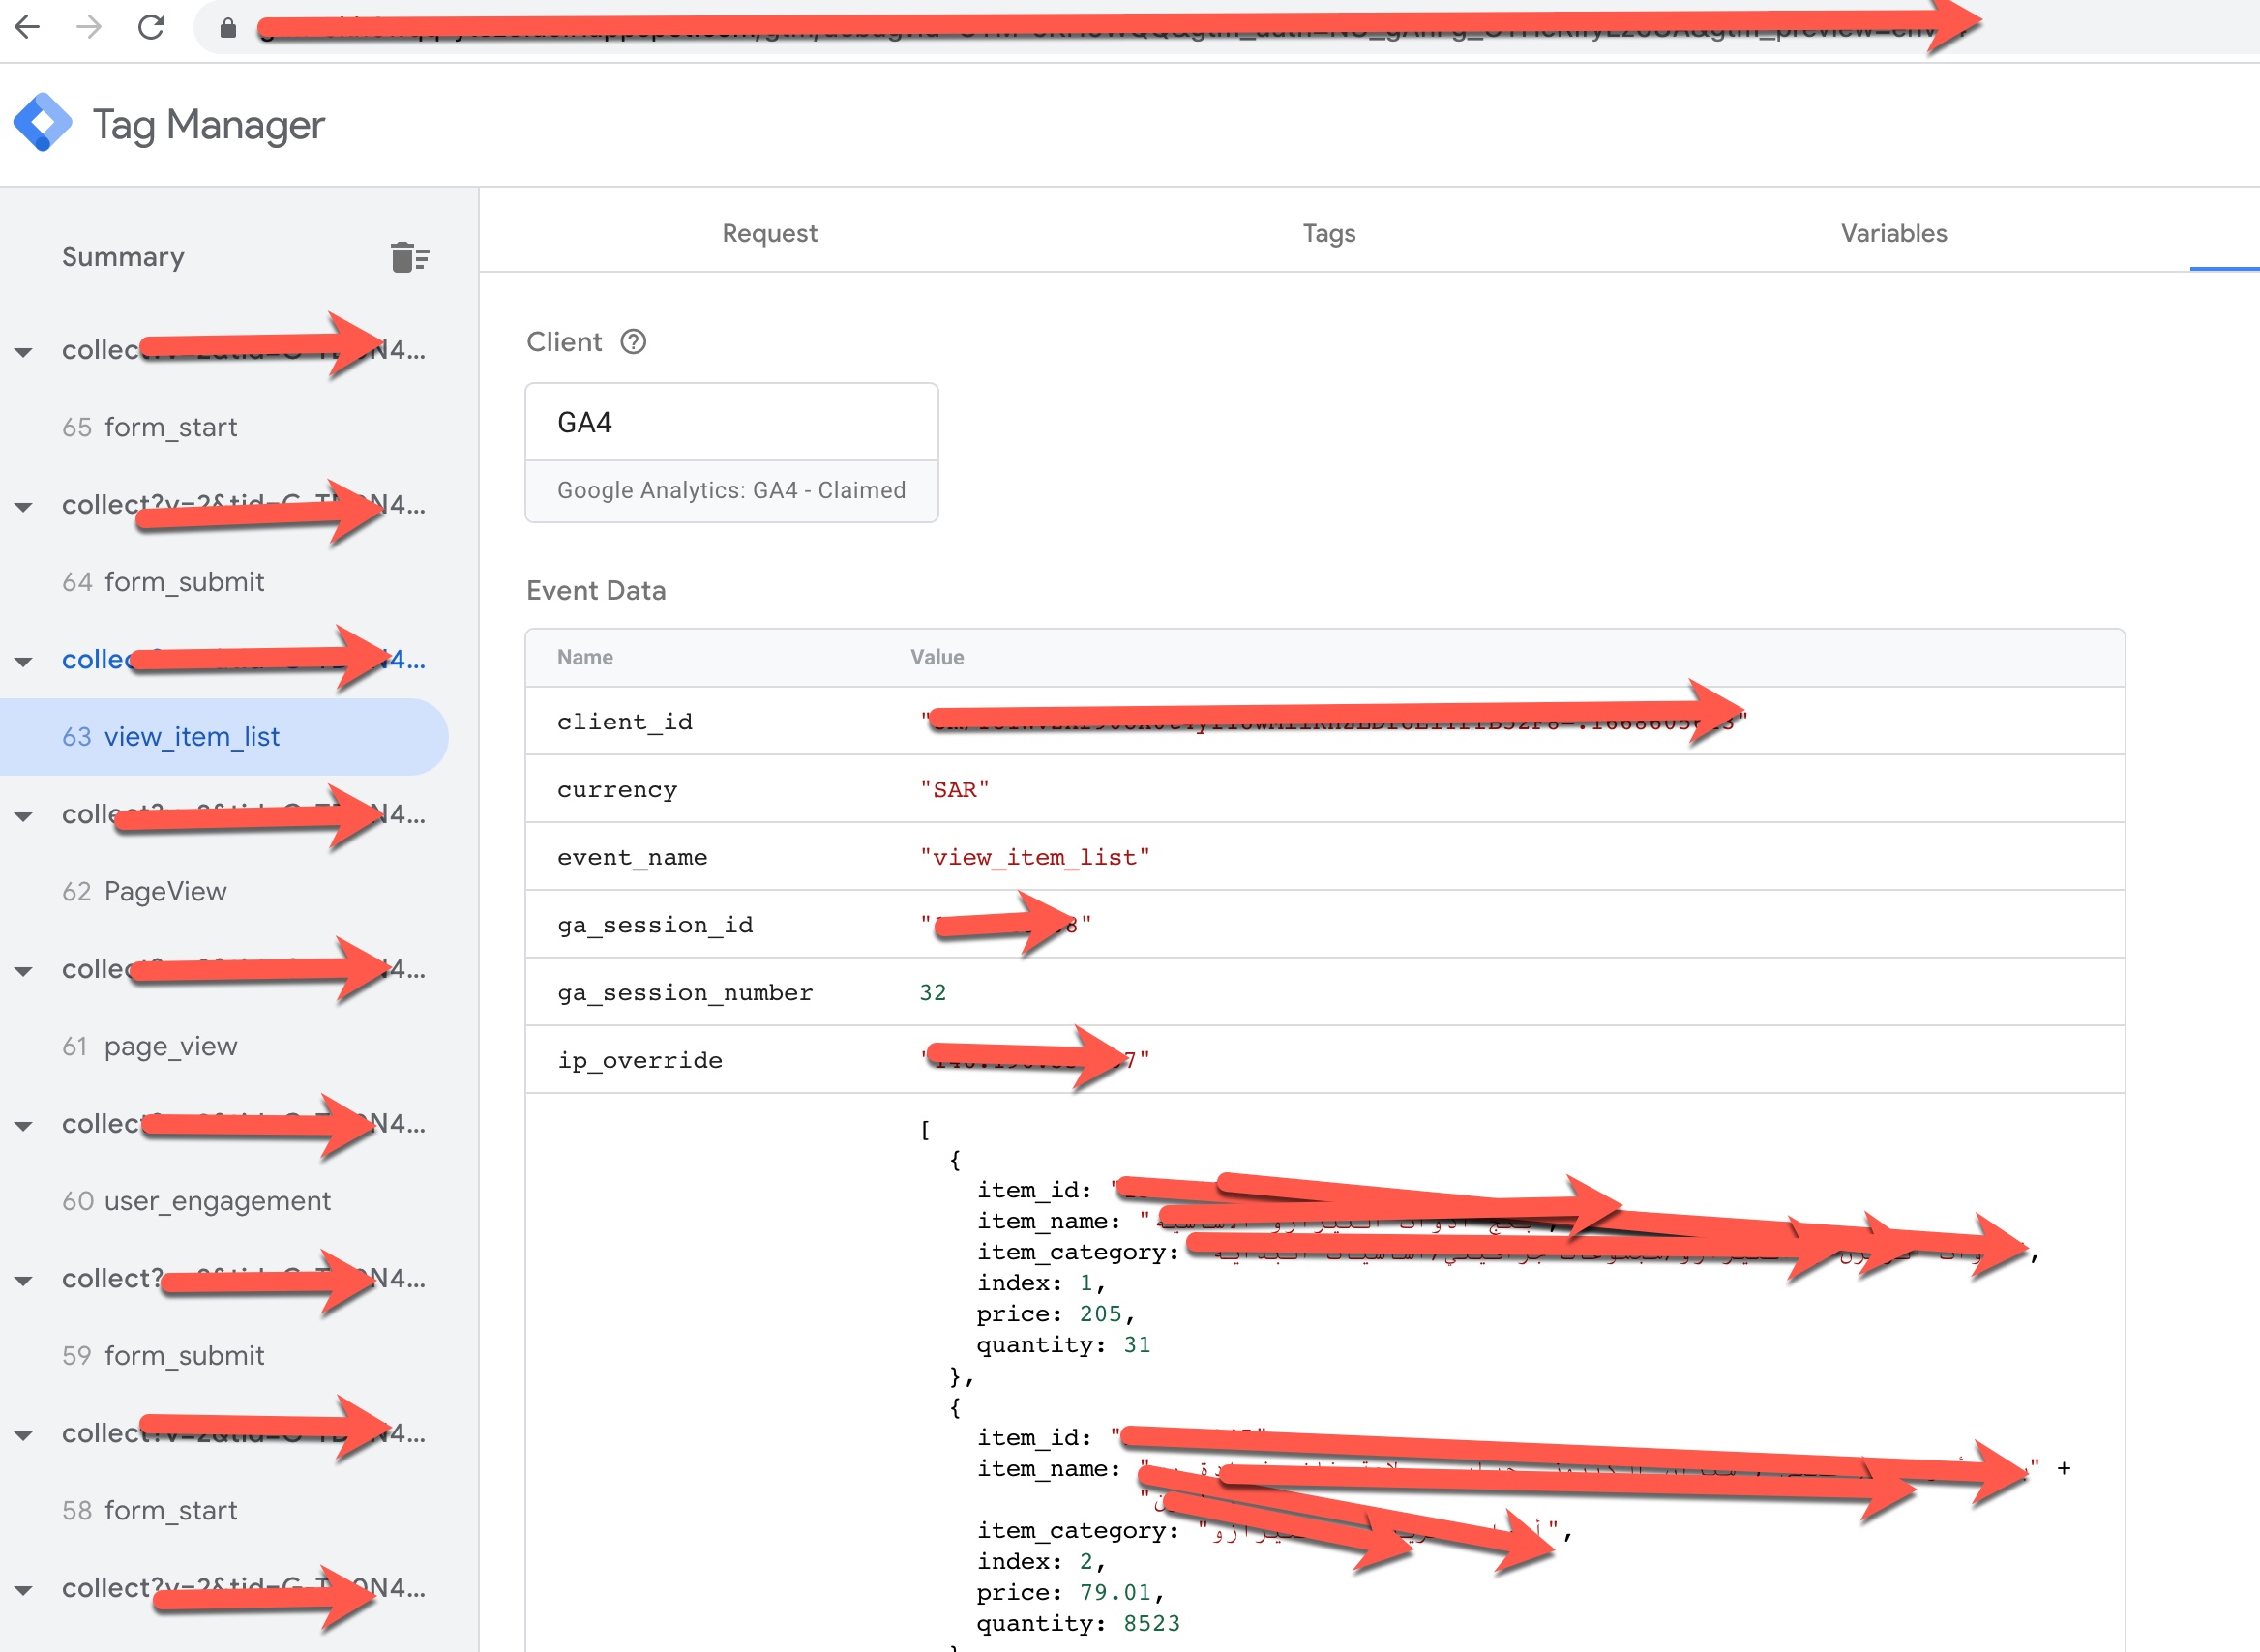
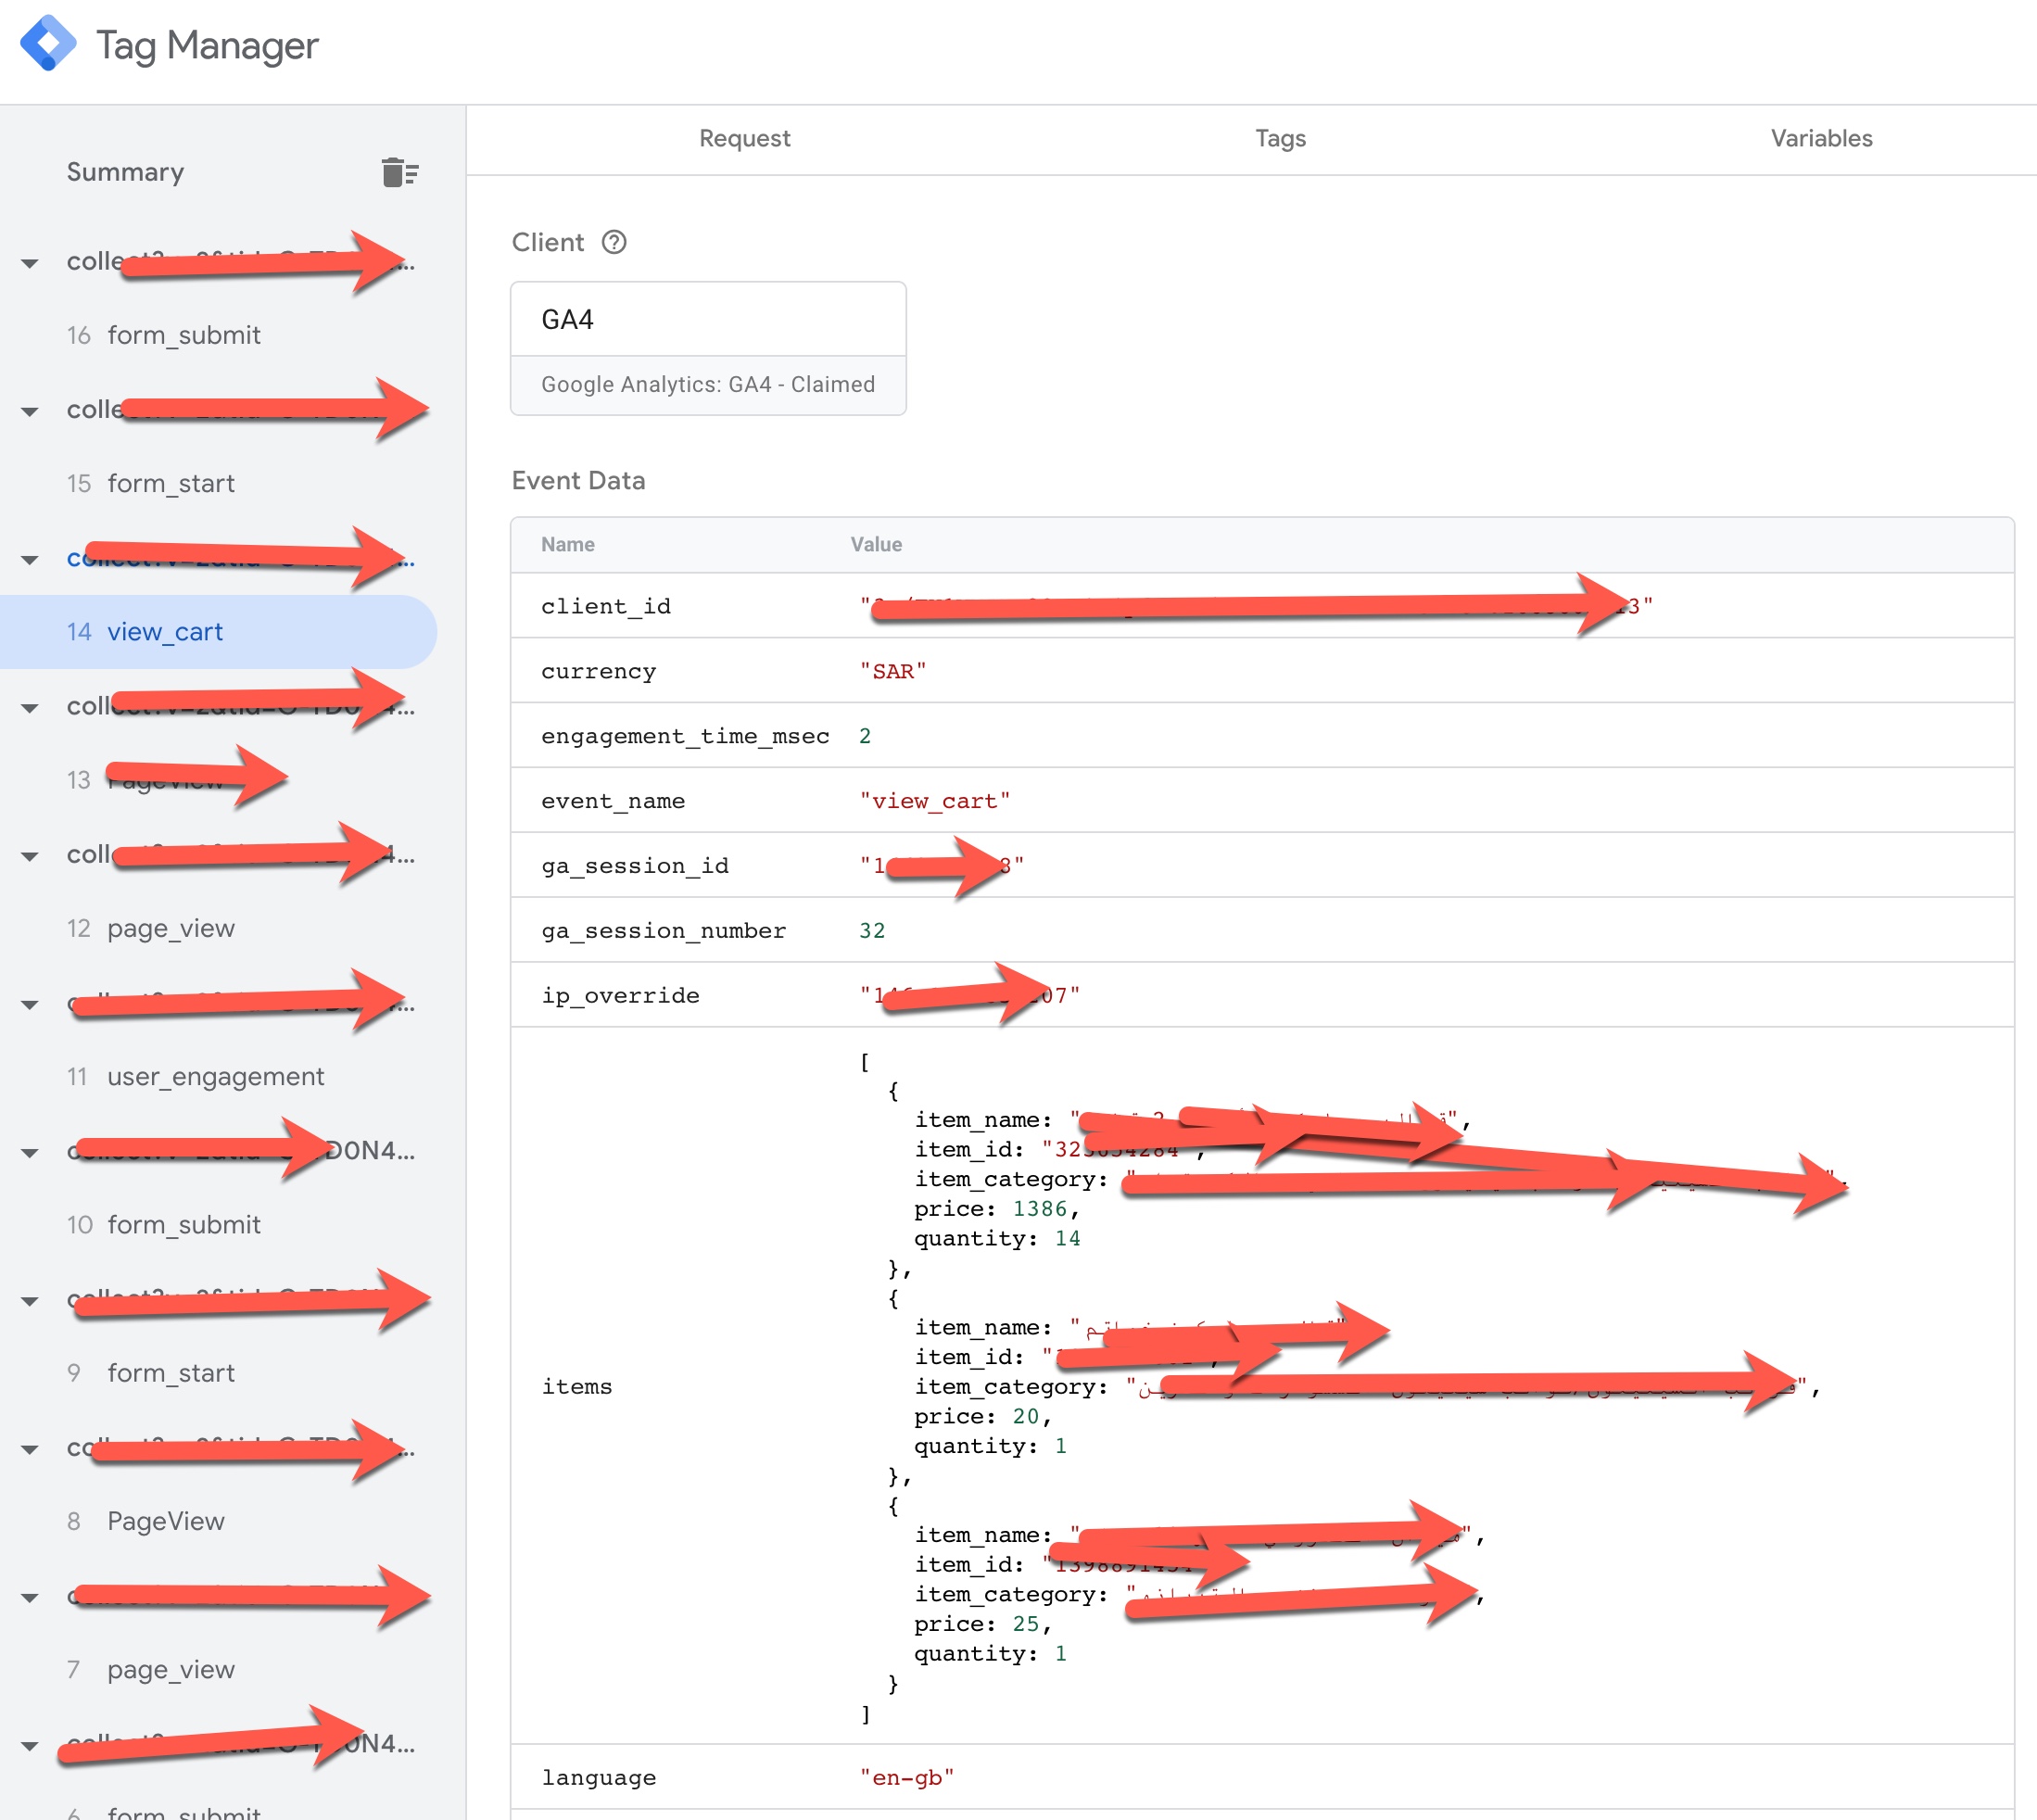
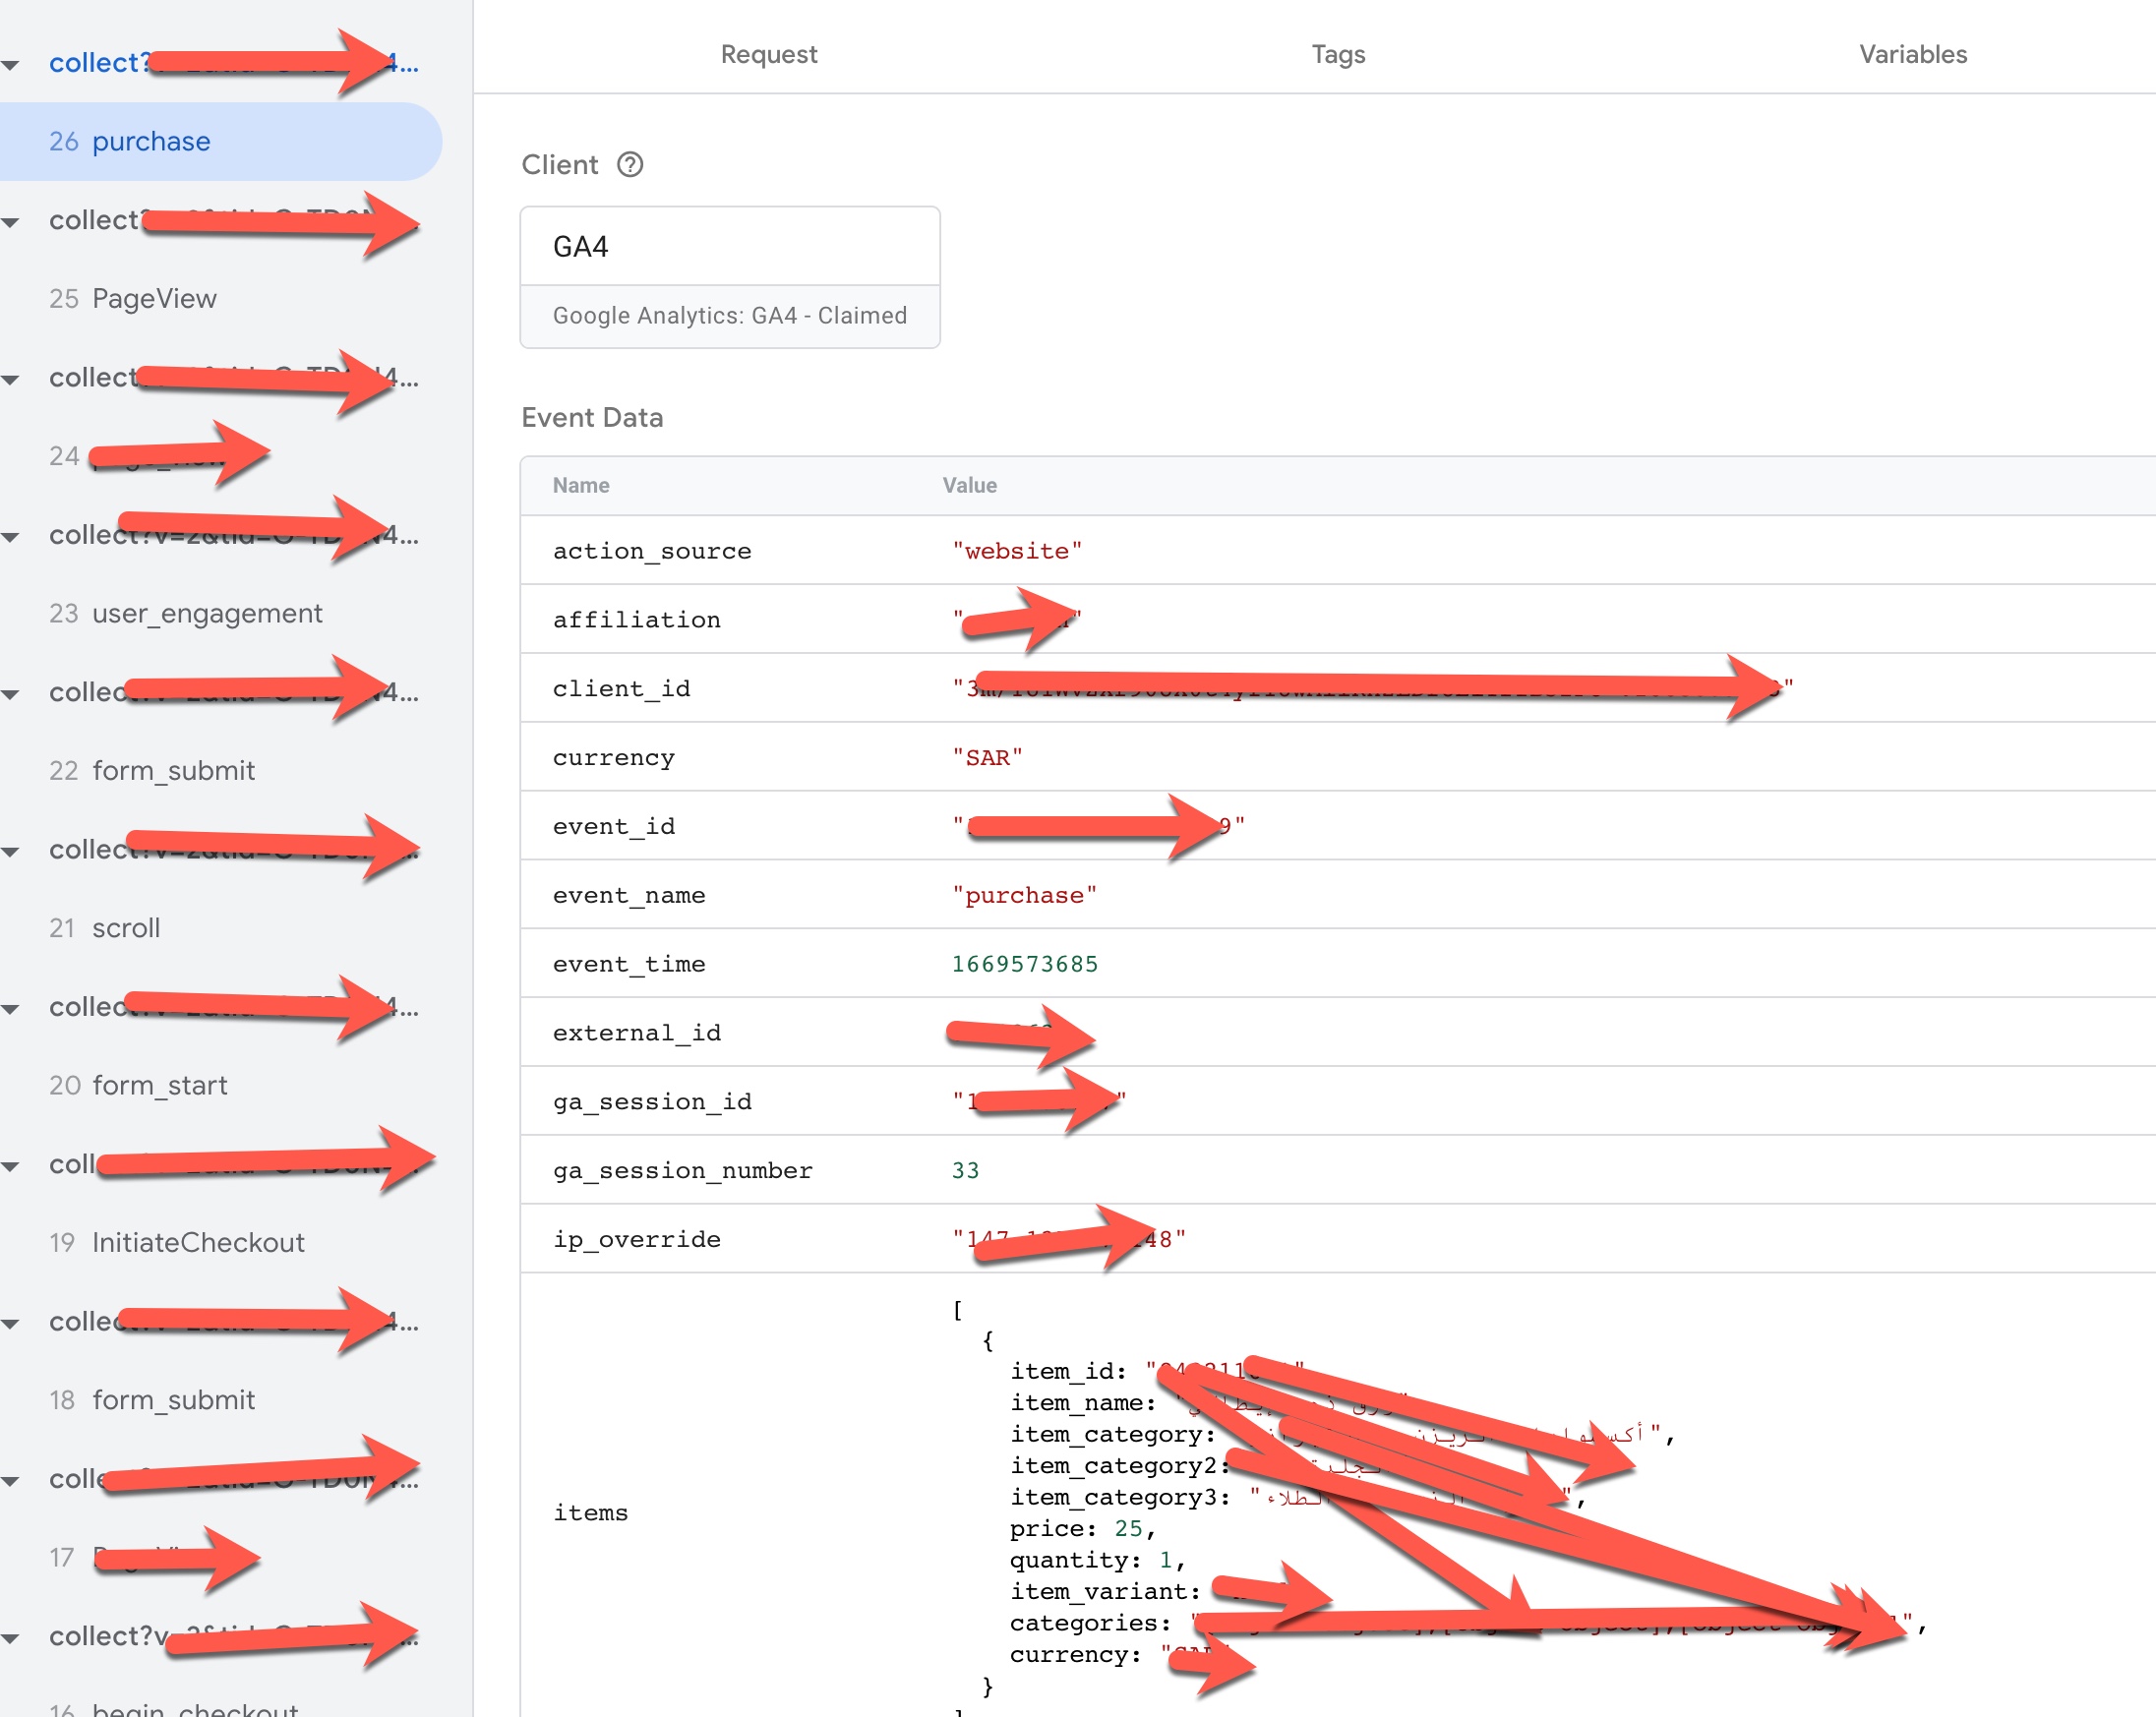
Step 5: Testing and Debugging

  1. Use GTM’s preview mode to test the tags and triggers.
  2. Ensure that the server is receiving and processing the conversion data correctly.
  3. Debug any issues using GTM’s built-in debugging tools.

Best Practices for Server-side Tracking

  1. Data Security and Privacy: Always adhere to data protection regulations and ensure user data is securely handled.
  2. Regular Monitoring and Updates: Keep the server environment and tags updated to avoid discrepancies in data tracking.
  3. Collaboration with Development Team: Work closely with your web development team to ensure proper implementation and maintenance.

Challenges and Considerations

  1. Technical Complexity: Setting up server-side tracking is more complex than client-side methods and may require technical expertise.
  2. Cost Implications: Running a server environment incurs additional costs compared to traditional client-side tracking.
  3. Data Processing Limitations: There might be limitations in processing real-time data, which needs consideration in campaign analysis.

Conclusion

Server-side Google Ads conversion tracking with GTM offers a more reliable and robust method for tracking user interactions and conversions. While it comes with its set of challenges, the benefits in terms of data accuracy, privacy compliance, and user experience make it a worthwhile investment for businesses serious about their online advertising efforts. By following the steps outlined in this guide and adhering to best practices, you can effectively implement server-side tracking for your Google Ads campaigns, leading to better-informed marketing decisions and improved ROI.

Integrating Meta Pixel and Conversions API with Google Tag Manager

Standard

Meta Pixel and the Conversions API, both from Meta (formerly Facebook), are powerful tools for tracking user activity and conversions. When integrated with Google Tag Manager (GTM), these tools provide a robust framework for tracking, managing, and optimizing marketing efforts. This article delves into the integration of Meta Pixel and Conversions API with Google Tag Manager, offering a detailed guide for digital marketers and webmasters.

Server-side Snapchat Conversion API (CAPI) & Snapchat pixel Setup using Google Tag Manager without touch website Code

Server-side Meta Conversions API (CAPI) Tracking with Event Match Quality using Google Tag Manager without Meta event deduplication using Google Tag Manager

Server-Side Implementation with iOS 14 TikTok Events API using Google Tag Manager

Configuration Meta API Conversion with Google Tag Manager

GA4 Server Side Tagging for Enhanced Ecommerce tracking using Google Tag Manager

Understanding Meta Pixel and Conversions API

Meta Pixel: Formerly known as the Facebook Pixel, the Meta Pixel is a piece of code that you add to your website. It enables you to track visitor activity, helping you understand how users interact with your website after viewing your Facebook ads. This data is crucial for ad optimization, remarketing, and understanding the effectiveness of your Facebook advertising campaigns.

Conversions API: The Conversions API works alongside the Meta Pixel, providing a way to send web and offline events directly from your server to Meta. This ensures more reliable data collection, especially in the face of increasing browser restrictions and privacy settings that can limit the effectiveness of pixel-based tracking.

Why Integrate with Google Tag Manager?

Google Tag Manager simplifies the process of adding and managing various tracking codes on your website. By integrating Meta Pixel and the Conversions API with GTM, you can:

  1. Easily deploy and update tracking tags without altering website code.
  2. Manage all tags in one place, ensuring consistency and reducing errors.
  3. Enhance data accuracy and overcome limitations posed by browser restrictions.

Step-by-Step Integration Guide

1. Setting Up Meta Pixel with Google Tag Manager

Step 1: Create a Meta Pixel

  • Visit your Meta Business Suite.
  • Navigate to the ‘Events Manager’ and click on ‘Connect Data Sources’.
  • Select ‘Web’ and then ‘Meta Pixel’. Follow the instructions to create a new pixel.

Step 2: Add Meta Pixel to Google Tag Manager

  • In GTM, create a new tag and select ‘Meta Pixel’ as the tag type.
  • Enter your Pixel ID (found in your Meta Business Suite).
  • Choose the trigger as ‘All Pages’ to fire the pixel on every page load.

2. Integrating Conversions API with Google Tag Manager

Step 1: Generate Access Token

  • In your Meta Business Suite, under ‘Events Manager’, select your pixel.
  • Navigate to the ‘Settings’ and find the ‘Conversions API’ section.
  • Generate an access token that will be used for authentication.

Step 2: Setting up the Server-Side Tag in GTM

  • In GTM, go to your container and select ‘Server’ as the container type.
  • Create a new tag and choose ‘Conversions API’ as the tag type.
  • Input your Pixel ID and the Access Token.
  • Define triggers based on the events you want to track (e.g., form submissions, purchases).

3. Testing and Debugging

Once you have set up the Meta Pixel and Conversions API in GTM, it’s crucial to test and ensure that they are firing correctly.

  • Use the ‘Preview’ mode in GTM to test your tags.
  • Verify that the Meta Pixel is firing using the Meta Pixel Helper Chrome extension.
    Check the ‘

Events Manager’ in your Meta Business Suite to confirm that events are being received through the Conversions API.

4. Configuring Events for Tracking

Both Meta Pixel and Conversions API allow you to track a variety of user actions. Common events include page views, form submissions, purchases, and lead generation. You can configure these events in GTM:

For Meta Pixel: Use the built-in event configuration or custom JavaScript within tags to define and fire specific events.
For Conversions API: Define the events you want to track in your server-side tag setup. Ensure that the parameters sent match those expected by Meta for each event type.

5. Advanced Configurations and Best Practices

For businesses looking to leverage these tools to their fullest, consider the following advanced strategies:

  • Custom Data Parameters: Customize events with additional data parameters for deeper insights into user behavior.
  • Dynamic Remarketing: Use Meta Pixel to track product views and leverage this data for dynamic remarketing campaigns.
  • Conversion Optimization: Utilize the data from both tools to optimize your Meta advertising campaigns for specific conversion events.

6. Monitoring and Analyzing Performance

Regular monitoring and analysis are essential. Use the reporting tools available in both the Meta Business Suite and Google Analytics (connected via GTM) to:

  • Analyze the performance of different events and the user journey.
  • Adjust your marketing strategies based on data-driven insights.
  • Conduct A/B testing to optimize ad performance and website user experience.

8. Troubleshooting Common Issues

Some common challenges might include discrepancies in data, tag firing issues, or data not appearing in reports. To troubleshoot:

  • Verify that the Pixel ID and Access Token are correctly configured.
  • Check that triggers are set up correctly in GTM.
  • Use debugging tools like the GTM Preview mode and Meta Pixel Helper.

Conclusion

Integrating Meta Pixel and the Conversions API with Google Tag Manager offers a powerful combination for tracking, analyzing, and optimizing your digital marketing efforts. By following this guide, you can set up a robust tracking system that enhances your ability to understand and engage your audience effectively, all while maintaining data accuracy and privacy compliance. As digital marketing continues to evolve, staying ahead with these advanced tracking techniques will be crucial for business success.

Server-side Tracking Facebook Conversions API (CAPI) with Event Match Quality

Standard

Server-side Facebook Conversions API (CAPI) Tracking with Event Match Quality using Google Tag Manager without Facebook event deduplication using Google Tag Manager

Recently one of client ask me to implemented to implement Facebook Server-side Conversions API (CAPI) Tracking using Google Tag Manager without Event Deduplication using Google Tag Manager.

Server-side Facebook Conversions API Tracking

Facebook Server-side Conversions API (CAPI) Tracking with Event Match Quality

Set Up Server-side Tracking Facebook Conversions API with Event Match Quality using Google Tag Manager 

Paste this code as high in the <head> of the page as possible:

<!– Google Tag Manager –>

<script>(function(w,d,s,l,i){w[l]=w[l]||[];w[l].push({‘gtm.start’:
new Date().getTime(),event:’gtm.js’});var f=d.getElementsByTagName(s)[0],
j=d.createElement(s),dl=l!=’dataLayer’?’&l=’+l:”;j.async=true;j.src=
‘https://www.googletagmanager.com/gtm.js?id=’+i+dl;f.parentNode.insertBefore(j,f);
})(window,document,’script’,’dataLayer’,’GTM-XXXX’);</script>
<!– End Google Tag Manager –>

Additionally, paste this code immediately after the opening <body> tag:
<!– Google Tag Manager (noscript) –>
<noscript><iframe src=”https://www.googletagmanager.com/ns.html?id=GTM-XXXX”
height=”0″ width=”0″ style=”display:none;visibility:hidden”></iframe></noscript>
<!– End Google Tag Manager (noscript) –>

Note: Make you will replace GTM Tracking Code with your GTM ID XXXXX

    • Server-Side Facebook Conversions API (CAPI) Tracking Magento – Set Up Server-Side GA4 Tracking for Server-side Facebook Conversions API (CAPI) with Event Match Quality integration using Google Tag without touchCode for Magento
    • Server-Side Facebook Conversions API (CAPI) Tracking Woocommerce – Set Up Server-Side GA4 Tracking for Server-side Facebook Conversions API (CAPI) with Event Match Quality using Google Tag without touchCode for Woocommerce
    • Server-Side Facebook Conversions API (CAPI) Tracking Volusion – Set Up Server-Side GA4 Tracking for Server-side Facebook Conversions API (CAPI) with Event Match Quality using Google Tag without touchCode for Volusion
    • Server-Side Facebook Conversions API (CAPI) Tracking for Bigcommerce – Set Up Server-Side GA4 Tracking forServer-side Facebook Conversions API (CAPI) with Event Match Quality using Google Tag without touchCode for BigCommerce 
    • Server-Side Facebook Conversions API (CAPI) Tracking for Neto – Set Up Server-Side GA4 Tracking for Server-side Facebook Conversions API (CAPI) with Event Match Quality using Google Tag without touchCode for Neto
    • Server-Side Facebook Conversions API (CAPI) Tracking for Shopify – Set Up Server-Side GA4 Tracking for Server-side Facebook Conversions API (CAPI) with Event Match Quality using Google Tag without touchCode for Shopify
    • Server-Side Facebook Conversions API (CAPI) Tracking for Custom Website – Set Up Server-Side GA4 Tracking for Server-side Facebook Conversions API (CAPI) with Event Match Quality using Google Tag without touchCode for Custom Website
    • Server-Side Facebook Conversions API (CAPI) Tracking for SquareSpace – Set Up Server-Side GA4 Tracking for Server-side Facebook Conversions API (CAPI) with Event Match Quality integration using Google Tag without touchCode for SquareSpace
    • Server-Side Facebook Conversions API (CAPI) for Opencart – Set Up Server-Side GA4 Tracking for Server-side Facebook Conversions API (CAPI) with Event Match Qualityusing Google Tag without touchCode for Opencart
    • Server-Side Facebook Conversions API (CAPI) for Wix -Set Up Server-Side GA4 Tracking for Server-side Facebook Conversions API (CAPI) with Event Match Quality using Google Tag without touchCode for Wix
    • Server-Side Facebook Conversions API (CAPI) for weebly – Set Up Server-Side GA4 Tracking for Server-side Facebook Conversions API (CAPI) with Event Match Quality using Google Tag without touchCode for Weebly
    • Server-Side Facebook Conversions API (CAPI) for osCommerce – Set Up Server-Side GA4 Tracking for Server-side Facebook Conversions API (CAPI) with Event Match Quality using Google Tag without touchCode for osCommerce
    • Server-Side Facebook Conversions API (CAPI) for Joomla – Set Up Server-Side GA4 Tracking for Server-side Facebook Conversions API (CAPI) with Event Match Qualityusing Google Tag without touchCode for Joomla
    • Server-Side Facebook Conversions API (CAPI) for Drupal – Set Up Server-Side GA4 Tracking for Server-side Facebook Conversions API (CAPI) with Event Match Quality using Google Tag without touchCode for Drupal
    • Server-Side Facebook Conversions API (CAPI) for OpenCart – Set Up Server-Side GA4 Tracking for Server-side Facebook Conversions API (CAPI) with Event Match Quality integration using Google Tag without touchCode for OpenCart
    • Server-Side Facebook Conversions API (CAPI) for PestaShop – Set Up Server-Side GA4 Tracking for Server-side Facebook Conversions API (CAPI) with Event Match Quality using Google Tag without touchCode for PestaShop

PageView:  It will trigger when a visitor visits, pages and Page loaded in the browser, it will send a pageView event for Server-Side Facebook Conversions API (CAPI) using Google Tag Manager

Setup Facebook Conversions API with Google Tag Manager

Google Tag Manager Server-Side with Facebook Conversion API

ViewContent:  It will trigger when a visitor visits a product  page , it will send a ViewContent event for Server-Side Facebook Conversions API (CAPI) using Google Tag Manager

Setup Facebook Conversions API with Google Tag Manager

Facebook Conversion API Manual Server-Side Tracking with Google Tag Manager

AddToCart:  It will trigger when a visitor visits a product  page then Click on AddToCart Button  , it will send a AddToCart event for Server-Side Facebook Conversions API (CAPI) using Google Tag Manager

Facebook conversion API set up

GA4 Server Side tracking for Facebook conversion API Setup using Google Tag Manager

InitiateCheckout:  It will trigger when a visitor entered to a checkout before buy a product  , it will send a InitiateCheckout event for Server-Side Facebook Conversions API (CAPI) using Google Tag Manager

Configure Server-Side Conversion API Events

Configure Server-Side Conversion API Events using Google Tag Manager

Purchase:  It will trigger when a visitor completed a purchased , it will send a purchase event for Server-Side Facebook Conversions API (CAPI) using Google Tag Manager

Purchase Server-Side Tracking Facebook Conversion API

Purchase Server-Side Tracking via Facebook Conversion API for Google Tag Manager

Warning: If you do n’t know about javascript or do n’t have developing knowledge then do n’t try to Server-side Tracking Facebook Conversions API (CAPI) with Event Match Quality using Google Tag Manager that can broke your site, Cart and other functionality 

Disclaimer: Google tag manager belongs to Google property 

For Contact: mappchero@gmail.com

I am available for Hire on Freelancer: Freelancer.com

I am available for Hire on Upwork: Upwork.com

I am available for Hire on Peopleperhour: Peopleperhour.com

I am available for Hire on Guru: Guru.com

Set Up Server-Side GA4 Tracking for Enhanced Ecommerce tracking

Standard

GA4 Server Side Tagging for Enhanced Ecommerce tracking using Google Tag Manager without Code Changes

Recently, one of client asks me to implement GA4 Server-side eCommerce Tracking and Enhanced eCommerce Tracking using Google Tag Manager without changing the previous data layer Code for Server Side Enhanced eCommerce tracking for GA4.

Implement GA4 Server-side Tracking with Google Tag Manager 

Server Side GA4 Ecommerce Tracking

Server Side Google Analytics 4 ( GA4) Ecommerce Tracking

Set Up Server-Side GA4 Tracking for Enhanced Ecommerce tracking for GA4 Server-side

Paste this code as high in the <head> of the page as possible:
<!– Google Tag Manager –>
<script>(function(w,d,s,l,i){w[l]=w[l]||[];w[l].push({‘gtm.start’:
new Date().getTime(),event:’gtm.js’});var f=d.getElementsByTagName(s)[0],
j=d.createElement(s),dl=l!=’dataLayer’?’&l=’+l:”;j.async=true;j.src=
‘https://www.googletagmanager.com/gtm.js?id=’+i+dl;f.parentNode.insertBefore(j,f);
})(window,document,’script’,’dataLayer’,’GTM-XXXX’);</script>
<!– End Google Tag Manager –>
Additionally, paste this code immediately after the opening <body> tag:
<!– Google Tag Manager (noscript) –>
<noscript><iframe src=”https://www.googletagmanager.com/ns.html?id=GTM-XXXX”
height=”0″ width=”0″ style=”display:none;visibility:hidden”></iframe></noscript>
<!– End Google Tag Manager (noscript) –>

Note: Make you will replace GTM Tracking Code with your GTM ID XXXXX

    • Server Side Tagging Conversion API Magento – Set Up Server-Side GA4 Tracking for Enhanced Ecommerce tracking  Server Side integration using Google Tag without touchCode for Magento
    • Server Side Tagging Conversion API Woocommerce – Set Up Server-Side GA4 Tracking for Enhanced Ecommerce tracking Server Side integration using Google Tag without touchCode for Woocommerce
    • Server Side Tagging Conversion API Volusion – Set Up Server-Side GA4 Tracking for Enhanced Ecommerce tracking integration using Google Tag without touchCode for Volusion
    • Server Side Tagging Conversion API for Bigcommerce – Set Up Server-Side GA4 Tracking for Enhanced Ecommerce tracking integration using Google Tag without touchCode for BigCommerce 
    • Server Side Tagging Conversion API for Neto – Set Up Server-Side GA4 Tracking for Enhanced Ecommerce tracking using Google Tag without touchCode for Neto
    • Server Side Tagging Conversion API for Shopify – Set Up Server-Side GA4 Tracking for Enhanced Ecommerce tracking using Google Tag without touchCode for Shopify
    • Server Side Tagging Conversion API for Custom Website – Set Up Server-Side GA4 Tracking for Enhanced Ecommerce tracking using Google Tag without touchCode for Custom Website
    • Server Side Tagging Conversion API for SquareSpace – Set Up Server-Side GA4 Tracking for Enhanced Ecommerce tracking integration using Google Tag without touchCode for SquareSpace
    • Server Side Tagging Conversion API for Opencart – Set Up Server-Side GA4 Tracking for Enhanced Ecommerce tracking using Google Tag without touchCode for Opencart
    • Server Side TaggingConversion API for Wix -Set Up Server-Side GA4 Tracking for Enhanced Ecommerce tracking using Google Tag without touchCode for Wix
    • Server Side TaggingConversion API for weebly – Set Up Server-Side GA4 Tracking for Enhanced Ecommerce tracking using Google Tag without touchCode for Weebly
    • Server Side TaggingConversion API for osCommerce – Set Up Server-Side GA4 Tracking for Enhanced Ecommerce tracking using Google Tag without touchCode for osCommerce
    • Server Side Tagging Conversion API for Joomla – Set Up Server-Side GA4 Tracking for Enhanced Ecommerce tracking using Google Tag without touchCode for Joomla
    • Server Side TaggingConversion API for Drupal – Set Up Server-Side GA4 Tracking for Enhanced Ecommerce tracking using Google Tag without touchCode for Drupal
    • Server Side Tagging Conversion API for OpenCart – Set Up Server-Side GA4 Tracking for Enhanced Ecommerce tracking integration using Google Tag without touchCode for OpenCart
    • Server Side Tagging Conversion API for PestaShop – Set Up Server-Side GA4 Tracking for Enhanced Ecommerce trackingusing Google Tag without touchCode for PestaShop

view_item_list: To Track product impression for Server-side GA4 Tagging Enhanced Ecommerce Tracking Enhanced Ecommerce Tracking using Google Tag Manager used custom javascript to get the value of price, product and brand etc

GA4 Server-Side Ecommerce Tracking

Set Up GA4 Tracking Using GTM Server-Side Ecommerce Tracking

select_item: To Track Product Click from Category to Work Server Side GA4 Enhance Ecommerce Tracking using Google Tag Manager used custom javascript to get the value of price, product and brand etc

GA4 Integrating Server Side Enhanced Ecommerce

Integrating Server Side Enhanced Ecommerce Tracking for GA4

add_to_cart: To Track number product added to shopping Cart Server Side GA4 Enhance Ecommerce Tracking using Google Tag Manager used custom javascript to get the value of price, product and brand etc

Implementing a Server-side GTM

Google GA4 Analytics Server side Pixel Tracking

view_cart: To Track views the cart process by Server Side GA4 Enhance Ecommerce Tracking using Google Tag Manager used custom javascript to get the value of price, product and brand etc

 Server Side Conversion API Events

Configure Server Side Conversion API Events using Google Tag Manager

begin_checkout: To Track start  Process of checkout process by Server Side GA4 Enhance Ecommerce Tracking using Google Tag Manager used custom javascript to get the value of price, product and brand etc

Sever Side GA4 Enhanced Ecommerce tracking

Server-side GA4 Enhanced Ecommerce tracking using Google Tag Manager

purchase: measuring a purchase a product by customer event sent to Server Side GA4 Enhance Ecommerce Tracking using Google Tag Manager used custom javascript to get the value of price, product and brand etc


Server-Side GA4 Tracking for Enhanced Ecommerce tracking

Purchase Event Server-Side GA4 Tracking for Enhanced Ecommerce tracking

Warning: If you do n’t know about javascript or do n’t have developing knowledge then do n’t try to Set Up Set Up Server-Side GA4 Tracking for Enhanced Ecommerce tracking using Google Tag Manager that can broke your site, Cart and other functionality 

Disclaimer: Google tag manager belongs to Google property 

For Contact: mappchero@gmail.com

I am available for Hire on Freelancer: Freelancer.com

I am available for Hire on Upwork: Upwork.com

I am available for Hire on Peopleperhour: Peopleperhour.com

I am available for Hire on Guru: Guru.com