Mastering Form Submission Tracking in GA4 and Google Ads via Google Tag Manager

Standard

In the ever-evolving landscape of digital marketing, understanding user behavior is pivotal. One critical aspect of this is tracking form submissions on your website. Whether it’s a sign-up, contact form, or a download request, form submissions are a key performance indicator. Integrating Google Analytics 4 (GA4) and Google Ads with Google Tag Manager (GTM) for tracking these submissions offers a streamlined, powerful solution.

Understanding the Basics:

Before diving into the setup, it’s essential to have a foundational understanding of the tools involved:

  1. Google Analytics 4 (GA4): The latest iteration of Google’s analytics service, offering more flexibility and AI-driven insights compared to its predecessor, Universal Analytics.
  2. Google Ads: A platform for running paid advertisements across Google’s network, including search results, websites, and YouTube.
  3. Google Tag Manager (GTM): A tag management system that simplifies the process of adding and updating website tags without needing to edit the code.

Step 1: Setting Up Google Tag Manager

  1. Create a GTM Account and Container: If you haven’t already, sign up for GTM and create a container for your website.
  2. Install GTM on Your Website: Follow GTM’s instructions to add the container code to your website. This involves adding two snippets of code to your site’s pages.

Step 2: Configuring GA4 and Google Ads

  1. Set Up a GA4 Property: If you’re not already using GA4, set up a new GA4 property in your Google Analytics account.
  2. Link GA4 with Google Ads: In your GA4 property, link your Google Ads account. This enables the sharing of data between GA4 and Google Ads.

Step 3: Creating Tags in GTM for Form Submission Tracking

  1. Create a New Tag for GA4: In GTM, create a new tag and select GA4 Configuration as the tag type. Enter your GA4 Measurement ID.
  2. Set Up Trigger for Form Submissions: Create a trigger that fires on form submissions. This can be based on form ID, form class, or form submission events, depending on how your website is structured.

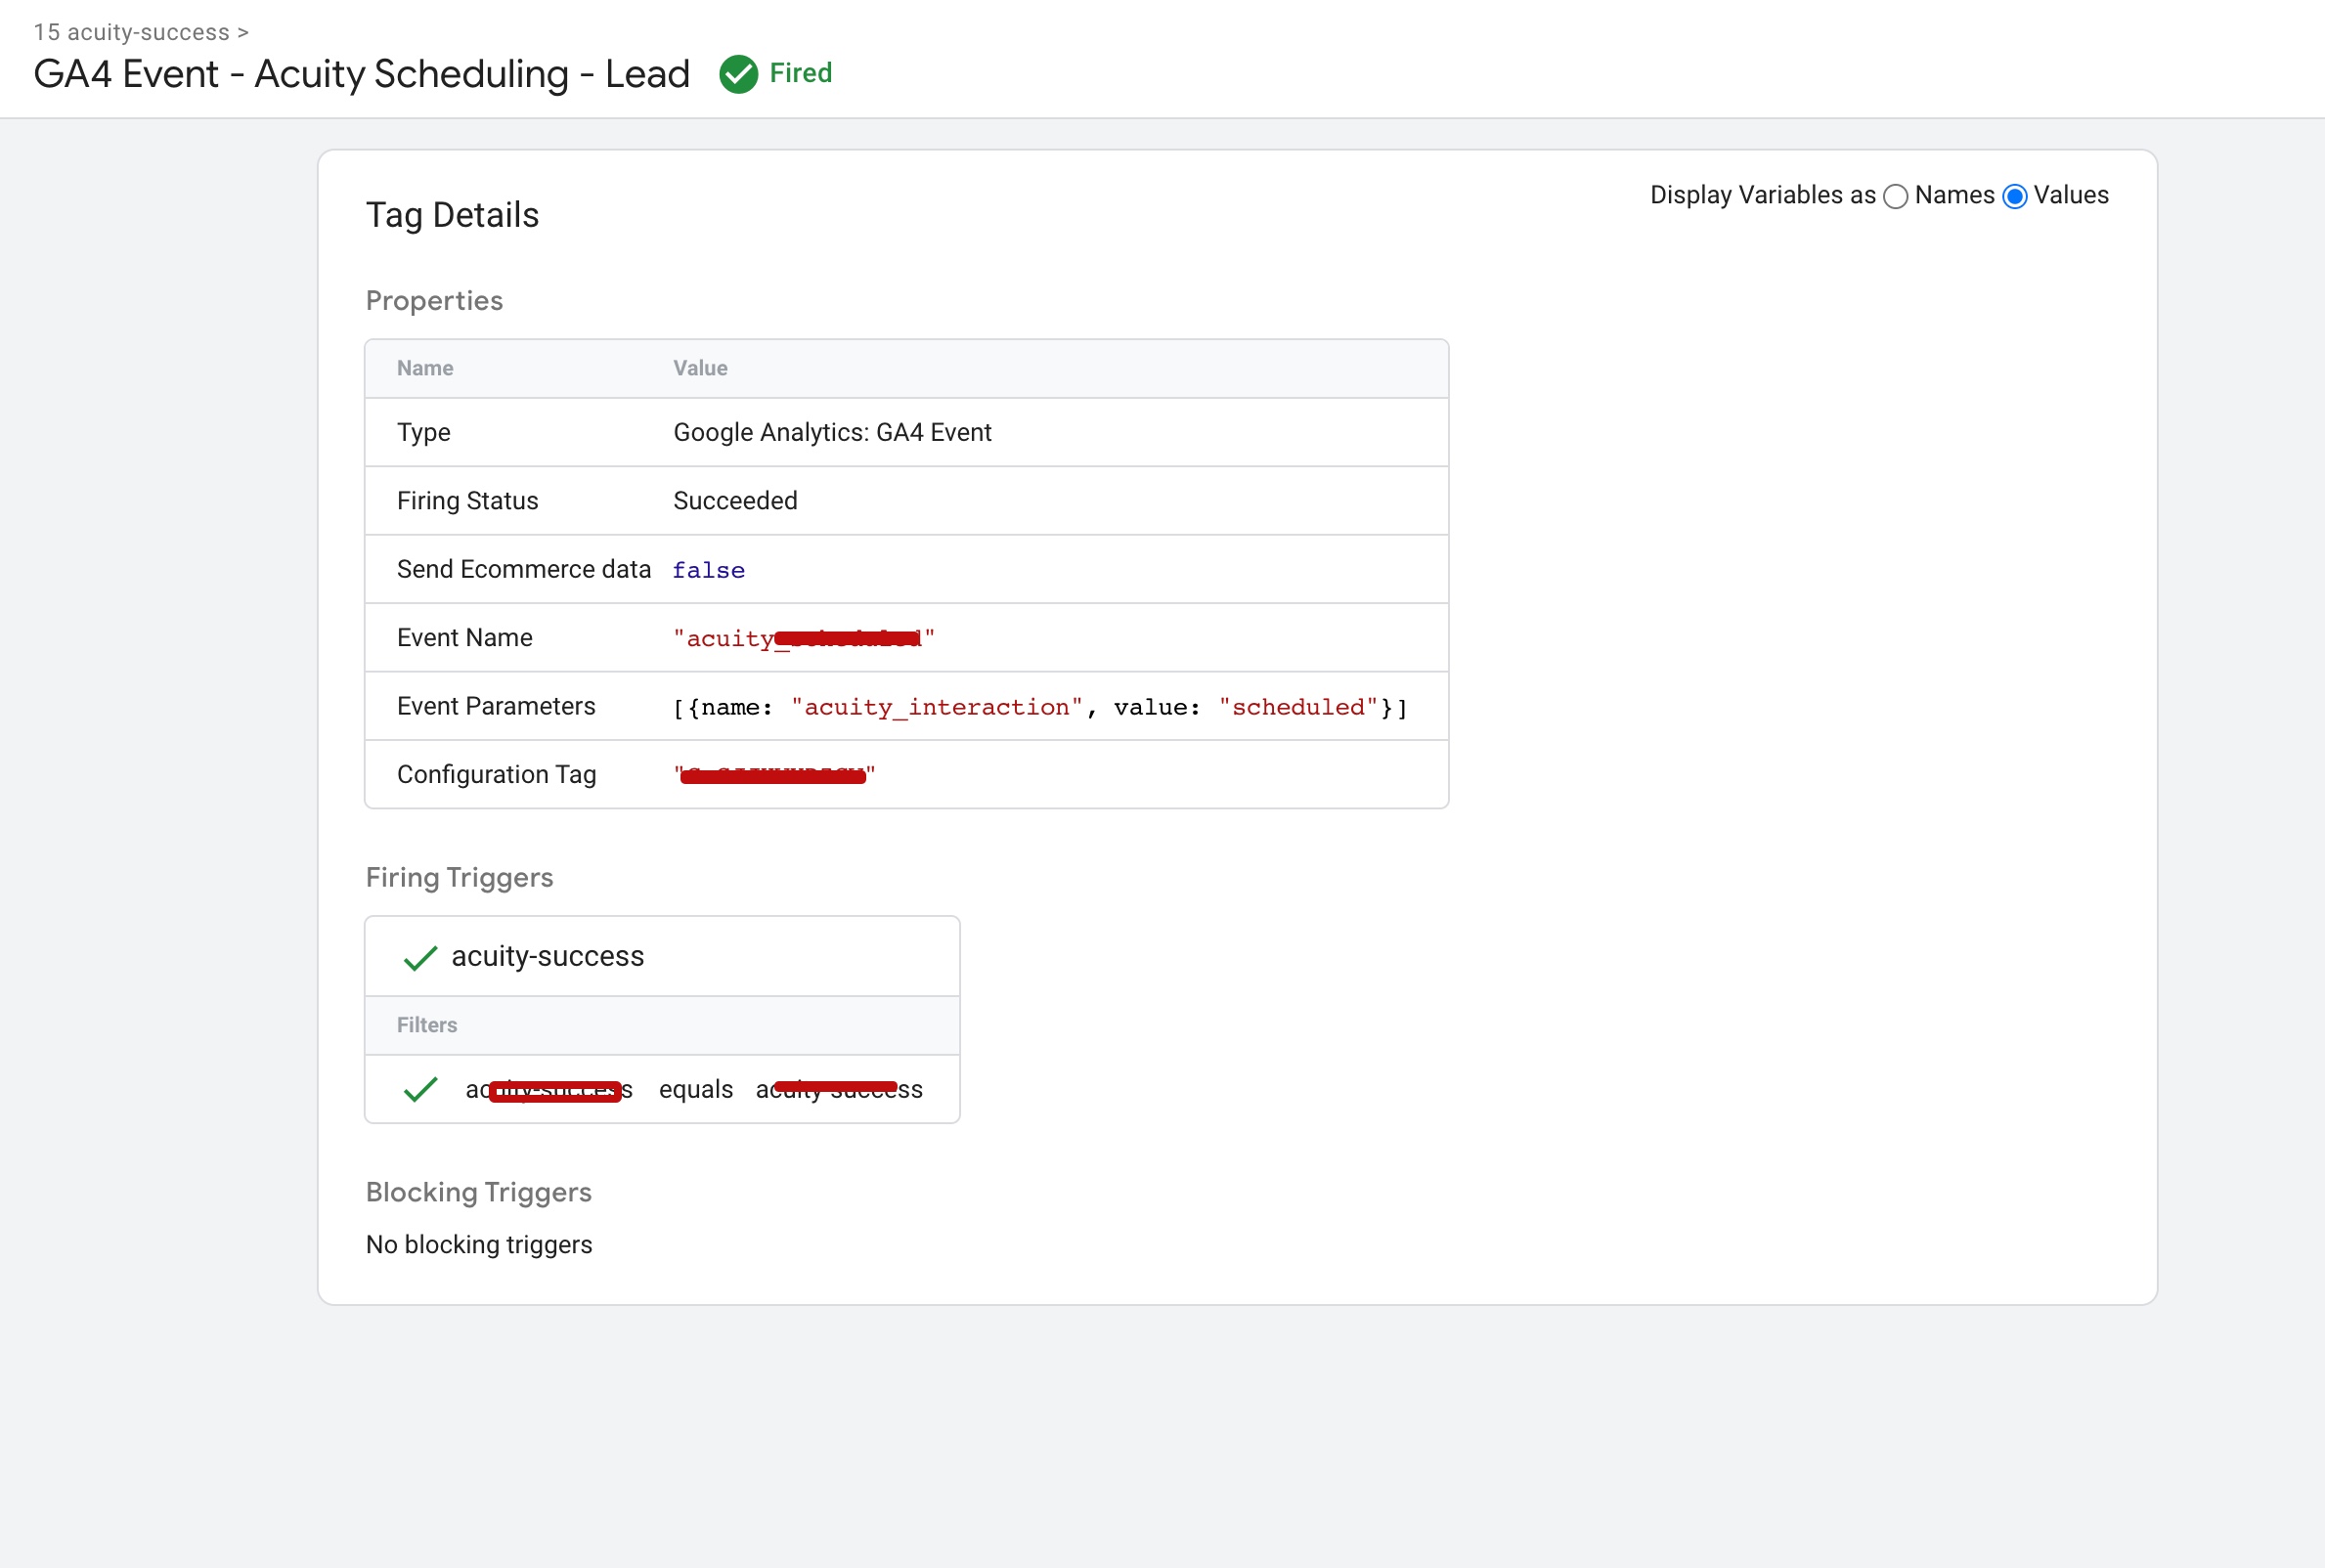
Step 4: Testing and Debugging

  1. Use GTM’s Preview Mode: Before publishing, use GTM’s preview mode to test your new tags and triggers. Ensure that the tag fires correctly when a form is submitted.
  2. Debug if Necessary: If the tag doesn’t fire, use GTM’s debugging tools to diagnose and fix the issue.

Step 5: Publishing and Going Live

Once you’ve tested and confirmed that everything is working, publish the changes in GTM. Your form submission tracking is now live.

Step 6: Viewing Data in GA4 and Google Ads

  1. Check Real-time Reports in GA4: Go to your GA4 property and view real-time reports to see immediate data on form submissions.
  2. Analyze in Google Ads: In your linked Google Ads account, you can now view and analyze how your ads contribute to form submissions.

Advanced Considerations:

  • Enhanced Measurement in GA4: GA4 offers enhanced measurement options that can automatically track certain types of form submissions. Explore these settings for additional insights.
  • Custom Dimensions and Metrics: If you need more detailed information, consider setting up custom dimensions and metrics in GA for your form submissions.
  • Cross-Domain Tracking: If your form redirects users across different domains, ensure you have cross-domain tracking set up in GA4.
  • Conversion Tracking in Google Ads: Utilize the data from form submissions as conversions in Google Ads to optimize your ad campaigns.
  • Using Google Ads Conversion Tags: For more accurate conversion data in Google Ads, consider setting up separate Google Ads conversion tags through GTM.
  • Event Parameters: Customize event parameters in GA4 for more granular data on form submissions, like form names or categories.

Conclusion:

Setting up form submission tracking in GA4 and Google Ads via Google Tag Manager can initially seem daunting, but by following these detailed steps, you can gain powerful insights into user interactions with your forms. This data is invaluable for understanding the effectiveness of your website and ad campaigns, ultimately leading to more informed decisions and improved digital marketing strategies.

Acuity (Squarespace) Scheduling Setup event for Google Analytic 4 (GA4)

Standard

Acuity (Squarespace) Scheduling Setup event for Google Analytics 4 (GA4) involves configuring event tracking for specific user interactions on your Acuity Scheduling booking page, such as booking confirmations, appointment rescheduling, or appointment cancellations. By setting up event tracking, you can monitor user behavior and measure the effectiveness of your Acuity Scheduling booking page.

To set up an event for Acuity (Squarespace) Scheduling in GA4, you need to first create a new event in your GA4 property. This involves defining the event name, category, and action, and adding any relevant parameters to track. Once you have created the event, you can add the GA4 tracking code to your Acuity (Squarespace) Scheduling booking page. This code should be added to the header section of the booking page to ensure that it tracks all user interactions.

After adding the GA4 tracking code, it’s important to test the event to make sure it’s working properly. You can do this by completing a test booking and checking if the event shows up in your GA4 property. If the event is tracked successfully, you can start analyzing the data to gain insights into user behavior and optimize your booking page to improve conversion rates.

Overall, setting up event tracking for Acuity (Squarespace) Scheduling in GA4 is a powerful way to monitor user behavior and measure the effectiveness of your booking page. By tracking specific user interactions,

Setting up an event for Acuity Scheduling in Google Analytics 4 (GA4) using Google Tag Manager (GTM) can be done in a few simple steps. Here’s how:

  1. Set up a GA4 Property:
    • Sign in to your Google Analytics account
    • Create a new GA4 property if you haven’t already
    • Follow the prompts to set up the property

2. Set up a Tag in GTM:

    • Sign in to your Google Tag Manager account
    • Create a new tag by clicking “Tags” and then “New”
    • Enter a name for your tag
    • Choose “Google Analytics: GA4 Event” as the tag type
    • Configure the tag by filling out the following fields:
    • Category: Enter a category for your event (e.g., “Booking”)
    • Action: Enter an action for your event (e.g., “Confirmed”)
    • Label: Enter a label for your event (e.g., “{{Appointment Type}}”)
    • Event Name: Enter a name for your event (e.g., “Booking Confirmation”)
    • Parameters: Add any additional parameters you want to track (e.g., {{Appointment Date}})
    • Choose “All Pages” as the trigger type
    • Save the tag

3. Add GTM Code to Acuity Scheduling:

    • Sign in to your Acuity (Squarespace) Scheduling account
    • Click on “Business Settings” and then “Integrations”
    • Select “Google Analytics” and paste the GTM code snippet in the “Google Tag Manager” section
    • Save the changes

4. Test the Event:

    • After adding the tag, it’s important to test that it’s working properly
    • Visit your Acuity Scheduling booking page and complete a test booking
    • After completing the booking, go back to your GA4 property and navigate to “Real-time” and then “Events”
    • Check if the test event shows up in your GA4 property

That’s it! You have now set up an event for Acuity(Squarespace) Scheduling in GA4 using Google Tag Manager. The event will track the number of bookings and provide information about the type of appointment, appointment date, and other parameters you have chosen to track.

Acuity (Squarespace) Scheduling Google Analytics 4 (GA4)

Implement Acuity (Squarespace) Scheduling Google Analytics 4 (GA4) using Google Tag Manager

Warning: If you don’t know about javascript or don’t have developing knowledge then don’t try to Acuity (Squarespace) Scheduling Setup event for Google Analytic 4 (GA4) that can break your site, Cart and other functionality 

Disclaimer: Google tag manager belongs to Google property 

For Contact: mappchero@gmail.com

I am available for Hire on Freelancer: Freelancer.com

I am available for Hire on Upwork: Upwork.com

I am available for Hire on Peopleperhour: Peopleperhour.com

I am available for Hire on Guru: Guru.com


To Track Form Submission Conversions in Zoho Forms in Google Analytic 4(GA4)

Standard

Track Zoho Forms Submission Events in Google Analytics 4 (GA4) using Google Tag Manager

With Zoho CRM, you can set up a “Web-to-Lead” form that connects to your Zoho Forms form, which will automatically create a lead in Zoho CRM when the form is submitted. This allows you to track the source of the lead and measure conversion rates.

To use Google Analytics 4 (GA4) for form tracking, you can set up a conversion goal in Google Analytics 4 (GA4) and add the tracking code to your Zoho Forms form. This will allow you to track form submissions as a conversion in Google Analytics, and analyze the traffic sources and behaviors of those who submit the form.

To track Zoho Form submissions as conversions in Google Analytics 4 (GA4) using Google Tag Manager, you can follow these steps:

  1. Create a GA4 Conversion event in Google Analytics

2. In Google Tag Manager, create a new tag of type “Google Analytics: GA4 Event” and configure it to fire on the submission of the Zoho Form.

3. In the tag configuration, set the “Event name” to the name of the GA4 Conversion event you created in step 1.

4. Set the “Event parameters” to include any relevant data you want to capture about the form submission, such as the form name or URL.

5. Add a trigger to the tag that fires when the Zoho Form is submitted.

6. Preview and test the tag to ensure it is tracking conversions correctly.

To track Zoho Form submissions as conversions in Google Analytics using Google Tag Manager and a data layer, you can follow these steps:

  1. Set up the data layer in Zoho Forms. You can do this by adding a “Data Layer” field to your form and specifying a variable name (e.g. “formSubmission”).

2. Configure the form to populate the data layer field with a value when the form is submitted. This can be done using JavaScript or a custom function in Zoho Forms.

3. In Google Tag Manager, create a new tag of type “Custom HTML” and write a script that listens for the formSubmission event on the data layer.

3. In the script, push the event to Google Tag Manager’s data layer using the dataLayer.push() method.

4. Create a second tag of type “Google Analytics: Universal Analytics” or “Google Analytics: GA4 Event” and configure it to fire on the event pushed to the data layer in step 4.

5. Set the “Event name” to the name of the conversion event you want to track in Google Analytics.

6. Add any relevant event parameters to the tag configuration (e.g. form name or URL).

7. Add a trigger to the tag that fires when the event is pushed to the data layer.

8. Preview and test the tags to ensure they are tracking conversions correctly.

Once these tags are set up and firing correctly, you should be able to track Zoho Form submissions as conversions in Google Analytics 4 (GA4) and analyze the conversion data in the Google Analytics 4 (GA4) interface.

Warning: If you do n’t know about javascript or do n’t have developing knowledge then do n’t try to To Track Form Submission Conversions in Zoho Forms in Google Analytic 4(GA4) that can broke your site, Cart and other functionality 

Disclaimer: Google tag manager belongs to Google property 

For Contact: mappchero@gmail.com

I am available for Hire on Freelancer: Freelancer.com

I am available for Hire on Upwork: Upwork.com

I am available for Hire on Peopleperhour: Peopleperhour.com

I am available for Hire on Guru: Guru.com

Track Elementor Form Submission Google Analytics (GA4) with Google Tag Manager

Standard

To Track Elementor form submissions with Google Analytics 4 (GA4) using Google Tag Manager (GTM), you’ll need to create a custom tag in GTM that fires on form submissions and sends the data to GA4 as events.

To Track Elementor form submissions with Google Tag Manager (GTM), you’ll need to create a custom tag in GTM that fires when a form is submitted and pushes the form data to the data layer. The form data can then be used in other GTM tags or triggers to track the form submissions as events in Google Analytics 4 (GA4) or other marketing and analytics tools.

To push Elementor form submission data to the data layer using Javascript, you’ll need to listen for the elementor/forms/submit/success event and use dataLayer.push() to add the form data to the data layer.

Here is an example of how to do this:

  • Make sure you have both Elementor and GTM installed on your website.
  • In Elementor, create a form and make note of the form ID or class name.
  • In GTM, create a new custom tag and choose “Custom HTML” as the tag type.
  • In the HTML editor, add the following script:
<script>
  document.addEventListener("elementor/forms/submit/success", function(event) {
    if (event.target.id === 'form-id') {
      window.dataLayer = window.dataLayer || [];
      window.dataLayer.push({
        'event': 'elementor_form_submission',
        'formId': event.target.id,
        'submissionDate': new Date().toISOString(),
        'userInputs': event.detail.fields
      });
    }
  });
</script>

Note: Replace ‘form-id’ with the actual ID of your Elementor form.

  • Add a trigger for the tag, and choose “Custom Event” as the trigger type.
  • In the trigger’s configuration, enter “elementor_form_submission” as the event name.
  • Publish the changes to your GTM container.

Note: Replace ‘form-id’ with the actual ID of your Elementor form. This code listens for the elementor/forms/submit/success event and pushes an object with form data to the data layer when the form is successfully submitted. The data layer object includes the form ID, submission date, and user inputs. You can access this data in other tags or scripts that have access to the data layer.

Disclaimer: Google tag manager belongs to Google property 

For Contact: mappchero@gmail.com

I am available for Hire on Freelancer: Freelancer.com

I am available for Hire on Upwork: Upwork.com

I am available for Hire on Peopleperhour: Peopleperhour.com

I am available for Hire on Guru: Guru.com

Google Analytics (GA4) Fluent Forms Event Tracking with Google Tag Manager

Standard

Google Analytics 4 (GA4) Event Tracking Fluent Forms via Google Tag Manager

Fluent Forms supports event tracking with Google Analytics 4 (GA4) through Google Tag Manager (GTM). With this setup, form submissions can be tracked as events in your GA4 property using the GTM container. To set up event tracking with GTM and GA4, you’ll need to have Fluent Forms and GTM installed on your website, create a form, and then configure the GA4 event tracking in GTM using a custom tag. You’ll also need to have a GA4 property and a GTM container with the GA4 tracking code set up for your website.

To Track Fluent Forms submissions using Google Tag Manager (GTM), you’ll need to create a custom tag that fires on form submissions. This tag can send information about the form submissions, such as the form ID, to your GTM data layer. From there, you can use the information in your GTM triggers and variables to track the submissions as events in Google Analytics, or pass the data to other marketing and analytics tools. To set this up, you’ll need to have both Fluent Forms and GTM installed on your website, as well as a basic understanding of how GTM works.

To push Fluent Forms submissions data to the data layer using JavaScript, you’ll need to write a custom script that retrieves the information you want to track, such as the form ID, submission date, and user inputs, and pushes it to the data layer. The data layer is a global object in the browser where you can store information that you want to pass between your website and GTM. The script should be triggered when a form is successfully submitted.

Here’s an example of what a basic script could look like:

document.addEventListener('fluentform_after_submission', function (event) {
  if (event.detail.formId === 'form-id') {
    window.dataLayer = window.dataLayer || [];
    window.dataLayer.push({
      'event': 'fluentform_submission',
      'formId': event.detail.formId,
      'submissionDate': new Date().toISOString(),
      'userInputs': event.detail.fields
    });
  }
});

Note that this is just one example, and you may need to modify the script based on your specific requirements and the data available in the Fluent Forms event object. To use the script, you’ll need to add it to your website’s HTML or JavaScript file and make sure it runs after both Fluent Forms and GTM are loaded.

Disclaimer: Google tag manager belongs to Google property 

For Contact: mappchero@gmail.com

I am available for Hire on Freelancer: Freelancer.com

I am available for Hire on Upwork: Upwork.com

I am available for Hire on Peopleperhour: Peopleperhour.com

I am available for Hire on Guru: Guru.com

Tracking Google Analytics 4 (GA4) Marketo Form Submission using Google Tag Manager

Standard

Google Analytics 4 (GA4) Marketo Form Submission Tracking using Google Tag Manager

GA4 Marketo Form Submission refers to the tracking of form submissions on Marketo landing pages using Google Analytics 4 (GA4). By integrating GA4 with Marketo, marketers can track the performance of their landing pages, including form submissions, and gain valuable insights into user behavior. This information can be used to optimize marketing strategies, improve the user experience, and increase conversion rates. The integration between GA4 and Marketo enables marketers to collect, analyze, and act on data from multiple sources to make data-driven decisions and drive better business outcomes.

To Track Marketo form submissions in Google Analytics 4 (GA4), you can set up an event in GA4 and then use Marketo’s tracking code to send form submission data as an event to GA4. Here’s a high-level overview of the steps:

  • Set up a GA4 event in your GA4 property: Go to the GA4 property for your website, navigate to the “Events” section, and create a new event for your Marketo form submissions.
  • Get your GA4 tracking code: In GA4, find your tracking code in the “Admin” section and copy it to your clipboard.
  • Add the GA4 tracking code to your Marketo form: In Marketo, go to the form you want to track and add the GA4 tracking code to the form’s tracking code.
  • Send form submission data as an event to GA4: In the tracking code, set up the event to be triggered when the form is submitted, and pass the form data as event parameters.

A Marketo Form Listener is a JavaScript code that listens for events on a Marketo form, such as when a form is submitted. The listener can then perform specific actions based on the event, such as sending the form data to another service or triggering an event in Google Analytics 4 (GA4).

To set up a Marketo Form Listener in Google Tag Manager (GTM), you’ll need to create a custom HTML tag and trigger in GTM and then add the Marketo Form Listener code to the custom HTML tag. Here’s a high-level overview of the steps:

Here’s an example of how you can set up a Marketo Form Listener:

  1. Create a custom HTML tag: In GTM, create a new custom HTML tag and add the Marketo Form Listener code to the tag.

2. Define the listener: In the custom HTML tag, define the listener using the Marketo Munchkin API.

MktoForms2.whenReady(function (form){
  form.onSubmit(function(){
    // Add your code here
  });
});

3. Create a trigger: In GTM, create a new trigger that fires on the page where your Marketo form is embedded.

4. Add the trigger to the custom HTML tag: In GTM, add the trigger to the custom HTML tag you created in step 1.

5. Perform actions based on the event: In the listener code, you can perform specific actions based on the form submission event, such as sending the form data to another service or triggering an event in Google Analytics 4 (GA4).

Here’s an example of how to send the form data to Google Analytics 4 (GA4):

MktoForms2.whenReady(function (form){
  form.onSubmit(function(){
    dataLayer.push({
      'event': 'formSubmission',
      'formId': form.getId()
    });
  });
}); 

By using a Marketo Form Listener in GTM, you can extend the functionality of your Marketo forms and perform specific actions based on form submissions, such as sending the form data to Google Analytics 4 (GA4).

Disclaimer: Google tag manager belongs to Google property 

For Contact: mappchero@gmail.com

I am available for Hire on Freelancer: Freelancer.com

I am available for Hire on Upwork: Upwork.com

I am available for Hire on Peopleperhour: Peopleperhour.com

I am available for Hire on Guru: Guru.com

Tracking Google Analytics 4 (GA4) Hubspot Forms Submission using Google Tag Manager

Standard

Conversions Tracking HubSpot Forms Submission in Google Analytics 4 (GA4) using Google Tag Manager

Tracking HubSpot Form Submissions in Google Analytics 4 (GA4) allows businesses to gather valuable insights into how users interact with their forms and make data-driven decisions to improve the user experience. To track form submissions in GA4, you need to set up GA4 tracking on your website and integrate it with HubSpot forms using Google Tag Manager (GTM).

HubSpot form submissions refer to the process of filling out and submitting a form on a website that is powered by the HubSpot platform. When a user submits a form, the data they entered is collected and stored in HubSpot, where it can be used for various purposes, such as lead generation, marketing automation, and sales enablement.

To track HubSpot forms in Google Analytics 4 (GA4), you can follow these steps:

  • Create a GA4 property and a GA4 tag in Google Tag Manager (GTM).
  • Add the GA4 tag to your website.
  • Copy the HubSpot form tracking code from your HubSpot account and paste it into GTM.
  • Create a trigger in GTM to track form submissions in GA4.
  • Test the form submissions in GA4 by navigating to the “Events” report.

Here’s an example of a trigger in GTM to track form submissions in GA4:

  • Go to GTM and click on “Triggers.”
  • Click on the “New” button to create a new trigger.
  • Give the trigger a name, such as “HubSpot Form Submission.”
  • Select “Custom Event” as the trigger type.
  • Enter “formSubmission” as the event name.
  • Save the trigger.

Here is an example of a HubSpot data layer script code that can be used to push form submission data to the data layer:

<script>
  hbspt.forms.create({
    target: '#your-form-container',
    onFormSubmit: function($form) {
      var data = {
        event: 'form_submission',
        form_id: $form.attr('id'),
        form_name: $form.find('.hs-form-name').text().trim()
      };
      window.dataLayer = window.dataLayer || [];
      window.dataLayer.push(data);
    }
  });
</script>

This script pushes a data object to the data layer when a form submission is confirmed. The data object contains information about the form ID and form name, which can be used in GTM tags and triggers.

Note: This is a basic example, and you can modify it to include additional information about the form submission such as field values, user information, and more. You will need to replace “your-portal-id” and “your-form-id” with the actual values from your HubSpot account.

Disclaimer: Google tag manager belongs to Google property 

For Contact: mappchero@gmail.com

I am available for Hire on Freelancer: Freelancer.com

I am available for Hire on Upwork: Upwork.com

I am available for Hire on Peopleperhour: Peopleperhour.com

I am available for Hire on Guru: Guru.com

Gravity Forms Submission Google Analytic 4 Event using Google Tag Manager

Standard

Track Gravity Forms Google Analytic 4 (GA4) With Google Tag Manager

Gravity Forms Tracking refers to the process of collecting and analyzing data about form submissions made using the Gravity Forms plugin for WordPress. This data can be used to gain insights into how users interact with your forms, such as the number of submissions, form fields that are being used, and common user paths. The tracking data can be used to optimize and improve the user experience, making it easier for users to complete forms and providing you with valuable insights into your website and audience. There are different methods to track Gravity Forms submissions, such as using Google Analytics, Google Tag Manager, custom code, or built-in tracking features within Gravity Forms.

GA4 Gravity Forms Tracking refers to the process of tracking Gravity Forms submissions in Google Analytics 4 (GA4). This allows you to gather information about form submissions and use that data to gain insights into how users interact with your forms. By tracking form submissions in GA4, you can see how many submissions were made, which form fields were used, and common user paths, among other things. This information can be used to optimize and improve the user experience, making it easier for users to complete forms and providing you with valuable insights into your website and audience. To track Gravity Forms submissions in GA4, you can use the Gravity Forms Google Analytics Add-On or a custom solution that integrates GA4 with Gravity Forms.

To use the Gravity Forms Data Layer script with Google Tag Manager (GTM), you can follow these steps:

  • Create a GTM container.
  • Install the GTM code on your WordPress website.
  • Create a data layer variable in GTM to access the Gravity Forms data.
  • Use the Gravity Forms Data Layer script to push form submission data to the data layer.
  • Create a tag in GTM to track the form submissions.
  • Verify the form submissions in Google Analytics 4 (GA4)by navigating to the “Events” report.

By using the Gravity Forms Data Layer script with GTM, you can access detailed information about form submissions and use it to create custom tags and triggers to track specific events and activities.

Here is an example of a Gravity Forms data layer script code that can be used to push form submission data to the data layer:

<script>
  if (!isReload) {
    var data = {
      event: 'form_submission',
      form_id: formId,
      form_name: jQuery('#gform_' + formId + ' .gform_title').text().trim()
    };
    window.dataLayer = window.dataLayer || [];
    window.dataLayer.push(data);
  }
});
</script>

This script pushes a data object to the data layer when a form submission is confirmed. The data object contains information about the form ID and form name, which can be used in GTM tags and triggers.

Note: This is a basic example, and you can modify it to include additional information about the form submission such as field values, user information, and more.

Disclaimer: Google tag manager belongs to Google property 

For Contact: mappchero@gmail.com

I am available for Hire on Freelancer: Freelancer.com

I am available for Hire on Upwork: Upwork.com

I am available for Hire on Peopleperhour: Peopleperhour.com

I am available for Hire on Guru: Guru.com

Set Up a Google Analytic 4 (GA4) Form Submission Conversion With Google Tag Manager

Standard

Track Form Submissions Conversion Using Google Analytics 4 (GA4) With Google Tag Manager

GA4 form submission refers to the tracking of form submissions in Google Analytics 4 (GA4). GA4 is the latest version of Google’s web analytics tool, and it allows you to track form submissions as events in real-time. This provides you with valuable data about the effectiveness of your forms and helps you make data-driven decisions to optimize your forms and improve your results.

To track form submissions in GA4, you need to install the GA4 tracking code on your website and create a conversion goal in GA4 based on the form submission event. You can also use Google Tag Manager to send the form submission data to GA4 and improve the accuracy of your tracking.

By tracking form submissions in GA4, you can see how many form submissions were made, what their values were, and which pages and campaigns generated the most form submissions. This information can help you make data-driven decisions to improve your forms, increase conversions, and ultimately drive more success for your business.

To set up a GA4 form submission conversion with Google Tag Manager, follow these steps:

  • Create a GA4 property: If you haven’t already done so, create a GA4 property in Google Analytics and install the GA4 tracking code on your website.
  • Set up a trigger in GTM: In Google Tag Manager, create a trigger that will fire when the form is submitted. This trigger will typically be based on a DOM event, such as “Form Submission.”
  • Create a GA4 event tag: In Google Tag Manager, create a GA4 event tag that will send the form submission data to GA4. Configure the tag to use the trigger you created in step 2, and set the event category, action, and label to reflect the form submission.
  • Set up the conversion in GA4: In GA4, create a conversion goal based on the form submission event. Make sure that the conversion goal is set up to track form submissions as events, not pageviews.
  • Preview and publish: Preview the GTM container to make sure the form submission data is being sent to GA4 correctly. If everything looks good, publish the container to make the form submission conversion tracking live on your website.
  • Verify the conversion data: In GA4, verify that the form submissions are being tracked as conversions. This data will be available in the Conversions report, which will show you how many form submissions were recorded and what their values were.

By following these steps, you should be able to set up form submission conversion tracking in GA4 using Google Tag Manager.

Warning: If you do n’t know about javascript or do n’t have developing knowledge then do n’t try to Set Up a Google Analytic 4 (GA4) Form Submission Conversion With Google Tag Manager that can broke your site, Cart and other functionality 

Disclaimer: Google tag manager belongs to Google property 

For Contact: mappchero@gmail.com

I am available for Hire on Freelancer: Freelancer.com

I am available for Hire on Upwork: Upwork.com

I am available for Hire on Peopleperhour: Peopleperhour.com

I am available for Hire on Guru: Guru.com

Ninja Form Submission Google Analytic 4 Event using Google Tag Manager

Standard

Set Up Ninja Forms Submission Event Google Analytic 4 (GA4) Tracking using Google Tag Manager

Tracking Ninja Forms conversions allows you to measure the effectiveness of your forms in converting visitors into leads or customers. There are several ways to track Ninja Forms conversions, including using Google Tag Manager (GTM) and Google Analytics 4 (GA4), and using JavaScript events.

With GTM, you can create a “Form Submission” trigger that fires when a Ninja Form is submitted, and then create a tag for the appropriate tracking code (such as Google Analytics or GA4) that fires on that trigger.

With GA4, you can use the “nfFormSubmit” event to track Ninja Forms conversions. This event is triggered when a form is submitted, and you can add GA4 event tracking code to run when the event is fired.

In both cases, you need to make sure that the tracking code is installed on your site and the script runs after the GA4 tracking code.

To track Ninja Forms conversions with Google Analytics 4 (GA4) using JavaScript events, you can use the “nfFormSubmit” event that is triggered when a form is submitted. Here’s an example of how you can set this up:

  1. Add the following JavaScript code to your Google Tag Manager 
document.addEventListener( 'nfFormSubmit', function( event ) {
    'event_category': 'Form',
    'event_label': 'Ninja Form'
  });
}, false );

Replace ‘event_category’ and ‘event_label’ values with the appropriate value for your implementation. Make sure that GA4 tracking code is installed on your site and the script runs after the GA4 tracking code. Once you have added the tracking code, the “nfFormSubmit” event will fire whenever a Ninja Form is submitted, and the GA4 event code will run.

Warning: If you do n’t know about javascript or do n’t have developing knowledge then do n’t try to Ninja Form Submission Google Analytic 4 Event using Google Tag Manager that can broke your site, Cart and other functionality 

Disclaimer: Google tag manager belongs to Google property 

For Contact: mappchero@gmail.com

I am available for Hire on Freelancer: Freelancer.com

I am available for Hire on Upwork: Upwork.com

I am available for Hire on Peopleperhour: Peopleperhour.com

I am available for Hire on Guru: Guru.com