Step-by-Step Guide to Integrating GA4 eCommerce Tracking on Your Shopify Store

Standard

In the ever-evolving landscape of digital marketing and e-commerce, staying ahead of the curve is crucial. For Shopify store owners, this means ensuring your store is effectively integrated with Google Analytics 4 (GA4), the latest iteration of Google’s analytics tool. GA4 offers advanced tracking features, helping you understand customer behavior and optimize your store for better performance. This comprehensive guide aims to simplify the process of integrating GA4 eCommerce tracking on your Shopify store in easy-to-follow steps.

Setup Google Analytics 4 Ecommerce Tracking on Shopify (Non-Plus) without an App

Set Up Advance eCommerce Google Analytics 4 (GA4) on Shopify Plus with Google Tag Manager without Any Shopify App

Understanding GA4 and Its Advantages for Shopify Stores

Google Analytics 4, commonly referred to as GA4, is the newest version of Google’s analytics platform. It differs significantly from its predecessor, Universal Analytics, by focusing on a more user-centric approach and offering more detailed insights into customer behavior across platforms and devices. For Shopify store owners, GA4 provides enhanced tracking capabilities, improved data collection methods, and better integration with Google’s advertising services. This allows for more accurate tracking of customer interactions, enhanced reporting features, and a better understanding of the customer journey.

Preparing Your Shopify Store for GA4 Integration

Before integrating GA4, ensure your Shopify store is ready. This preparation includes ensuring that your website is up to date and that all your products and pages are correctly configured. Additionally, it’s essential to familiarize yourself with GA4’s interface and features. You may also want to review your current analytics setup to understand what data you are already collecting and what additional information GA4 can provide.

  • Creating a GA4 Property

The first step in integrating GA4 is to create a new GA4 property in your Google Analytics account. To do this, log in to your Google Analytics account and click on ‘Admin’. Under the ‘Account’ column, select the appropriate account where you want the GA4 property. Then, in the ‘Property’ column, click on ‘+ Create Property’. Follow the onscreen instructions, ensuring to select ‘Web’ as your platform. This process will generate a new GA4 property with a unique tracking ID.

  • Configuring GA4 Settings for eCommerce Tracking

Once your GA4 property is created, the next step is to configure it for eCommerce tracking. This involves enabling data streams for your Shopify store in GA4. Go to ‘Admin’ in your GA4 property, then under the ‘Property’ column, click on ‘Data Streams’ and select your web stream. Here, ensure that ‘Enhanced Measurement’ is turned on, as it automatically tracks certain types of interactions. Next, navigate to ‘Events’ in the GA4 property and ensure that all relevant eCommerce events (like ‘purchase’, ‘add_to_cart’, etc.) are marked as ‘Engagement’ events to track them effectively.

  • Adding GA4 Tracking Code to Shopify

To integrate GA4 with your Shopify store, you need to add the GA4 tracking code to your Shopify theme. Firstly, find your GA4 tracking ID (it starts with ‘G-’) in your GA4 property. Then, in your Shopify admin, go to ‘Online Store’ and then ‘Themes’. Find your current theme and click on ‘Actions’, then ‘Edit code’. You need to add your GA4 tracking code to the theme.liquid file, preferably in thesection. This ensures the tracking code loads on every page of your store. Be cautious while editing the code and consider creating a backup of your theme before making changes.

  • Verifying the Integration and Troubleshooting Common Issues

After integrating GA4 with your Shopify store, it’s crucial to verify that the tracking is working correctly. You can do this by checking real-time reports in GA4 to see if it’s recording visits to your store. If you encounter issues, common troubleshooting steps include checking if the tracking code is correctly installed, ensuring that the GA4 property is properly configured, and confirming that there are no conflicts with other scripts or plugins on your Shopify store. If problems persist, consulting Shopify or GA4 support forums can be helpful.

  • Utilizing GA4 Data to Optimize Your Shopify Store

Once GA4 is successfully integrated and collecting data, you can start using this information to optimize your Shopify store. GA4 offers a wealth of data, including customer acquisition, behavior, and conversion metrics. Key areas to focus on include analyzing traffic sources to understand where your customers are coming from, examining user behavior to see how they interact with your store, and tracking conversions to understand what drives sales.

Leverage GA4’s audience segmentation to create targeted marketing campaigns. Use the insights to tailor your store’s layout, product placements, and marketing strategies. Monitor your checkout process and identify any drop-off points that could be optimized for better conversion rates.

Furthermore, GA4’s integration with other Google services, like Google Ads, can help in refining your advertising strategies based on the collected data. Use the audience data to create more effective and targeted ad campaigns, leading to better ROI.

Conclusion

Integrating GA4 eCommerce tracking on your Shopify store is a strategic move towards understanding your customers better and optimizing your store for increased sales and customer satisfaction. By following this step-by-step guide, you can ensure a smooth integration process. Once set up, GA4 opens up a new realm of analytics capabilities, from detailed customer insights to enhanced marketing strategies. Remember, the key to making the most of GA4 is continuous learning and adapting based on the data insights you gather. Embrace this powerful tool, and watch your Shopify store reach new heights of success.

Dynamic Remarketing Tags for a Shopify store

Standard

Google Ads Dynamic Remarketing Tags for a Shopify store using Google Tag Manager 

Dynamic remarketing tags for a Shopify store are a powerful tool that can help you reach potential customers who have previously interacted with your store. This technology allows you to create personalized ads that show products or services that are relevant to each visitor, based on their previous interactions with your Shopify store.

Dynamic remarketing tags work by tracking the pages that each visitor has viewed on your Shopify store, as well as the products that they have added to their cart or purchased. This data is then used to create ads that are tailored to each visitor’s interests and preferences, increasing the likelihood that they will return to your store and make a purchase.

To set up dynamic remarketing tags for your Shopify store, you will need to create a Google Ads account and connect it to your store. This involves installing a tracking code on your Shopify store that allows Google to track the actions of each visitor, such as the pages they view, the products they add to their cart, and their purchase history.

Once you have installed the tracking code, you can create remarketing lists in Google Ads that target specific groups of visitors based on their behavior on your Shopify store. For example, you could create a remarketing list that targets visitors who have added items to their cart but haven’t completed a purchase, or visitors who have viewed a particular category of products.

When you create dynamic ads in Google Ads, you can choose to show specific products or categories of products to each visitor, based on their behavior on your Shopify store. For example, if a visitor has added a particular item to their cart but hasn’t completed the purchase, you can show them an ad that features that specific product, along with a personalized message encouraging them to complete the purchase.

One of the key benefits of dynamic remarketing tags for Shopify stores is that they allow you to create highly personalized ads that are tailored to each visitor’s interests and preferences. This can be particularly effective in encouraging visitors to return to your store and complete a purchase, as they are more likely to engage with ads that are relevant to their needs and interests.

Another benefit of dynamic remarketing tags for Shopify stores is that they allow you to track the effectiveness of your advertising campaigns and optimize them for better performance. By tracking the behavior of each visitor and measuring the success of your ads in converting them into customers, you can make informed decisions about how to adjust your campaigns to achieve better results.

Overall, dynamic remarketing tags are an essential tool for any Shopify store owner who wants to increase their sales and attract more customers to their store. By creating personalized ads that are tailored to each visitor’s interests and preferences, you can build stronger relationships with your audience and encourage them to return to your store time and time again.

However, it’s important to note that setting up dynamic remarketing tags for your Shopify store requires some technical expertise and a good understanding of Google Ads. If you are not familiar with these technologies, it may be worth seeking the advice of an expert to help you get started and ensure that your campaigns are set up correctly.

In conclusion, dynamic remarketing tags for a Shopify store are a powerful tool that can help you reach potential customers who have previously interacted with your store. By creating personalized ads that are tailored to each visitor’s interests and preferences, you can increase the likelihood that they will return to your store and make a purchase. With the right strategy and expertise, dynamic remarketing tags can be an effective way to grow your Shopify store and achieve your business goals.

The ‘event’, ‘view_item_list‘ dynamic remarketing tag for a Shopify store is a powerful tool that allows you to track when a visitor views a list of products on your store. This data can then be used to create personalized ads that show relevant products to each visitor, increasing the likelihood that they will return to your store and make a purchase.

Google Ads Remarketing on Shopify

Setup Google Ads Dynamic Remarketing Tag on Shopify using Google Tag Manager

The ‘event’, ‘view_item’ dynamic remarketing tag for a Shopify store is a tracking code that allows you to monitor when a visitor views a specific product page on your store. By using this tag, you can create customized ads that show the exact product or related products to the visitor when they are browsing other websites or platforms.

Set Up Dynamic Remarketing Tag for Shopify

Install Google Ads Dynamic Remarketing on Shopify using Google Tag Manager

The ‘event’, ‘add_to_cart‘ dynamic remarketing tag for a Shopify store is a tracking code that allows you to monitor when a visitor adds a specific product to their cart on your store. By using this tag, you can create customized ads that show the product the visitor added to their cart or related products to the visitor when they are browsing other websites or platforms. This can help to increase the chances of conversion by reminding the visitor about the product they were interested in and potentially prompting them to return to your Shopify store to complete the purchase.

Dynamic Remarketing Google Ads Shopify

Adding Dynamic Remarketing Tags for Google Ads in Shopify using Google Tag Manager

The ‘event’, ‘purchase‘ dynamic remarketing tag for a Shopify store is a tracking code that allows you to monitor when a visitor completes a purchase on your store. By using this tag, you can create customized ads that show the visitor related products or accessories to the ones they have already purchased, or promote future sales and discounts, to encourage repeat purchases and build customer loyalty.

Google Ads Dynamic Remarketing for Shopify

Conversion Tracking and Dynamic Remarketing Tag for Shopify using Google Tag Manager

Warning: If you don’t know about javascript or don’t have developing knowledge then don’t try to Google Ads Dynamic Remarketing Tags for a Shopify store usig Google Tag Manager that can break your site, Cart and other functionality 

Disclaimer: Google tag manager belongs to Google property 

For Contact: mappchero@gmail.com

I am available for Hire on Freelancer: Freelancer.com

I am available for Hire on Upwork: Upwork.com

I am available for Hire on Peopleperhour: Peopleperhour.com

I am available for Hire on Guru: Guru.com

Shopify (Non-Plus) Google Analytics (GA4) Ecommerce Tracking using Google Tag Manager

Standard

Setup Google Analytics 4 Ecommerce Tracking on Shopify (Non-Plus) without an App

Google Tag Manager (GTM) is a free tool offered by Google that helps manage marketing tags (such as tracking and marketing optimization JavaScript tags) on your website.

Shopify is an e-commerce platform that provides a simple and convenient way to create an online store.

Google Analytics 4 (GA4) is the latest version of Google Analytics. It is a platform for collecting, processing, and analyzing customer data from websites and mobile apps.

Google Tag Manager can be integrated with Shopify and GA4 to enable e-commerce tracking. This involves setting up tracking tags in GTM to track various e-commerce-related events, such as product impressions, add-to-cart events, and purchases. The data collected through these tags is then sent to GA4, where it can be used to gain insights into customer behavior and to optimize your online store’s conversion rate.

Shopify Non-Plus eCommerce tracking refers to tracking e-commerce data and metrics on a Shopify store that doesn’t have the Plus plan. With GTM and GA4, you can still track e-commerce data and metrics on a non-Plus Shopify store, but you may need to customize your tracking implementation.

Event “view_item_list”: The “view_item_list” event in non-Shopify Plus ecommerce platforms with Google Analytics 4 (GA4) is used to track the view of a list of products on an ecommerce website. It is typically triggered when a customer views a product category page or a search results page. The event sends data to GA4, such as the products viewed, their IDs, and the categories they belong to, which can then be used to understand customer behavior and improve the shopping experience. This event is a key part of ecommerce tracking and is essential for measuring the effectiveness of product listings and category pages.

Set up GA4 eCommerce tracking on Non Shopify Plus using Google Tag Manager

Event “select_item”: The “select_item” event in non-Shopify Plus ecommerce platforms with Google Analytics 4 (GA4) is used to track when a customer selects a product for further information or purchase. This event is typically triggered when a customer clicks on a product from a list view, such as a product category or search results page. The event sends data to GA4, such as the product ID, name, and category, which can be used to understand customer behavior and preferences. This event is a key part of ecommerce tracking and helps to measure the success of product listings and determine which products are most popular with customers.

Add Google Analytics 4 to Non Shopify Plus

Setting up Google Analytics 4 (GA4) on Non Shopify Plus using Google Tag Manager

Event “view_item”:  The “view_item” event is a type of e-commerce tracking event that is triggered when a customer views a specific product on an online store. This event can provide valuable information about customer behavior, such as which products are attracting the most attention and which ones are being ignored.

In Google Analytics 4 (GA4), the “view_item” event can be tracked by sending the appropriate data to GA4 whenever the event occurs. If you are using Shopify and do not have the Plus plan, you can still track the “view_item” event by using Google Tag Manager (GTM) to set up a tracking tag that triggers when the event occurs. The data collected by the tag can then be sent to GA4 for analysis.

Non Shopify Plus GA4 eCommerce Tracking

Implement Non Shopify Plus GA4 Ecommerce Tracking using Google Tag Manager

Event “add_to_cart”: The “add_to_cart” event is a type of e-commerce tracking event that is triggered when a customer adds a product to their shopping cart on an online store. This event provides valuable information about customer behavior, such as which products are popular and which ones are being abandoned in the cart.

In Google Analytics 4 (GA4), the “add_to_cart” event can be tracked by sending the appropriate data to GA4 whenever the event occurs. If you are using Shopify and do not have the Plus plan, you can still track the “add_to_cart” event by using Google Tag Manager (GTM) to set up a tracking tag that triggers when the event occurs. The data collected by the tag can then be sent to GA4 for analysis.

Non Shopify Plus GA4 Analytics Setup

Ecommerce Tracking GA4 Non Shopify Plus on Google Tag Manager

Event “view_cart”:  The “view_cart” event is a type of e-commerce tracking event that is triggered when a customer views their shopping cart on an online store. This event provides valuable information about customer behavior, such as how often customers view their carts and whether they abandon their carts before completing a purchase.

In Google Analytics 4 (GA4), the “view_cart” event can be tracked by sending the appropriate data to GA4 whenever the event occurs. If you are using Shopify and do not have the Plus plan, you can still track the “view_cart” event by using Google Tag Manager (GTM) to set up a tracking tag that triggers when the event occurs. The data collected by the tag can then be sent to GA4 for analysis.

 Add Google Tag Manager Snippet to Shopify (Non-Plus)

Shopify (Non-Plus) Google Analytics 4 (GA4) eCommerce Tracking for Shopify using Google Tag Manager

Event “remove_from_cart”: The “remove_from_cart” event is a type of e-commerce tracking event that is triggered when a customer removes a product from their shopping cart on an online store. This event provides valuable information about customer behavior, such as which products are being removed from carts and why.

In Google Analytics 4 (GA4), the “remove_from_cart” event can be tracked by sending the appropriate data to GA4 whenever the event occurs. If you are using Shopify and do not have the Plus plan, you can still track the “remove_from_cart” event by using Google Tag Manager (GTM) to set up a tracking tag that triggers when the event occurs. The data collected by the tag can then be sent to GA4 for analysis.

 Install Google Analytics 4 on Shopify (Non-Plus)

Migrate All UA Events to Google Analytics 4 (GA4) In Shopify (Non-Plus) using Google Tag Manager

Event “purchase”: The “purchase” event is a type of e-commerce tracking event that is triggered when a customer completes a purchase on an online store. This event is crucial for measuring the success of an online store, as it provides information about revenue, average order value, and conversion rates.

In Google Analytics 4 (GA4), the “purchase” event can be tracked by sending the appropriate data to GA4 whenever the event occurs. If you are using Shopify and do not have the Plus plan, you can still track the “purchase” event by using Google Tag Manager (GTM) to set up a tracking tag that triggers when the event occurs. The data collected by the tag can then be sent to GA4 for analysis.

Google Analytics 4 Implementation Purchase Tracking in Shopify (Non Plus)

Set Up Google Analytics 4 (GA4) Ecommerce Purchase Tracking in Shopify (Non Plus) using Google Tag Manager

Warning: If you do n’t know about javascript or do n’t have developing knowledge then do n’t try to Set Up GA4 eCommerce tracking on Shopify (Non Plus) with Google Tag Manager without module that can broke your site, Cart and other functionality 

Disclaimer: Google tag manager belongs to Google property 

For Contact: mappchero@gmail.com

I am available for Hire on Freelancer: Freelancer.com

I am available for Hire on Upwork: Upwork.com

I am available for Hire on Peopleperhour: Peopleperhour.com

I am available for Hire on Guru: Guru.com


Set Up GA4 eCommerce tracking on Shopify Plus with Google Tag Manager

Standard

Set Up Advance eCommerce Google Analytics 4 (GA4) on Shopify Plus with Google Tag Manager without Any Shopify App

Google Tag Manager (GTM) can be used to track ecommerce activity on a Shopify Plus website with Google Analytics 4 (GA4). GA4 is the latest version of Google Analytics and has a different tracking methodology compared to Universal Analytics. To track ecommerce activities in Google Analytics 4 (GA4), you need to create a GA4 property and install the Google Analytics 4 (GA4) tracking code on your Shopify Plus website. Once the tracking code is installed, you can set up tags in GTM to track important events such as product views, add to carts, and purchases, and send that data to your Google Analytics 4 (GA4) property for analysis. GTM provides a user-friendly interface for setting up and managing tracking, making it easier for non-technical users to implement ecommerce tracking.

Google Tag Manager (GTM) can be used in conjunction with Google Analytics 4 (GA4) to track ecommerce activity on a Shopify Plus website.

Here’s the process:

  1. Create a Google Analytics 4 (GA4) property: This can be done in the Google Analytics interface.

2. Install the Google Tag Manager (GTM) code: The Google Tag Manager (GTM) code can be added to the Shopify Plus website through the Shopify theme editor or by using a data layer  from the Shopify Store.

3. Install the GA4 tracking code: The GA4 tracking code can be added to the website through Google Tag Manager (GTM) by creating a tag in Google Tag Manager (GTM) and configuring it to send data to your Google Analytics 4 (GA4) property.

3. Set up ecommerce tracking in Google Tag Manager (GTM): You need to set up ecommerce tracking in Google Tag Manager (GTM) by creating tags that track important events such as product views, add to carts, and purchases.

4. Test tracking: Before using the data in your Google Analytics 4 (GA4) reports, it is recommended to test your tracking implementation to ensure that it is working correctly.

By using Google Tag Manager (GTM) to track ecommerce activity on a Shopify Plus website with GA4, you can take advantage of the user-friendly interface and robust tracking capabilities of Google Tag Manager (GTM), while also using Google Analytics 4 (GA4) to analyze the ecommerce data and make informed business decisions.

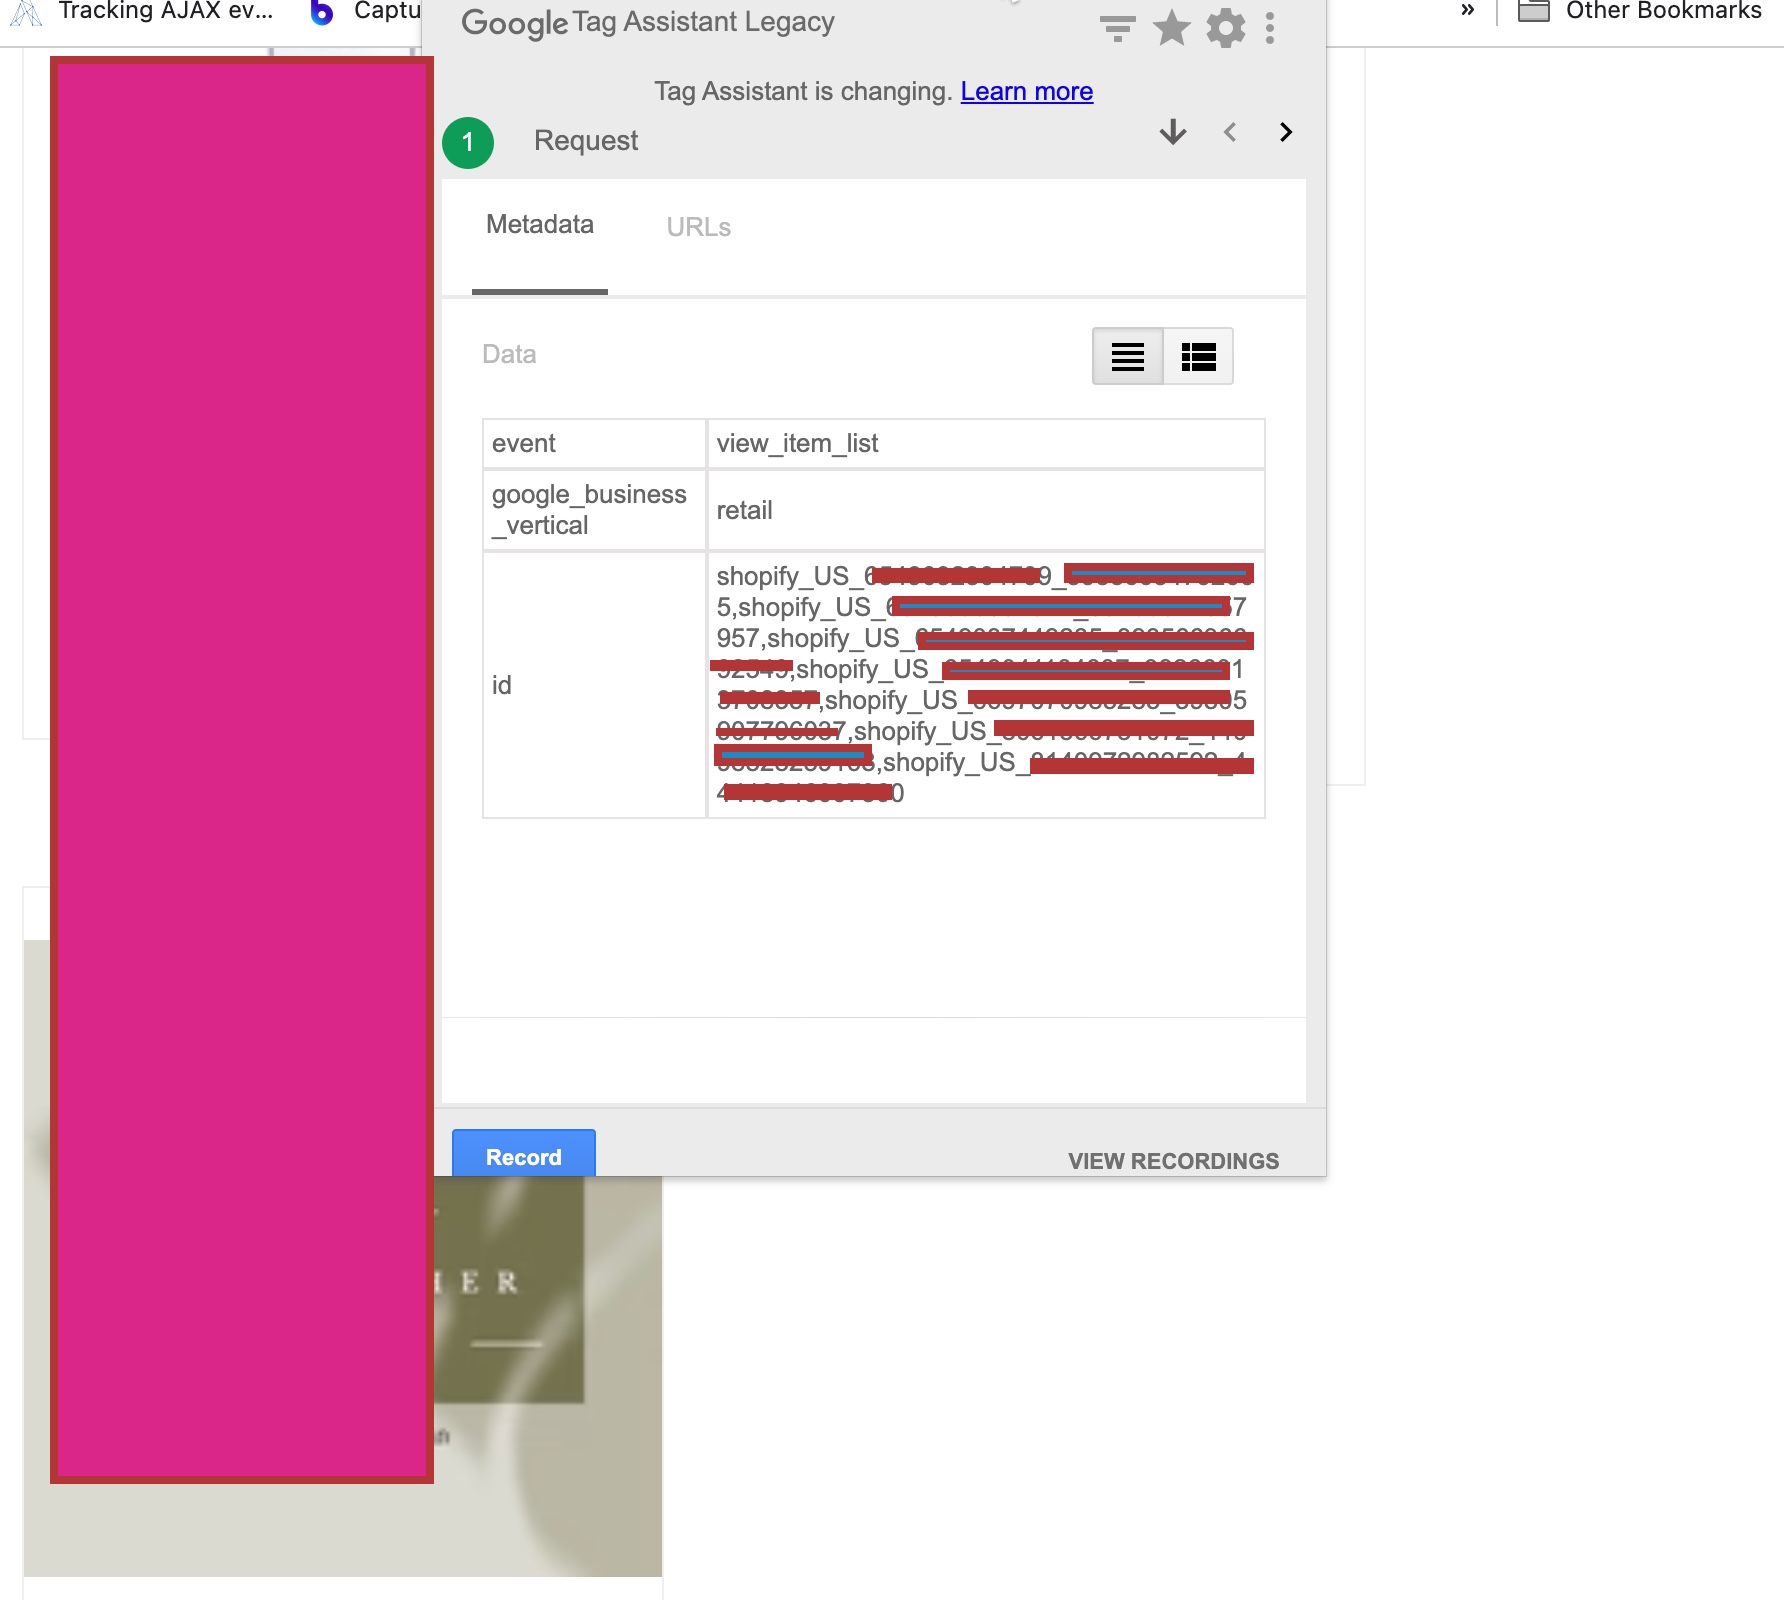
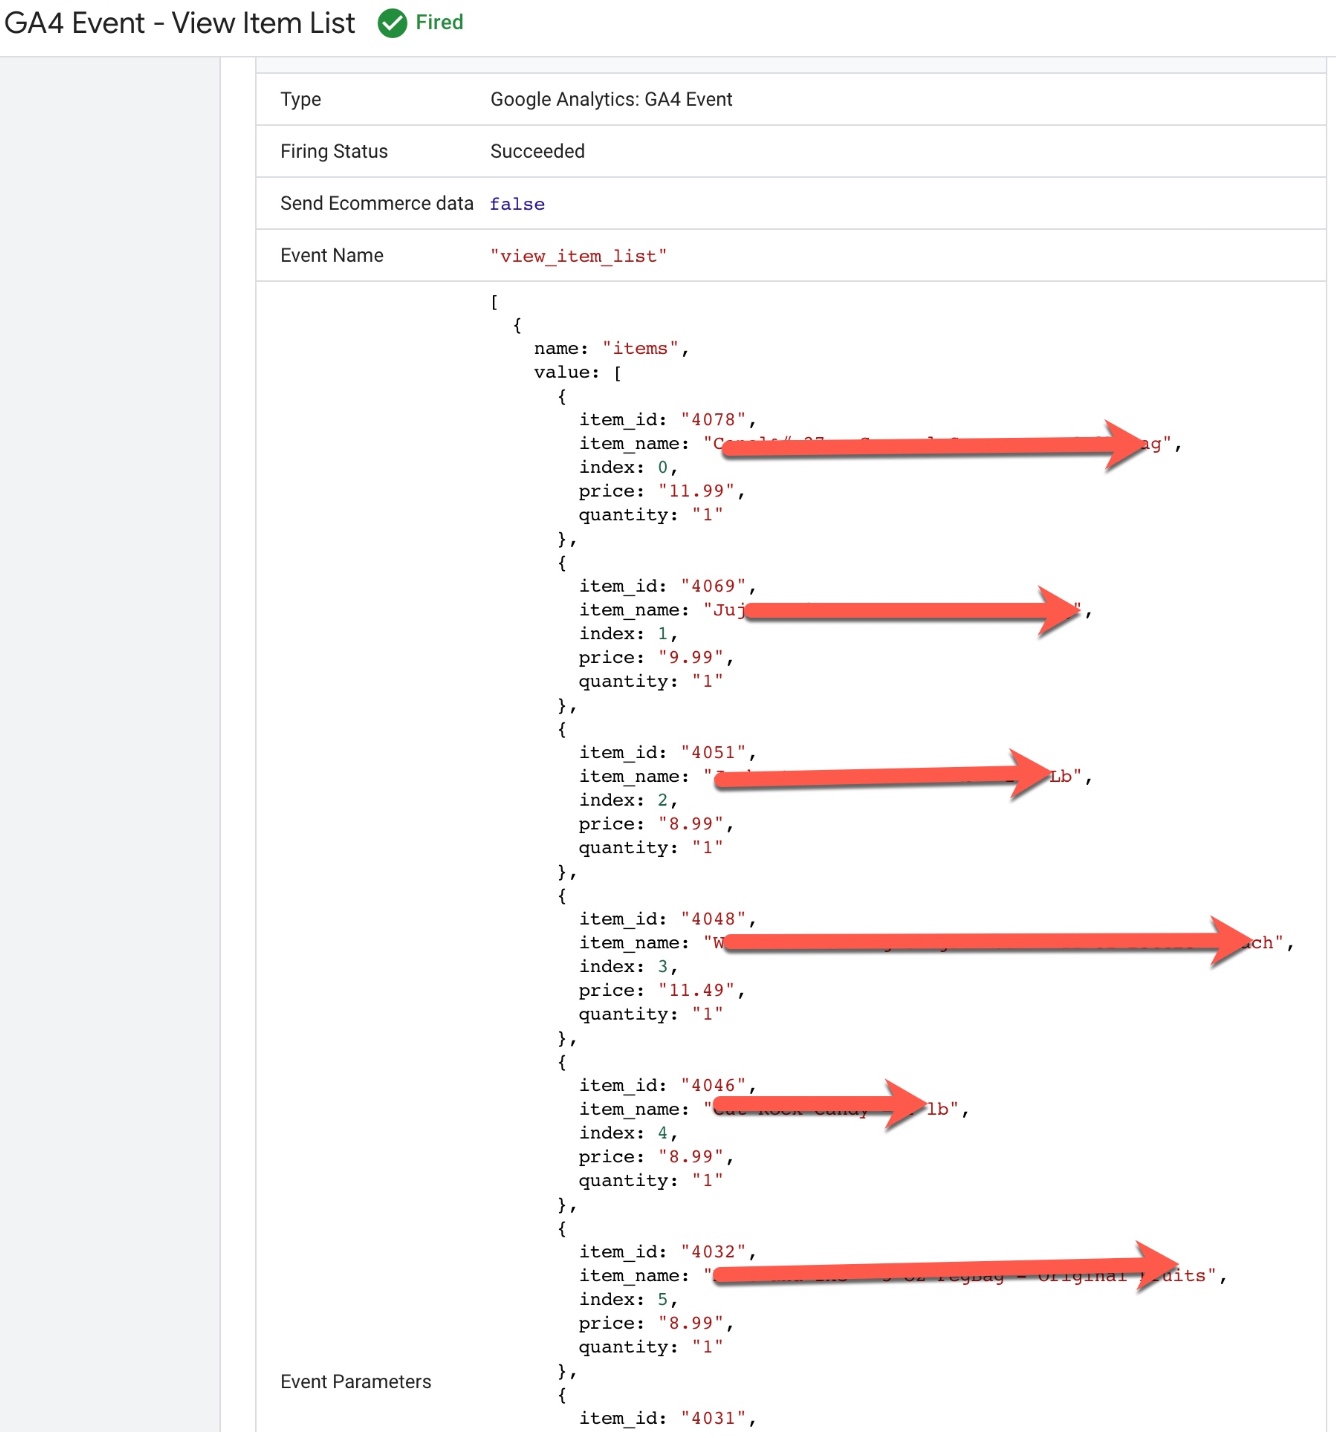
“view_item_list” : In Google Analytics 4 (GA4) and Google Tag Manager (GTM), the “view_item_list” event can be used to track when a user views a list of items, such as a category page, on a Shopify Plus website.

Here’s how you can track this event:

1 Implement a data layer: On the Shopify Plus website, you need to implement a data layer to hold data about the “view_item_list” event. This can be done by adding a JavaScript object to the page that holds information about the event, such as the list name or the number of items.

2. Set up the “view_item_list” event in GTM: In GTM, you can create a tag that uses the data layer to track the “view_item_list” event by using the GA4 Event Tracking template. In the tag configuration, you need to specify the event name as “view_item_list” and map the event data from the data layer to the GA4 event fields.

Here is an example of how you can implement a data layer to track the “view_item_list” event in Google Analytics 4 (GA4) and Google Tag Manager (GTM) on a Shopify Plus website:

<script>
  window.dataLayer = window.dataLayer || [];
  dataLayer.push({
  event: "view_item_list",
  ecommerce: {
    item_list_id: "related_products",
    item_list_name: "Related products",
    items: [
     {
      item_id: "SKU1,Productid1",
      item_name: "Produt1",
      index: 0,
      item_brand: "brand2",
      item_category: "Category1",
      item_variant: "variant2",
      location_id: "2ahYfAR_6128fGcTUEo",
      price: 9.99,
      quantity: 1
    },
    {
      item_id: "SKU_12346",
      item_name: "Produt2",
      index: 1,
      item_brand: "brand2",
      item_category: "Category2",
      item_variant: "variant2",
      location_id: "ChffIJIQBpAGEo",
      price: 20.99,
      quantity: 1
    }]
  }
});
</script>
Google Analytics 4 Ecommerce Tracking to Shopify Site

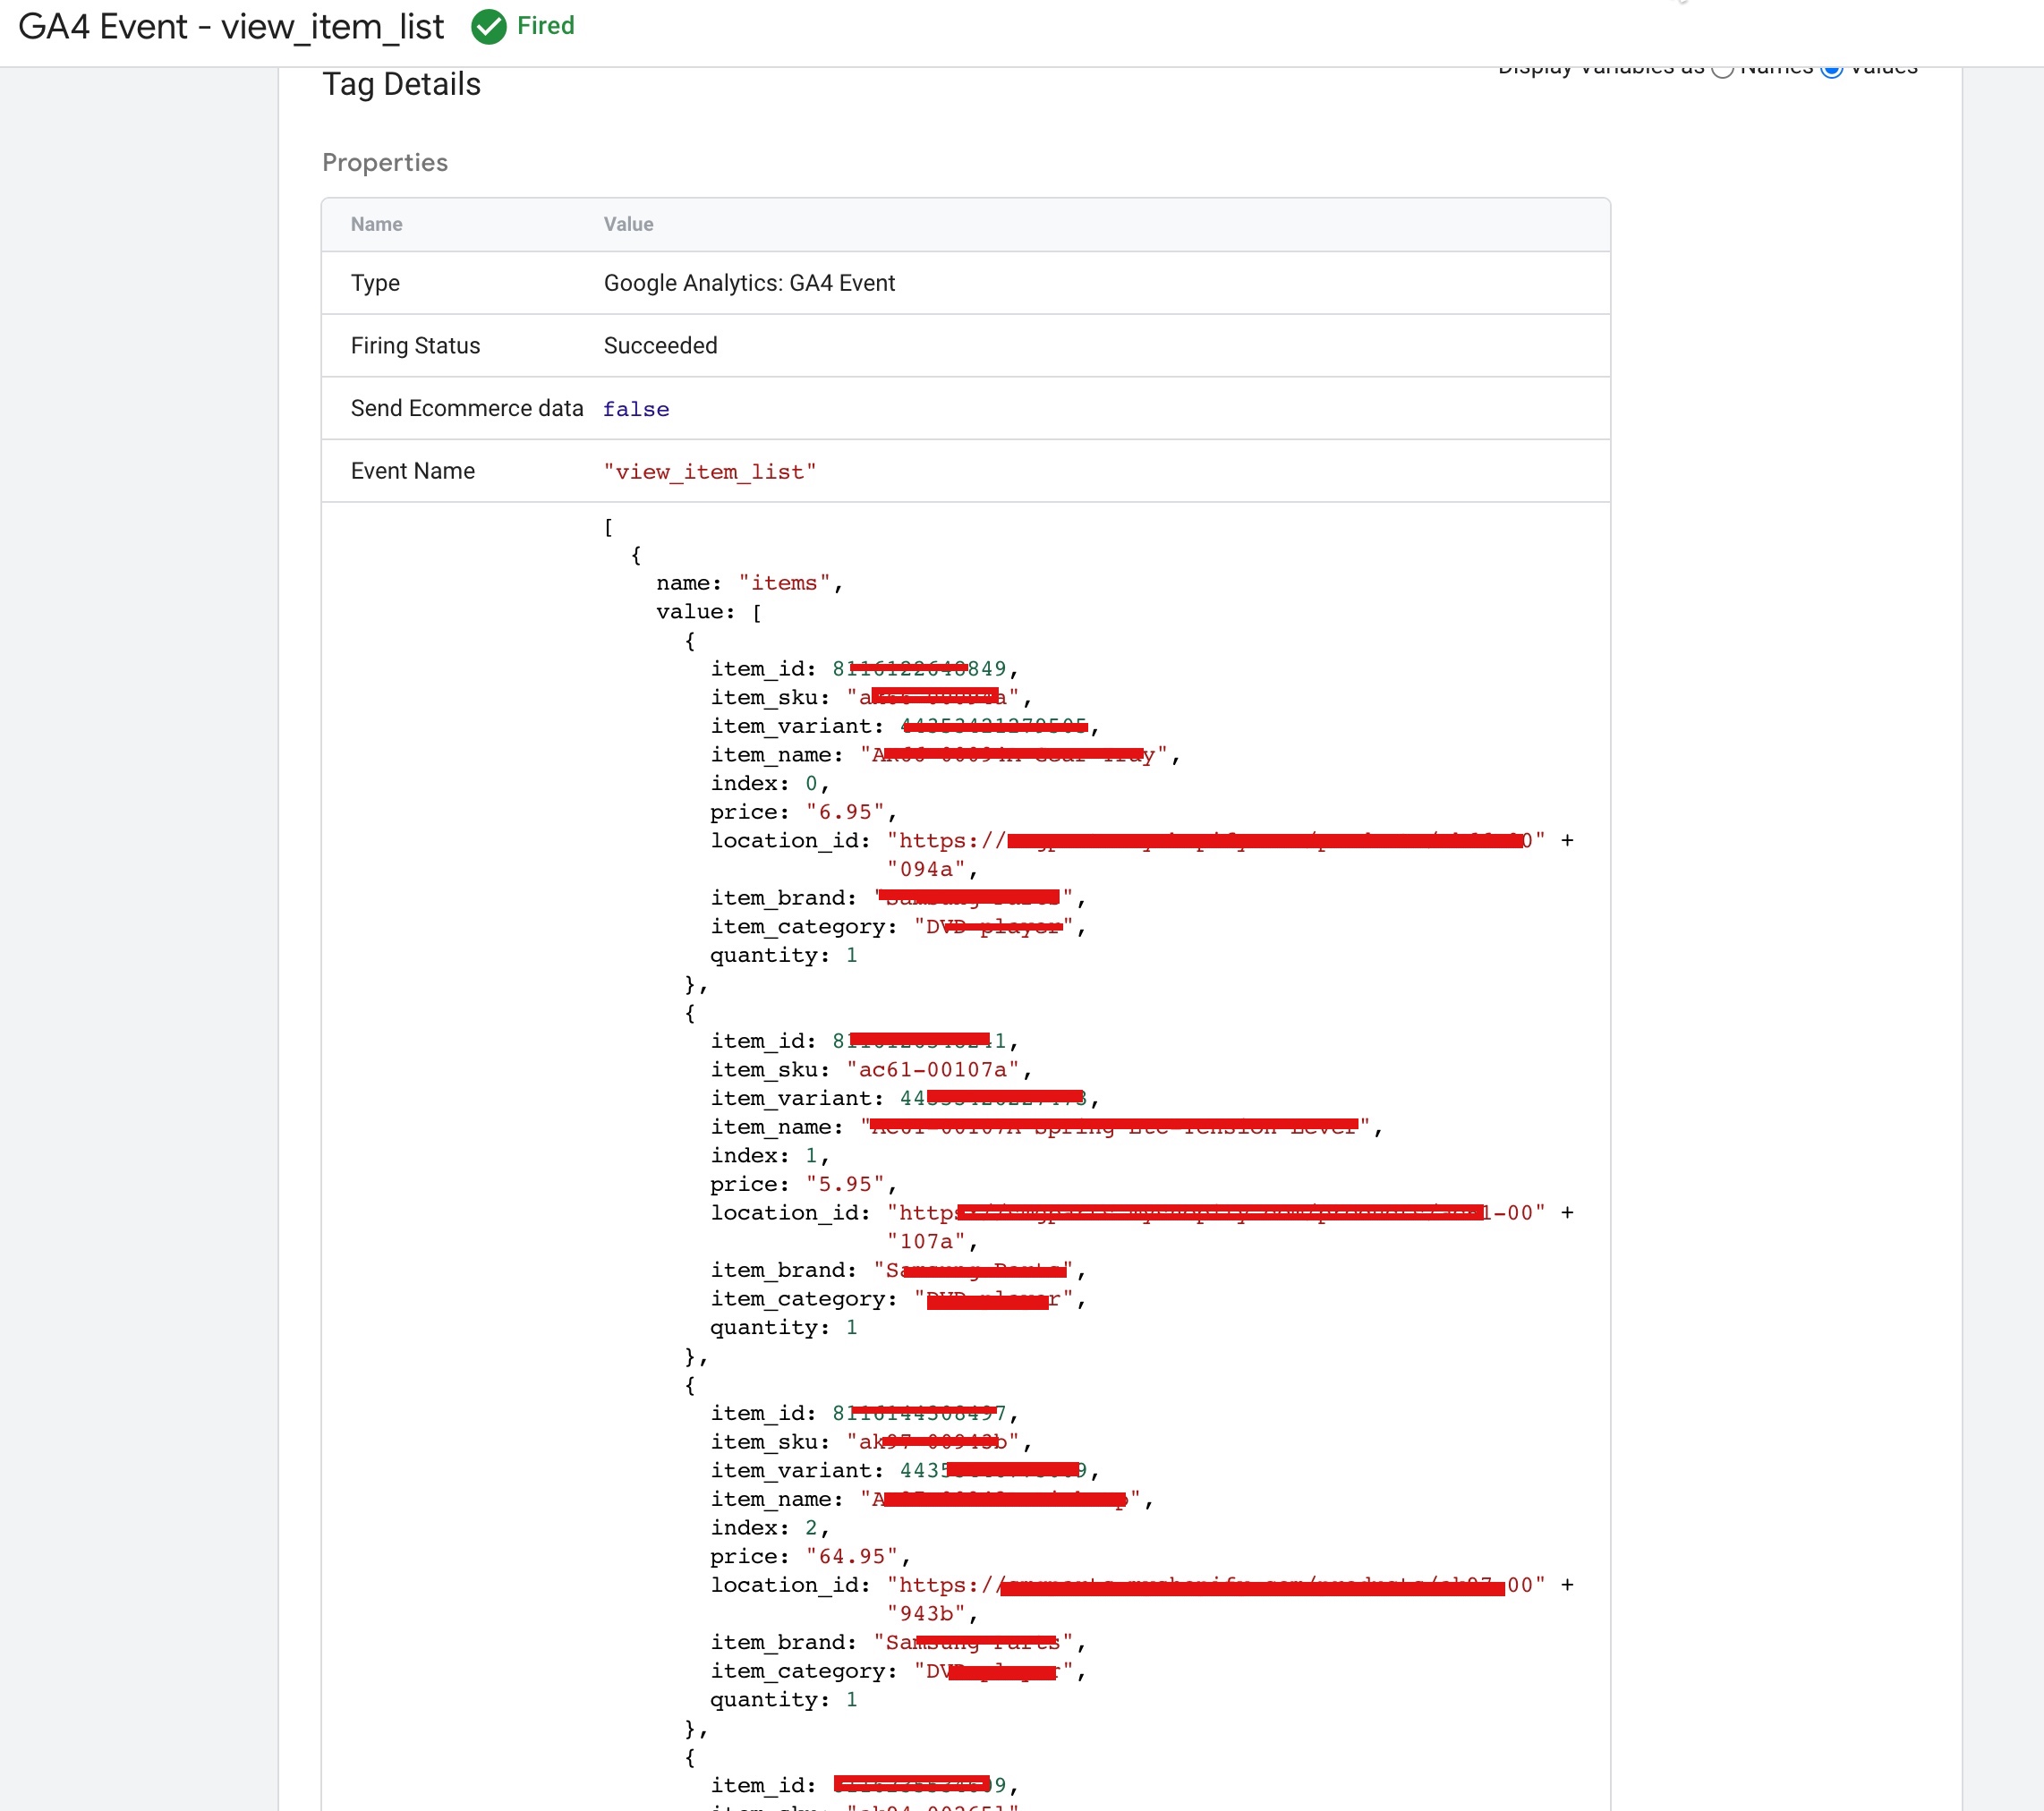
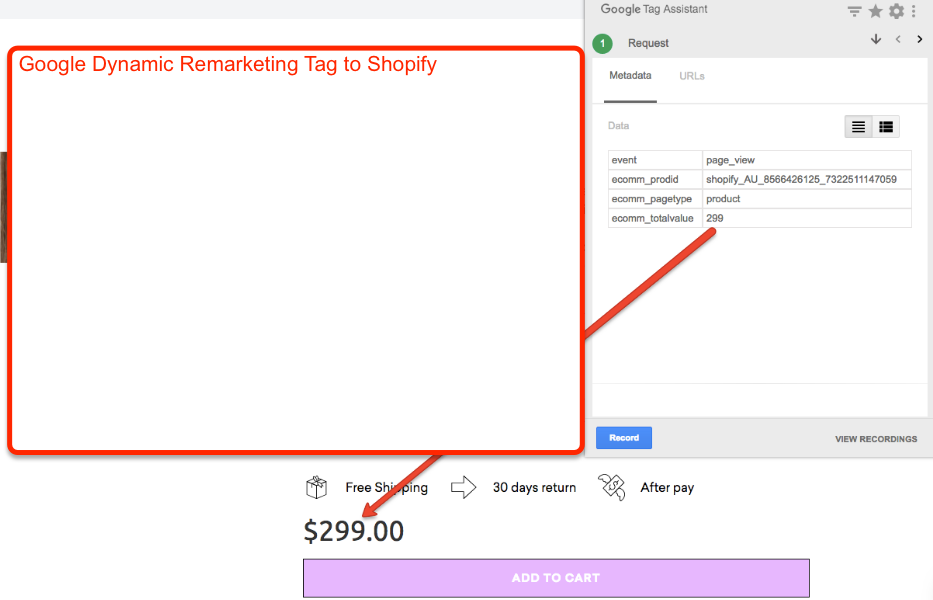
GA4 Ecommerce Tracking on Shopify Plus in Google Analytics 4 using Google Tag Manager

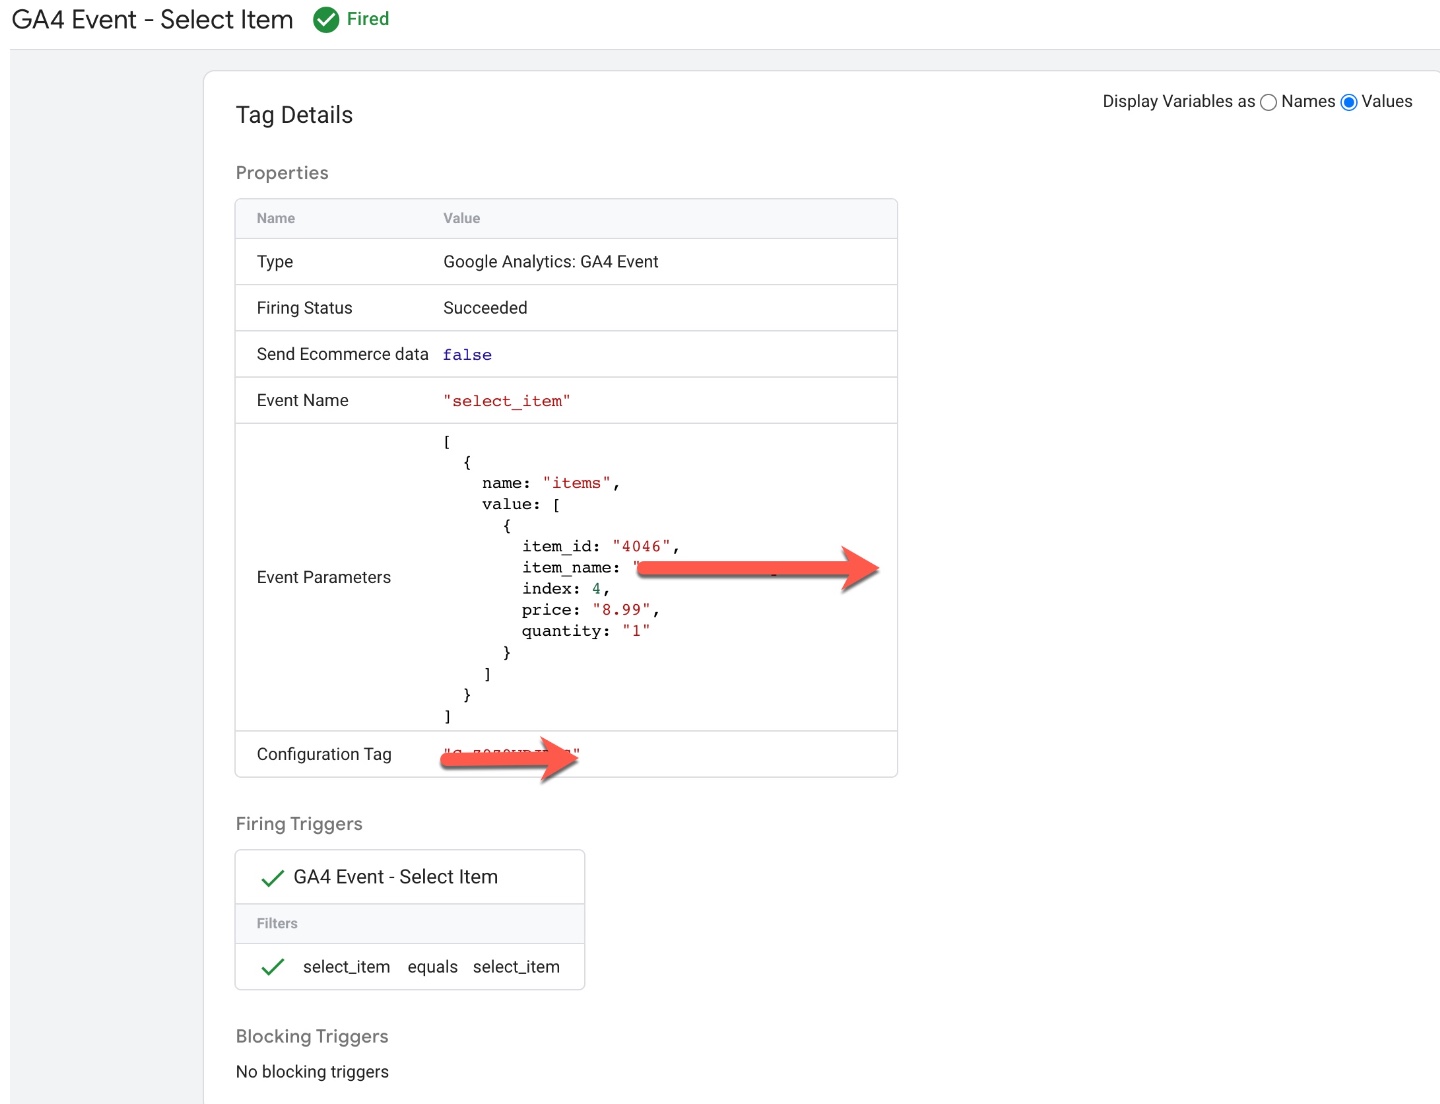
“select_item” : The “select_item” event in Google Analytics 4 (GA4) and Google Tag Manager (GTM) can be used to track user interactions with items on a Shopify Plus.

Here’s how you can track this event:

  1. Implement GA4 event tracking: On the Shopify Plus website, you need to implement event tracking to capture the “select_item” event. This can be done by using JavaScript to send an event to GTM when the user interacts with an item on the website, such as by clicking on it.

2. Set up the “select_item” event in GTM: In GTM, you can create a tag that tracks the “select_item” event by using the GA4 Event Tracking template. In the tag configuration, you need to specify the event name as “select_item” and map the event data from the JavaScript event to the GA4 event fields.

Here is an example of how you can implement a data layer to track the “select_item” event in Google Analytics 4 (GA4) and Google Tag Manager (GTM) on a Shopify Plus website:

<script>
  dataLayer.push({
    'event': 'select_item',
    'item_name': 'Product',
    'item_id': '123456789',
    'item_brand': 'Brand',
    'index': 0,
    'item_category': 'category',
    'item_variant': '123456789',
    'quantity': '1',
    'price': 50.00
  });
</script>
Setting up Google Analytics 4 (GA4) on Shopify

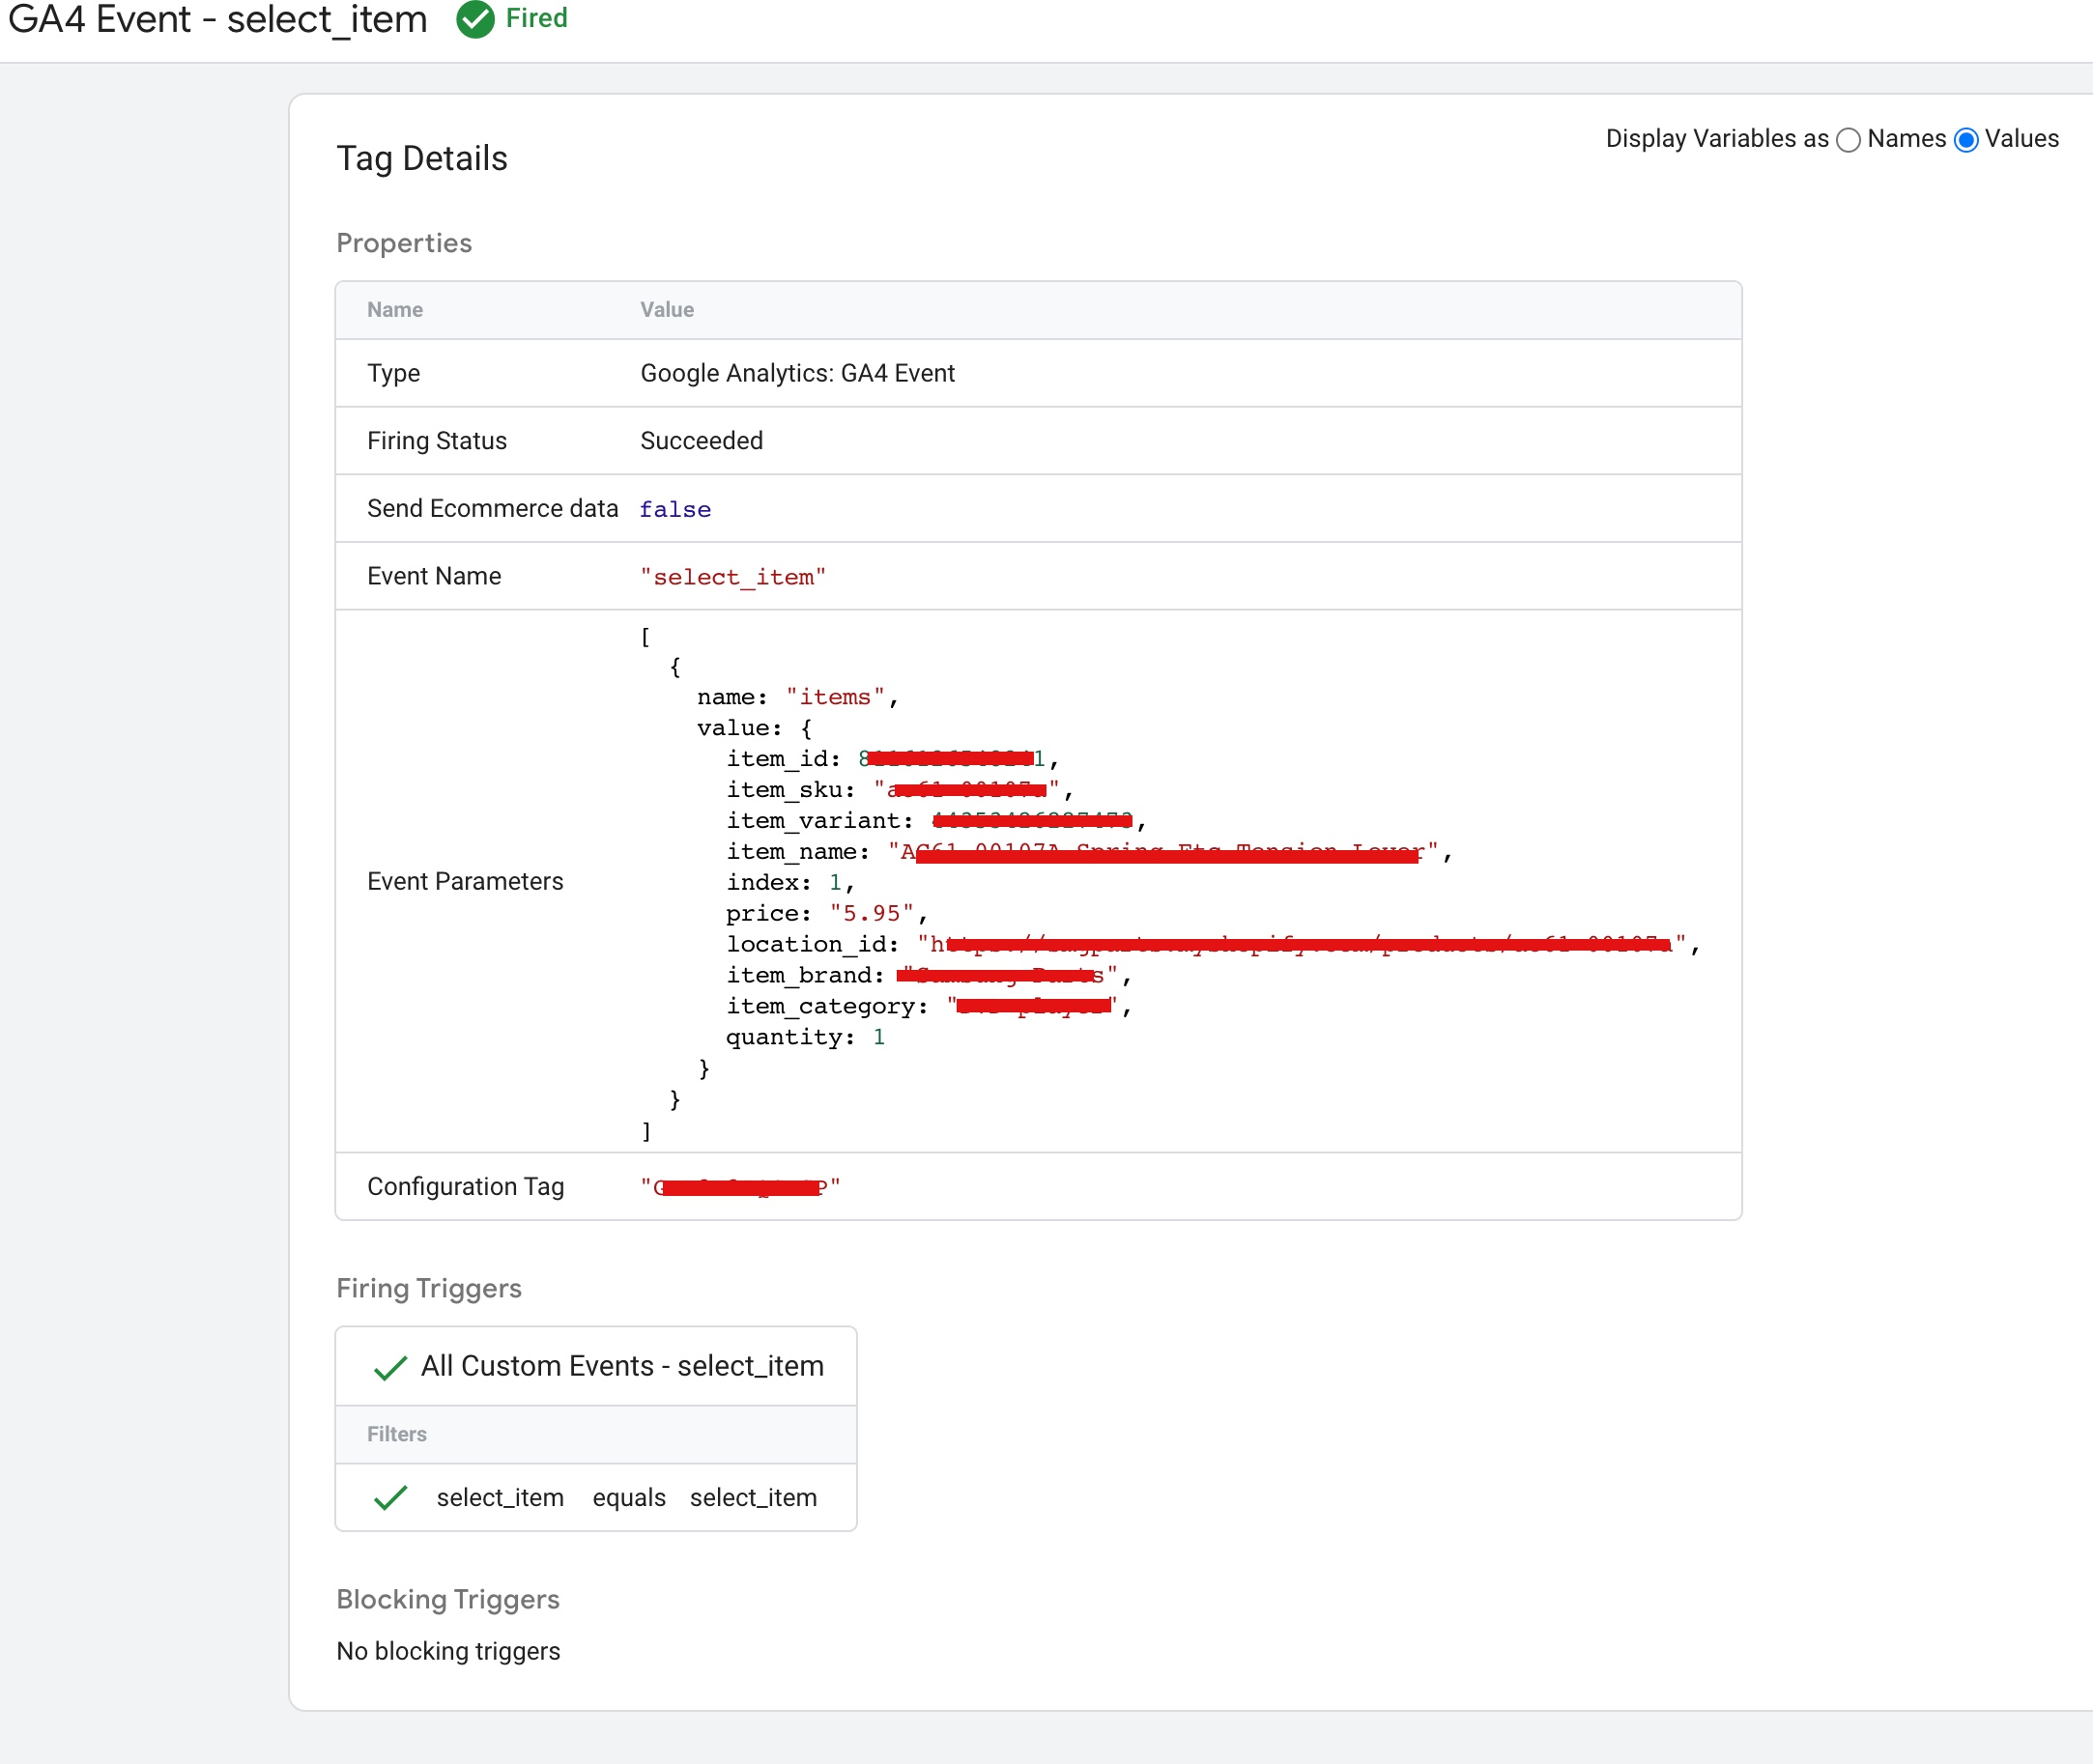
Implement Google Analytics 4 for E-commerce on Shopify Plus Stores using Google Tag Manager

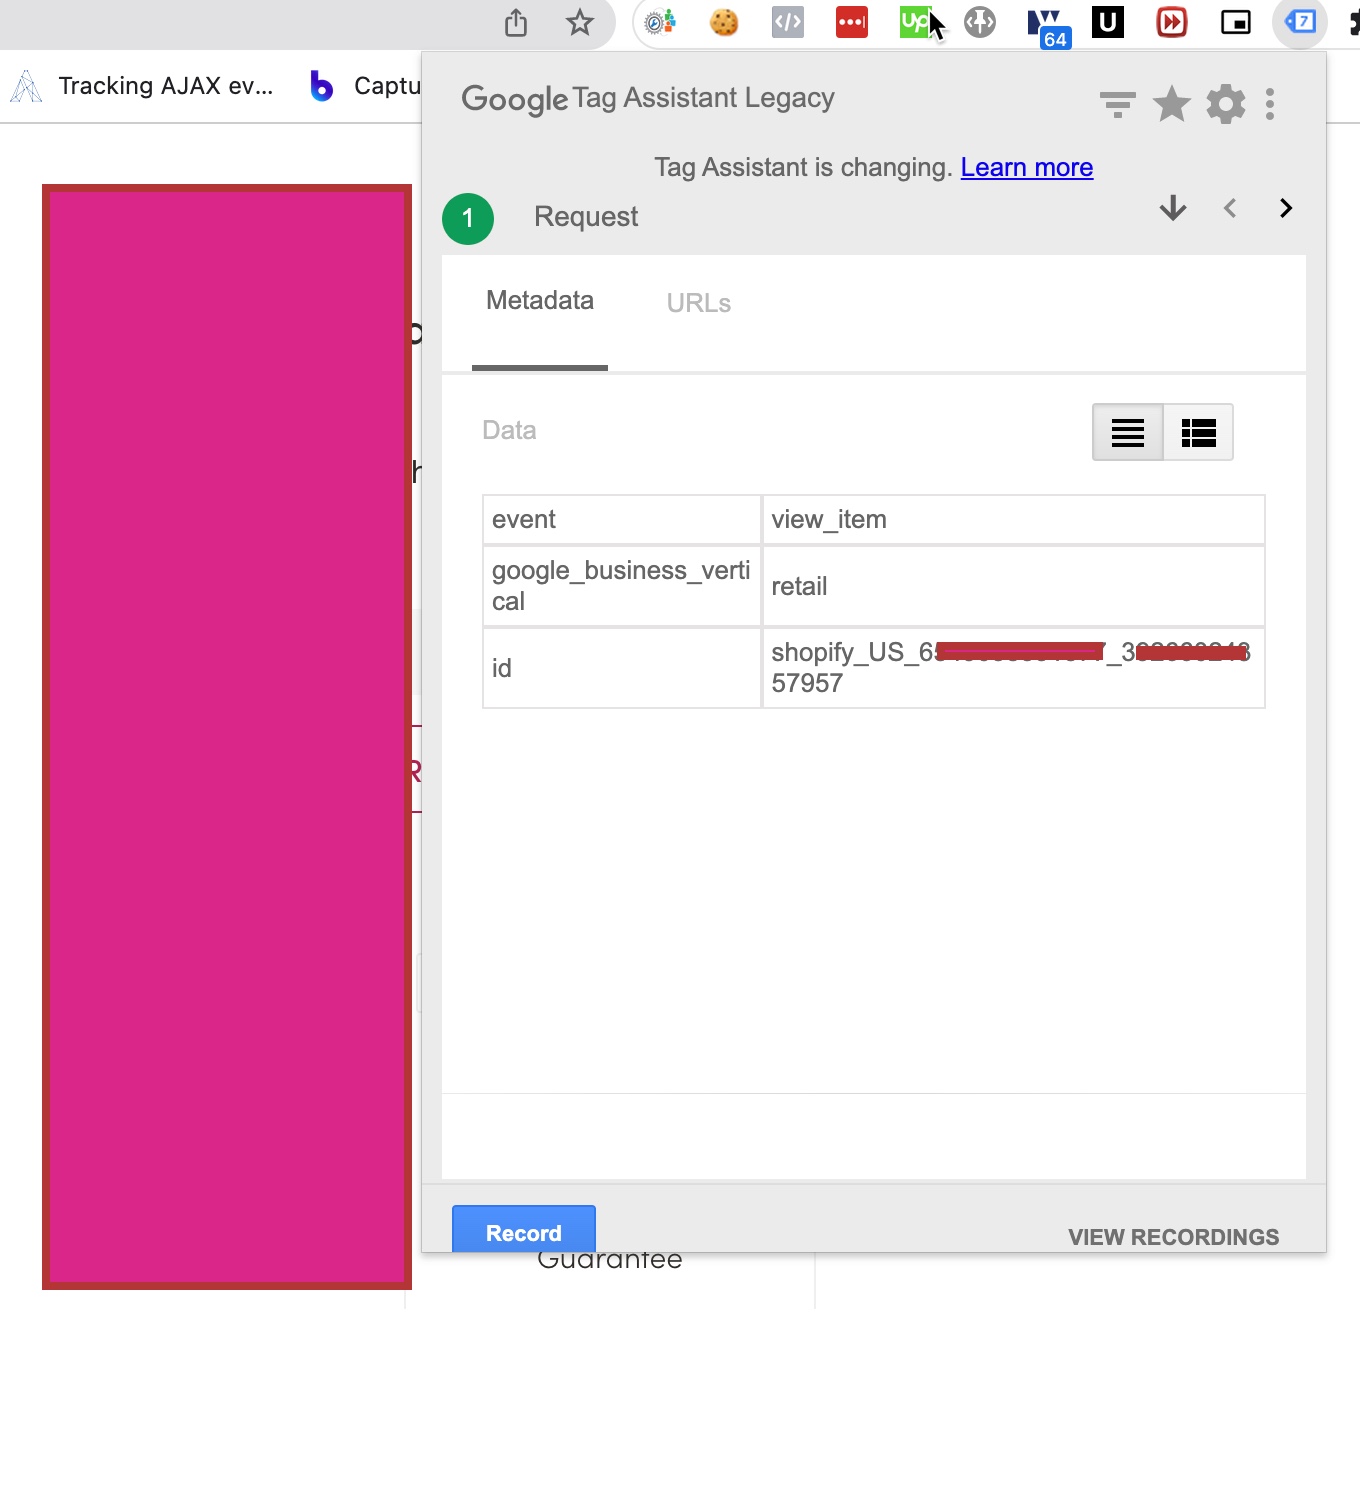
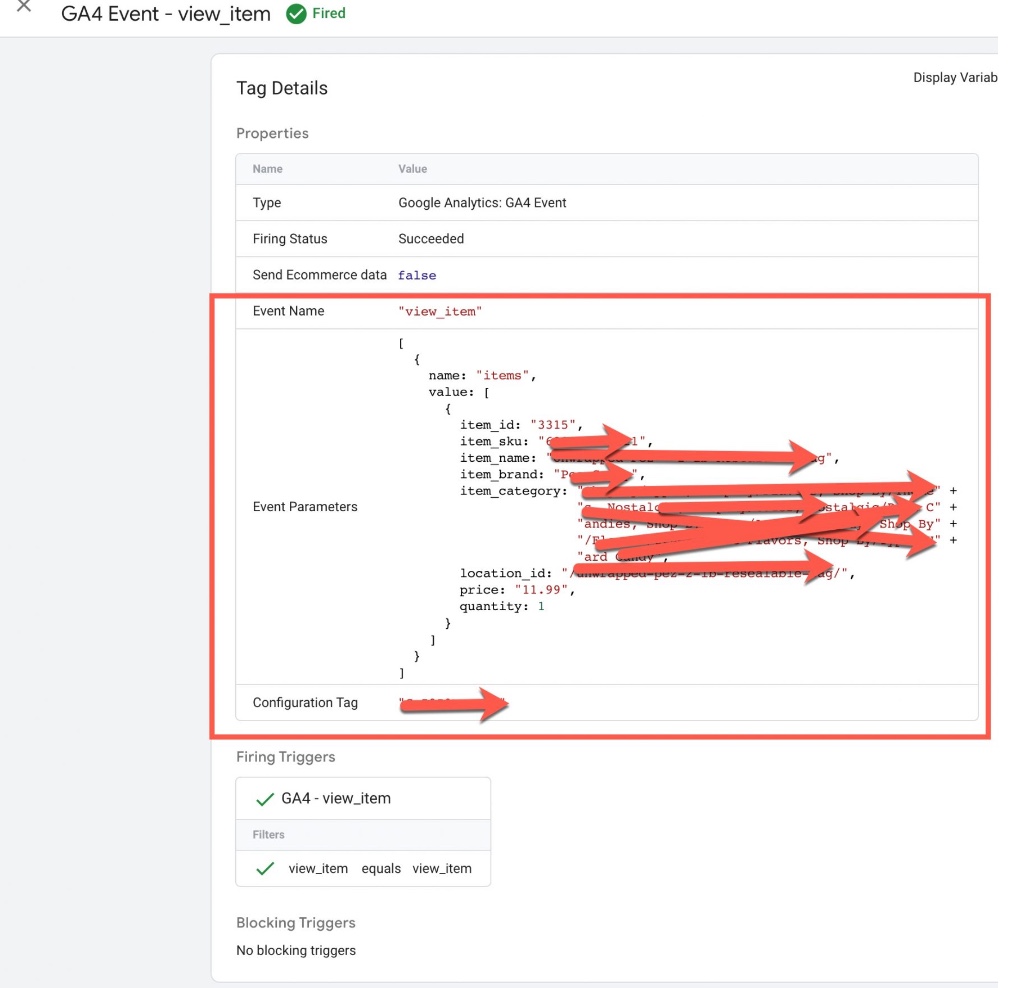
“view_item” : The “view_item” event in Google Analytics 4 (GA4) and Google Tag Manager (GTM) can be used to track when a user views an item on a Shopify Plus.

Here’s how you can track this event:

1. Implement event tracking: On the Shopify Plus website, you need to implement event tracking to capture the “view_item” event. This can be done by using JavaScript to send an event to GTM when the user views an item on the website, such as by navigating to its product detail page.

2. Set up the “view_item” event in GTM: In GTM, you can create a tag that tracks the “view_item” event by using the GA4 Event Tracking template. In the tag configuration, you need to specify the event name as “view_item” and map the event data from the JavaScript event to the GA4 event fields.

Here is an example of how you can implement a data layer to track the “view_item” event in Google Analytics 4 (GA4) and Google Tag Manager (GTM) on a Shopify Plus website:

<script>
  window.dataLayer = window.dataLayer || [];
  dataLayer.push({
    'event': 'view_item',
    'item_name': 'Product2',
    'item_id': '12346789',
    'item_category': "Category2",
    'item_brand': "brand2",
    'index': 6,
    'price': 50.00,
    'quantity': 1

  });
</script>
GA4 Ecommerce Enhanced Conversion Tracking for Shopify Plus

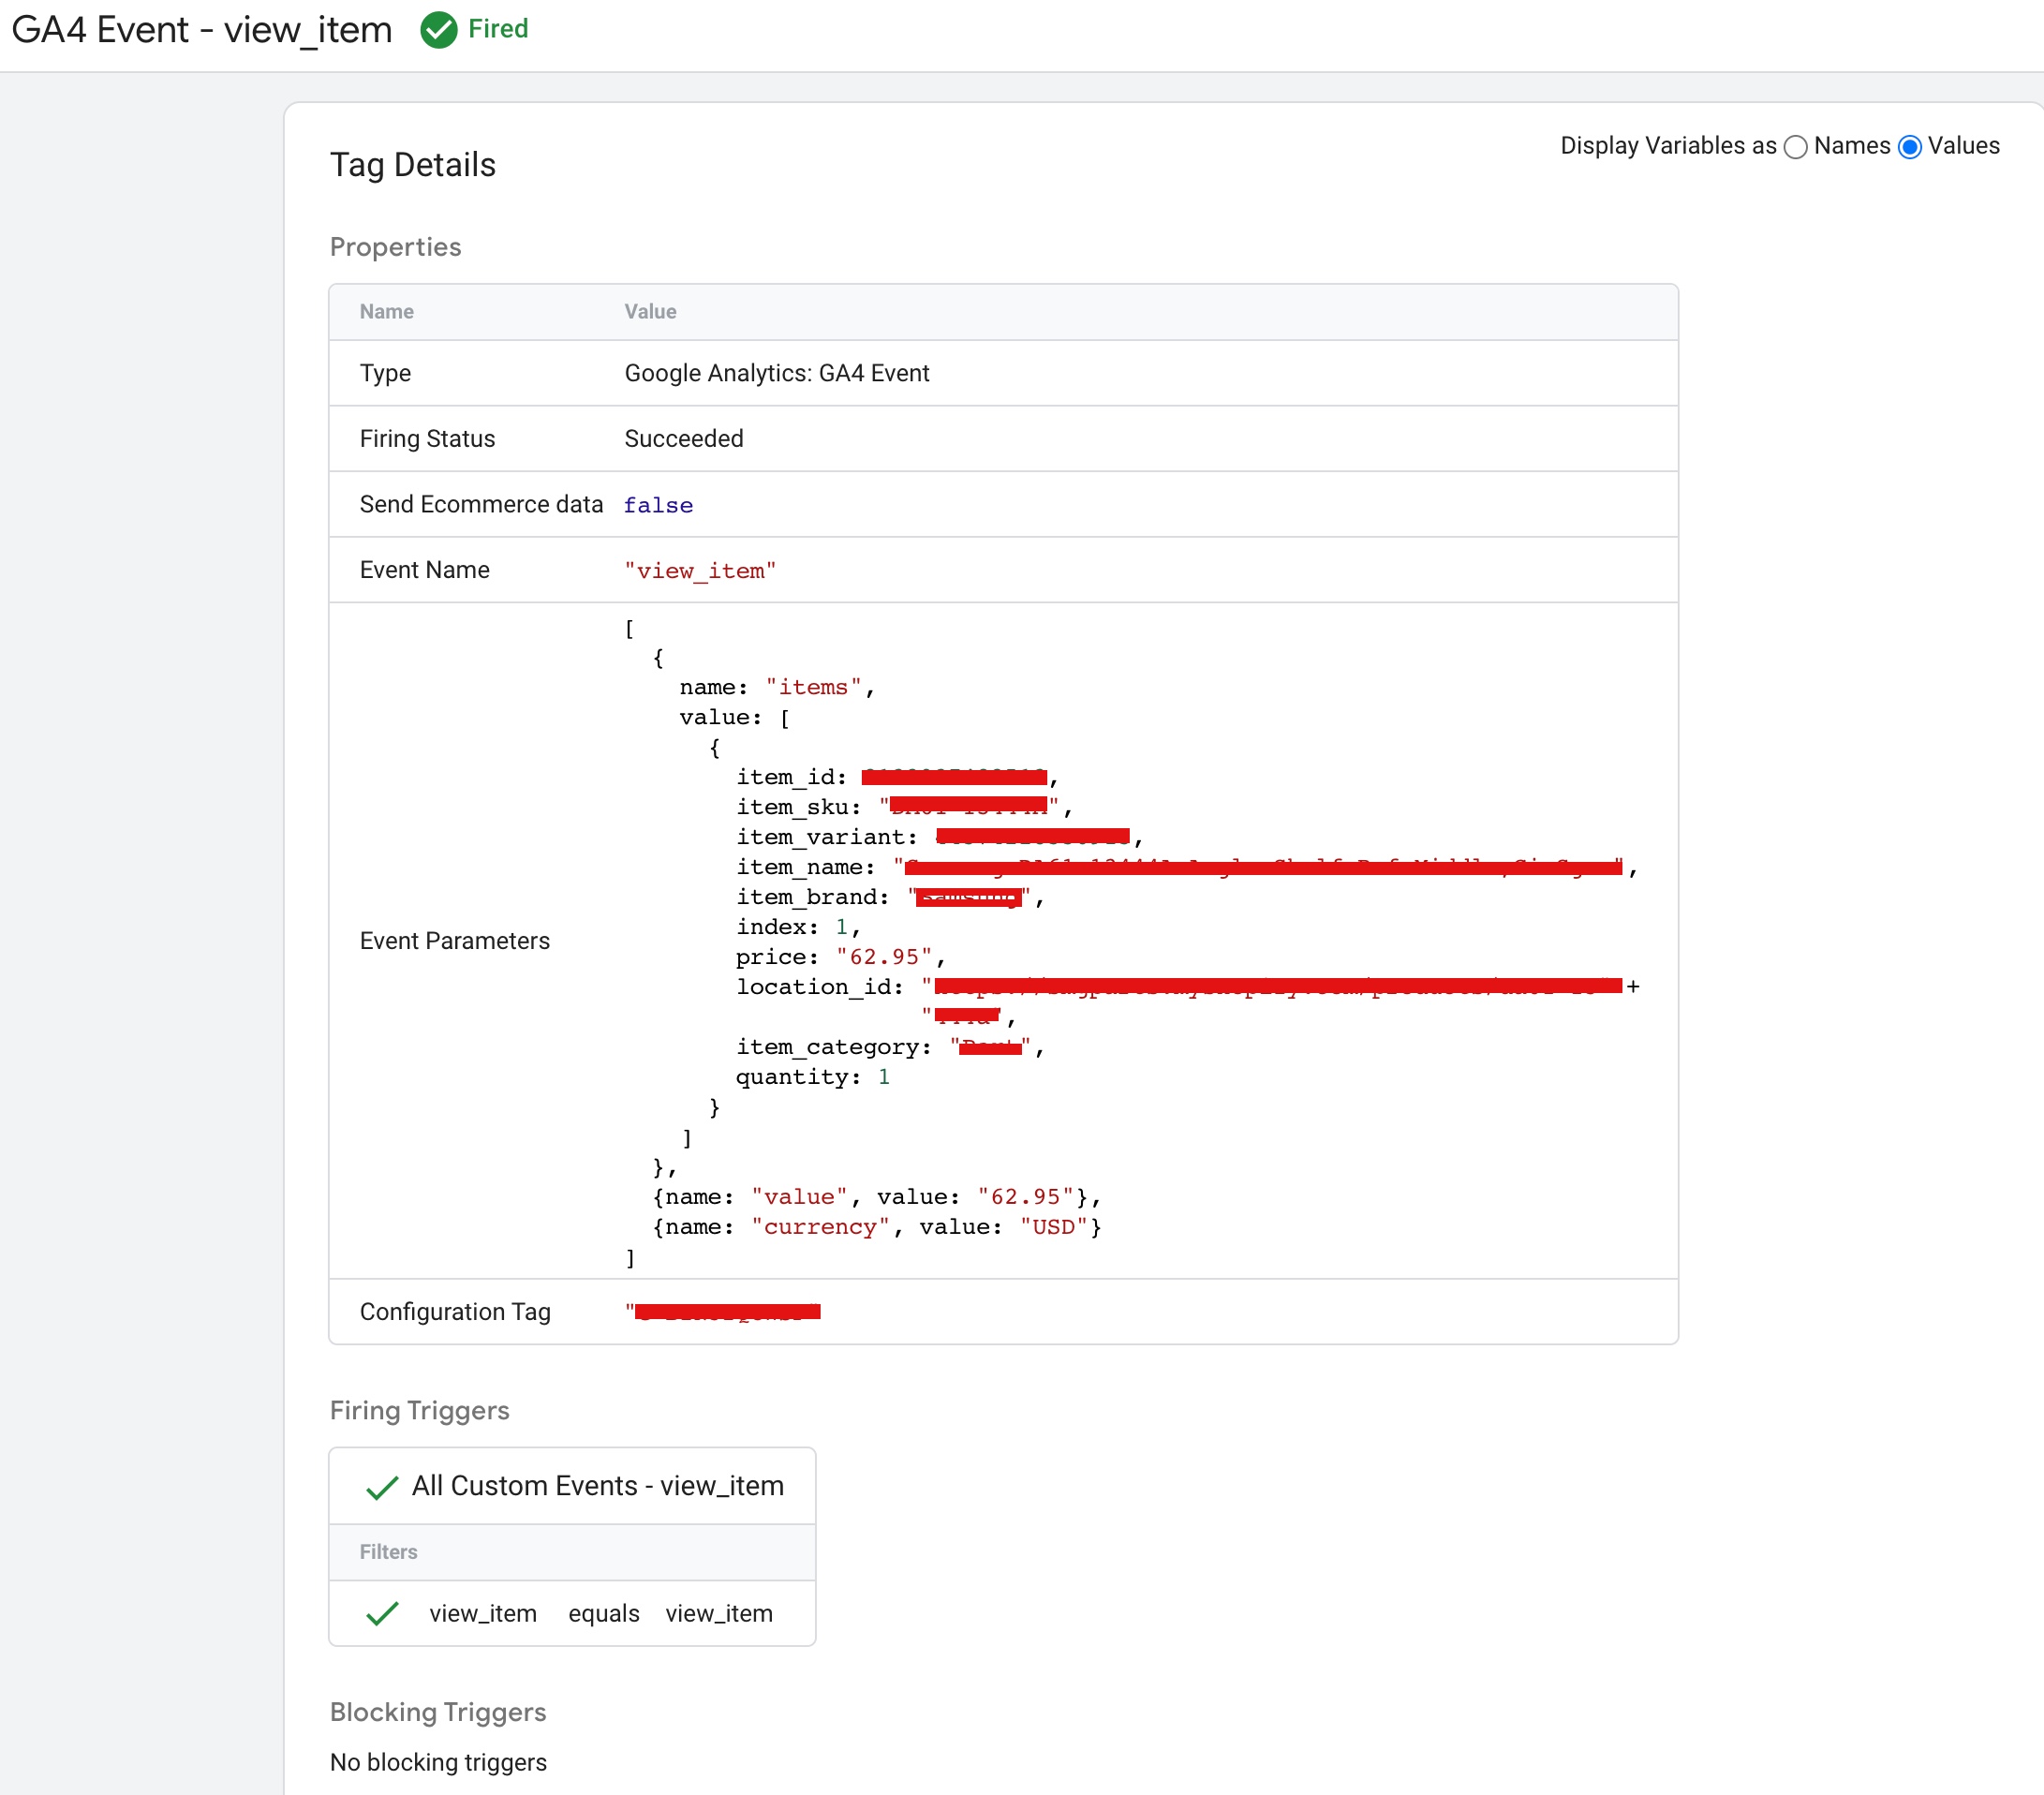
Set Up Google Analytics 4 (GA4) Ecommerce Purchase Event Tracking in Shopify Plus using Google Tag Manager

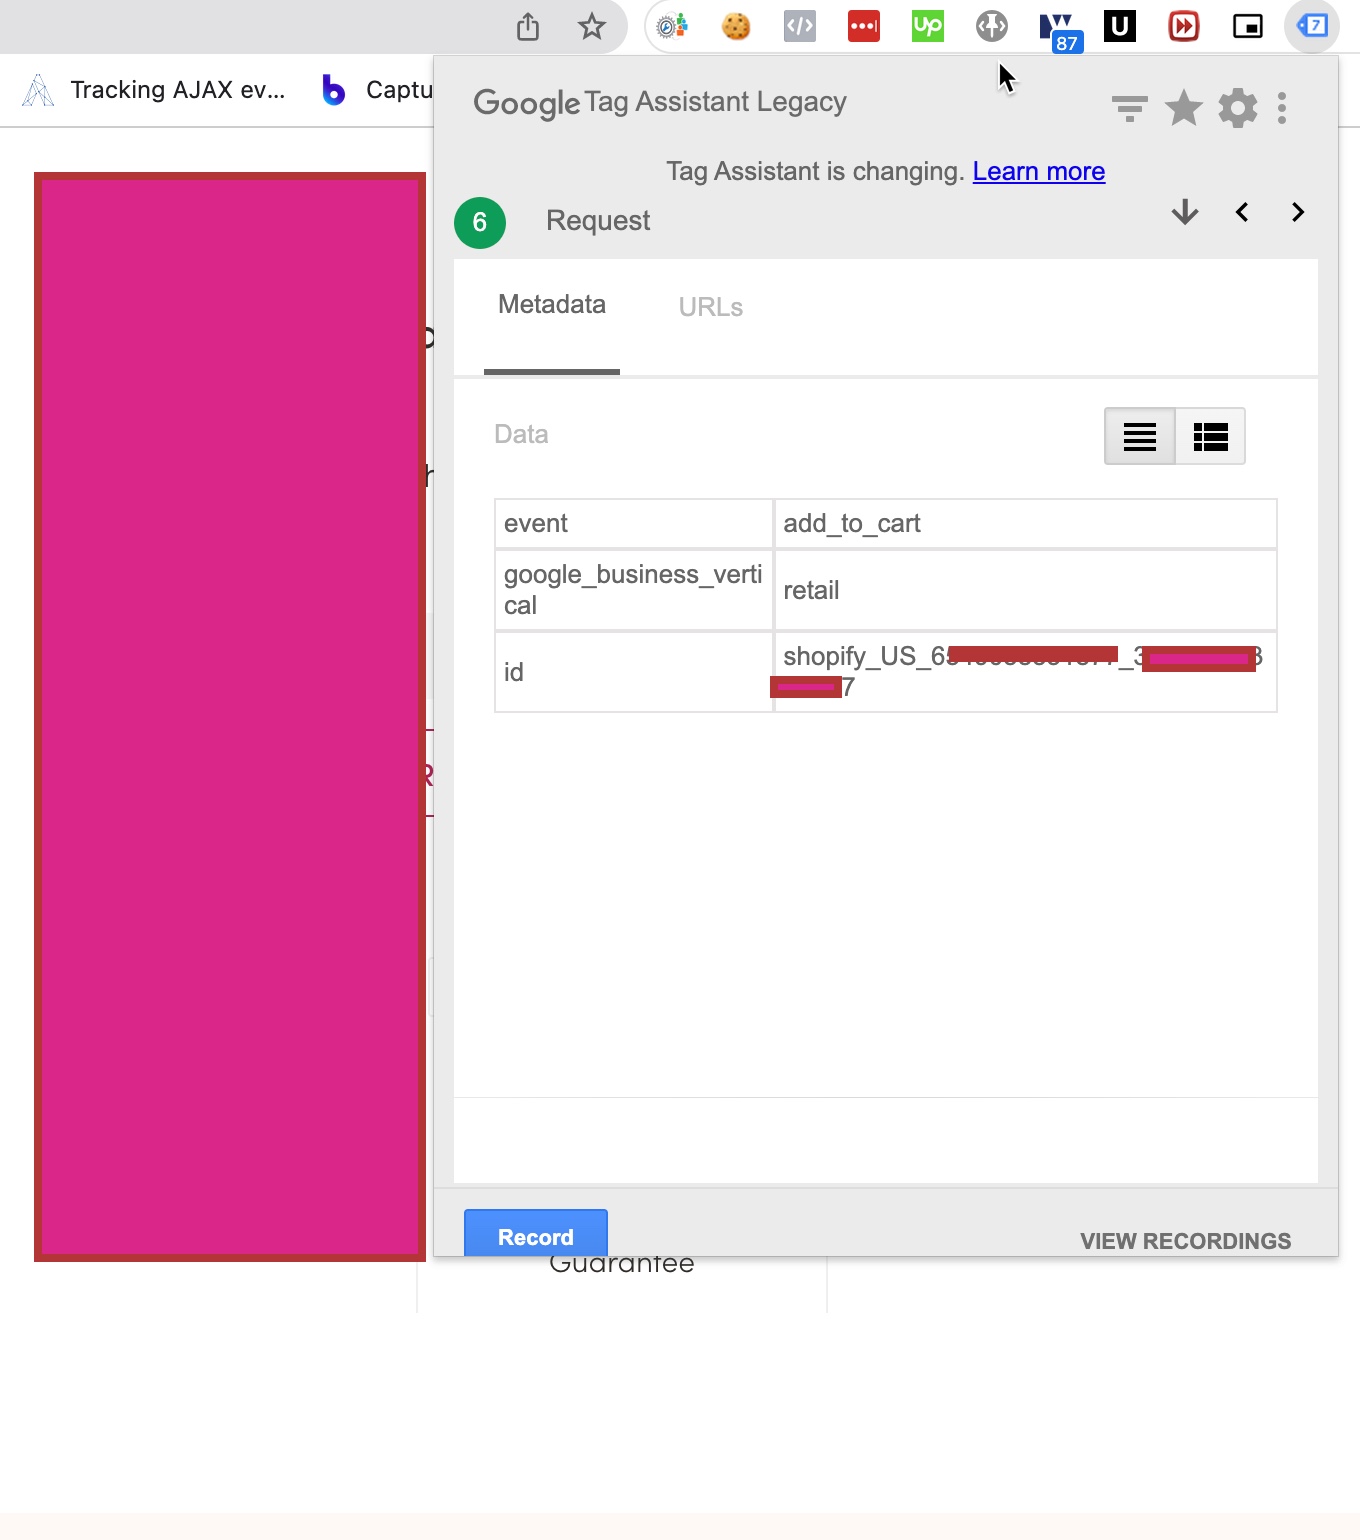
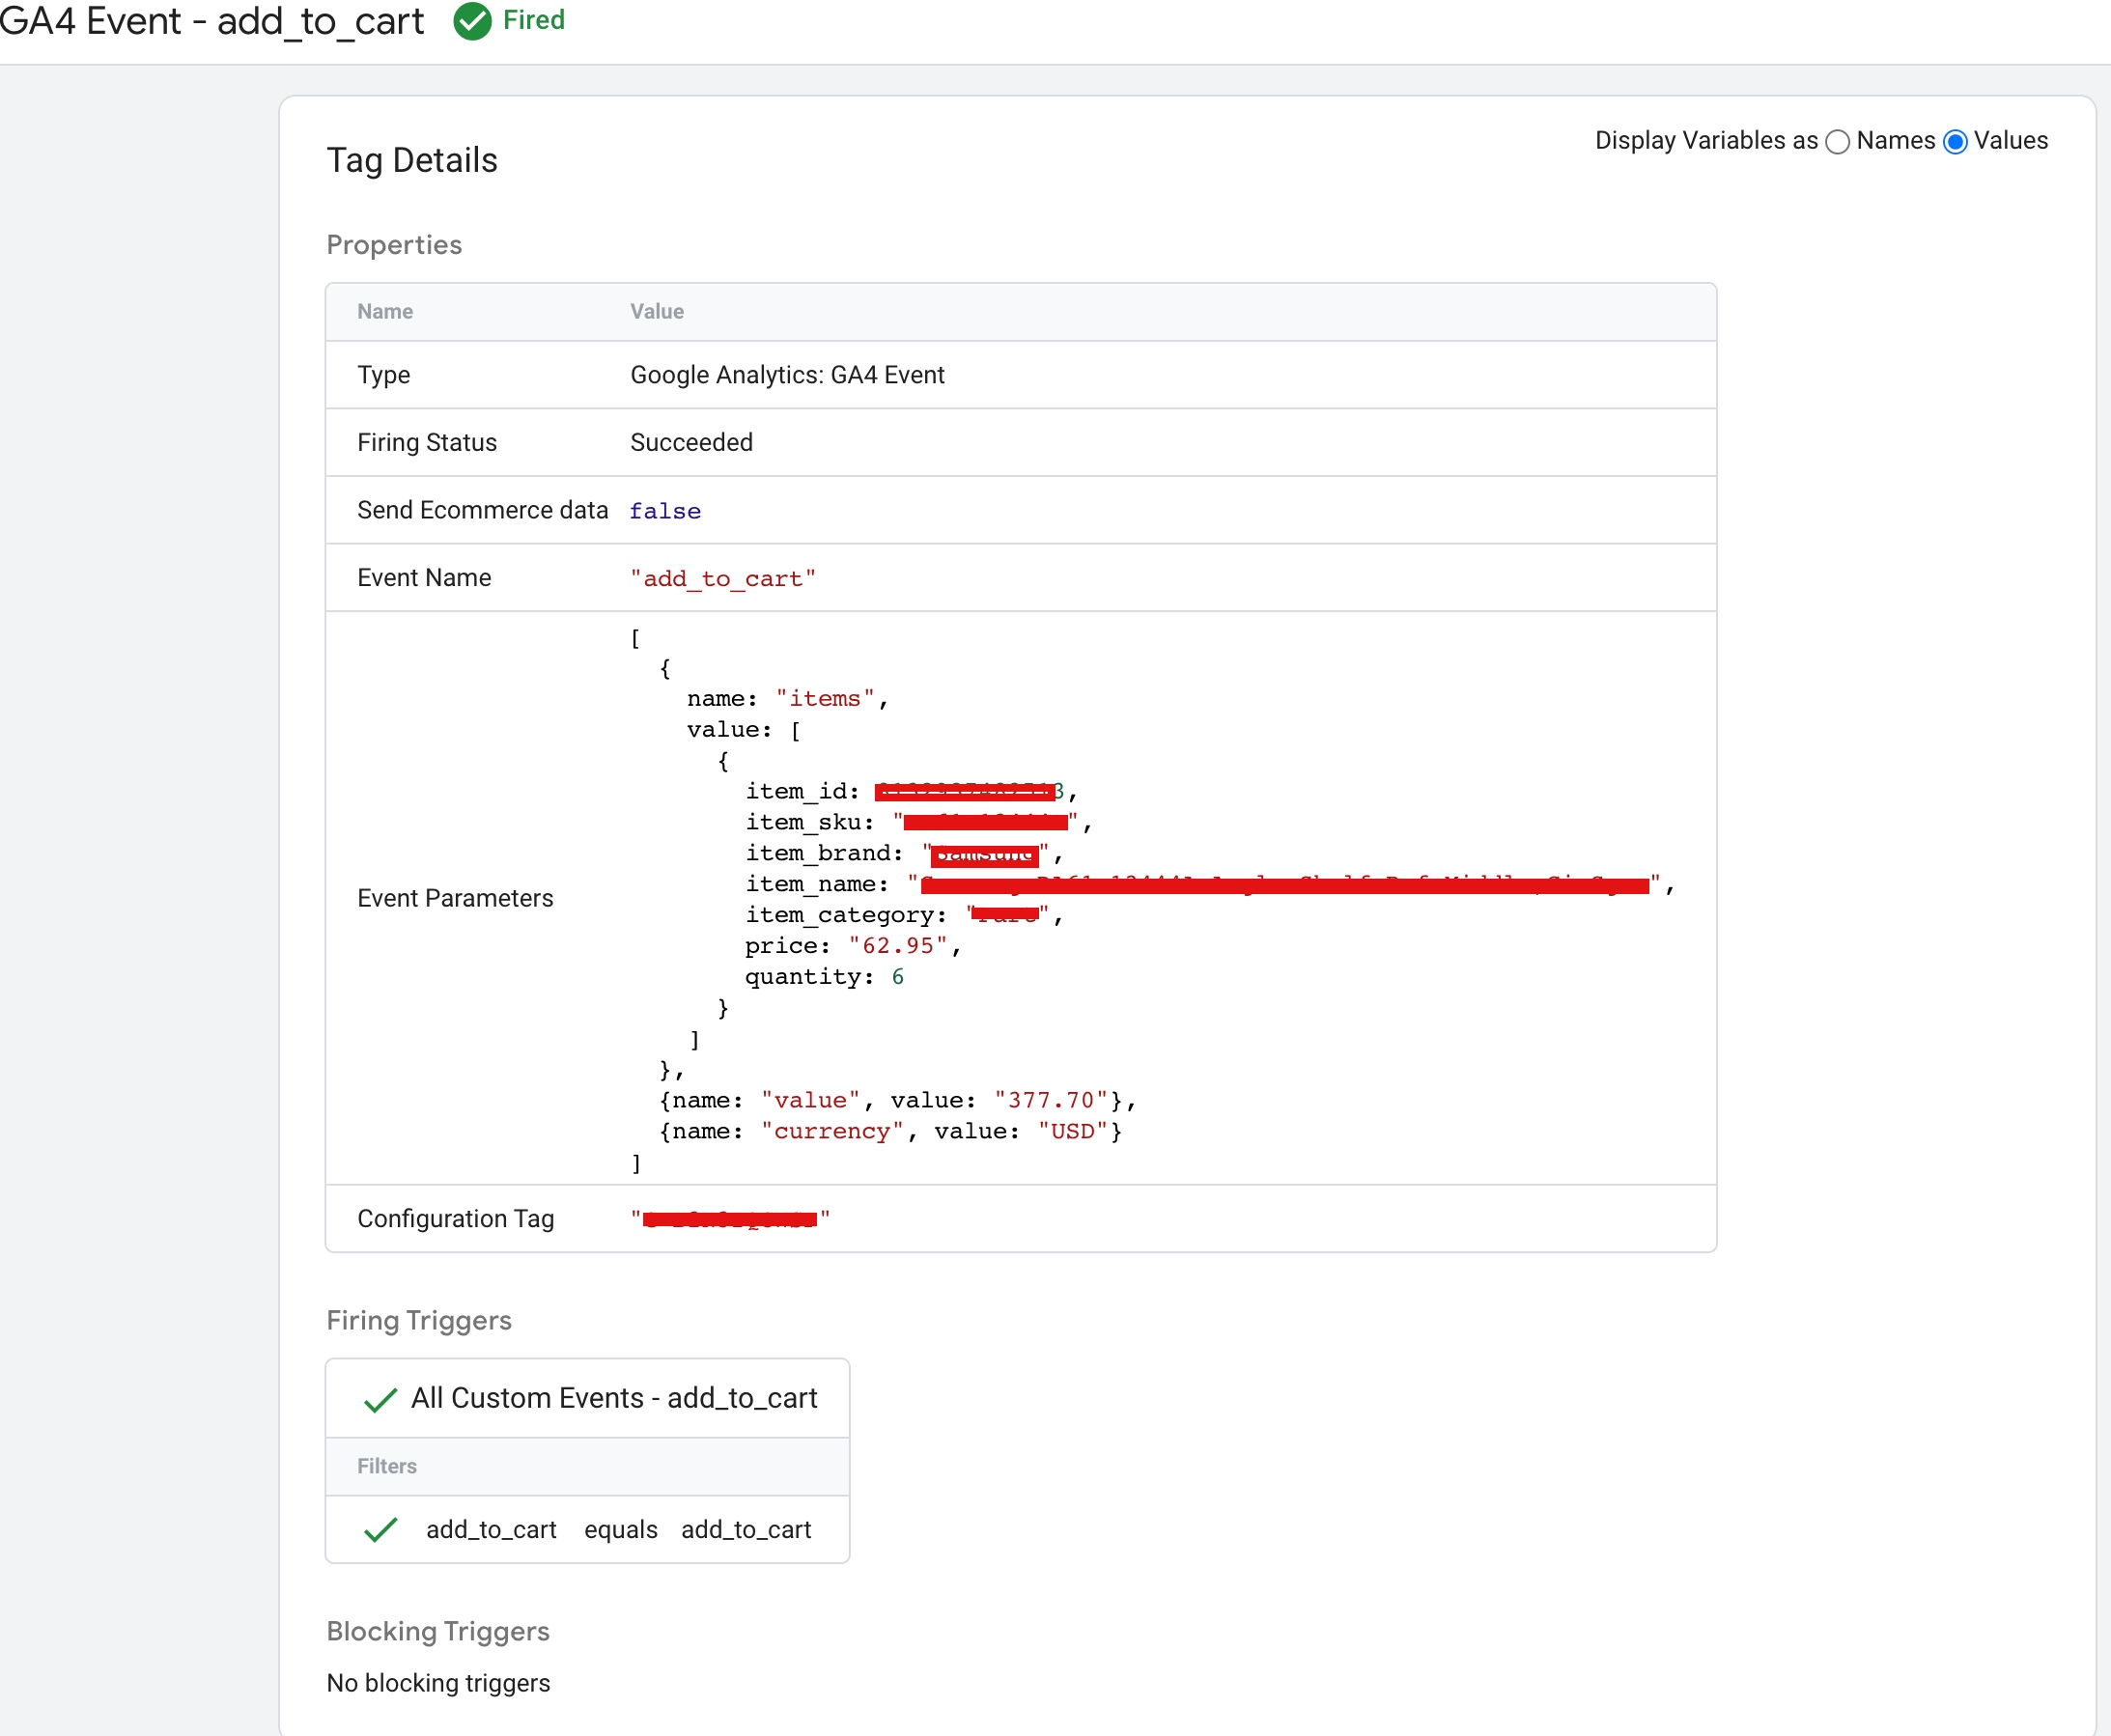
“add_to_cart” : The “add_to_cart” event in Google Analytics 4 (GA4) and Google Tag Manager (GTM) can be used to track when a user adds an item to their shopping cart on a Shopify Plus.

Implement event tracking: On the Shopify Plus website, you need to implement event tracking to capture the “add_to_cart” event. This can be done by using JavaScript to send an event to GTM when the user adds an item to their cart, such as by clicking an “Add to Cart” button.

Set up the “add_to_cart” event in GTM: In GTM, you can create a tag that tracks the “add_to_cart” event by using the GA4 Event Tracking template. In the tag configuration, you need to specify the event name as “add_to_cart” and map the event data from the JavaScript event to the GA4 event fields.

Here is an example of how you can implement a data layer to track the “add_to_cart” event in Google Analytics 4 (GA4) and Google Tag Manager (GTM) on a Shopify Plus website:

<script>
  window.dataLayer = window.dataLayer || [];
  dataLayer.push({
    'event': 'add_to_cart',
    'item_name': 'Product5',
    'item_id': '1256789',
    'index': 9,
    'item_brand': "brand5",
    'item_category': "category6",
    'price': 50.00,
    'quantity': 1
  });
</script>
Add Google Analytics 4 to Shopify

Shopify Enhanced Ecommerce Tracking with Google Analytics 4 (GA4) using Google Tag Manager

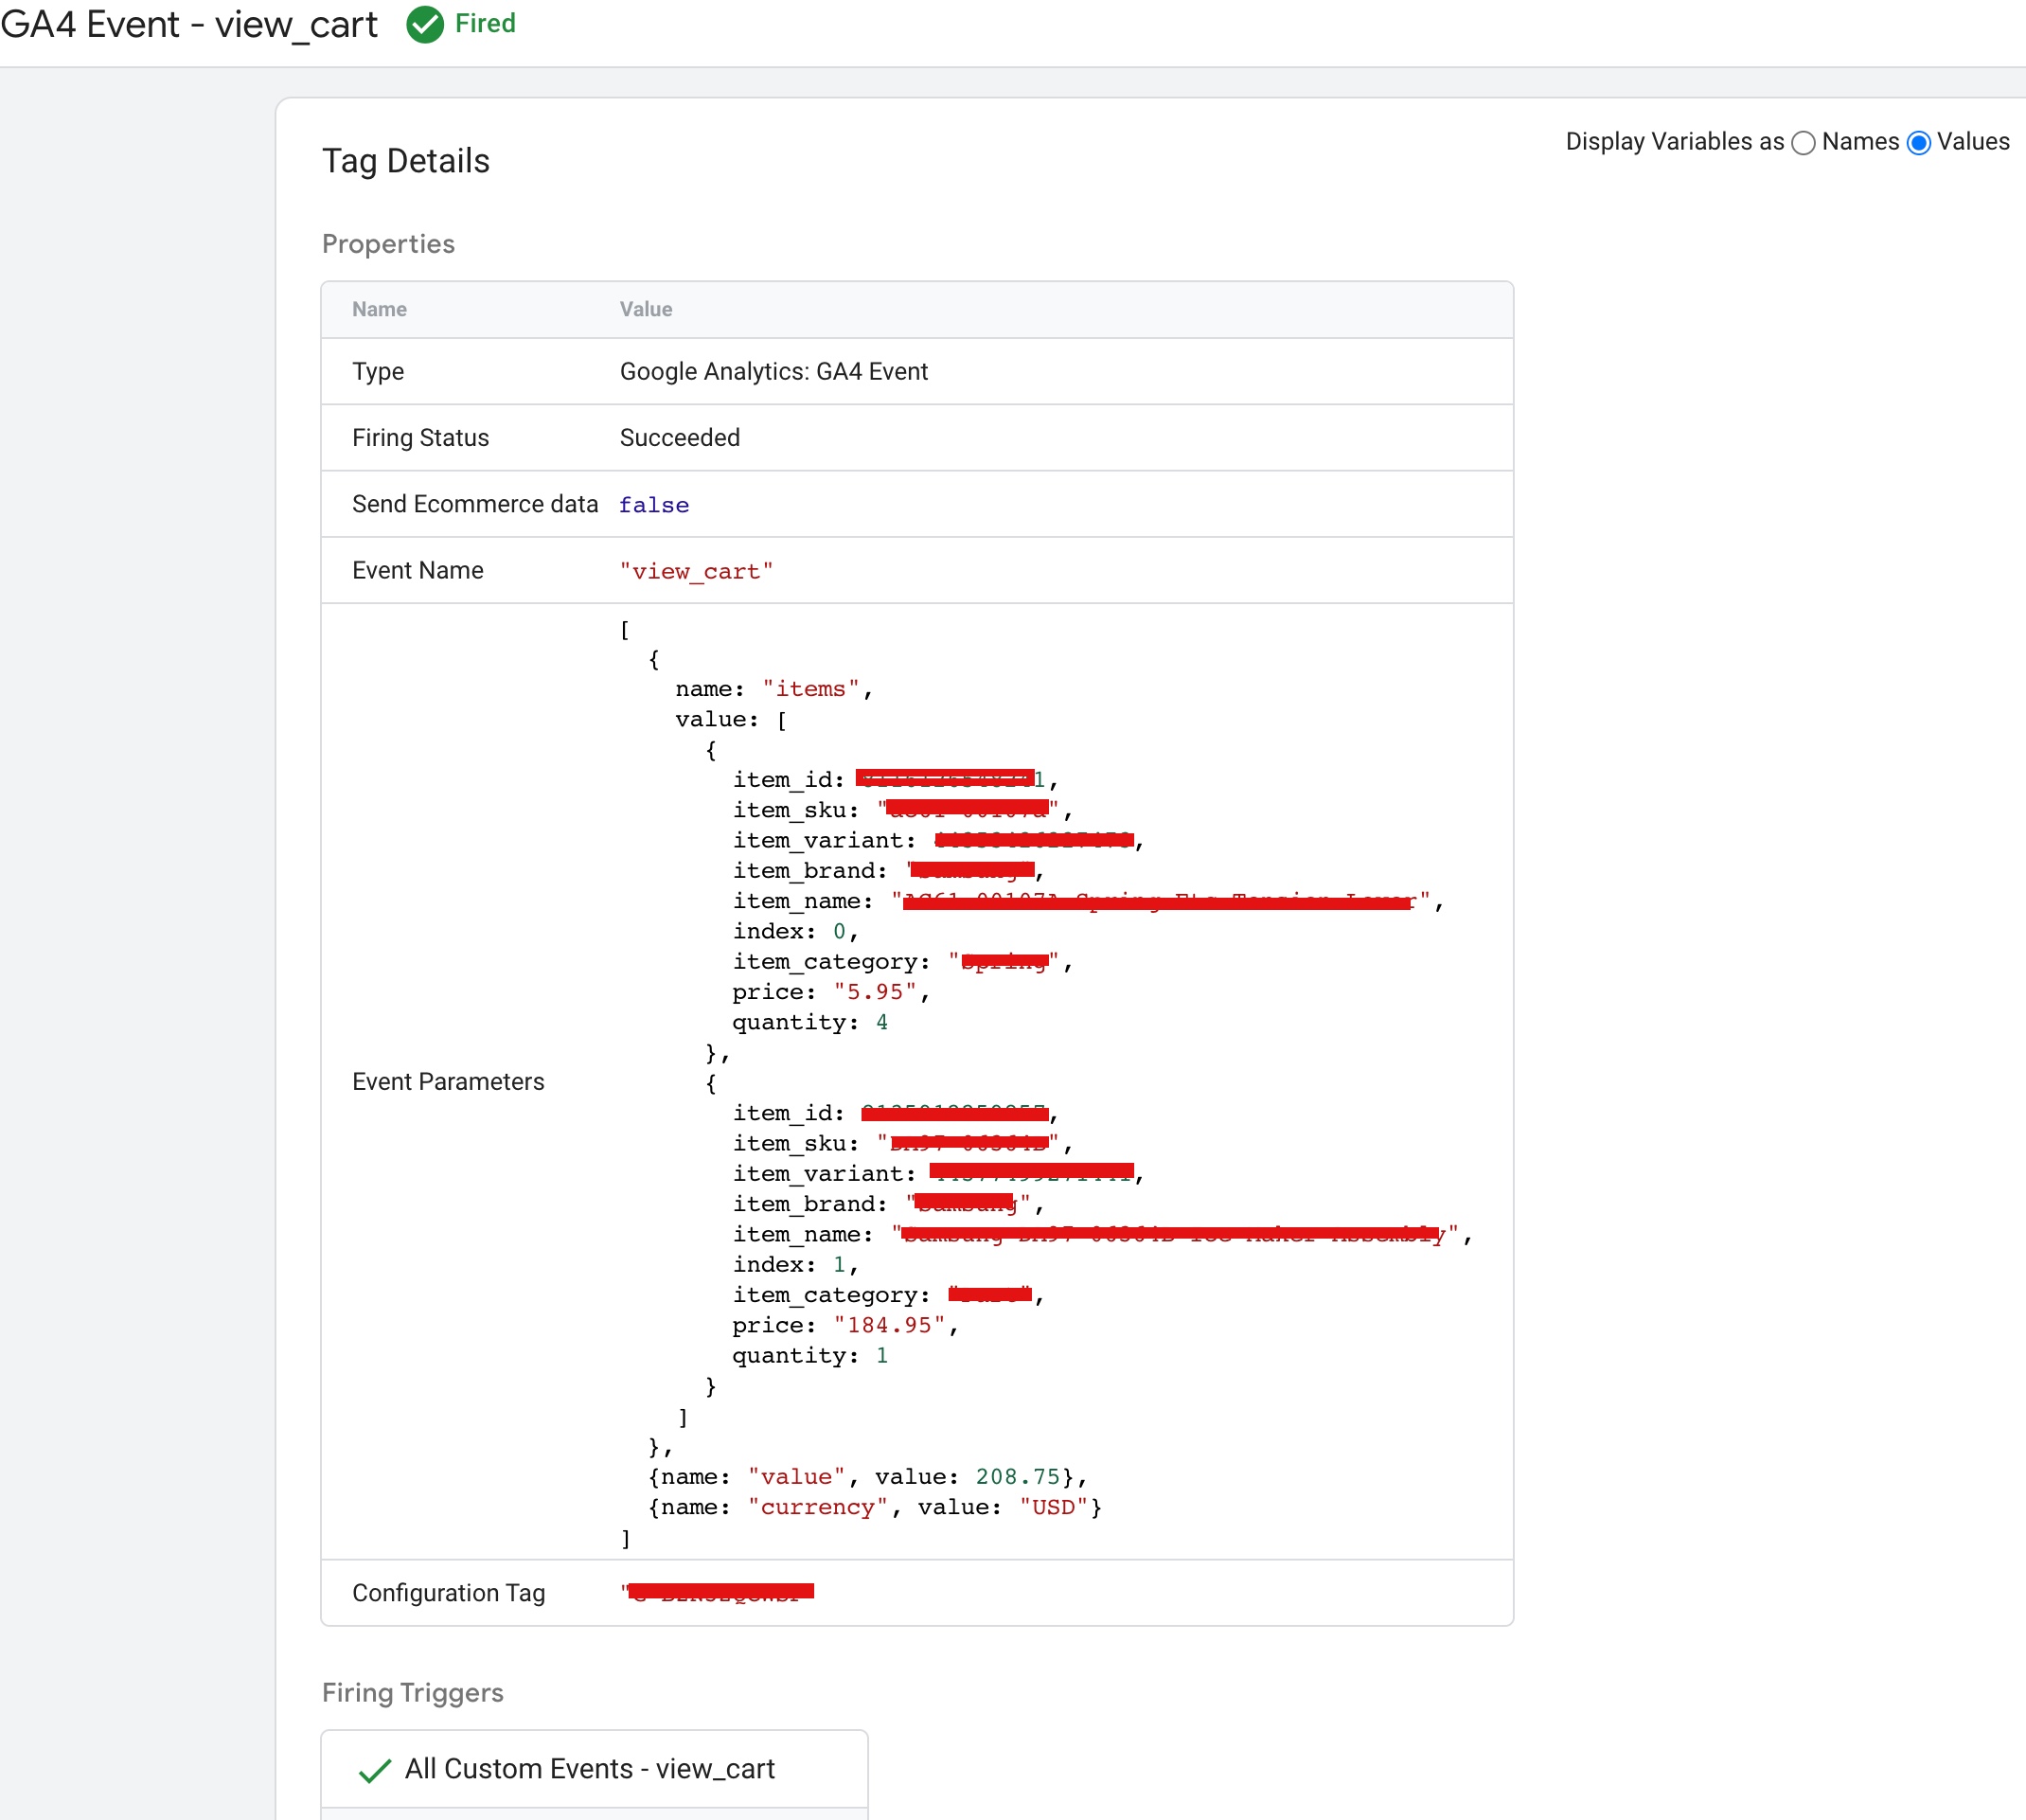
“view_cart” : The “view_cart” event in Google Analytics 4 (GA4) and Google Tag Manager (GTM) can be used to track when a user views their shopping cart on a Shopify Plus e-commerce website.

Here’s how you can track this event:

Implement event tracking: On the Shopify Plus website, you need to implement event tracking to capture the “view_cart” event. This can be done by using JavaScript to send an event to GTM when the user views their cart, such as by clicking a “View Cart” button.

Set up the “view_cart” event in GTM: In GTM, you can create a tag that tracks the “view_cart” event by using the GA4 Event Tracking template. In the tag configuration, you need to specify the event name as “view_cart”.

<script>
window.dataLayer = window.dataLayer || [];
dataLayer.push({
    'event': 'view_cart',
    'ecommerce': {
            'products': [{
                'item_name': 'Product7',
                'item_id': '12334566','
index: 89, 'price': 50.00, 'item_brand': 'Brand4', 'item_category': 'cateogry21', 'quantity': 1 }] } }); </script>

This data layer code makes use of Shopify Liquid syntax to dynamically populate the product information in the data layer.

In order to make use of this data layer, you’ll need to have Google Tag Manager set up on your Shopify Plus store. You can then create a tag in GTM that will fire when the view_cart event is pushed to the data layer.

Shopify Enhanced eCommerce GA4

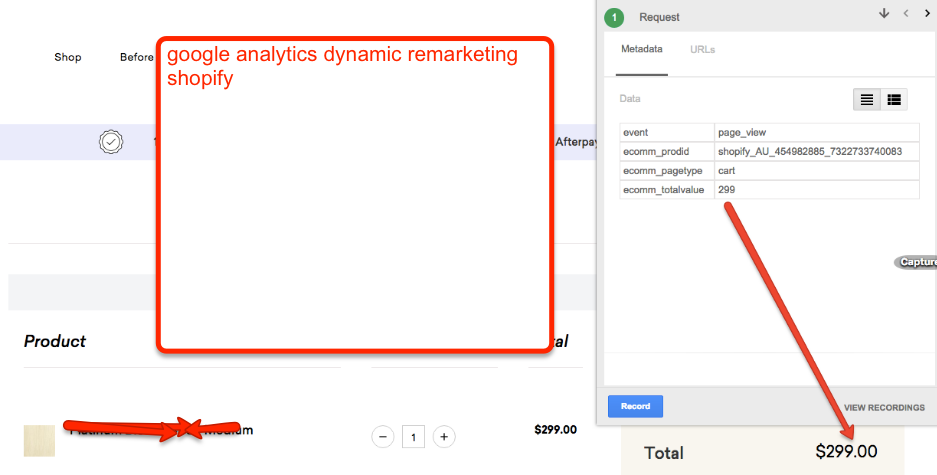
Shopify Plus Google Tag Manager Enhanced Ecommerce Tracking Google Analytic 4 (UA/GA4) Tracking

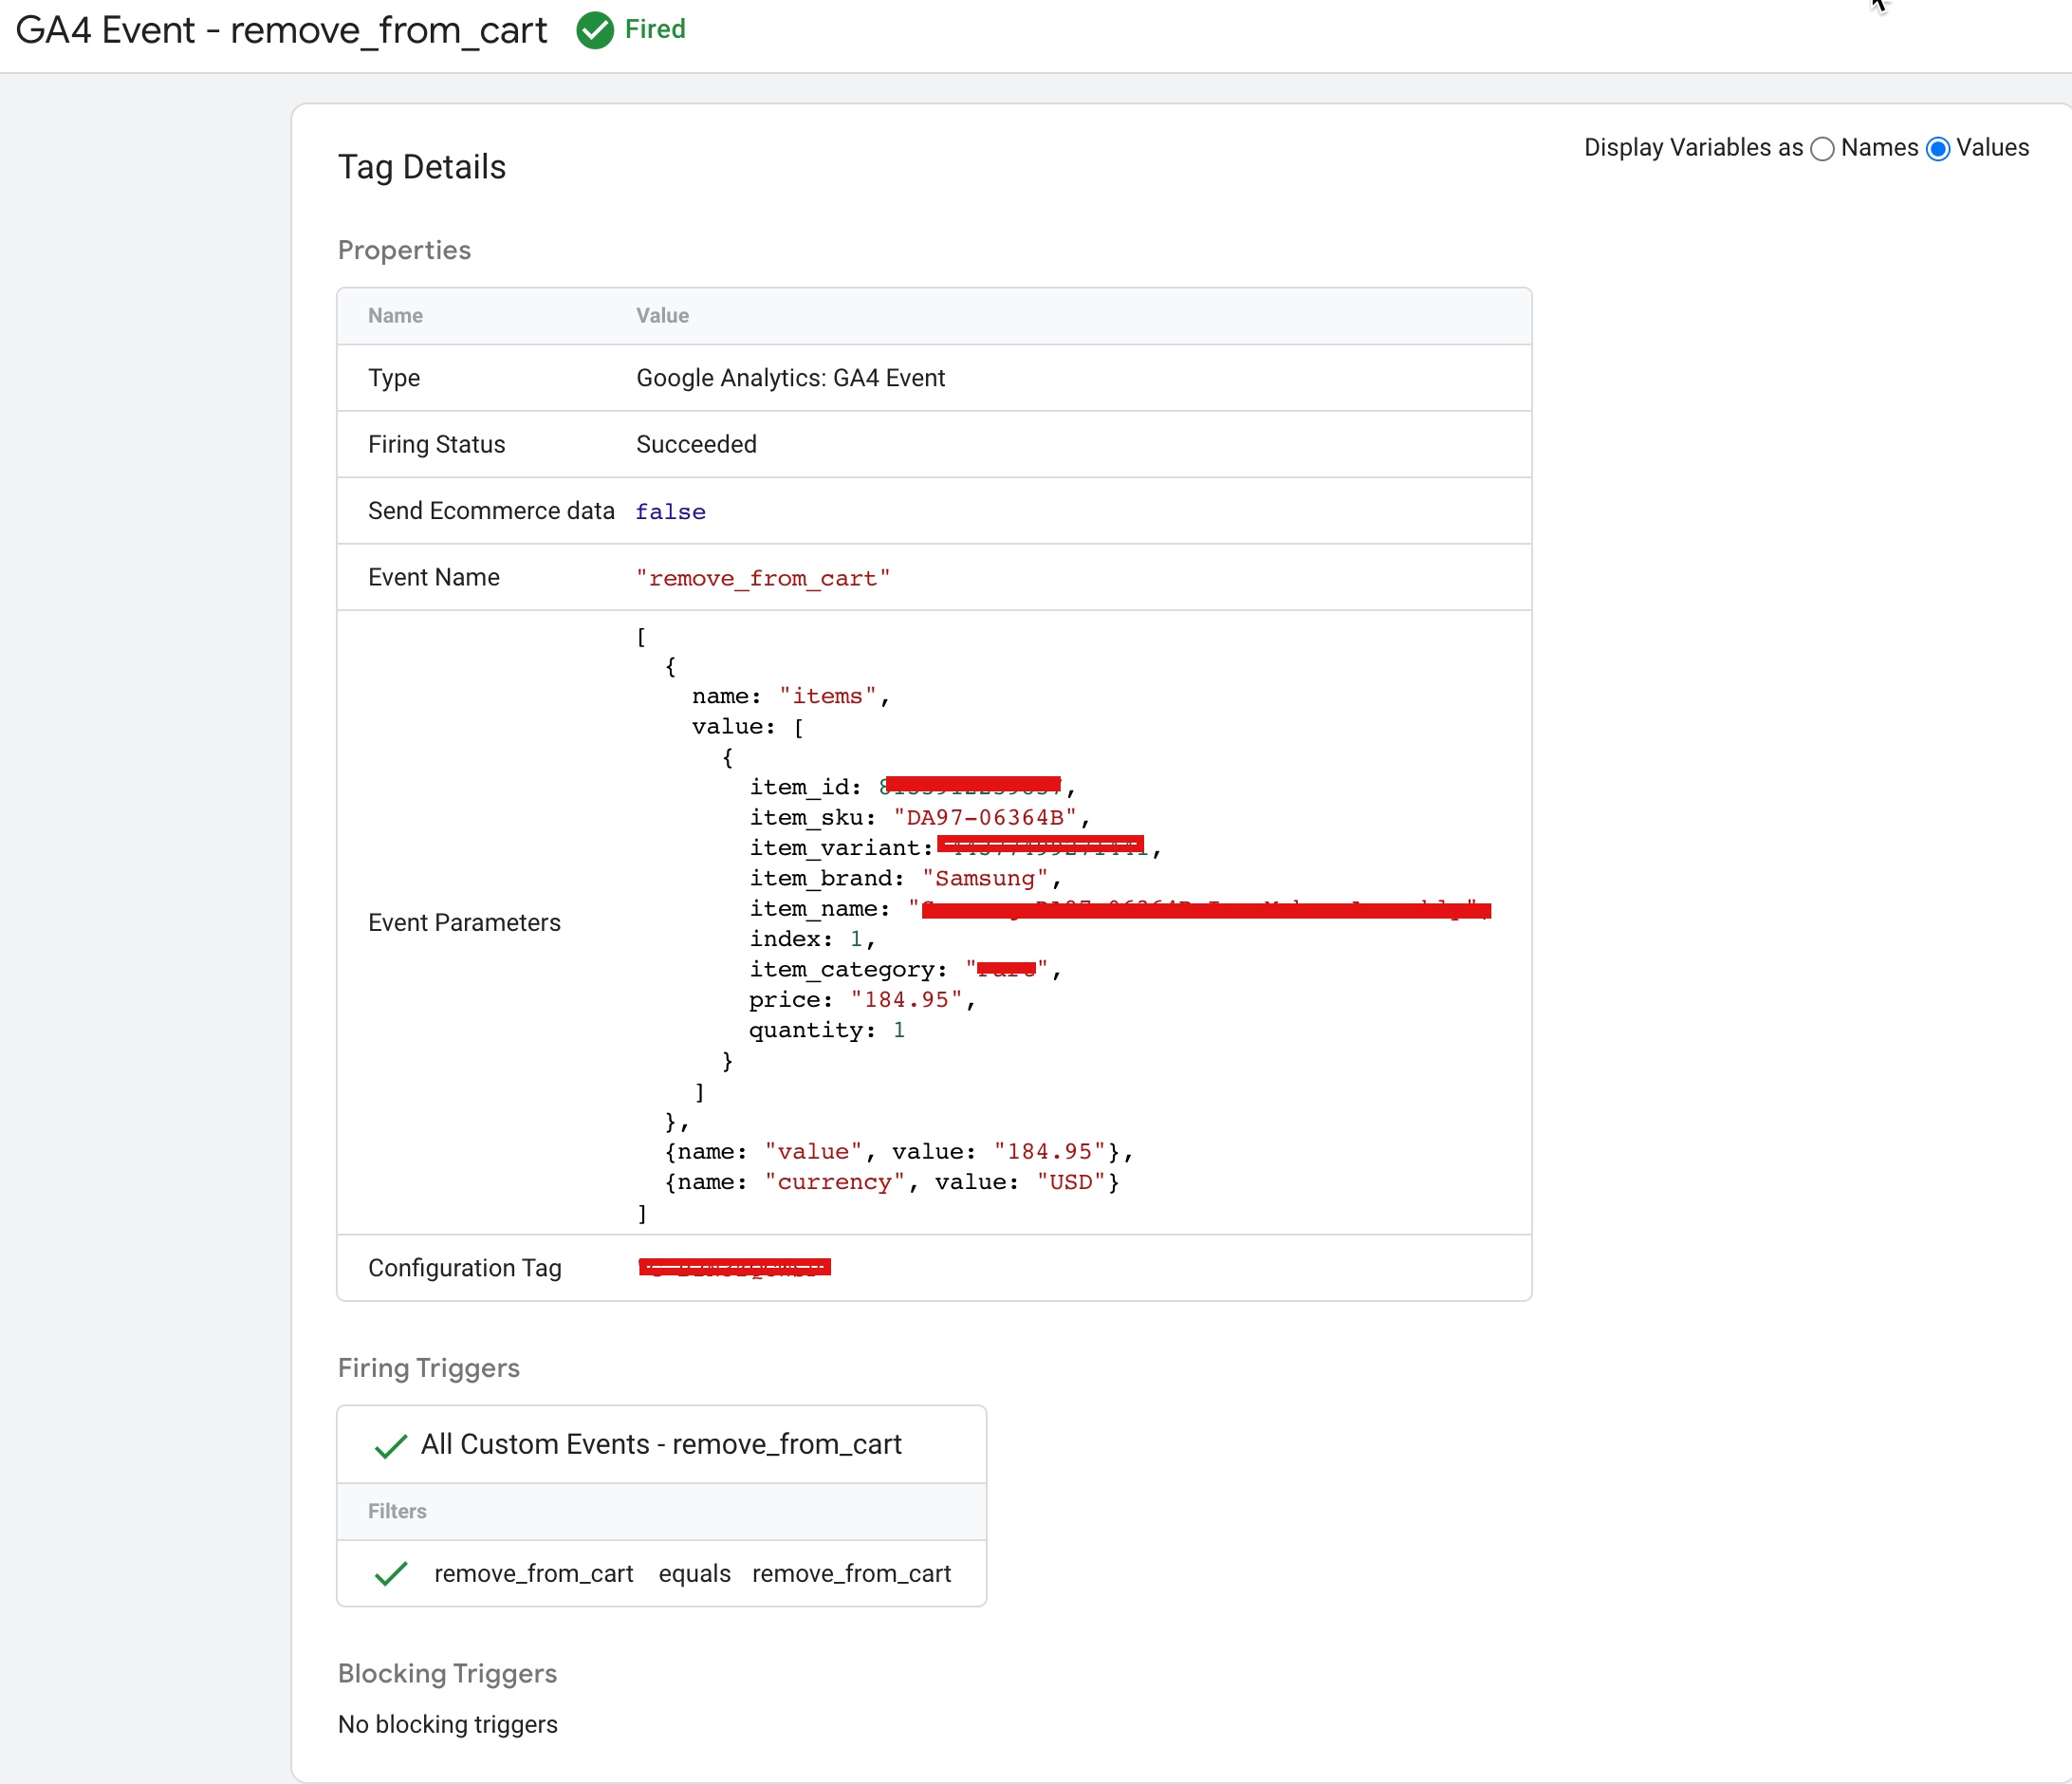
“remove_from_cart” : The event “remove_from_cart” is a type of tracking event used to monitor when an item is removed from a customer’s shopping cart in  a Shopify Plus store. The event is being tracked through GA4 (Google Analytics 4), which is a new version of Google Analytics, and is implemented on a Shopify Plus platform using Google Tag Manager. This event helps in understanding customer behavior and making data-driven decisions to improve the shopping experience.

To track the “remove_from_cart” event in Google Analytics 4 (GA4) with Google Tag Manager (GTM), you would need to set up the appropriate data layer and trigger in GTM.

Here’s an example of how you might set up the data layer in Shopify Plus:

<script>
  window.dataLayer = window.dataLayer || [];
  dataLayer.push({
    event: "remove_from_cart",
    items: [
      {
        item_id: "12345", // Replace with the actual product ID
        item_name: "Example Product", // Replace with the actual product name
        price: "9.99", // Replace with the actual product price
        quantity: "1" // Replace with the actual quantity removed
      }
    ]
  });
</script>
GA4 Ecommerce Tracking Shopify Plus

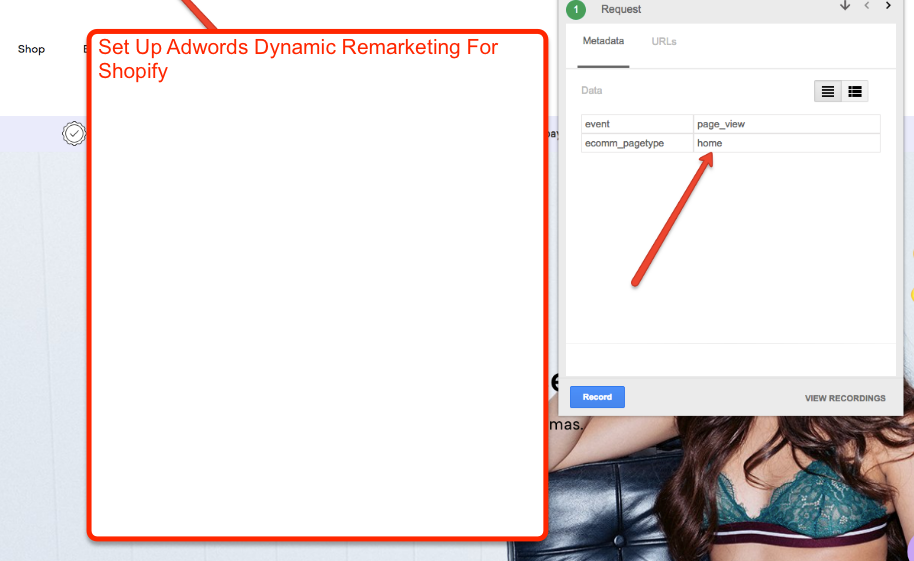
Set up GA4 E-commerce Tracking using Shopify Plus with Google Tag Manager

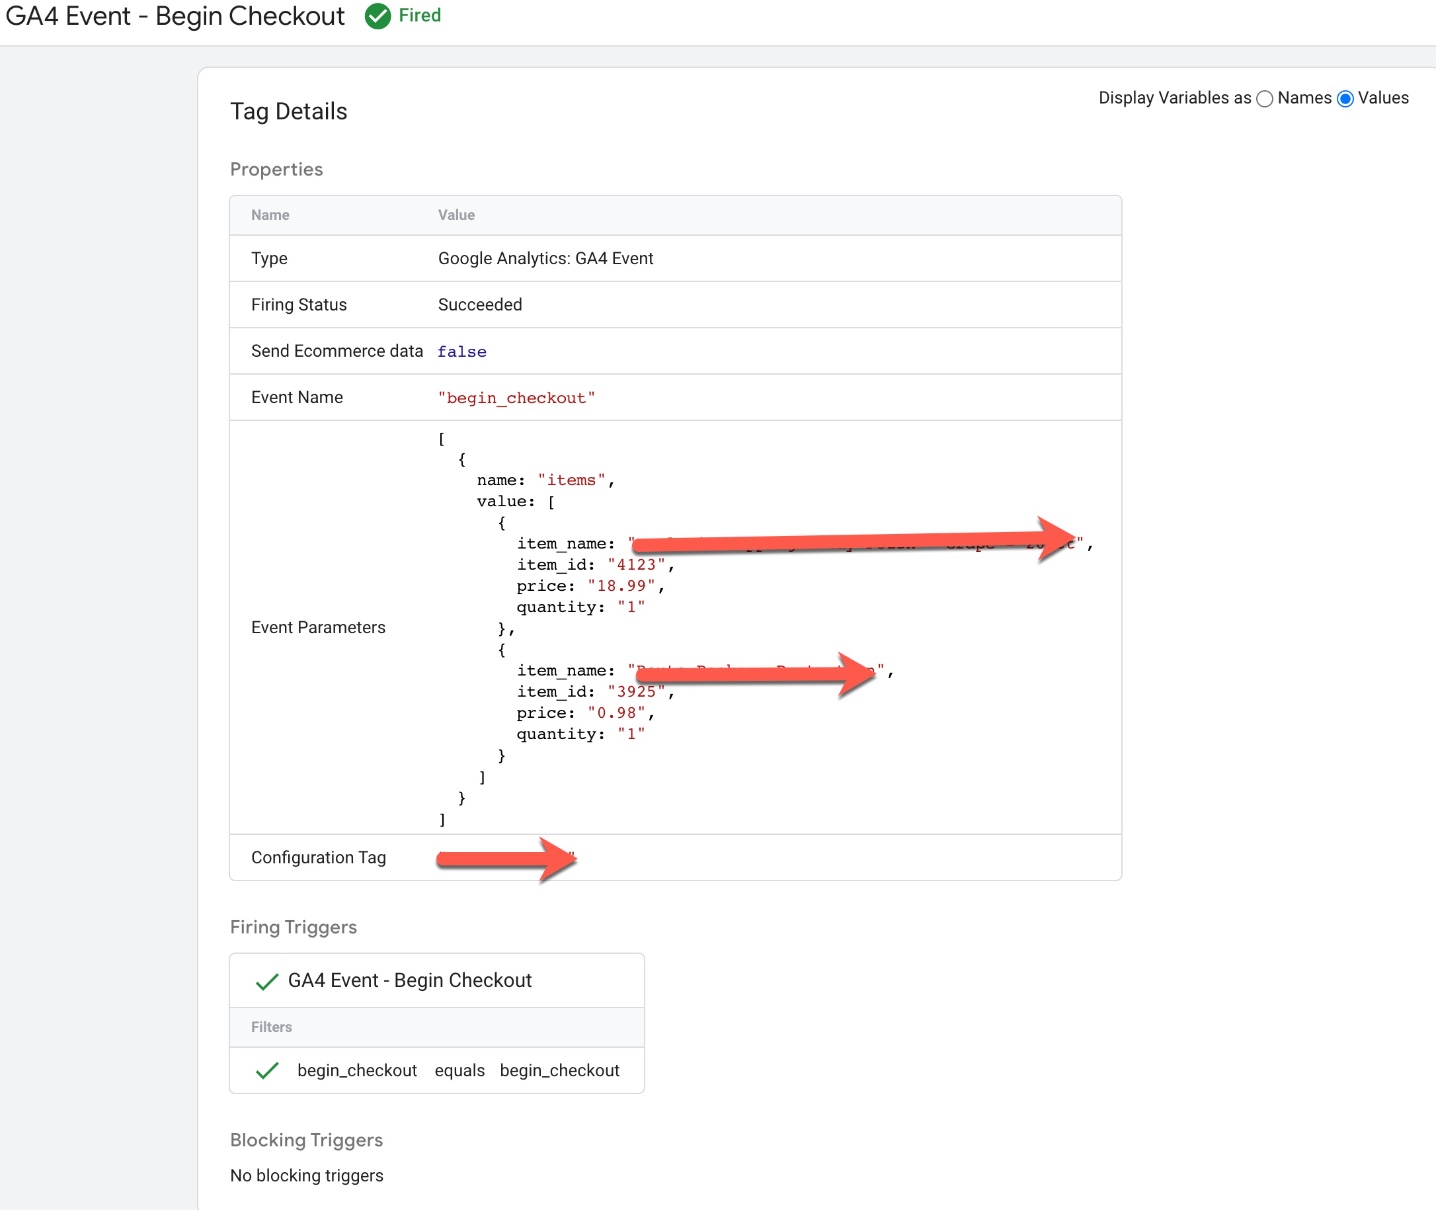
“begin_checkout” : is an event that can be used in Shopify Plus ecommerce tracking with GA4 (Google Analytics 4). It represents the initiation of the checkout process and can be recorded using GA4 tracking code and data layer with the help of Google Tag Manager. The “begin_checkout” event can be used to understand and analyze customer behavior, including the number of initiated checkouts and how far customers progressed through the checkout process.

The event “begin_checkout” refers to the action of starting the checkout process on an e-commerce website. The e-commerce platform being used is Shopify Plus and is being tracked using Google Analytics 4 (GA4) with data layer implementation.

Here is an example code of pushing the “begin_checkout” event to the data layer in a Shopify Plus:

dataLayer.push({
  event: "begin_checkout",
  items: [
    {
      item_id: "item-id",
      item_name: "item-name",
index: 0,
item_brand: "brand_3",
item_category: "Apparel_3", price: "item-price", quantity: "item-quantity" } ] });

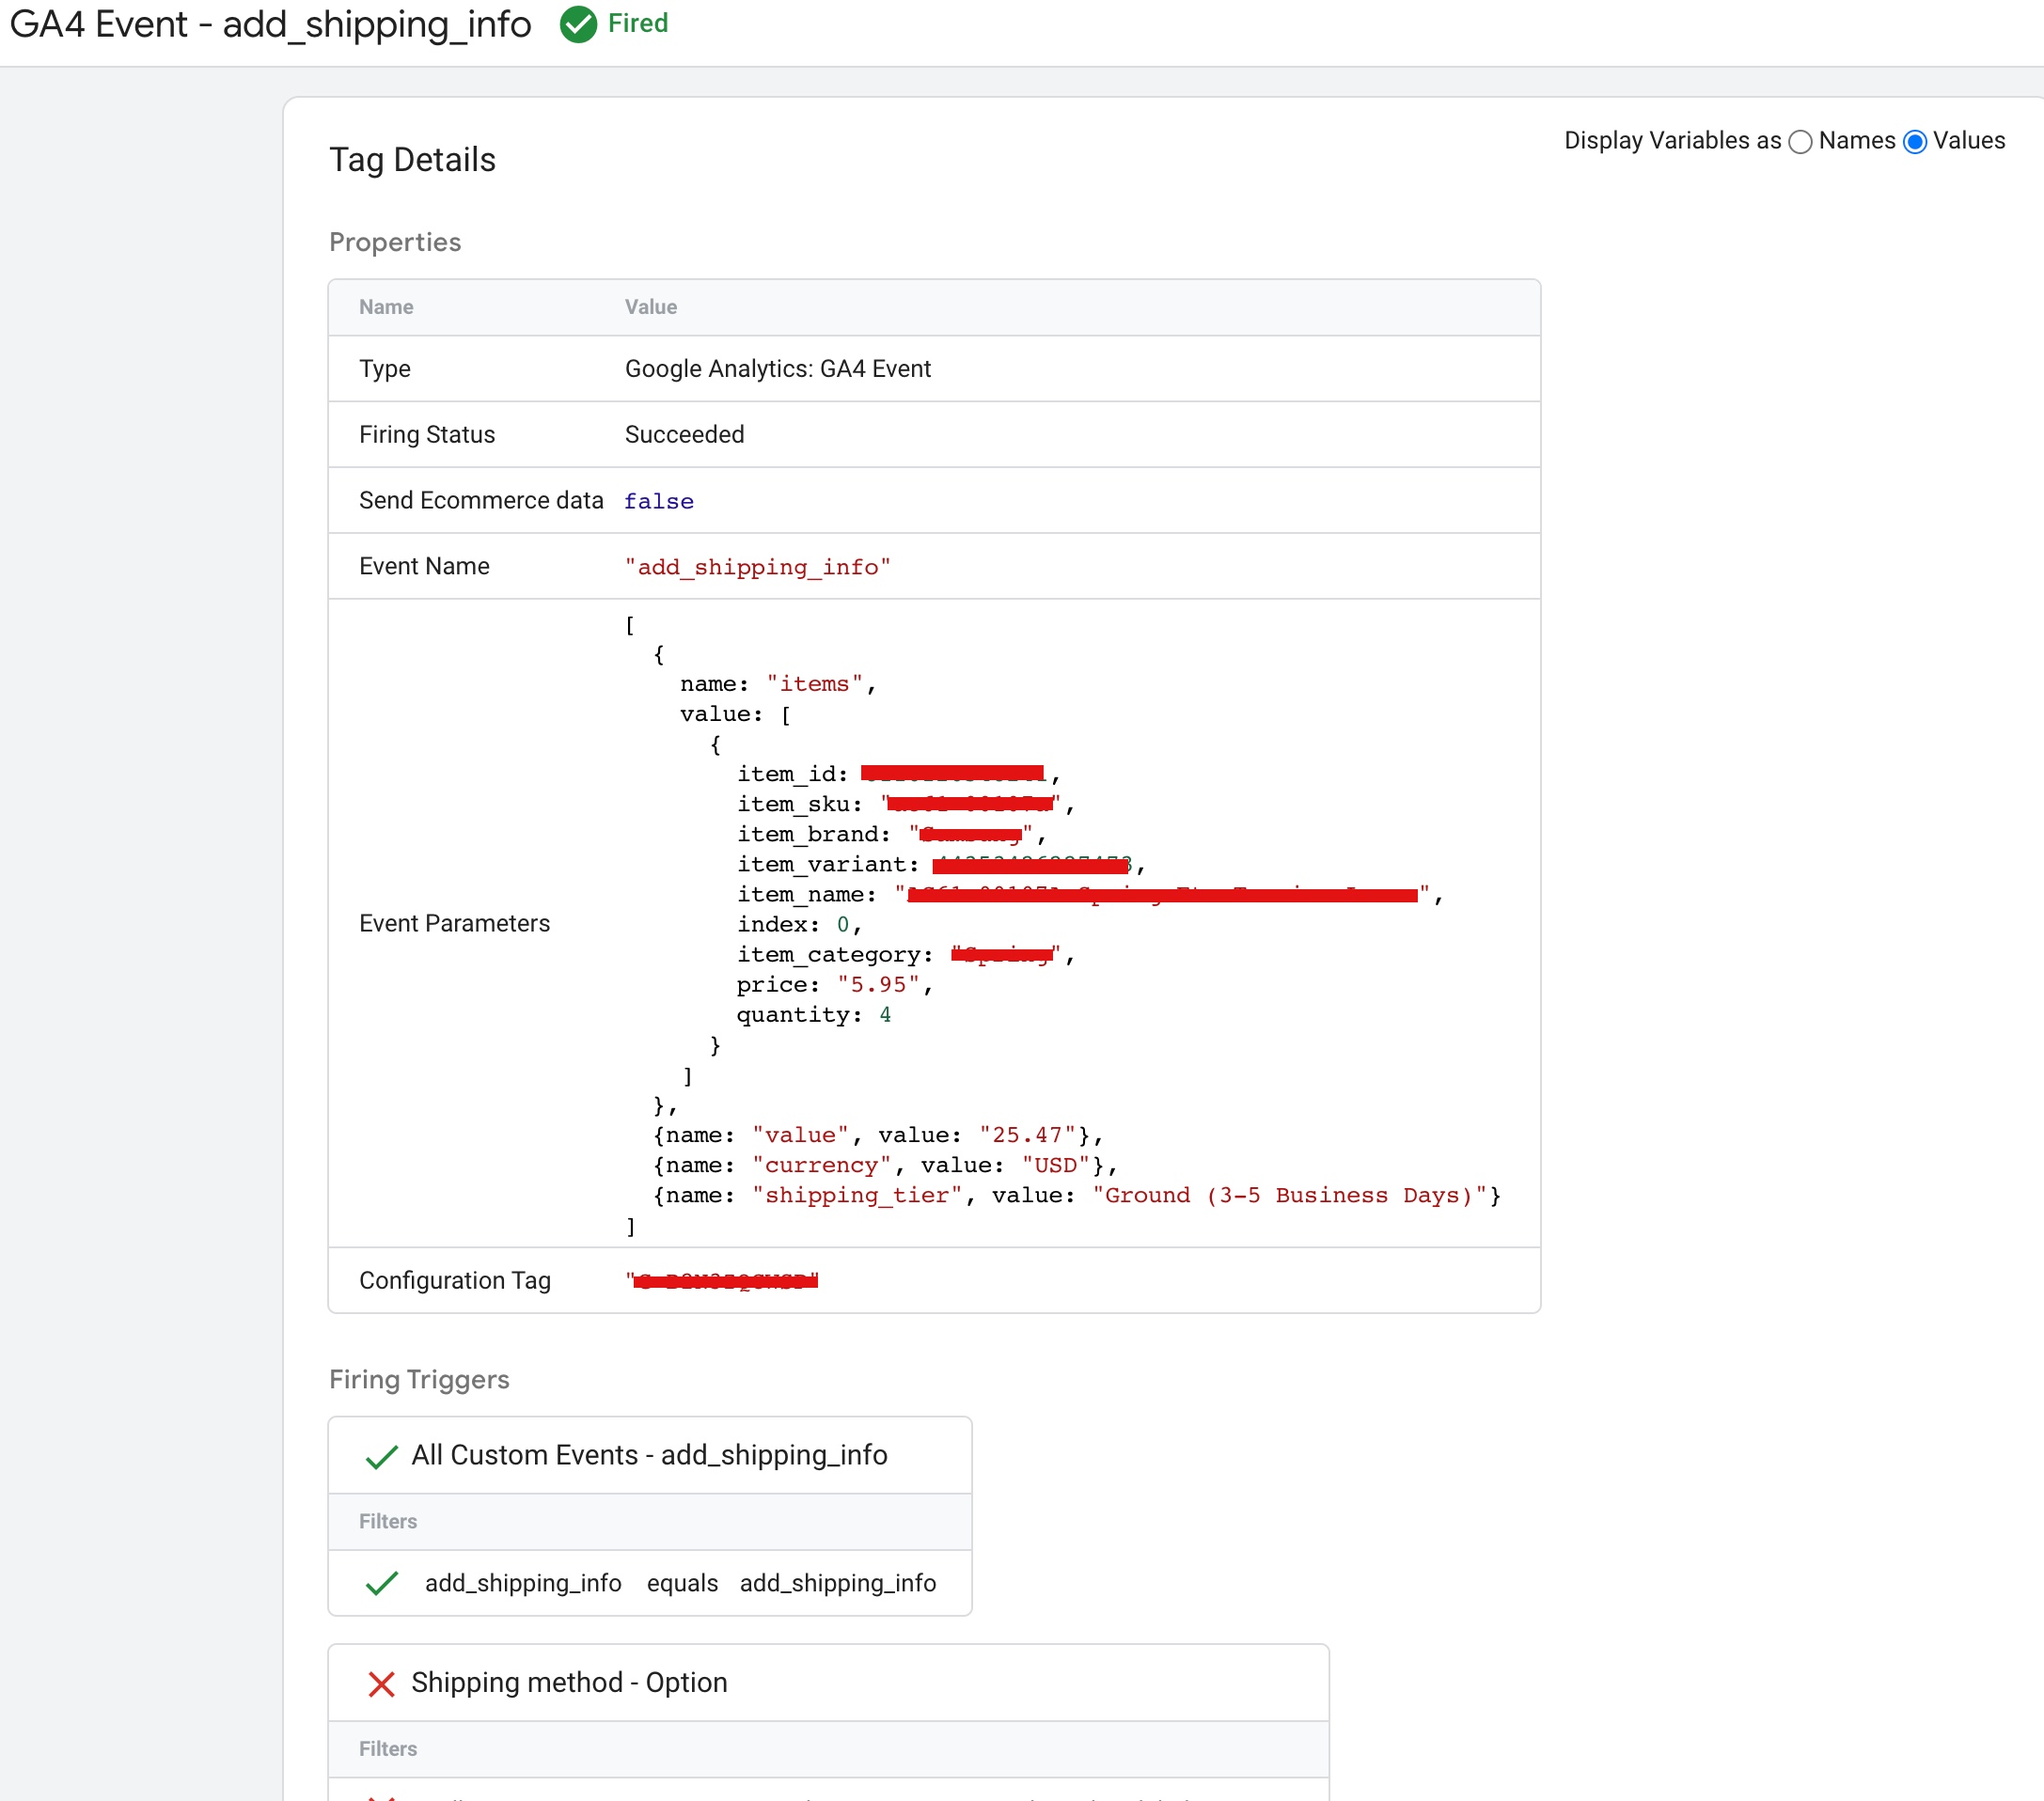
“add_shipping_info” : The “add_shipping_info” event is a custom event used to track the addition of shipping information in an e-commerce store that uses GA4 (Google Analytics 4) and Google Tag Manager, and is built on the Shopify Plus platform. The event can be triggered when a customer adds their shipping information during the checkout process. The event can be implemented using a data layer in which you push an object that contains the event name and other relevant data to the data layer. This information can then be used to trigger tags in Google Tag Manager that send the event data to GA4 for tracking and analysis.

Here’s an example code to implement “add_shipping_info” event with ecommerce data layer in Google Analytics 4 (GA4) with Google Tag Manager to the data layer in a Shopify Plus:

dataLayer.push({
  event: "add_shipping_info",
  ecommerce: {
    currency: "USD",
    value: 7.77,
    shipping_tier: "shipping method",
    items: [
    {
      item_id: "productsku/id",
      item_name: "producname",
      index: 0,
      item_brand: "brand",
      item_category: "category45"
      price: 9.99,
      quantity: 1
    }
    ]
  }
});
Shopify Plus Ecommerce Tracking in Google Analytics 4 (GA4)

Shopify Plus Advance GA4 eCommerce Tracking using Google Tag Manager

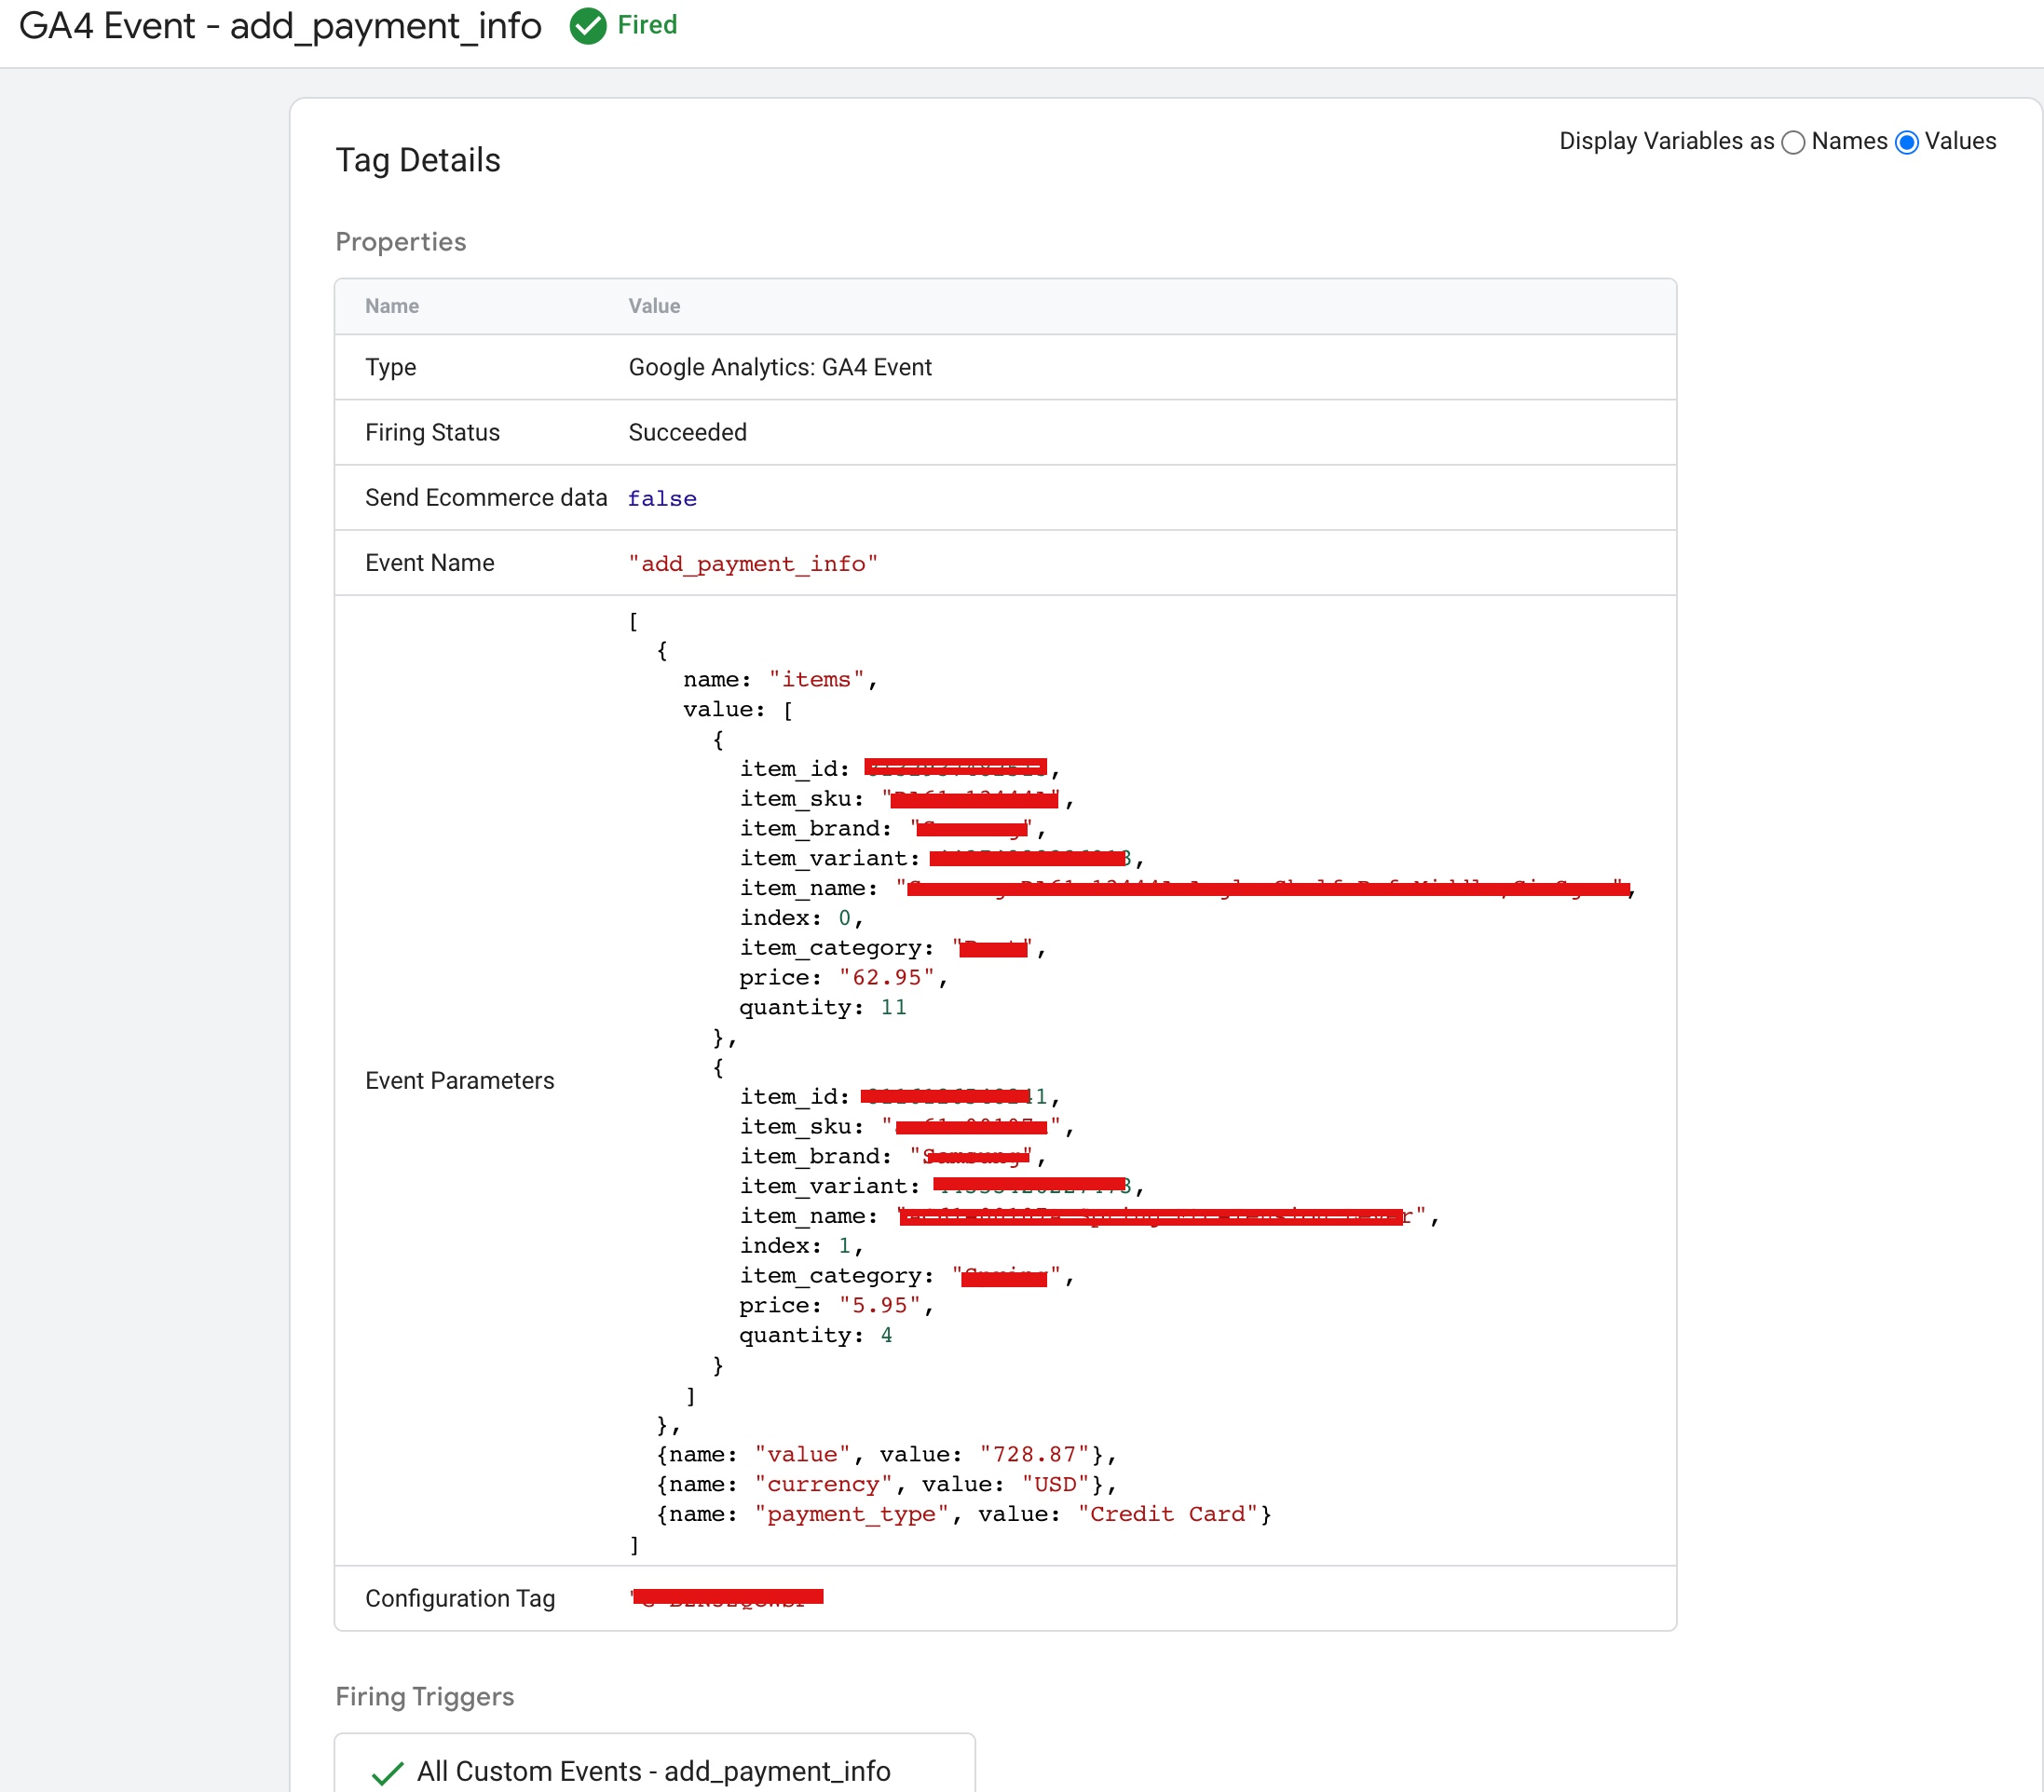
“add_payment_info” is an event that can be used in ecommerce tracking to record when a customer has added payment information on a website. The event can be implemented using Google Analytics 4 (GA4) and Google Tag Manager (GTM). In this setup, GTM collects data from the website and sends it to GA4 for analysis. The data layer is used to push information about the event to GTM, including the event name and any relevant details such as payment information.

The event “add_payment_info” is used in Shopify Plus ecommerce tracking with Google Analytics 4 (GA4) and Google Tag Manager. The data layer code would look similar to the following example:

dataLayer.push({
  event: "add_payment_info",
  ecommerce: {
   payment_type: "Credit Card",
    items: [
    {
      item_id: "Productid 1",
      item_name: "producname7",
      index: 0,
      item_brand: "brand",
      item_category: "category45"
      price: 9.99,
      quantity: 1
    }
    ]
  }
});
Google Analytics 4 Integration for Shopify Plus

Connect Google Analytics 4 (GA4) eCommerce Tracking for Shopify Plus using Google Tag Manager

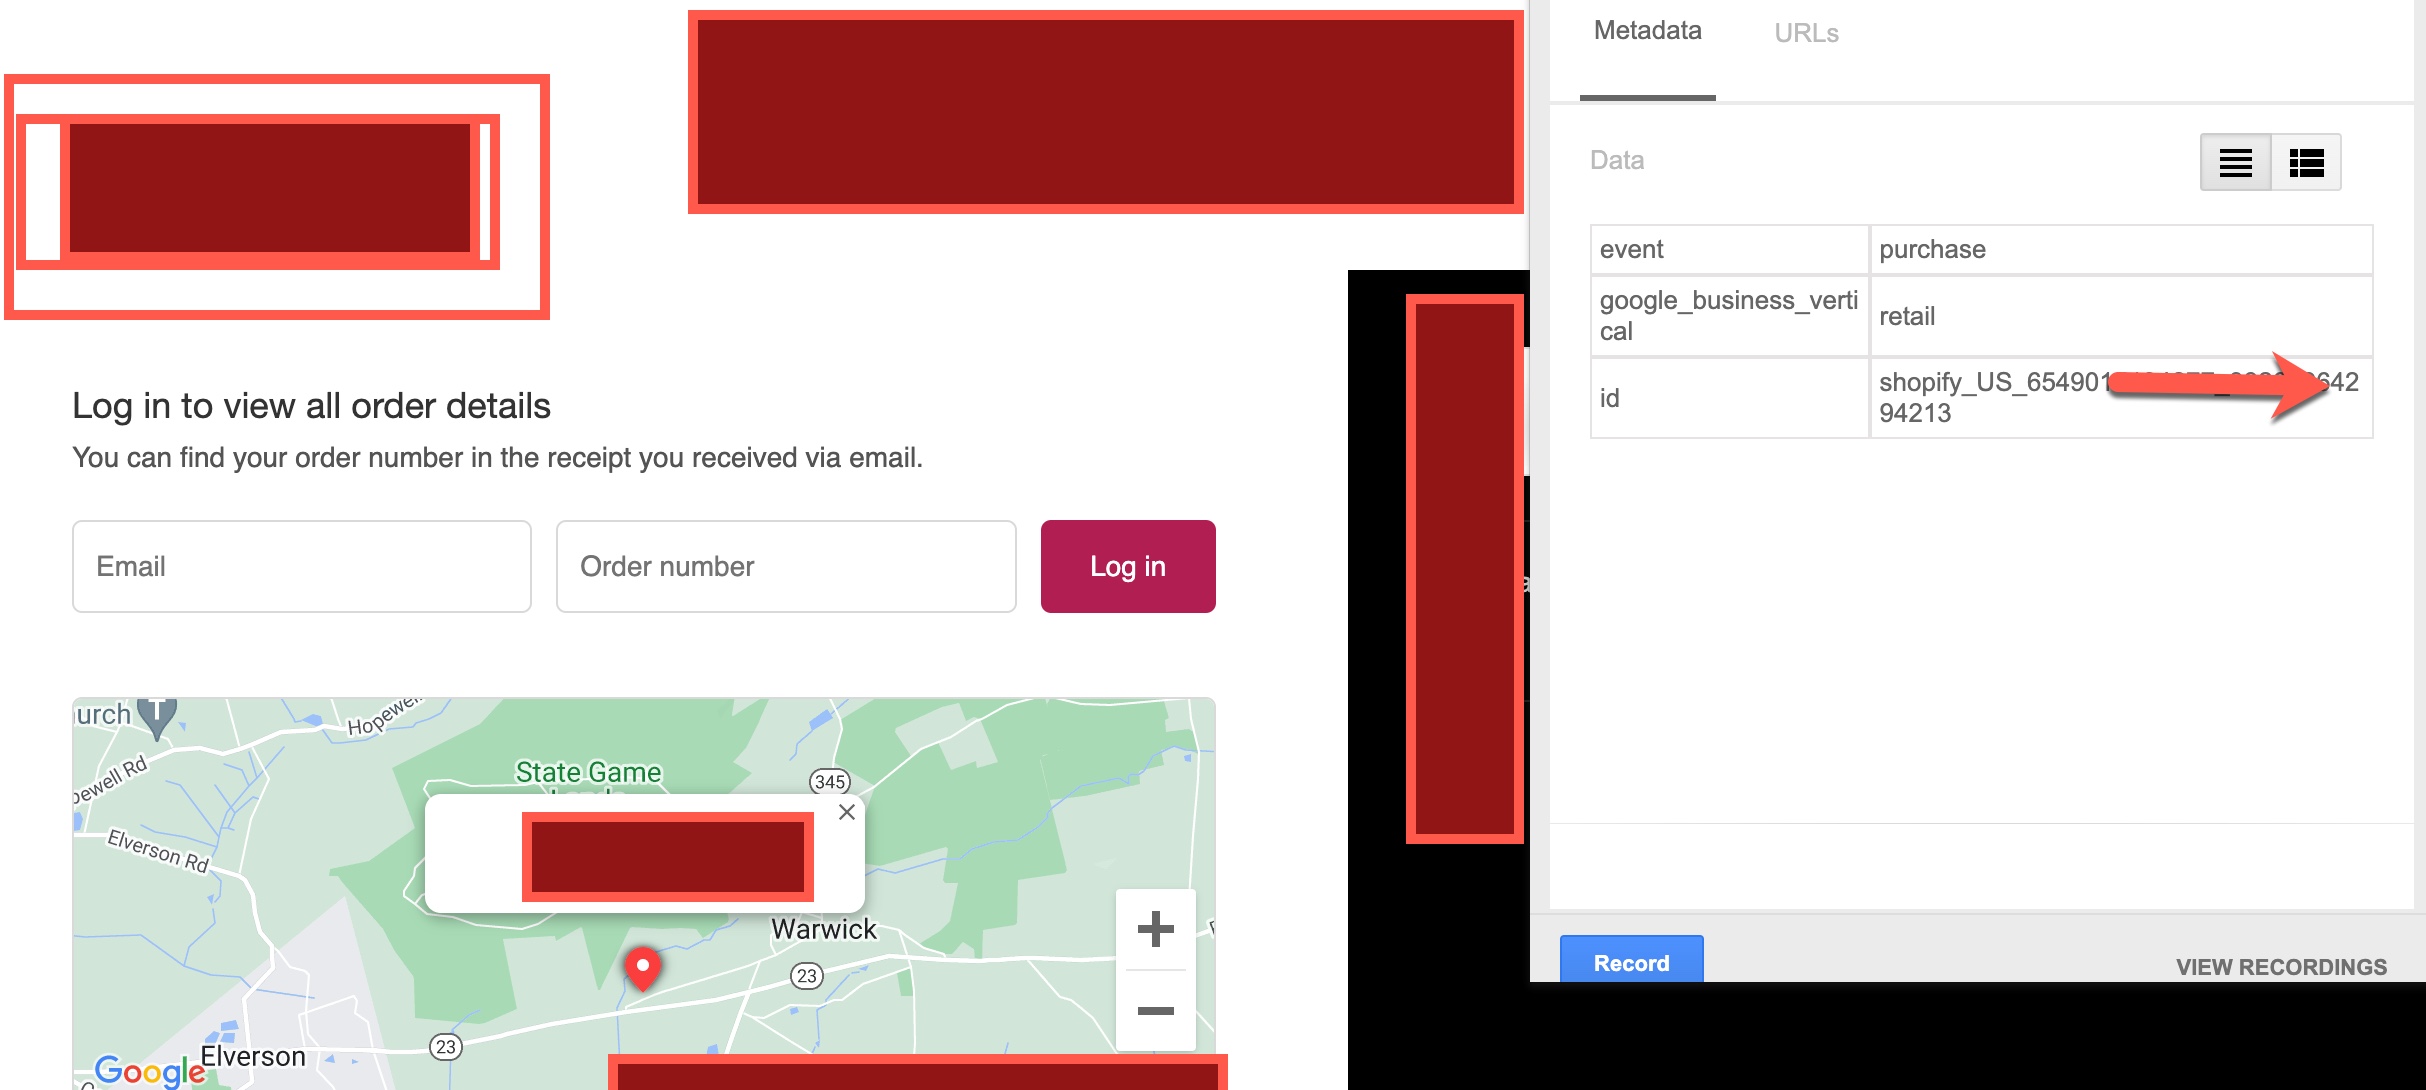
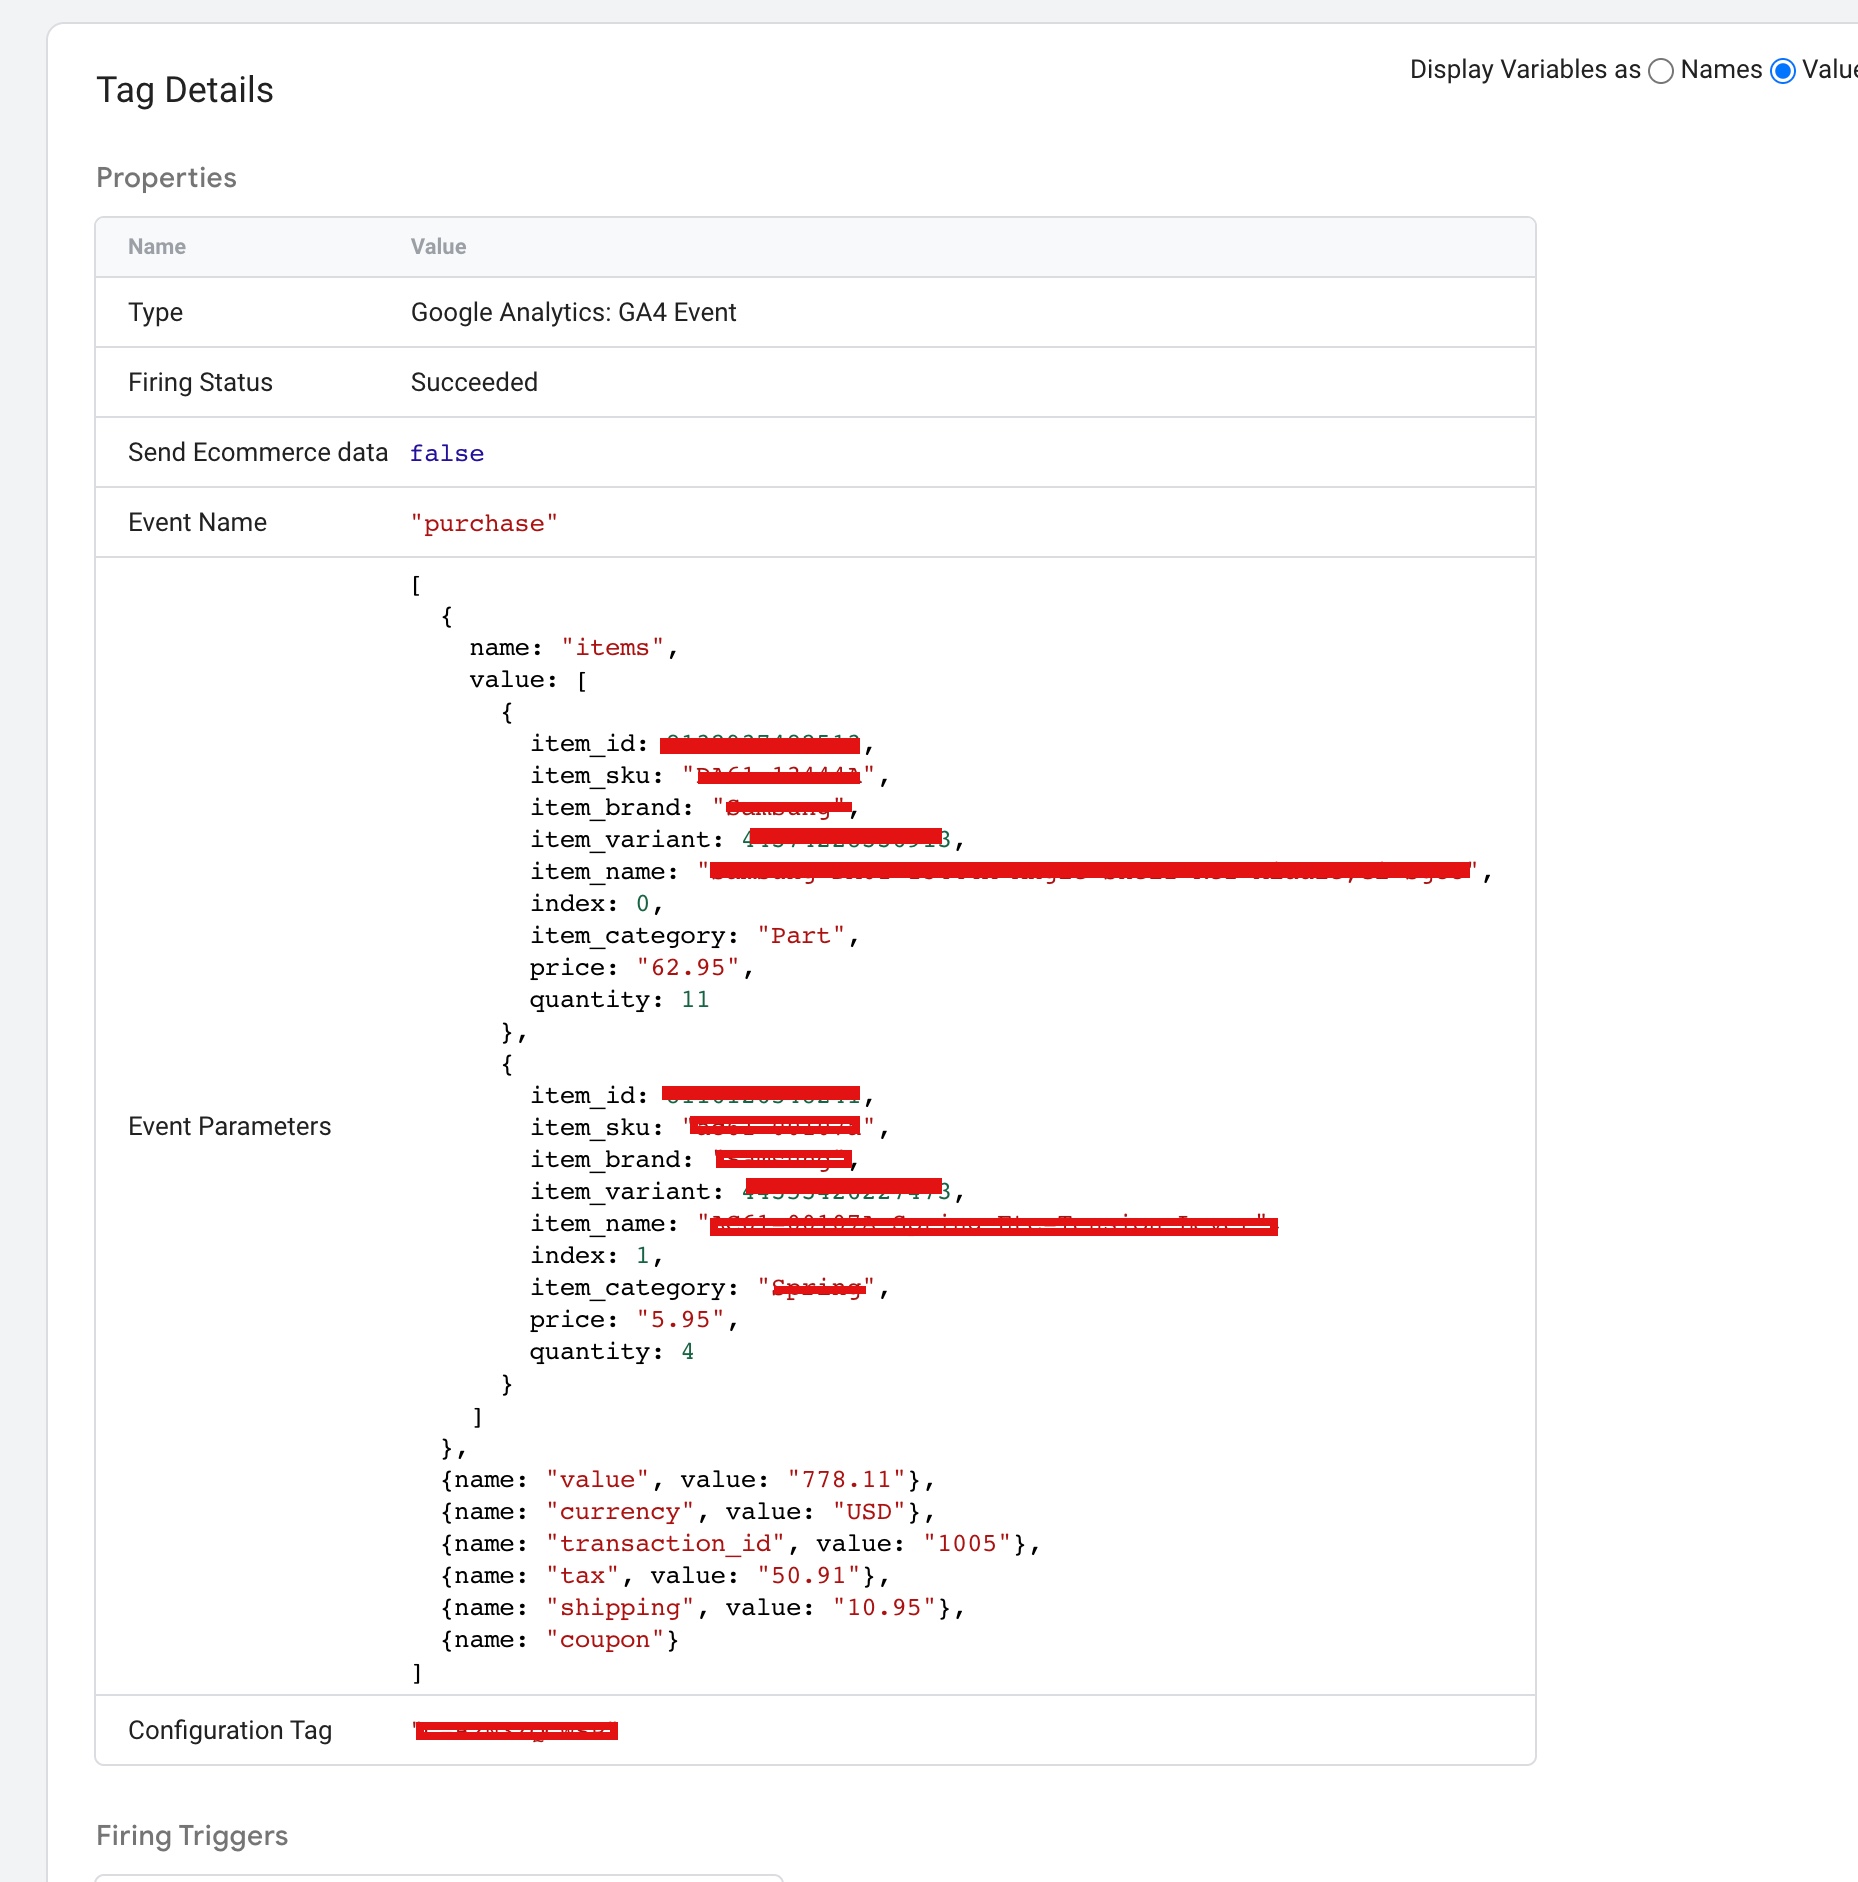
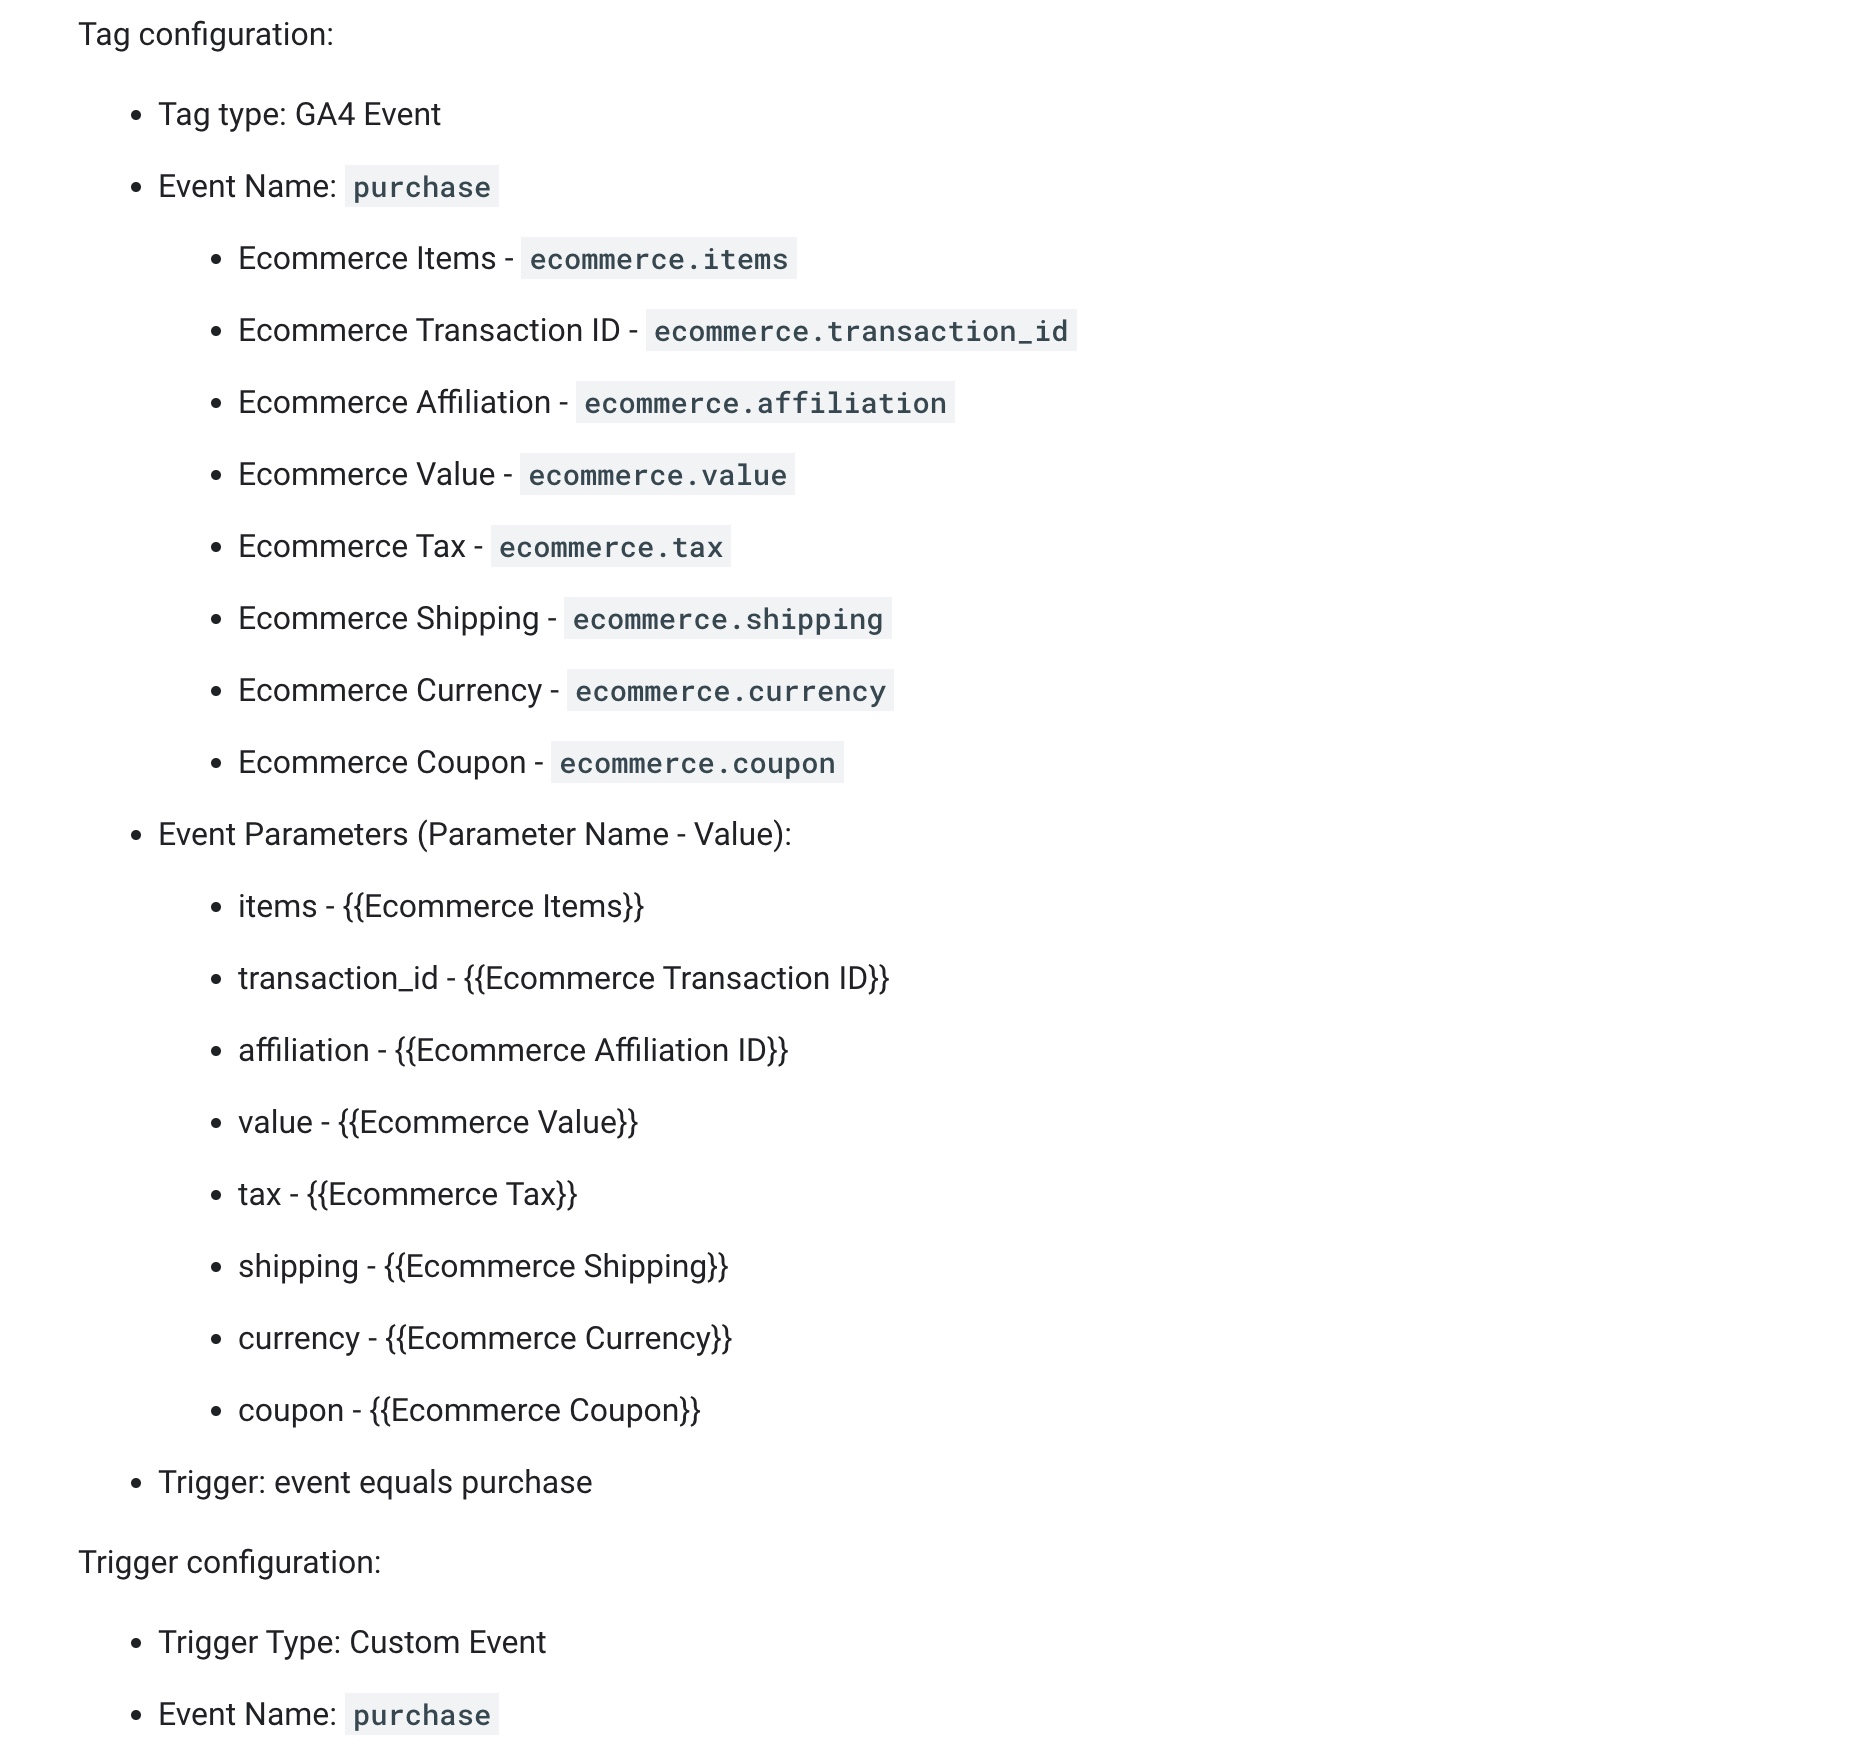
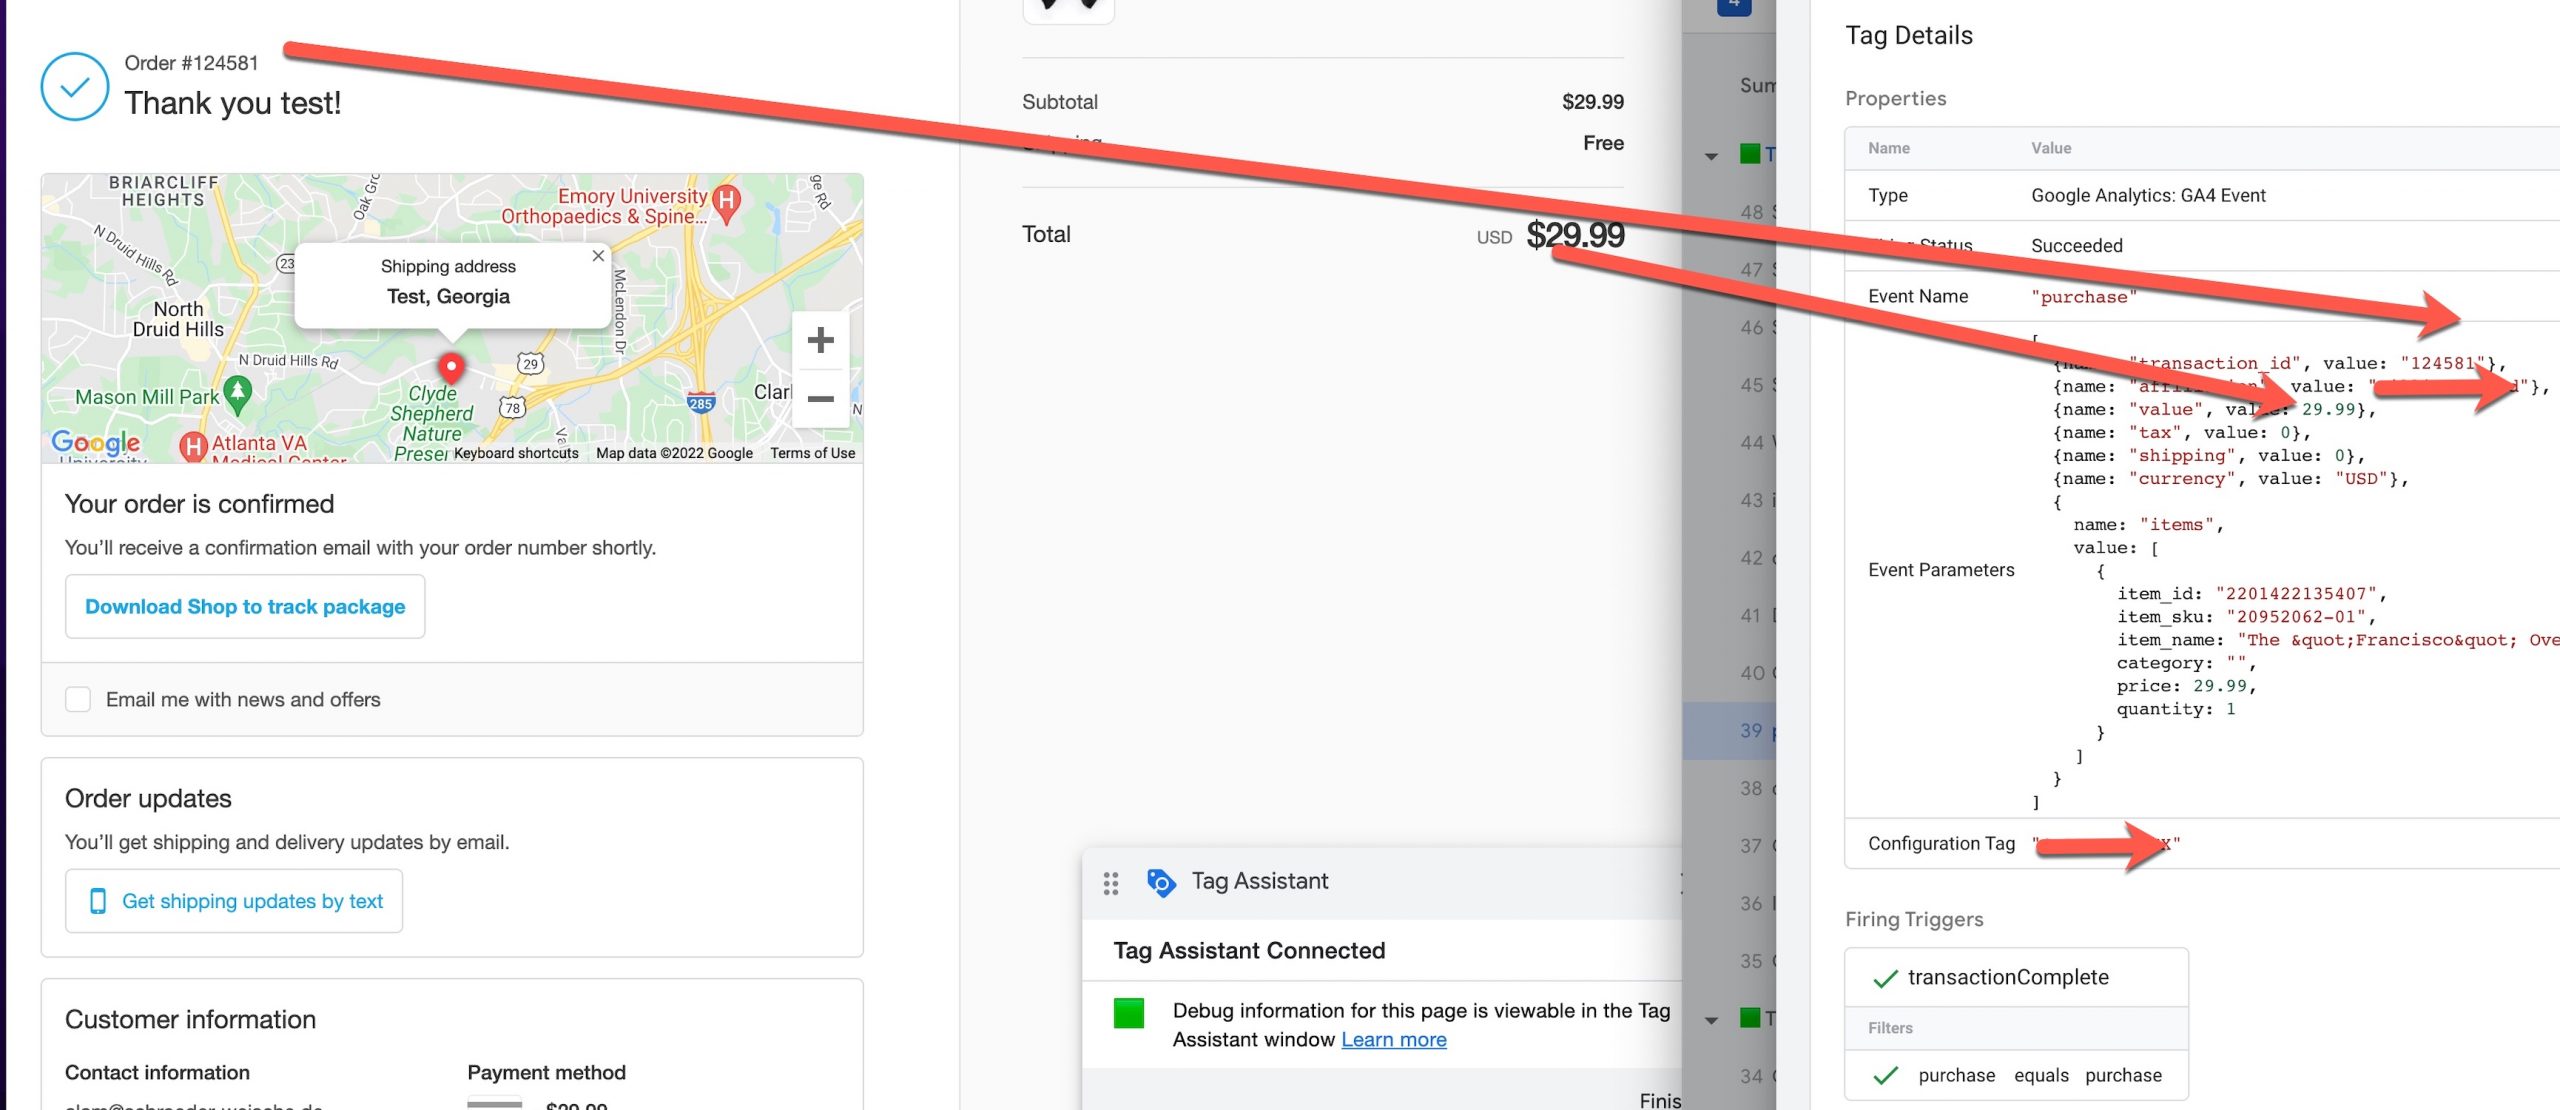
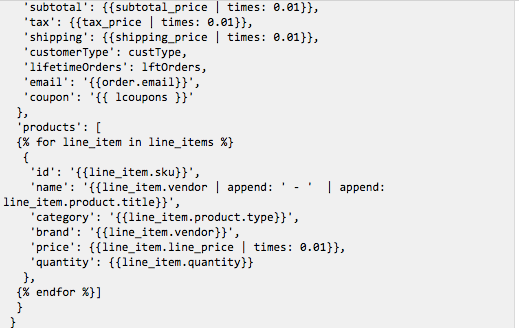
“purchase”: The event “purchase” is a standard ecommerce event in Google Analytics 4 (GA4) that tracks the completion of a transaction on a website. The event is usually set up with the help of Google Tag Manager and can be integrated with Shopify Plus to track ecommerce data. When the event is triggered, the data related to the purchase, such as product and transaction information, is sent to GA4 for analysis.

The event “purchase” is a commonly used event in ecommerce tracking to track when a customer has completed a transaction and purchased items from a website. When using Shopify Plus with Google Tag Manager and GA4, you can use the following code in your data layer to trigger this event:

dataLayer.push({
event: "purchase",
ecommerce: {
transaction_id: "transaction_id", // replace with actual transaction ID
affiliation: "your store",
value: "your_revenue", // replace with actual revenue value
tax: "your_tax", // replace with actual tax value
shipping: "your_shipping", // replace with actual shipping value
coupon: "your_coupon" // replace with actual coupon value (if any)
},
items: [{
item_name: "product_name", // replace with actual product name
item_id: "product_id", // replace with actual product ID
price: "product_price", // replace with actual product price
item_brand: "product_brand", // replace with actual product brand
item_category: "product_category", // replace with actual product category
item_variant: "product_variant", // replace with actual product variant (if any)
quantity: "product_quantity" // replace with actual product quantity
}]
});
Shopify GA4 Purchase eCommerce tracking

Setup Google Analytics 4 eCommerce on Shopify Plus without an App using Google Tag Manager

Warning: If you do n’t know about javascript or do n’t have developing knowledge then do n’t try to Set Up GA4 eCommerce tracking on Shopify Plus with Google Tag Manager without module that can broke your site, Cart and other functionality 

Disclaimer: Google tag manager belongs to Google property 

For Contact: mappchero@gmail.com

I am available for Hire on Freelancer: Freelancer.com

I am available for Hire on Upwork: Upwork.com

I am available for Hire on Peopleperhour: Peopleperhour.com

I am available for Hire on Guru: Guru.com


Shopify GA4 Ecommerce Tracking without using Elevar Plugin

Standard

GA4 Shopify Enhanced Ecommerce Tracking without using Elevar Plugin for Shopify Basic Versions

Recently once client asks me to implement Shopify Basic version GA4 Enhanced Ecomerce Tracking without Elevar Plugin using Google Tag Manager. I started writing a Data layer to working GA4 Enhnaced eCommerce Tracking without Elevar Plugin and Challenging was to work with a Checkout basic version of Shopify does not allow to modify anything on checkout, Which Control by it’s Shopify, I tried to manage somehow to work correct source attribution a transaction and other tracking as well as.

Set up Google Analytics 4 (GA4) on Shopify

GA4 Ecommerce Enhanced conversion tracking for Shopify without using Elevar Plugin

Shopify GA4 Ecommerce Tracking without using Elevar Plugin Data Layer using Google Tag Manager 

Paste this code as high in the <head> of the page as possible:

<!– Google Tag Manager –>

<script>(function(w,d,s,l,i){w[l]=w[l]||[];w[l].push({‘gtm.start’:
new Date().getTime(),event:’gtm.js’});var f=d.getElementsByTagName(s)[0],
j=d.createElement(s),dl=l!=’dataLayer’?’&l=’+l:”;j.async=true;j.src=
‘https://www.googletagmanager.com/gtm.js?id=’+i+dl;f.parentNode.insertBefore(j,f);
})(window,document,’script’,’dataLayer’,’GTM-XXXX’);</script>
<!– End Google Tag Manager –>

Additionally, paste this code immediately after the opening <body> tag:
<!– Google Tag Manager (noscript) –>
<noscript><iframe src=”https://www.googletagmanager.com/ns.html?id=GTM-XXXX”
height=”0″ width=”0″ style=”display:none;visibility:hidden”></iframe></noscript>
<!– End Google Tag Manager (noscript) –>

Note: Make you will replace GTM Tracking Code with your GTM ID XXXXX

Shopify GA4 Enhanced Ecommerce Events without Elevar Plugin for view_item_list: To Track when user visitscategory pages where list of product listed on the Page for GA4 (Google Analytics 4) Enhanced Ecommerce Tracking for Shopify without using Elevar Plugin via Google Tag Manager

Set up Google Analytics 4 (GA4) on Shopify

Add GA4 Shopify Enhanced Ecommerce Tracking without using Elevar Plugin Via Google Tag Manager

Shopify GA4 Enhanced Ecommerce Events without Elevar Plugin for select_item: To Track when user selected product  on list of product listed on the category Pages using Shopify GA4 Ecommerce Tracking without using Elevar Plugin via Google Tag Manager

Shopify GA4 Ecommerce Tracking

GA4 Shopify Enhanced Ecommerce Tracking using Google Tag Manager

Shopify GA4 Enhanced Ecommerce Events without Elevar Plugin for view_item: To Track when user visit a product details to the Shopify using GA4 Enhanced Ecommerce Tracking for Shopify GA4 Ecommerce Tracking without using Elevar Plugin via Google Tag Manager

GA4 Enhanced Ecommerce Datalayer

Google Analytics 4 Setup on Shopify without Elevar Plugin

Shopify GA4 Enhanced Ecommerce Events without Elevar Plugin for add_to_cart: To Track when user visit a product details page on the Shopify Click on AddtoCart using Shopify GA4 Ecommerce Tracking without using Elevar Plugin via Google Tag Manager

GA4 Ecommerce Tracking For Shopify

Implementation GA4 eCommerce Tracking on Shopify without using Elevar Plugin

Shopify GA4 Enhanced Ecommerce Events without Elevar Plugin for add_to_wishlist: To Track when Added a product into AddtoWishlist using Shopify GA4 Ecommerce Tracking without using Elevar Plugin via Google Tag Manager

Set Up Google Analytics 4 With Shopify

Set Up Google Analytics 4 With Shopify without Elevar Plugin

Shopify GA4 Enhanced Ecommerce Events without Elevar Plugin for view_cart: To Track when user entered to View_Cart using Shopify GA4 Ecommerce Tracking without using Elevar Plugin via Google Tag Manager

Ecommerce Tracking GA4 Shopify

Ecommerce Tracking GA4 Shopify without Elevar Plugin

Shopify GA4 Enhanced Ecommerce Events without Elevar Plugin for begin_checkout: To Track when user visited to begin_checkout using Shopify GA4 Ecommerce Tracking without using Elevar Plugin

Advanced GA4 Shopify E-commerce Tracking

Advanced GA4 Shopify E-commerce Tracking without using Elevar Plugin

Shopify GA4 Enhanced Ecommerce Events without Elevar Plugin for add_shipping_info: To Track when user visited to selected a Shipping Method using Shopify GA4 Ecommerce Tracking without using Elevar Plugin

Shopify GA4 Ecommerce Tracking

Shopify GA4 Ecommerce Tracking Implementation without using Elevar Plugin

Shopify GA4 Enhanced Ecommerce Events without Elevar Plugin for add_payment_info: To Track when user Visited Payment Page to selected a Payment Method using Shopify GA4 Enhanced Ecommerce Events without Elevar Plugin

Set up Google Analytics 4 (GA4) on Shopify

Setting Up Google Analytics 4 for Shopify using Google Tag Manager

Shopify GA4 Enhanced Ecommerce Events without Elevar Plugin for purchase: To Track when user completed order to purchase using Shopify GA4 Ecommerce Tracking without using Elevar Plugin

Google Analytics 4 With Shopify To Track Purchases

Set Up Google Analytics 4 With Shopify To Track Purchases without using Elevar Plugin

Warning: If you do n’t know about javascript or do n’t have developing knowledge then do n’t try to Shopify GA4 Ecommerce Tracking without using Elevar Plugin that can broke your site, Cart and other functionality 

Disclaimer: Google tag manager belongs to Google property 

For Contact: mappchero@gmail.com

I am available for Hire on Freelancer: Freelancer.com

I am available for Hire on Upwork: Upwork.com

I am available for Hire on Peopleperhour: Peopleperhour.com

I am available for Hire on Guru: Guru.com

Advanced GA4 E-commerce Tracking for Shopify without an App (Basic and Plus Version)

Standard

Set Up Google Analytics 4 (GA4) E-commerce Tracking on Shopify Plus and Basic Version without An App

Recently, one of Client asks to implement an eCommerce Tracking on Shopify Basic and Shopify Plus eCommerce tracking for GA4 and Adding pieces of Code using Data Layer using Google Tag Manager without an App.

Google Analytics 4 Integration – GA3 to GA4 Migration Shopify Setup with GA4 Ecommerce Tracking using Google Tag Manager without An App

Migrate from Universal Analytics to Google Analytics 4 on Shopify

Setup Google Analytics 4 on Shopify without an app using Google Tag Manager

Step 1: Install Google Tag Manager on Move from Universal Analytics to Google Analytics 4 on Shopify using  Google Tag Manager without an App

Paste this code as high in the <head> of the page as possible:
<!– Google Tag Manager –>
<script>(function(w,d,s,l,i){w[l]=w[l]||[];w[l].push({‘gtm.start’:
new Date().getTime(),event:’gtm.js’});var f=d.getElementsByTagName(s)[0],
j=d.createElement(s),dl=l!=’dataLayer’?’&l=’+l:”;j.async=true;j.src=
‘https://www.googletagmanager.com/gtm.js?id=’+i+dl;f.parentNode.insertBefore(j,f);
})(window,document,’script’,’dataLayer’,’GTM-XXXX’);</script>
<!– End Google Tag Manager –>
Additionally, paste this code immediately after the opening <body> tag:
<!– Google Tag Manager (noscript) –>
<noscript><iframe src=”https://www.googletagmanager.com/ns.html?id=GTM-XXXX”
height=”0″ width=”0″ style=”display:none;visibility:hidden”></iframe></noscript>
<!– End Google Tag Manager (noscript) –>

Note: Make you will replace GTM Tracking Code with your GTM ID XXXXX

To measure a purchase Shopify eCommerce Tracking GA4 using Google Tag Manager without an App with Shopify Plus GA4 (Google Analytics 4) Ecommerce Tracking via Google Tag Manager without Any Shopify Plugin or An App.

Google Analytics 4 (GA4) Ecommerce Purchase Tracking in Shopify

Google Analytics 4 (GA4) Ecommerce Tracking on Shopify Plus and Basic

Warning: If you do n’t know about javascript or do n’t have developing knowledge then do n’t try to Implement and Migrate Shopify Google Analytics 4 (GA4) For Ecommerce & Enhanced Ecommerce using Google Tag Manager without an app that can broke your site, Cart and other functionality 

Disclaimer: Google tag manager belongs to Google property 

For Contact: mappchero@gmail.com

I am available for Hire on Freelancer: Freelancer.com

I am available for Hire on Upwork: Upwork.com

I am available for Hire on Peopleperhour: Peopleperhour.com

I am available for Hire on Guru: Guru.com

Install Dynamic Remarketing Global Site Tag (gtag.js) on Shopify

Standard

Setup Google Dynamic Remarketing Global Site Tags/Pixel (gtag.js) In Shopify

Recently once of Client ask me implement (gtag.js) on shopify to work Dynamic remarketing Tags/pixels for shopify using without plugin and put directly on Shopify theme!!

Due to recently updated google ads dynamic remarketing for Global Tags/Pixel (gtag.js) that’s need modify tracking with (gtag.js) for Shopify Google Ads Dynamic remarketing implementation. Shopify Dynamic remarketing pixel (gtag.js) below these parameters.

‘ecomm_prodid’: ‘REPLACE_WITH_STRING_VALUE‘,
‘ecomm_pagetype’: ‘REPLACE_WITH_STRING_VALUE‘,
‘ecomm_totalvalue’:REPLACE_WITH_STRING_VALUE

‘ecomm_prodid’: For Product id that could be product id or Sku, it’s depend on product feed which one you have considered on product feed, if you have consider product id then, you need to pass it product id or considered sku then you need pass through sku on “ecomm_prodid”

‘ecomm_pagetype’:  For that you need fire these pixe on Home Page , search results Page, Product Page, Cart Part, Checkout, on success page 

‘ecomm_totalvalue’: You need show product value, Cart total value, Checkout total value, on Success Page total amount, and Home Page zero value.

For Work Dynamic Remarketing Tags (gtag.js) on Shopify: You need make changes in Google Analytic setup these parameters as custom dimentsion in Google Analytic to work Shopify Google Dynamic Remarketing Global Site Tags/Pixel (gtag.js)

Google Dynamic Remarketing Tags for Shopify

Google Ads remarketing code /Global Site Tag (gtag.js) on Shopify Store 

1. First need to install Global Site Tag (gtag.js) on all the pages for work Dynamic remarketing tags on Shopify store 

<!-- Global Site Tag (gtag.js) - Google AdWords: xxxxxxx -->
<script async src="https://www.googletagmanager.com/gtag/js?id=AW-xxxxxxx"></script>
<script>
window.dataLayer = window.dataLayer || [];
function gtag(){dataLayer.push(arguments)
;}
gtag('js', new Date());

  gtag('config', 'AW-xxxxxx');
</script>

2. Need to place these code on describe product type page above in Shopify Remarketing Pixel  

<!– Event snippet for Example dynamic remarketing Code  for Shopify Store –>
<script>
gtag(‘event’, ‘page_view’, {‘send_to’: ‘AW-xxxxxxxx’,
‘ecomm_prodid’: ‘REPLACE_WITH_STRING_VALUE‘,
‘ecomm_pagetype’: ‘REPLACE_WITH_STRING_VALUE‘,
‘ecomm_totalvalue’: ‘REPLACE_WITH_STRING_VALUE
});
</script>

For Product Page:

Google Dynamic Remarketing Tags for Shopify

Install New Global Sitewide Tag on Google Ads Dynamic Remarketing Shopify

For Cart Page – 

Setup AdWords Dynamic Remarketing for Shopify

Shopify Google Analytics Dynamic Remarketing Tags for Shopify for New Global Tags

Home Page –

Setup google adwords dynamic remarketing for your shopify store

Set Up Adwords Dynamic Remarketing Tag For Shopify

3. It’s time to verify Google Ads Dynamic Remarketing Tags for Shopify with New Global Tags using Google Ad Conversion Remarketing pixel 

Google Dynamic Remarketing Tags for Shopify

Add Shopify Dynamic Remarketing Tags using Global Site Tag (gtag.js)

Warning:if you do n’t know about javascript or don’t have developing knowledge then do n’t try to Install Dynamic Remarketing Global Site Tag (gtag.js) on Shopify javascript without using Any plugin that can broke your site, Cart and other functionality 

Disclaimer: Google tag manager belongs to Google property 

For Contact: mappchero@gmail.com

I am available for Hire on Freelancer: Freelancer.com

I am available for Hire on Upwork: Upwork.com

I am available for Hire on Peopleperhour: Peopleperhour.com

I am available for Hire on Guru: Guru.com No Fields Found.

Cross Domain Tracking Shopify Buy Button using Google Analytics

Standard

Shopify Cross Domain Google Analytics with Buy Button (Shopify Buy Button Embed)

Recently once of client ask me to implement cross domain on Shopify with Buy Button or Shopify Buy Button Embed (either Buy Button on wordPress or Any other Website ) using Shopify Google Analytics Cross Domain Tracking, I ask to client share website url to understand users , How to buy a product through shopify using Buy button and finishing order on shopify. Once I looked his/her website and found it they use Shopify Buy Button to track on another website, once you will Click on Shopify buy Button, they will redirect to shopify Checkout and rest of process need completed before confirm order Like below Screen shot.

  1. Are you looking to Implement Cross Domain any time type of website like Magento, iframe OpenCart , WordPress, Php, .Net, Custom Website or Any type of website with Buy Button using Google Analytic or Google Tag Manager 

2. If you are looking to implement Cross Domain Tracking on Iframe using Google Analytic and Google Tag Manager

3. If you are facing issue on Cross Domain direct traffic or Referral issue on Cross Domain Tracking or session broken as direct traffic in Google Analytic  

Shopify Cross Domain Google Analytics with Buy Button

Cross Domain Tracking Shopify Buy Button

2. Written Some custom javascript get Cross domain for Shopify Buy Button using Google Analytic and Shopify Cross Domain tracking lead with _ga Shopify Cross Domain buy button.

Cross Domain Tracking Shopify Buy Button

Custom Google Analytics Shopify Cross Domain with Buy Button

3. It’s time to verify result of Shopify Cross Domain with Buy button using Google Analytic 

Shopify Cross Domain Buy Button Google Analytics

Shopify Ecommerce Google Analytics Cross Domain with Buy Button

Warning:if you do n’t know about javascript or don’t have developing knowledge then do n’t try to Shopify Cross Domain Google Analytics with Buy Button using Google Analytic a custom javascript without using Any plugin that can broke your site, Cart and other functionality 

Disclaimer: Google tag manager belongs to Google property 

For Contact: mappchero@gmail.com No Fields Found.

Track Ecommerce transaction with Google Tag Manager in Vb.net

Standard

Recently, one of the client has asked to implement e-commerce tracking on ASP.NET ( Vb.net) website using Google Tag Manager

E-commerce tracking is one of most challenging part to implement in ASP.NET (Vb.net)

E-Commerce tracking even allows you to see your conversions to improve. Doesn’t that sound thrilling? It is fairly easy to empower your site for creating such advice. All that you need is a couple of codes that are additional. Naturally, you even have to examine the information presented to make the most of it.Transaction data passed back by the payment gateway or is usually saved in your back end systems.

You have to pass this info to the script that is analytics. To put it differently, you will use a server side language like PHP write a JavaScript directly to the resultant HTML page and to get the data.

You can see this features set up ecommerce tracking using Google Tag Manager in .net website.

  • Transaction Revenue
  • Transaction Tax
  • Transaction Shipping
  • Item Revenue
  • Revenue per Transaction
  • Revenue per Visit
  • Total Value
  • Revenue per Item

    Implementing E-Commerce Tracking via Google Tag Manager

    E-Commerce Conversion Tracking Using Google Tag Manager

    Google Tag Manager eCommerce Tracking installation

    Google Tag Manager integration (GTM)

    Step 1. First Install Google Tag Manager on Your ASP.NET ( Vb.net) website for Setup E-commerce Tracking using Google Tag Manager

    Copy the code below and paste it onto every page of your website. Place it immediately after the opening <body> tag.

    <!– Google Tag Manager –>
    <noscript><iframe src=”//www.googletagmanager.com/ns.html?id=GTM-XXXXXX
    height=”0″ width=”0″ style=”display:none;visibility:hidden”></iframe></noscript>
    <script>(function(w,d,s,l,i){w[l]=w[l]||[];w[l].push({‘gtm.start’:
    new Date().getTime(),event:’gtm.js’});var f=d.getElementsByTagName(s)[0],
    j=d.createElement(s),dl=l!=’dataLayer’?’&l=’+l:”;j.async=true;j.src=
    ‘//www.googletagmanager.com/gtm.js?id=’+i+dl;f.parentNode.insertBefore(j,f);
    })(window,document,’script’,’dataLayer’,’GTM-XXXXXX‘);</script>
    <!– End Google Tag Manager –>

    Note: Make you will replace GTM Tracking Code with your GTM ID.

Step 2. Create a data layer using Custom HTML Tag 

<script type=”text/javascript”>

function read_cookie(name) {
var result = document.cookie.match(new RegExp(name + ‘=([^;]+)’));
result && (result = JSON.parse(result[1]));
return result;
}
function getParameterByName(name, url) {
if (!url) url = window.location.href;
name = name.replace(/[\[\]]/g, “\\$&”);
var regex = new RegExp(“[?&]” + name + “(=([^&#]*)|&|#|$)”),
results = regex.exec(url);
if (!results) return null;
if (!results[2]) return ”;
return decodeURIComponent(results[2].replace(/\+/g, ” “));
}
var items = read_cookie(“ga_cart”);
var total = parseFloat(read_cookie(“ga_total”));
var products = [];
for (var i = 0; i < items.length; i++) {
var product = {
‘sku’ : items[i].TradingItem[“#text”],

 DataLayer In Custom JavaScript Variables

Google Tag Manager Data Layer ECommerce

Step 3. Create a data layer using Custom HTML Tag for Store

<script type=”text/javascript”>
function parseXML(val) {
if (document.implementation && document.implementation.createDocument) {
xmlDoc = new DOMParser().parseFromString(val, ‘text/xml’);
}
else if (window.ActiveXObject) {
xmlDoc = new ActiveXObject(“Microsoft.XMLDOM”);
xmlDoc.loadXML(val);
}
else
{
alert(‘Your browser cant handle this script’);
return null;
}
return xmlDoc;
}

function xmlToJson(xml) {

// Create the return object
var obj = {};

if (xml.nodeType == 1) { // element
// do attributes
if (xml.attributes.length > 0) {
obj[“@attributes”] = {};
for (var j = 0; j < xml.attributes.length; j++) {
var attribute = xml.attributes.item(j);
obj[“@attributes”][attribute.nodeName] = attribute.nodeValue;
}

Google Tag Manager E-commerce data Layer

Implement using the Data Layer

For Contact: mappchero@gmail.com

Warning:if you do n’t know about javascript or do n’t have developing knowledge then do n’t try to implement on ASP.NET () E-commerce  Setup using Google Tag Manager  that can broke your site, Cart and other functionality 

Disclaimer: Google tag manager belongs to Google property 

Shopify Ecommerce Setup Using Google Tag Manager

Standard

E-commerce Tracking in Shopify using Google Tag Manager 

Recently so many client ask me to implement E-commerce and Enhanced E-commerce tracking through Google Tag Manager on Shopify, As usual you know very well why e-commerce tracking on the website, You can see in revenue and number sale which product sales, you can see in Google Analytic. There was a certain limitation with Shopify, but recently I have seen Shopify migrate hosted to domain checkout on Shopify.

To set up GA4 Shopify Ecommerce with a data layer, you need to add ecommerce data to the data layer for each event that you want to track. Here are the steps:

  1. Set up a Google Analytics 4 property for your Shopify store.

2. Install Google Tag Manager on your Shopify store.

3. Set up the data layer on your Shopify store’s checkout pages. You can add ecommerce data to the data layer using JavaScript, and you should add the following data for each event:

  • For the “purchase” event: transaction ID, transaction revenue, and any other transaction-level data you want to track.
  • For the “add to cart” event: product ID, product name, and product price.
  • For the “remove from cart” event: product ID, product name, and product price.
  • For the “checkout” event: step number and any other checkout-level data you want to track.

4. Create a new Google Tag Manager tag for GA4 and configure it with your GA4 measurement ID.

5. Use the data layer variables to map the ecommerce data to the GA4 ecommerce event parameters.

6. Set up triggers in Google Tag Manager to track ecommerce events, such as add to cart, remove from cart, initiate checkout, and purchase.

7. Test the GA4 tags and triggers to make sure they are set up correctly and are tracking the right events.

Once you complete these steps, you should be able to track your Shopify store’s ecommerce activity in Google Analytics 4 using the data layer, and use the data to optimize your store’s performance and improve the customer experience.

Click to Below Link see a new article for Related to Shopify for GA4

Setup Google Analytics 4 Ecommerce Tracking on Shopify (Non-Plus) without an App

Set Up Advance eCommerce Google Analytics 4 (GA4) on Shopify Plus with Google Tag Manager without Any Shopify App

GA4 Shopify Enhanced Ecommerce Tracking without using Elevar Plugin for Shopify Basic Versions

Integrating E-commerce Track Google Tag Manager with Shopify

Google Tag Manager on Shopify

Google Tag Manager to Shopify

  1. First Install Google Tag Manager on Shopify Ecommerce Tracking without touching Code
How to put Google Tag Manager Code on Shopify put on Theme.liquid file.  
Online Store ——->Themes ——>click on Edit HTML/CSS
Paste this code as high in the <head> of the page as possible:
<!– Google Tag Manager –>
<script>(function(w,d,s,l,i){w[l]=w[l]||[];w[l].push({‘gtm.start’:
new Date().getTime(),event:’gtm.js’});var f=d.getElementsByTagName(s)[0],
j=d.createElement(s),dl=l!=’dataLayer’?’&l=’+l:”;j.async=true;j.src=
‘https://www.googletagmanager.com/gtm.js?id=’+i+dl;f.parentNode.insertBefore(j,f);
})(window,document,’script’,’dataLayer’,’GTM-XXXX’);</script>
<!– End Google Tag Manager –>
Additionally, paste this code immediately after the opening <body> tag:
<!– Google Tag Manager (noscript) –>
<noscript><iframe src=”https://www.googletagmanager.com/ns.html?id=GTM-XXXX”
height=”0″ width=”0″ style=”display:none;visibility:hidden”></iframe></noscript>
<!– End Google Tag Manager (noscript) –>

Note: Make you will replace GTM Tracking Code with your GTM ID XXXXX

2. Add to DataLayer on Checkout on Order Confirmation for E-commerce tracking on Shopify using Google Tag Manager

Google Tag Manager Shopify Installation

Google Tag Manager Checkout Page Data Layer on Shopify

Written Custom E-commerce Tracking Code using Help of Custom HTML on Google Tag Manager on Shopify without Touching Code/ Data Layer on the website for E-commerce/eCommerce Tracking 

Implementing E-Commerce Tracking on Shopify using Google Tag Manager

Implementing E-Commerce Tracking on Shopify via Google Tag Manager

Warning:if you do n’t know about javascript/ Datalayer/Jquery or do n’t have developing knowledge then do n’t try on Shopify Google Tag Manager Ecommerce Tracking without touching Codea custom javascript without using Any plugin that can broke your site, Cart and other functionality 

Disclaimer: Google tag manager belongs to Google property 

For Contact: mappchero@gmail.com

I am avaible for Hire on Freelancer: Freelancer.com

I am avaible for Hire on Upwork: Upwork.com

I am avaible for Hire on Peopleperhour: Peopleperhour.com

I am avaible for Hire on Guru: Guru.com