Configuring Google Analytics 4 (GA4) Enhanced Ecommerce using Google Tag Manager
Enhanced ecommerce tracking is a feature in Google Analytics 4 (GA4) that allows businesses and website owners to track and analyze various aspects of their ecommerce performance in more detail. Some of the key features of enhanced ecommerce tracking include:
- Product data: GA4 allows you to track detailed information about products, such as product name, category, price, and quantity. This data can be used to analyze which products are most popular and which are driving the most revenue.
2. Shopping behavior: GA4 provides insights into how users interact with products on your website, such as add-to-cart events, product views, and checkout steps. This data can be used to optimize the user experience and increase conversions.
3. Checkout behavior: GA4 allows you to track the entire checkout process, including the steps leading up to a purchase and any issues that may arise during the checkout process. This data can be used to identify and fix common roadblocks that users encounter during checkout.
4. Refunds and returns: GA4 allows you to track refunds and returns and understand the reasons behind them.
5. Custom dimensions and metrics: GA4 allows you to create custom dimensions and metrics to track additional data points that are specific to your business. This can include data such as customer loyalty or product popularity.
6. Funnel analysis: GA4 allows you to set up and track user journeys through your website, including the steps leading up to a purchase. This can help you identify where users are dropping off in the process and make changes to improve conversions.
7. Machine learning: GA4 uses machine learning to automatically identify and alert you to important insights in your data, such as sudden changes in customer behavior.
Setting up ecommerce events in Google Analytics 4 (GA4) involves a few steps:
- Add the GA4 ecommerce tracking code to your website: The ecommerce tracking code should be added to the pages of your website where users complete transactions. The code typically includes parameters such as transaction details, product details and any additional information such as the product category.
2. Configure ecommerce events: Once the ecommerce tracking code is in place, you can configure specific ecommerce events such as “add_to_cart” and “purchase” to track user interactions with products on your site.
3. Test ecommerce tracking: To ensure that your ecommerce tracking code is working correctly, you can use the GA4 Debugger tool to verify that the tracking code is sending data to your GA4 property. You can also review the ecommerce reports in GA4 to confirm that data is being collected correctly.
4. Analyze ecommerce data: Once your ecommerce events are set up and configured, you can start analyzing the data in your GA4 reports. This includes metrics such as revenue, transactions, and conversion rate, as well as data on individual products and product categories.
5. Create goals: You can create goals in GA4 to track important ecommerce events such as purchase or checkout completion.
6. Segmentation: You can segment your ecommerce data by different dimensions such as product category, channel or custom dimensions to get deeper insights.
Google Analytics 4 (GA4) with Enhanced Ecommerce Tracking via Google Analytics 4 using Google Tag Manager
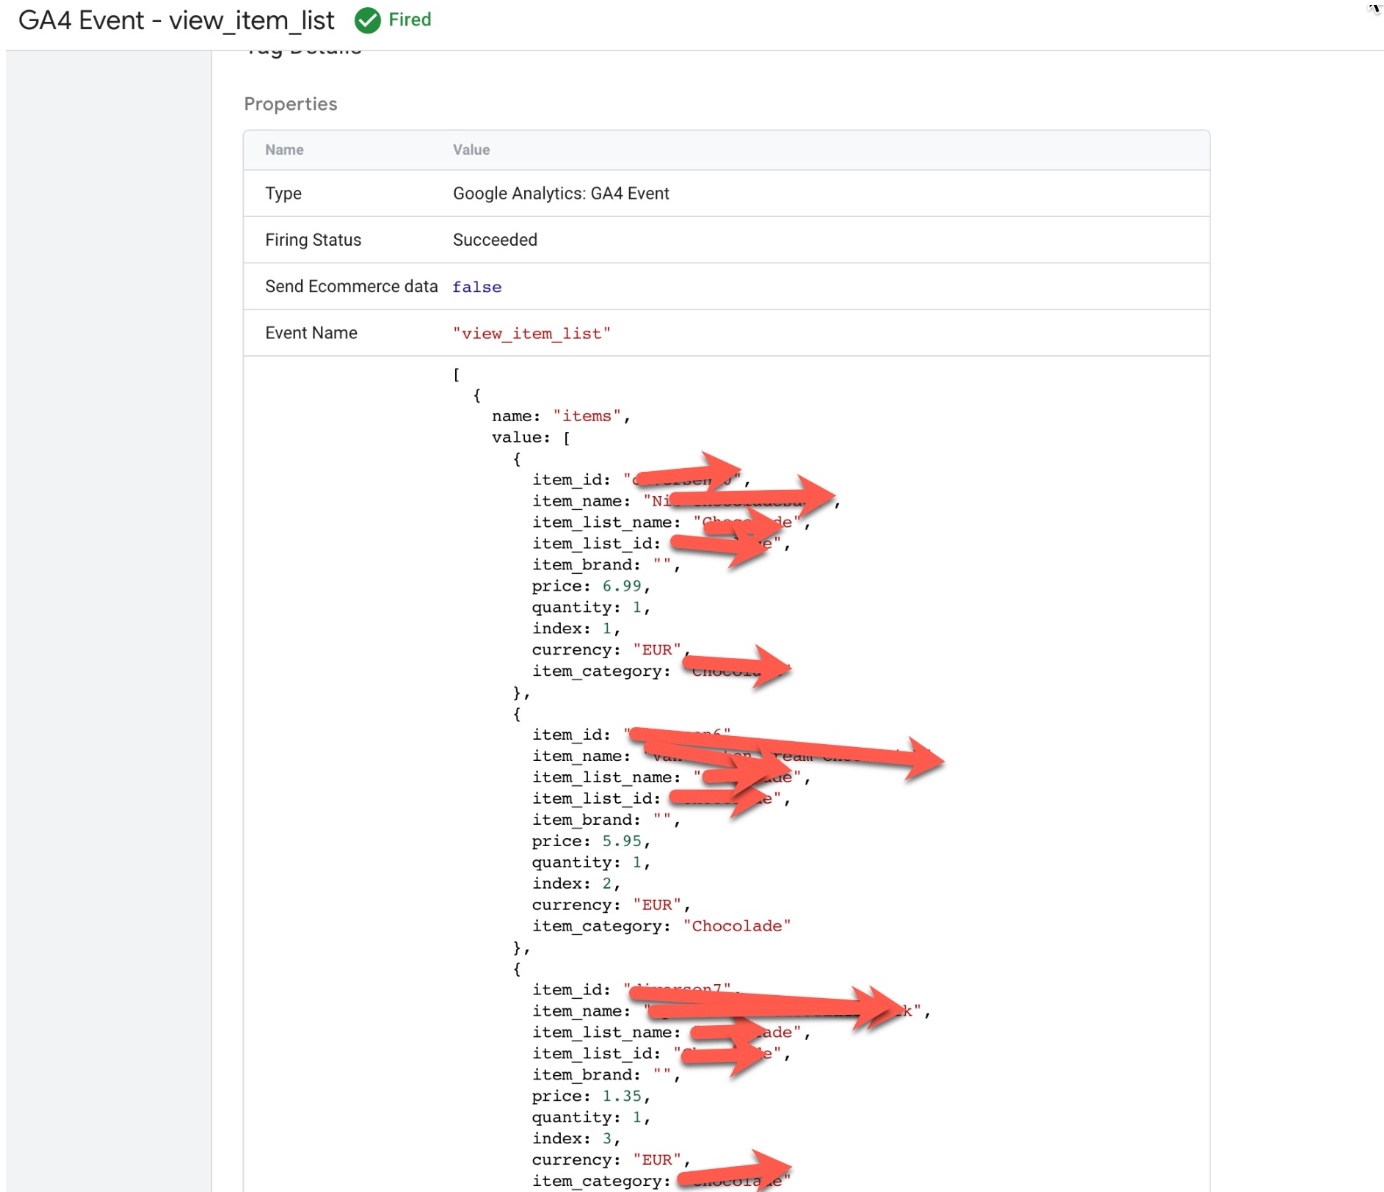
GA4 “view_item_list” using Google Tag Manager: In Google Analytics 4 (GA4), the view_item_list event can be used in conjunction with a data layer to track and analyze ecommerce data. A data layer is a JavaScript object that contains information about the page and its content, as well as any user interactions or events that occur on the page. This information can be passed to GA4 through the tracking code, and can be used to track specific ecommerce events such as product views, add-to-cart actions, and purchases.
To set up the ‘view_item_list’ event using a data layer, you will need to create a data layer object on your website’s pages and push data into it when a user views a list of items. For example, when a user views a list of products, the following data could be pushed into the data layer:
dataLayer.push({
'event': 'view_item_list',
'items': [ {
      'item_id': 'P12345',
      'item_name': 'Android Warhol T-Shirt',
      'list_name': 'Popular Products',
      'item_brand': 'Google',
      'item_category': 'Apparel',
      'item_variant': 'black',
      'index': 0,
      'price': '29.20',
      'quantity': '1'
    },
    {
      'item_id': 'P67890',
      'item_name': 'Flame Challenger Hoodie',
      'list_name': 'Popular Products',
      'item_brand': 'Google',
      'item_category': 'Apparel',
      'item_variant': 'red',
      'index': 1,
      'price': '49.99',
      'quantity': '1'
    }
  ]
});
Once the data is in the data layer, you can then configure GA4 to listen for the view_item_list event and use the data to track product views and other ecommerce metrics.
It’s important to keep in mind that the data in the data layer should be in a specific format, and it should be well-structured, otherwise GA4 will not be able to process it.
Using a data layer in conjunction with GA4 events can provide more detailed and accurate ecommerce data, and can help you to gain deeper insights into user behavior and product performance.
‘view_item_list’ event in Google Analytics 4: The ‘view_item_list’ event in Google Analytics 4 (GA4) is used to track when a user views a list of items on an ecommerce website. This event can be used to understand how users are interacting with different product listings and can provide insights into which products are most popular or which product lists are driving the most conversions.
To track the ‘view_item_list‘ event in GA4, you will need to add the event code to your website’s HTML or JavaScript. The event code typically includes parameters such as the event name (‘view_item_list‘), the products that were viewed, and any additional information such as the product category.
gtag('event', 'view_item_list', {
  'items': [
    {
      'item_id': 'P12345',
      'item_name': 'Android Warhol T-Shirt',
      'item_list_name': 'Popular Products',
      'item_brand': 'Google',
      'item_category': 'Apparel',
      'item_variant': 'black',
      'index': 0,
      'price': '29.20',
      'quantity': '1'
    },
    {
      'item_id': 'P67890',
      'item_name': 'Flame Challenger Hoodie',
      'item_list_name': 'Popular Products',
      'item_brand': 'Google',
      'item_category': 'Apparel',
      'item_variant': 'red',
      'index': 1,
      'price': '49.99',
      'quantity': '1'
    }
  ]
});
Setting Up Enhanced Ecommerce ‘view_item_list’ in Google Analytics 4 using Google Tag Manager
GA4 “select_item event” using Google Tag Manager: The ‘select_item‘ event in Google Analytics 4 (GA4) can be used to track when a user selects an item on an ecommerce website. This event can be used to understand how users are interacting with different products and can provide insights into which products are most popular or which are driving the most conversions.
To track the ‘select_item’ event in GA4 using a data layer, you will need to create a data layer object on your website’s pages and push data into it when a user selects an item. For example, when a user selects a product, the following data could be pushed into the data layer:
dataLayer.push({
  'event': 'select_item',
  'items': [
    {
      'id': 'P12345',
      'name': 'Android Warhol T-Shirt',
      'brand': 'Google',
      'category': 'Apparel',
      'variant': 'black',
      'price': '29.20',
      'quantity': '1'
    }
  ]
});
Once the data is in the data layer, you can then configure GA4 to listen for the view_item event and use the data to track product views and other ecommerce metrics.
It’s important to keep in mind that the data in the data layer should be in a specific format, and it should be well-structured, otherwise GA4 will not be able to process it.
Using a data layer in conjunction with GA4 events can provide more detailed and accurate ecommerce data, and can help you to gain deeper insights into user behavior and product performance.
‘select_item’ event in Google Analytics 4: The ‘select_item‘ event in Google Analytics 4 (GA4) is used to track when a user selects an item on an ecommerce website. This event can be used to understand how users are interacting with different products and can provide insights into which products are most popular or which are driving the most conversions.
To track the ‘select_item’ event in GA4, you will need to add the event code to your website’s HTML or JavaScript. The event code typically includes parameters such as the event name (‘select_item’), the product that was selected, and any additional information such as the product category.
For example, the following code snippet shows an example of how to track a select_item event in GA4:
gtag('event', 'select_item', {
  'items': [
    {
      'item_id': 'P12345',
      'item_name': 'Android Warhol T-Shirt',
      'item_brand': 'Google',
      'item_category': 'Apparel',
      'item_variant': 'black',
      'price': '29.20',
      'quantity': '1'
    }
  ]
});
Once the event is set up correctly, it will start sending data to your GA4 property and you will be able to view the event in the GA4 reports.
Google Analytics 4 eCommerce ‘select_item’ Event Tracking using Google Tag Manager
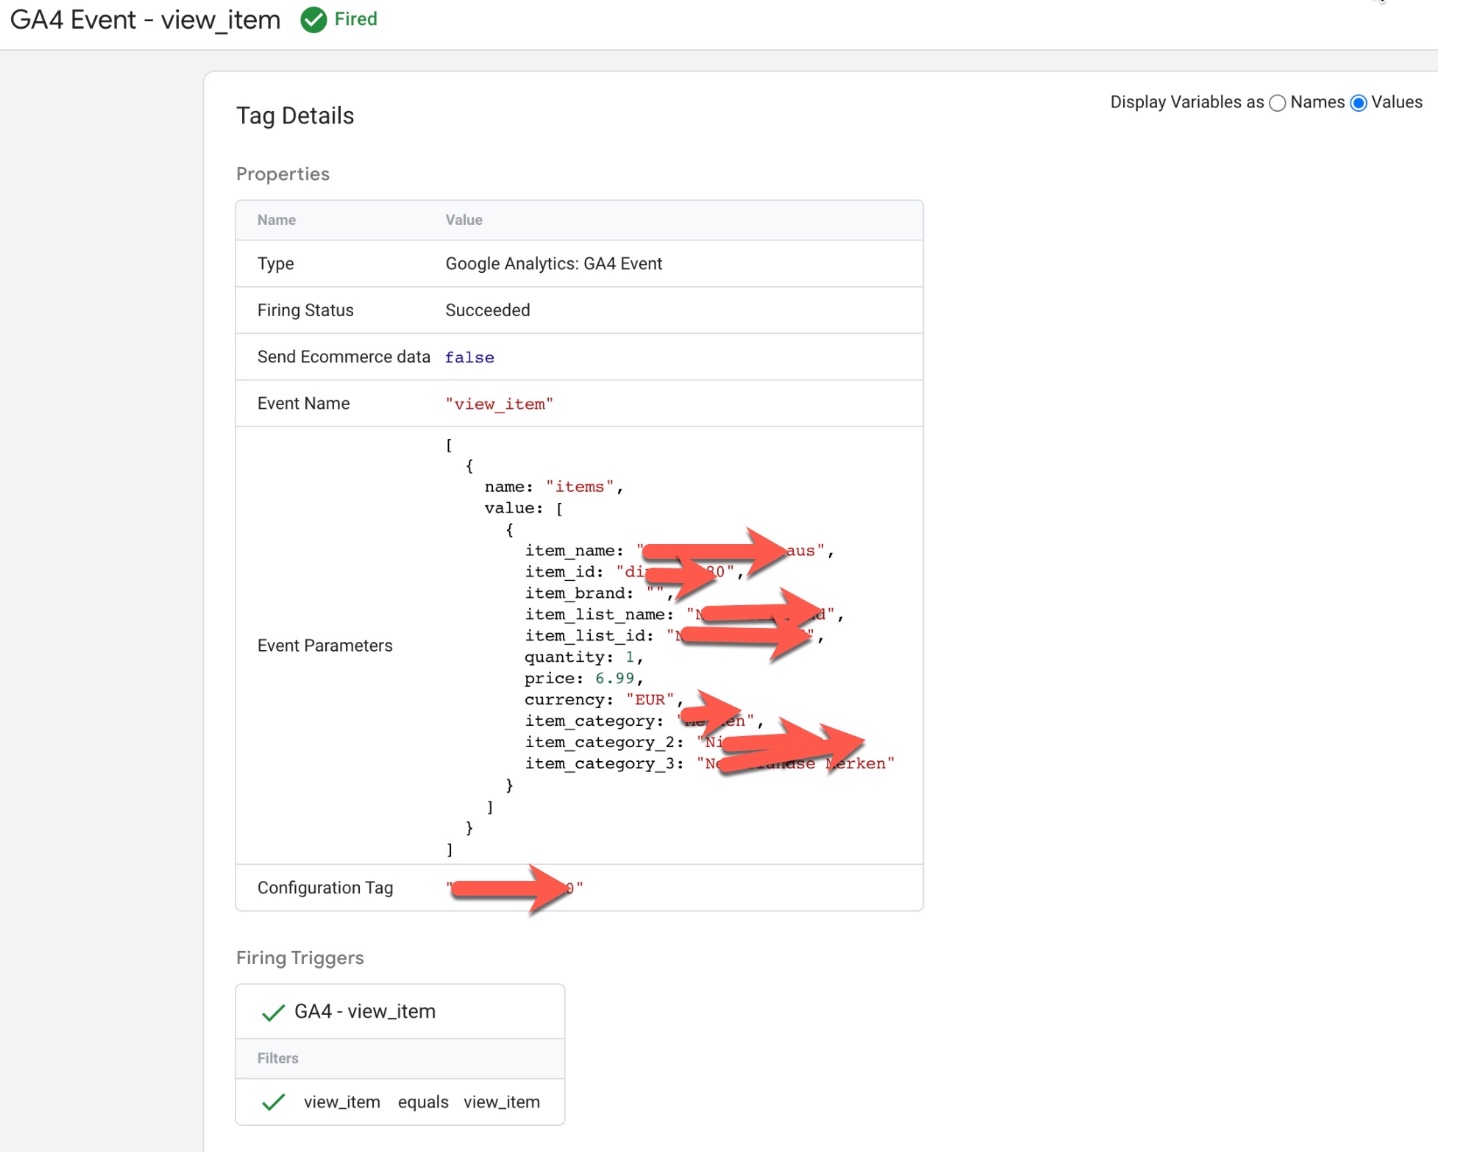
GA4 “view_item” data layer using Google Tag Manager: The ‘view_item‘ event in Google Analytics 4 (GA4) can be used to track when a user views a specific item on an ecommerce website. This event can be used to understand how users are interacting with different products and can provide insights into which products are most popular or which are driving the most conversions.
To track the ‘view_item’ event in GA4 using a data layer, you will need to create a data layer object on your website’s pages and push data into it when a user views an item. For example, when a user views a product, the following data could be pushed into the data layer:
dataLayer.push({
  'event': 'view_item',
  'items': [
    {
      'item_id': 'P12345',
      'item_name': 'Android Warhol T-Shirt',
      'item_brand': 'Google',
      'item_category': 'Apparel',
      'item_variant': 'black',
      'price': '29.20',
      'quantity': '1'
    }
  ]
});
Once the data is in the data layer, you can then configure GA4 to listen for the view_item event and use the data to track product views and other ecommerce metrics.
‘view_item’ event in Google Analytics 4: The ‘view_item’ event in Google Analytics 4 (GA4) is used to track when a user views a specific item on an ecommerce website. This event can be used to understand how users are interacting with different products and can provide insights into which products are most popular or which are driving the most conversions.
To track the ‘view_item’ event in GA4, you will need to add the event code to your website’s HTML or JavaScript. The event code typically includes parameters such as the event name (view_item), the product that was viewed, and any additional information such as the product category.
For example, the following code snippet shows an example of how to track a view_item event in GA4:
gtag('event', 'view_item', {
  'items': [
    {
      'item_id': 'P12345',
      'item_name': 'Android Warhol T-Shirt',
      'item_brand': 'Google',
      'item_category': 'Apparel',
      'item_variant': 'black',
      'price': '29.20',
      'quantity': '1'
    }
  ]
});
Once the event is set up correctly, it will start sending data to your GA4 property and you will be able to view the event in the GA4 reports.
Track Enhanced Ecommerce Events with Google Analytics 4 (GA4)using Google Tag Manager
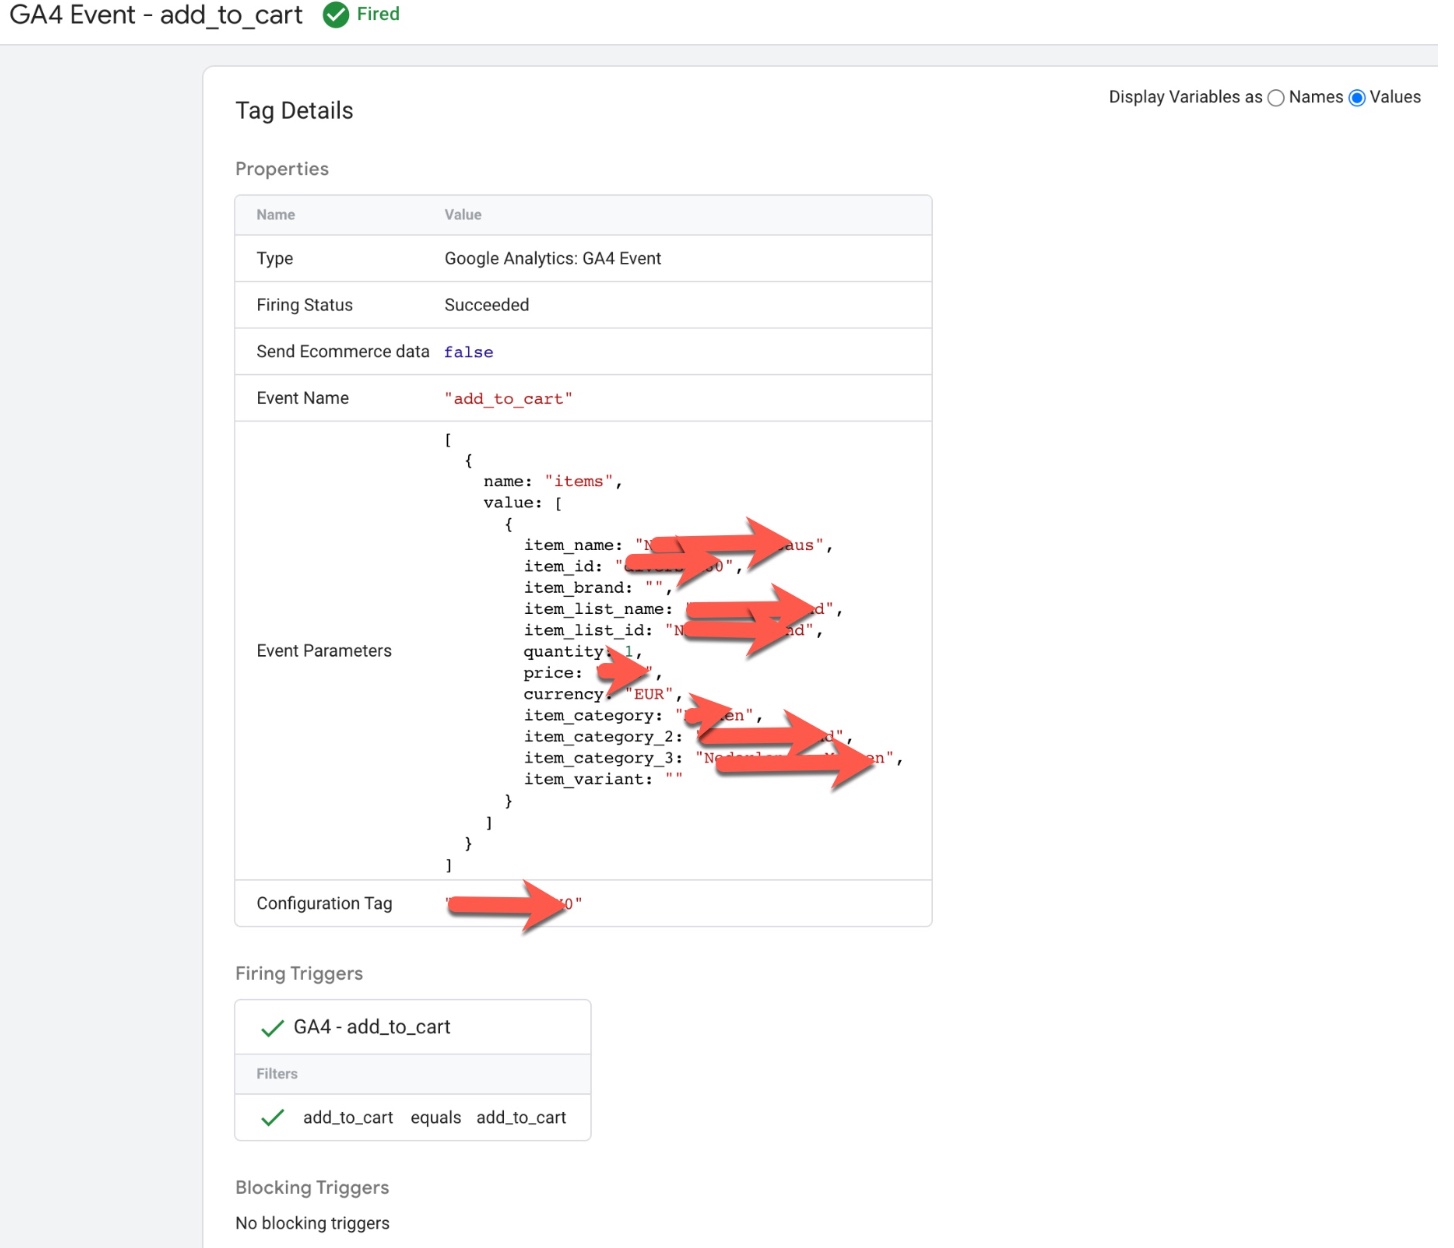
‘add_to_cart’ event in Google Analytics 4: The ‘add_to_cart‘ event in Google Analytics 4 (GA4) is used to track when a user adds an item to their cart on an ecommerce website. This event can be used to understand how users are interacting with different products and can provide insights into which products are most popular or which are driving the most conversions.
To track the ‘add_to_cart’ event in GA4, you will need to add the event code to your website’s HTML or JavaScript. The event code typically includes parameters such as the event name (‘add_to_cart‘), the product that was added to the cart, and any additional information such as the product category.
For example, the following code snippet shows an example of how to track a add_to_cart event in GA4:
gtag('event', 'add_to_cart', {
  'items': [
    {
      'item_id': 'P12345',
      'item_name': 'Android Warhol T-Shirt',
      'item_brand': 'Google',
      'item_category': 'Apparel',
      'item_variant': 'black',
      'price': '29.20',
      'quantity': '1'
    }
  ]
});
Once the event is set up correctly, it will start sending data to your GA4 property and you will be able to view the event in the GA4 reports.
GA4 “Add_to_cart” data layer using Google Tag Manager: The ‘add_to_cart’ event in Google Analytics 4 (GA4) can be used to track when a user adds an item to their cart on an ecommerce website using a data layer. This event can be used to understand how users are interacting with different products and can provide insights into which products are most popular or which are driving the most conversions.
To track the ‘add_to_cart’ event in GA4 using a data layer, you will need to create a data layer object on your website’s pages and push data into it when a user adds an item to their cart.
For example, when a user adds a product to their cart, the following data could be pushed into the data layer:
dataLayer.push({
  'event': 'add_to_cart',
  'items': [
    {
      'item_id': 'P12345',
      'item_name': 'Android Warhol T-Shirt',
      'item_brand': 'Google',
      'item_category': 'Apparel',
      'item_variant': 'black',
      'price': '29.20',
      'quantity': '1'
    }
  ]
});
Once the data is in the data layer, you can then configure GA4 to listen for the ‘add_to_cart’ event and use the data to track product views and other ecommerce metrics.
Leverage GA4 for Enhanced Ecommerce Tracking using Google Tag Manager
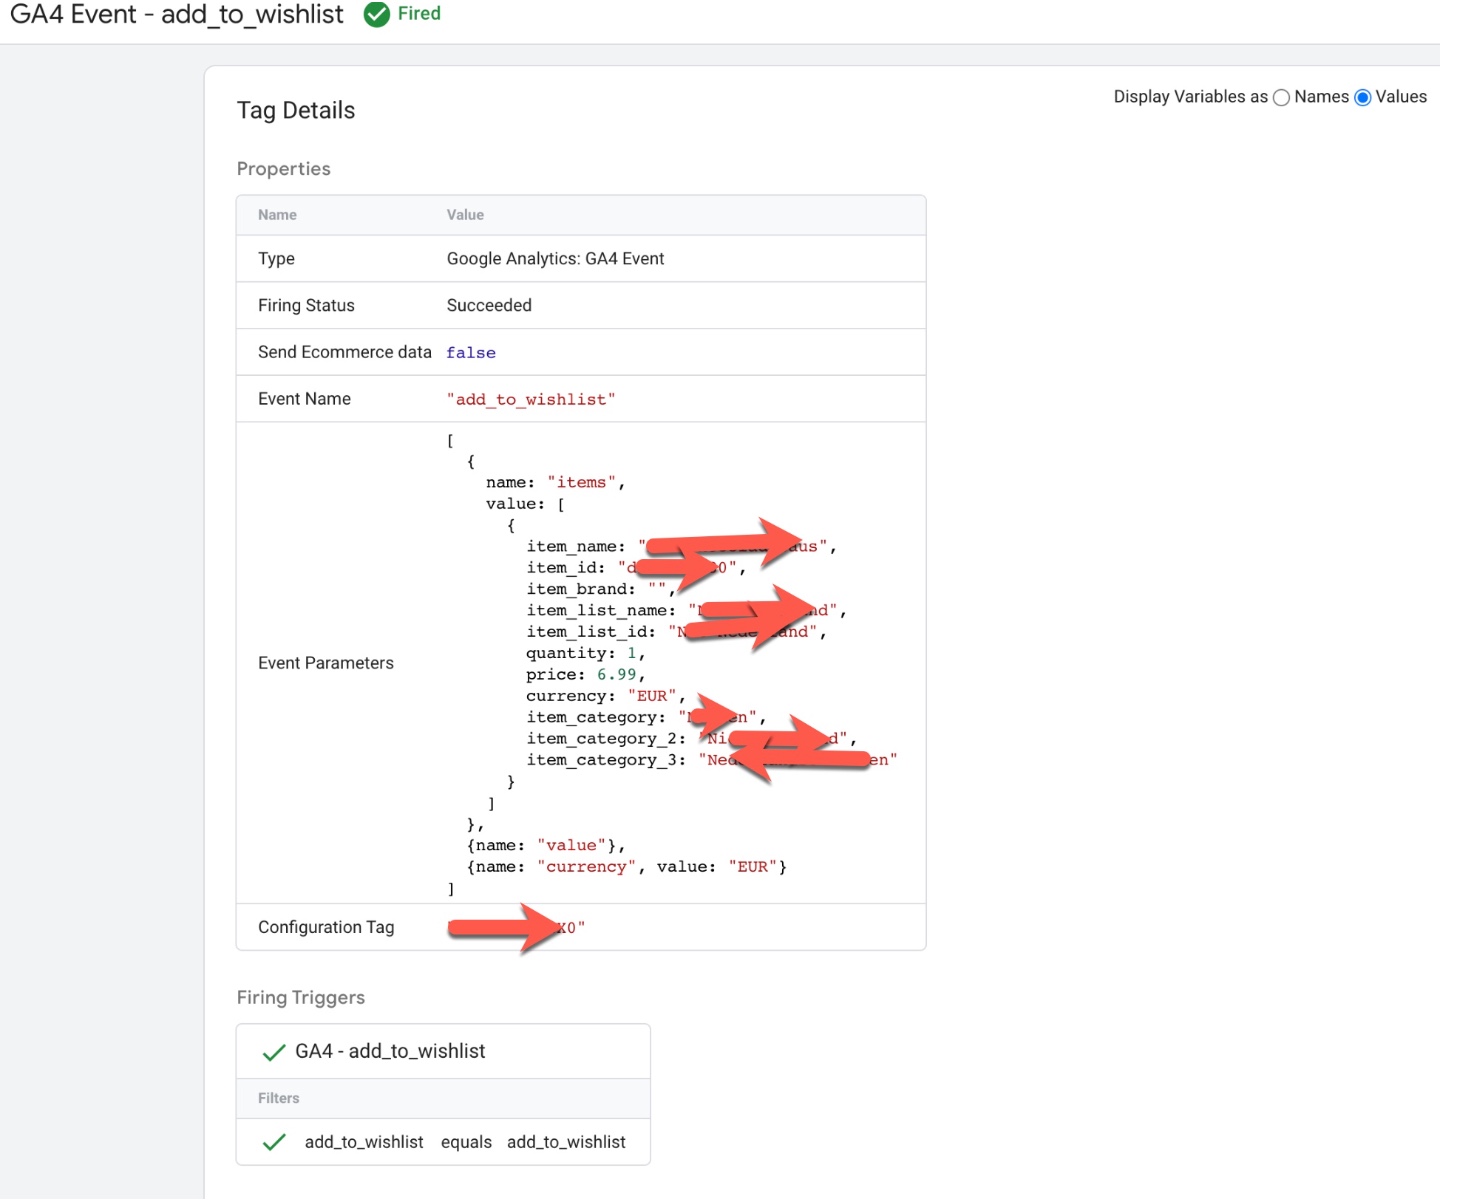
‘add_to_wishlist’ event in Google Analytics 4: The ‘add_to_wishlist‘ event in Google Analytics 4 (GA4) is used to track when a user adds an item to their wishlist on an ecommerce website. This event can be used to understand how users are interacting with different products and can provide insights into which products are most popular or which are being saved by users for future purchase.
To track the ‘add_to_wishlist‘ event in GA4, you will need to add the event code to your website’s HTML or JavaScript. The event code typically includes parameters such as the event name (‘add_to_wishlist‘), the product that was added to the wishlist, and any additional information such as the product category.
For example, the following code snippet shows an example of how to track a ‘add_to_wishlist’ event in GA4:
gtag('event', 'add_to_wishlist', {
  'items': [
    {
      'item_id': 'P12345',
      'item_name': 'Android Warhol T-Shirt',
      'item_brand': 'Google',
      'item_category': 'Apparel',
      'item_variant': 'black',
      'price': '29.20',
      'quantity': '1'
    }
  ]
});
Once the event is set up correctly, it will start sending data to your GA4 property and you will be able to view the event in the GA4 reports.
GA4 “add_to_wishlist” data layer using Google Tag Manager: The ‘add_to_wishlist‘ event in Google Analytics 4 (GA4) can be used to track when a user adds an item to their wishlist on an ecommerce website using a data layer. This event can be used to understand how users are interacting with different products and can provide insights into which products are most popular or which are being saved by users for future purchase.
To track the ‘add_to_wishlist‘ event in GA4 using a data layer, you will need to create a data layer object on your website’s pages and push data into it when a user adds an item to their wishlist. For example, when a user adds a product to their wishlist, the following data could be pushed into the data layer:
dataLayer.push({
  'event': 'add_to_wishlist',
  'items': [
    {
      'item_id': 'P12345',
      'item_name': 'Android Warhol T-Shirt',
      'item_brand': 'Google',
      'item_category': 'Apparel',
      'item_variant': 'black',
      'price': '29.20',
      'quantity': '1'
    }
  ]
});
Once the data is in the data layer, you can then configure GA4 to listen for the add_to_wishlist event and use the data to track product views and other ecommerce metrics.
Integrating Google Analytics (GA4) Enhanced Ecommerce using Google Tag Manager
GA4 “view_cart” data layer using Google Tag Manager: The ‘view_cart’ event in Google Analytics 4 (GA4) can be used to track when a user views their cart on an ecommerce website using a data layer. This event can be used to understand how users are interacting with the cart feature and can provide insights into the cart abandonment rate, average items per cart, and other metrics.
To track the ‘view_cart’ event in GA4 using a data layer, you will need to create a data layer object on your website’s pages and push data into it when a user views their cart.
For example, when a user views their cart, the following data could be pushed into the data layer:
dataLayer.push({
  'event': 'view_cart',
  'items': [
    {
      'item_id': 'P12345',
      'item_name': 'Android Warhol T-Shirt',
      'item_brand': 'Google',
      'category': 'Apparel',
      'item_variant': 'black',
      'price': '29.20',
      'quantity': '1'
    },
    {
      'item_id': 'P54321',
      'item_name': 'Google Pixel Phone',
      'item_brand': 'Google',
      'item_category': 'Electronics',
      'item_variant': 'black',
      'price': '799.00',
      'quantity': '1'
    }
  ],
  'value': 828.20
});
Once the data is in the data layer, you can then configure GA4 to listen for the ‘view_cart’ event and use the data to track cart views and other ecommerce metrics.
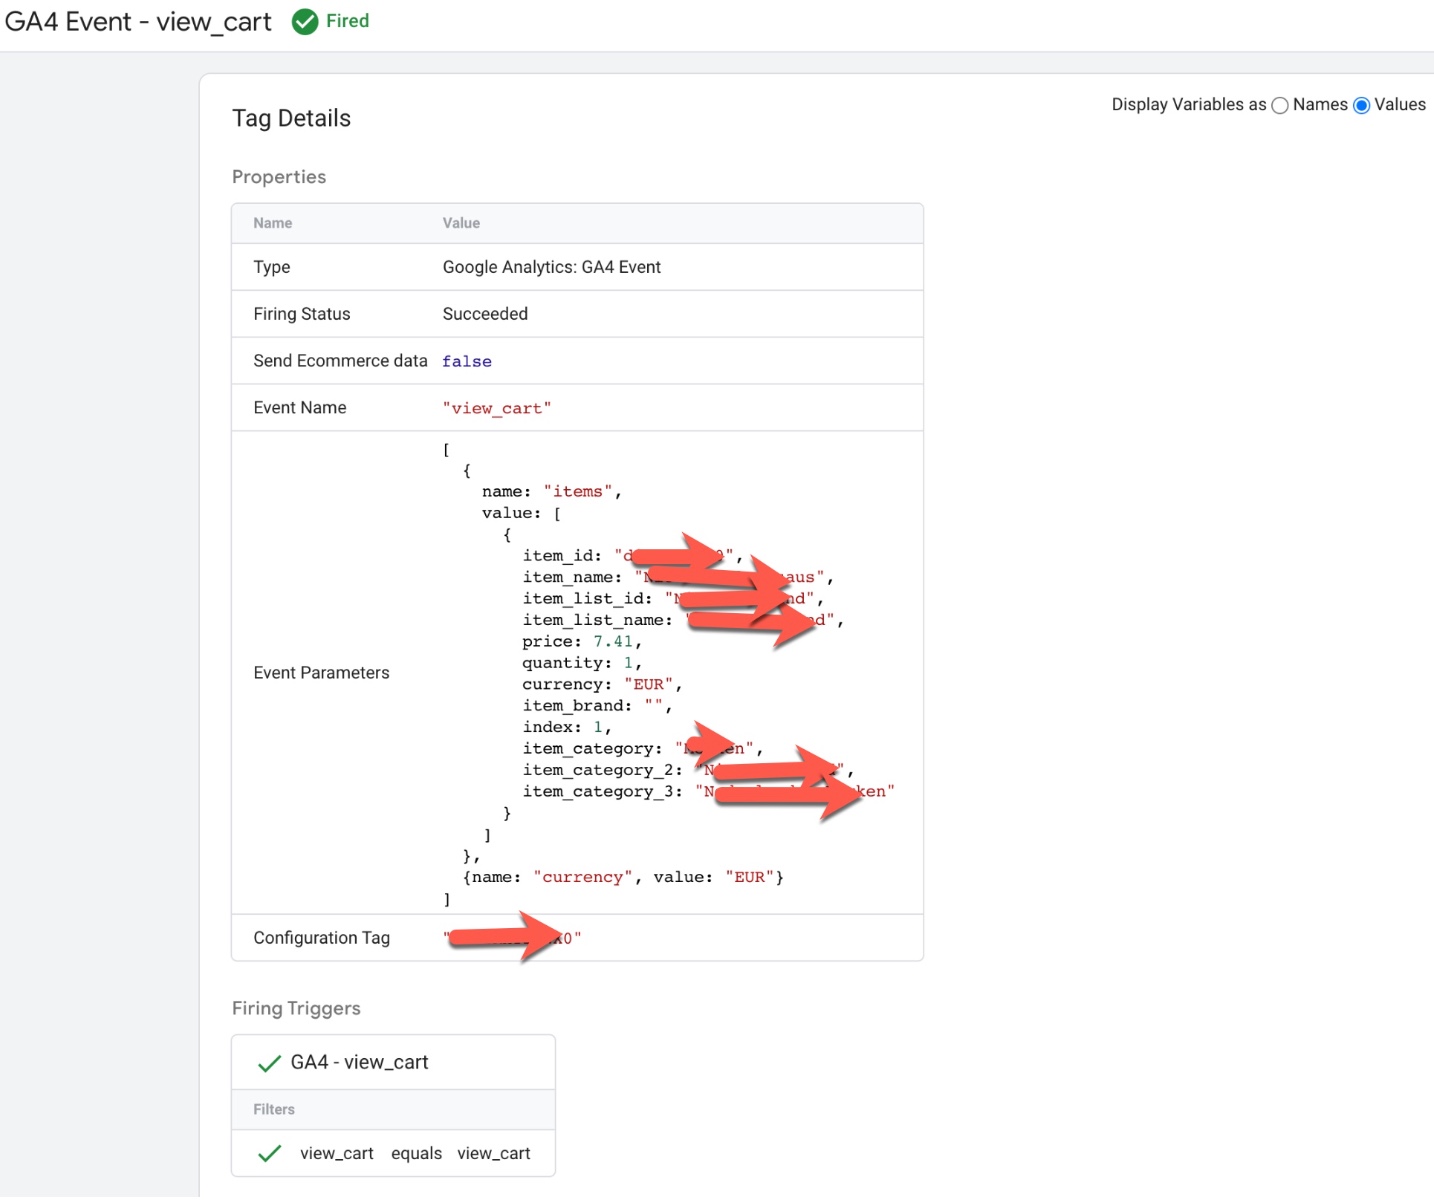
‘view_cart’ event in Google Analytics 4: The ‘view_cart’ event in Google Analytics 4 (GA4) is used to track when a user views their cart on an ecommerce website. This event can be used to understand how users are interacting with the cart feature and can provide insights into the cart abandonment rate, average items per cart and other metrics.
To track the ‘view_cart’ event in GA4, you will need to add the event code to your website’s HTML or JavaScript. The event code typically includes parameters such as the event name (‘view_cart‘) and any additional information such as the total value of the items in the cart.
For example, the following code snippet shows an example of how to track a ‘view_cart‘ event in GA4:
gtag('event', 'view_cart', {
  'items': [
    {
      'item_id': 'P12345',
      'item_name': 'Android Warhol T-Shirt',
      'item_brand': 'Google',
      'item_category': 'Apparel',
      'item_variant': 'black',
      'price': '29.20',
      'quantity': '1'
    },
    {
      'item_id': 'P54321',
      'item_name': 'Google Pixel Phone',
      'item_brand': 'Google',
      'item_category': 'Electronics',
      'item_variant': 'black',
      'price': '799.00',
      'quantity': '1'
    }
  ],
  'value': 828.20
});
Revenue Measurement with GA4 eCommerce Tracking using Google Tag Manager
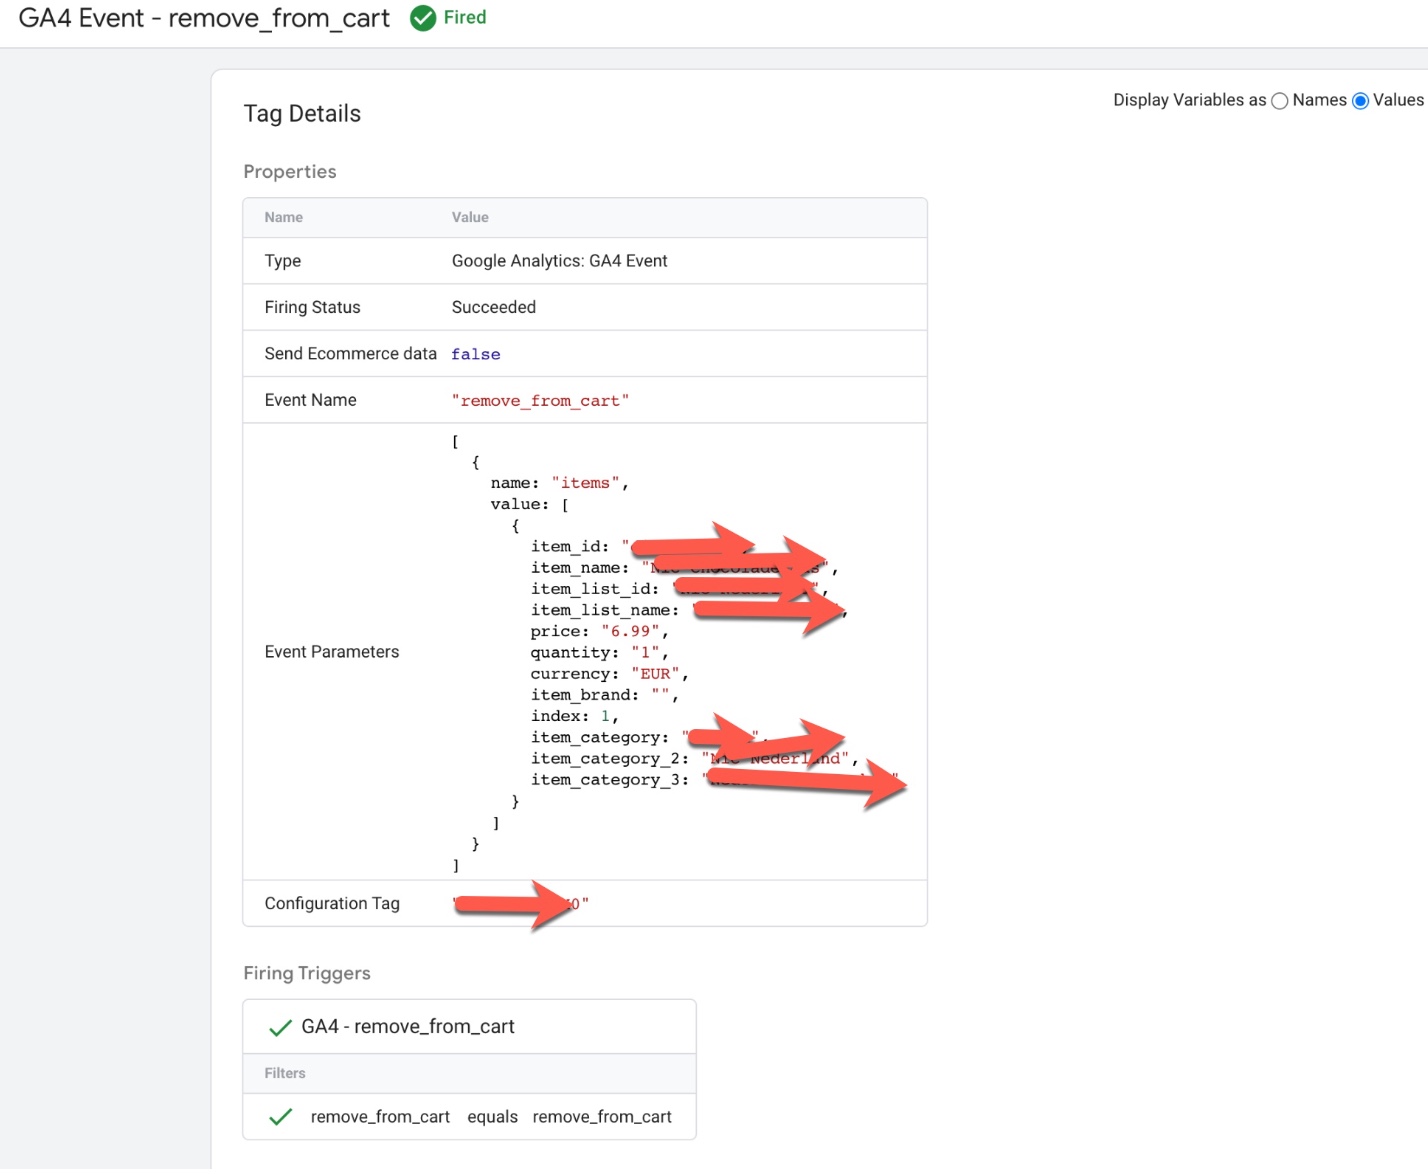
‘remove_from_cart’ event in Google Analytics 4: The ‘remove_from_cart’ event in Google Analytics 4 (GA4) is used to track when a user removes an item from their cart on an ecommerce website. This event can be used to understand how users are interacting with the cart feature and can provide insights into the cart abandonment rate, average items per cart, and other metrics.
To track the ‘remove_from_cart’ event in GA4, you will need to add the event code to your website’s HTML or JavaScript. The event code typically includes parameters such as the event name (‘remove_from_cart’), the product that was removed from the cart, and any additional information such as the product category.
For example, the following code snippet shows an example of how to track a ‘remove_from_cart’ event in GA4:
gtag('event', 'remove_from_cart', {
  'items': [
    {
      'item_id': 'P12345',
      'item_name': 'Android Warhol T-Shirt',
      'item_brand': 'Google',
      'item_category': 'Apparel',
      'item_variant': 'black',
      'price': '29.20',
      'quantity': '1'
    }
  ]
});
Once the event is set up correctly, it will start sending data to your GA4 property and you will be able to view the event in the GA4 reports.
GA4 “remove_from_cart” data layer using Google Tag Manager: The ‘remove_from_cart’ event in Google Analytics 4 (GA4) can be used to track when a user removes an item from their cart on an ecommerce website using a data layer. This event can be used to understand how users are interacting with the cart feature and can provide insights into the cart abandonment rate, average items per cart, and other metrics.
To track the ‘remove_from_cart’ event in GA4 using a data layer, you will need to create a data layer object on your website’s pages and push data into it when a user removes an item from their cart. For example, when a user removes a product from their cart, the following data could be pushed into the data layer:
dataLayer.push({
  'event': 'remove_from_cart',
  'items': [
    {
      'item_id': 'P12345',
      'item_name': 'Android Warhol T-Shirt',
      'item_brand': 'Google',
      'item_category': 'Apparel',
      'item_variant': 'black',
      'price': '29.20',
      'quantity': '1'
    }
  ]
});
UA ecommerce implementation to populate GA4 ecommerce events using Google Tag Manager
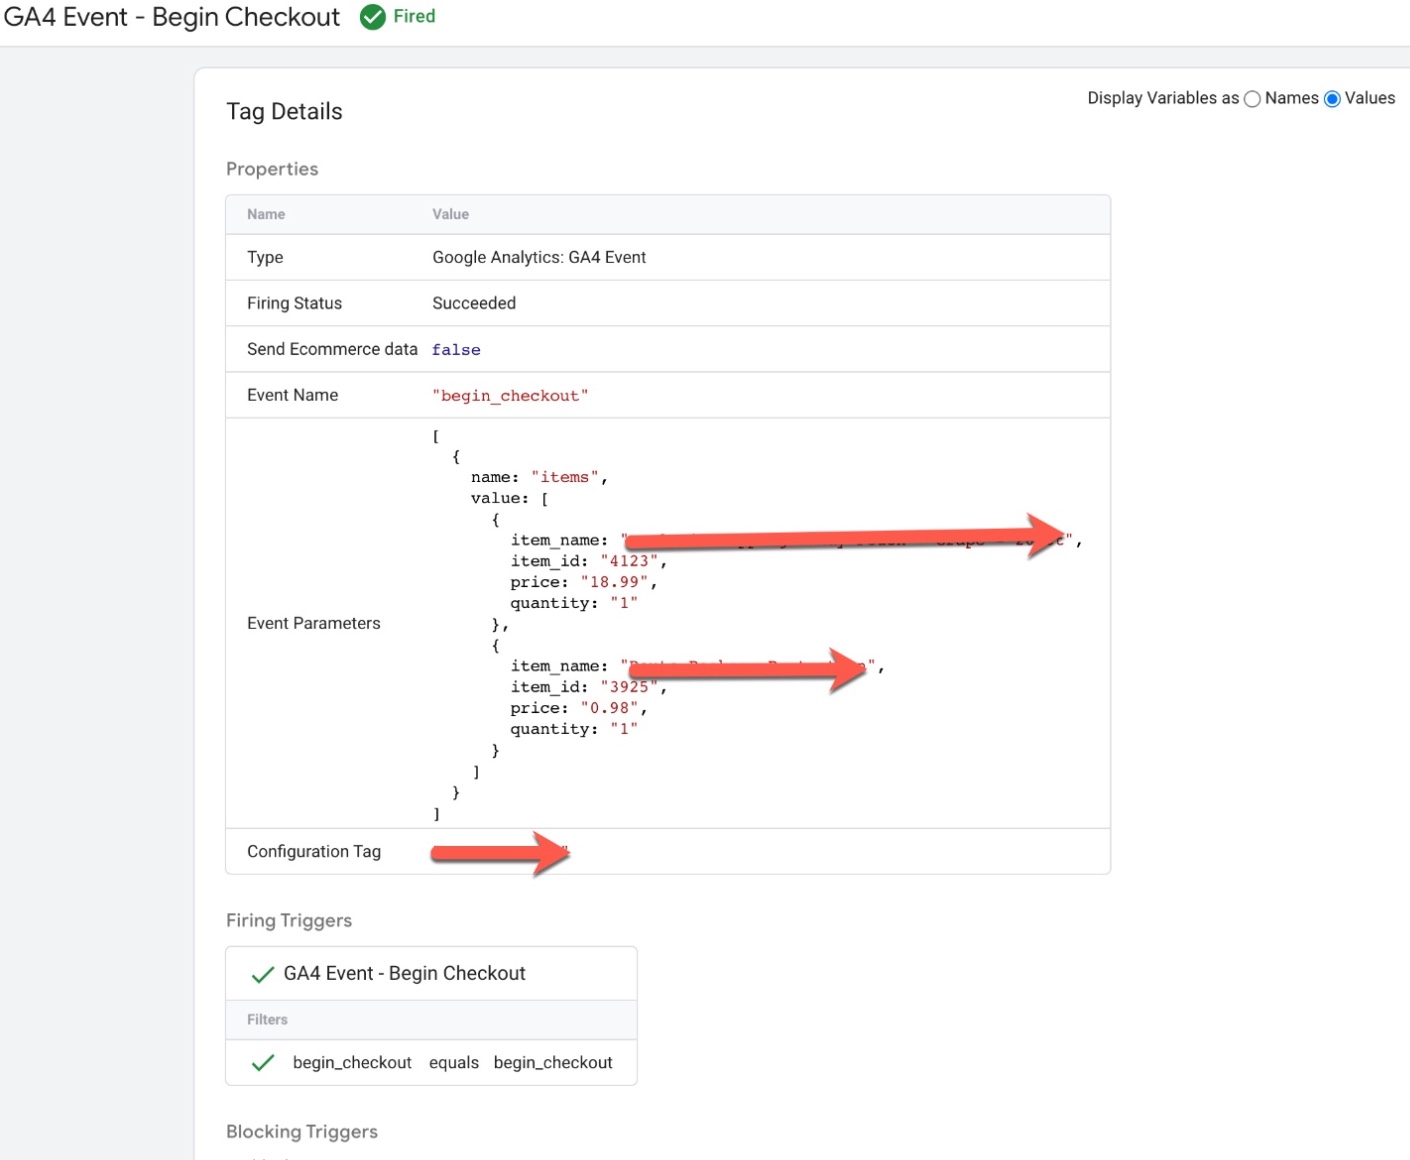
‘begin_checkout’ event in Google Analytics 4: The ‘begin_checkout’ event in Google Analytics 4 (GA4) is used to track when a user begins the checkout process on an ecommerce website. This event can be used to understand how users are interacting with the checkout feature and can provide insights into the checkout conversion rate, average order value and other metrics.
To track the ‘begin_checkout’ event in GA4, you will need to add the event code to your website’s HTML or JavaScript. The event code typically includes parameters such as the event name (‘begin_checkout’), the products that are included in the order, and any additional information such as the total value of the order.
For example, the following code snippet shows an example of how to track a ‘begin_checkout’ event in GA4:
gtag('event', 'begin_checkout', {
  'items': [
    {
      'item_id': 'P12345',
      'item_name': 'Android Warhol T-Shirt',
      'item_brand': 'Google',
      'item_category': 'Apparel',
      'item_variant': 'black',
      'price': '29.20',
      'quantity': '1'
    },
    {
      'item_id': 'P54321',
      'item_name': 'Google Pixel Phone',
      'item_brand': 'Google',
      'item_category': 'Electronics',
      'item_variant': 'black',
      'price': '799.00',
      'quantity': '1'
    }
  ],
  'value': 828.20
});
Once the event is set up correctly, it will start sending data to your GA
GA4 “begin_checkout” data layer using Google Tag Manager: The ‘begin_checkout’ event in Google Analytics 4 (GA4) can be used to track when a user begins the checkout process on an ecommerce website using a data layer. This event can be used to understand how users are interacting with the checkout feature and can provide insights into the checkout conversion rate, average order value and other metrics.
To track the ‘begin_checkout‘ event in GA4 using a data layer, you will need to create a data layer object on your website’s pages and push data into it when a user begins the checkout process.
For example, when a user begins the checkout process, the following data could be pushed into the data layer:
dataLayer.push({
  'event': 'begin_checkout',
  'items': [
    {
      'item_id': 'P12345',
      'item_name': 'Android Warhol T-Shirt',
      'item_brand': 'Google',
      'item_category': 'Apparel',
      'item_variant': 'black',
      'price': '29.20',
      'quantity': '1'
    },
    {
      'item_id': 'P54321',
      'item_name': 'Google Pixel Phone',
      'item_brand': 'Google',
      'item_category': 'Electronics',
      'item_variant': 'black',
      'price': '799.00',
      'quantity': '1'
    }
  ],
  'value': 828.20,
});
Once the data is in the data layer, you can then configure GA4 to listen for the ‘begin_checkout’ event and use the data to track checkout views and other ecommerce metrics.
Setup Google Analytics 4, GA4 Ecommerce Tracking using Google Tag Manager
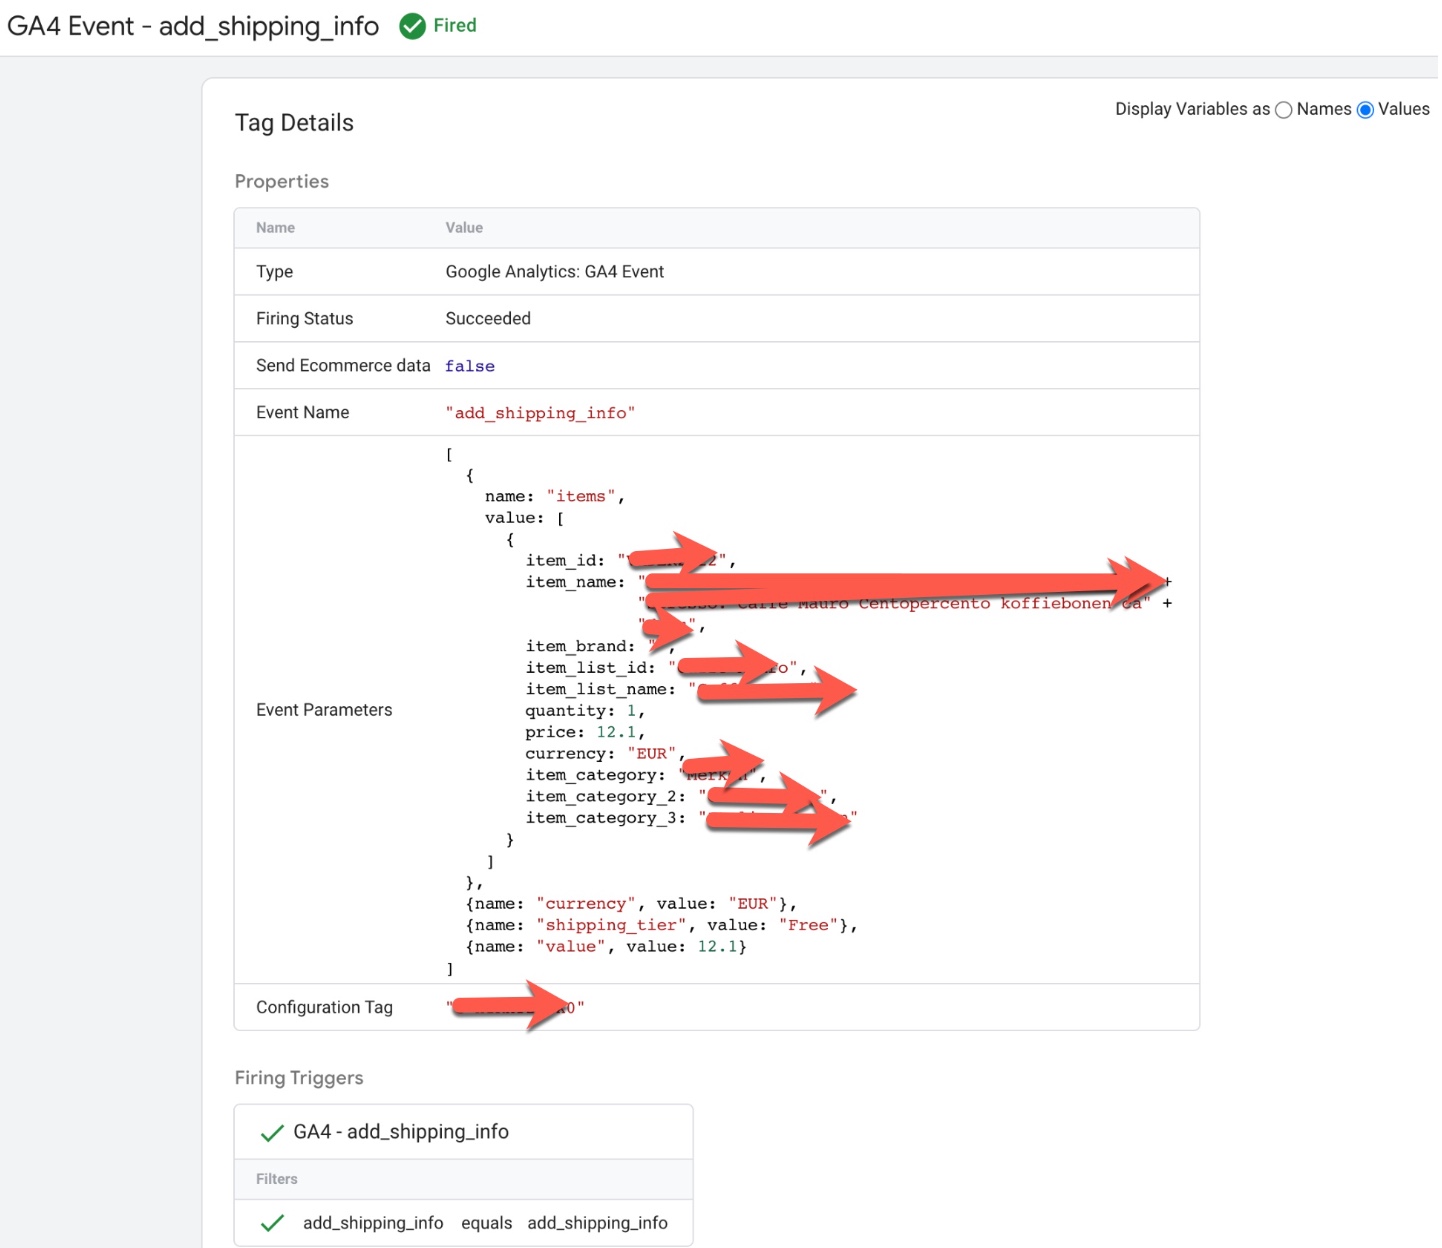
‘add_shipping_info’ event in Google Analytics 4: The ‘add_shipping_info’ event in Google Analytics 4 (GA4) is used to track when a user enters their shipping information during the checkout process on an ecommerce website. This event can be used to understand how users are interacting with the checkout feature and can provide insights into the checkout conversion rate, average order value, and other metrics.
To track the ‘add_shipping_info’ event in GA4, you will need to add the event code to your website’s HTML or JavaScript. The event code typically includes parameters such as the event name (‘add_shipping_info’) and any additional information such as the shipping address and method.
For example, the following code snippet shows an example of how to track a ‘add_shipping_info’ event in GA4:
gtag('event', 'add_shipping_info', {
  'items': [
    {
      'item_id': 'P12345',
      'item_name': 'Android Warhol T-Shirt',
      'item_brand': 'Google',
      'item_category': 'Apparel',
      'item_variant': 'black',
      'price': '29.20',
      'quantity': '1'
    },
    {
      'item_id': 'P54321',
      'item_name': 'Google Pixel Phone',
      'item_brand': 'Google',
      'item_category': 'Electronics',
      'item_variant': 'black',
      'price': '799.00',
      'quantity': '1'
    }
  ],
  'value': 828.20,
  'shipping_tier': "FedEx Ground"
});
Once the event is set up correctly, it will start sending data to your GA4 property and you will be able to view the event in the GA4 reports.
GA4 “add_shipping_info” data layer using Google Tag Manager: The ‘add_shipping_info’ event in Google Analytics 4 (GA4) can be used to track when a user enters their shipping information during the checkout process on an ecommerce website using a data layer. This event can be used to understand how users are interacting with the checkout feature and can provide insights into the checkout conversion rate, average order value, and other metrics.
To track the ‘add_shipping_info’ event in GA4 using a data layer, you will need to create a data layer object on your website’s pages and push data into it when a user enters their shipping information.
For example, when a user enters their shipping information, the following data could be pushed into the data layer:
dataLayer.push({
  'event': 'add_shipping_info',
  'items': [
    {
      'item_id': 'P12345',
      'item_name': 'Android Warhol T-Shirt',
      'item_brand': 'Google',
      'item_category': 'Apparel',
      'item_variant': 'black',
      'price': '29.20',
      'quantity': '1'
    },
    {
      'item_id': 'P54321',
      'item_name': 'Google Pixel Phone',
      'item_brand': 'Google',
      'item_category': 'Electronics',
      'item_variant': 'black',
      'price': '799.00',
      'quantity': '1'
    }
  ],
  'value': 828.20,
  'shipping_tier': "FedEx Ground"
});
Transfer E-commerce Data From Universal Analytics to GA4 using Google Tag Manager
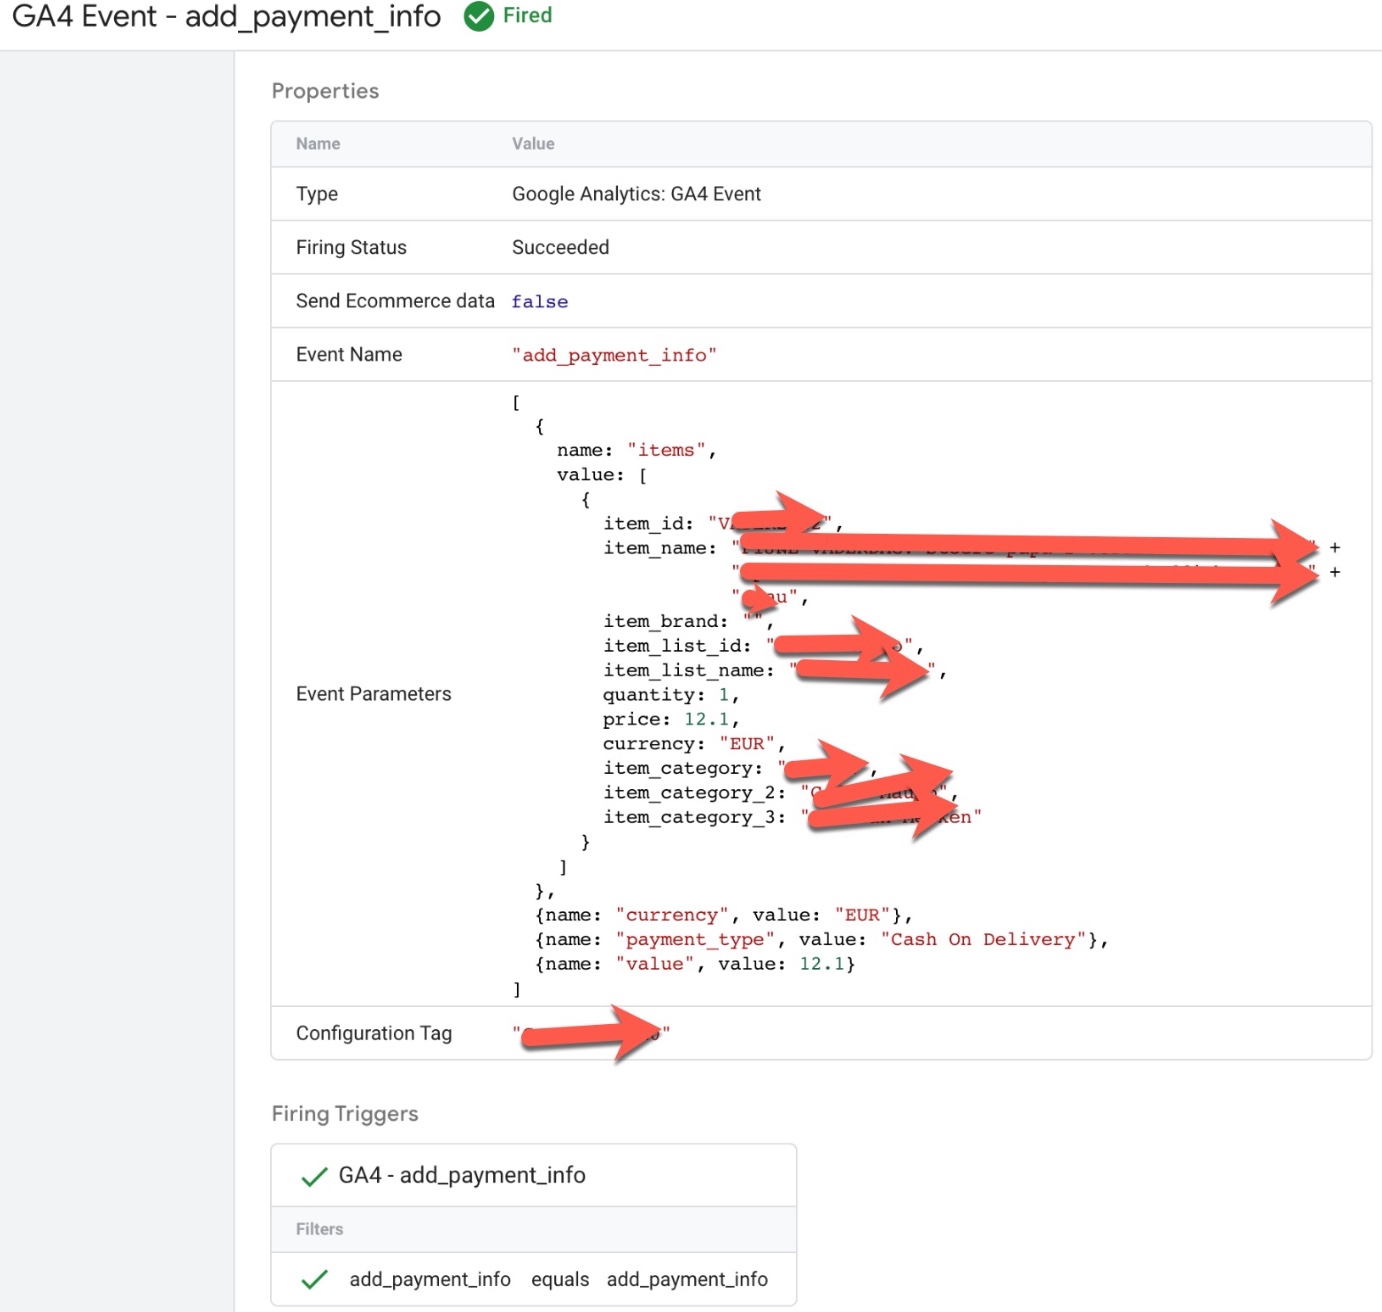
‘add_payment_info’ event in Google Analytics 4: The ‘add_payment_info’ event in Google Analytics 4 (GA4) is used to track when a user enters their payment information during the checkout process on an ecommerce website. This event can be used to understand how users are interacting with the checkout feature and can provide insights into the checkout conversion rate, average order value, and other metrics.
To track the ‘add_payment_info’ event in GA4, you will need to add the event code to your website’s HTML or JavaScript. The event code typically includes parameters such as the event name (‘add_payment_info’) and any additional information such as the payment method and transaction ID.
gtag('event', 'add_payment_info', {
  'items': [
    {
      'item_id': 'P12345',
      'item_name': 'Android Warhol T-Shirt',
      'item_brand': 'Google',
      'item_category': 'Apparel',
      'item_variant': 'black',
      'price': '29.20',
      'quantity': '1'
    },
    {
      'item_id': 'P54321',
      'item_name': 'Google Pixel Phone',
      'item_brand': 'Google',
      'item_category': 'Electronics',
      'item_variant': 'black',
      'price': '799.00',
      'quantity': '1'
    }
  ],
  'value': 828.20,
  'payment_type': "Visa"
});
GA4 “add_payment_info” data layer using Google Tag Manager: The ‘add_payment_info’ event in Google Analytics 4 (GA4) can be used to track when a user enters their payment information during the checkout process on an ecommerce website using a data layer. This event can be used to understand how users are interacting with the checkout feature and can provide insights into the checkout conversion rate, average order value, and other metrics.
To track the ‘add_payment_info’ event in GA4 using a data layer, you will need to create a data layer object on your website’s pages and push data into it when a user enters their payment information. For example, when a user enters their payment information, the following data could be pushed into the data layer:
dataLayer.push({
  'event': 'add_payment_info',
  'items': [
    {
      'item_id': 'P12345',
      'item_name': 'Android Warhol T-Shirt',
      'item_brand': 'Google',
      'item_category': 'Apparel',
      'item_variant': 'black',
      'price': '29.20',
      'quantity': '1'
    },
    {
      'item_id': 'P54321',
      'item_name': 'Google Pixel Phone',
      'item_brand': 'Google',
      'item_category': 'Electronics',
      'item_variant': 'black',
      'price': '799.00',
      'quantity': '1'
    }
  ],
  'value': 828.20,
  'payment_type': "Visa"
});
Once the data is in the data layer, you can then configure GA4 to listen for the ‘add_payment_info’ event and use the data to track payment information views and other ecommerce metrics.
Setting Up Event and Conversion Tracking in GA4 using Google Tag Manager
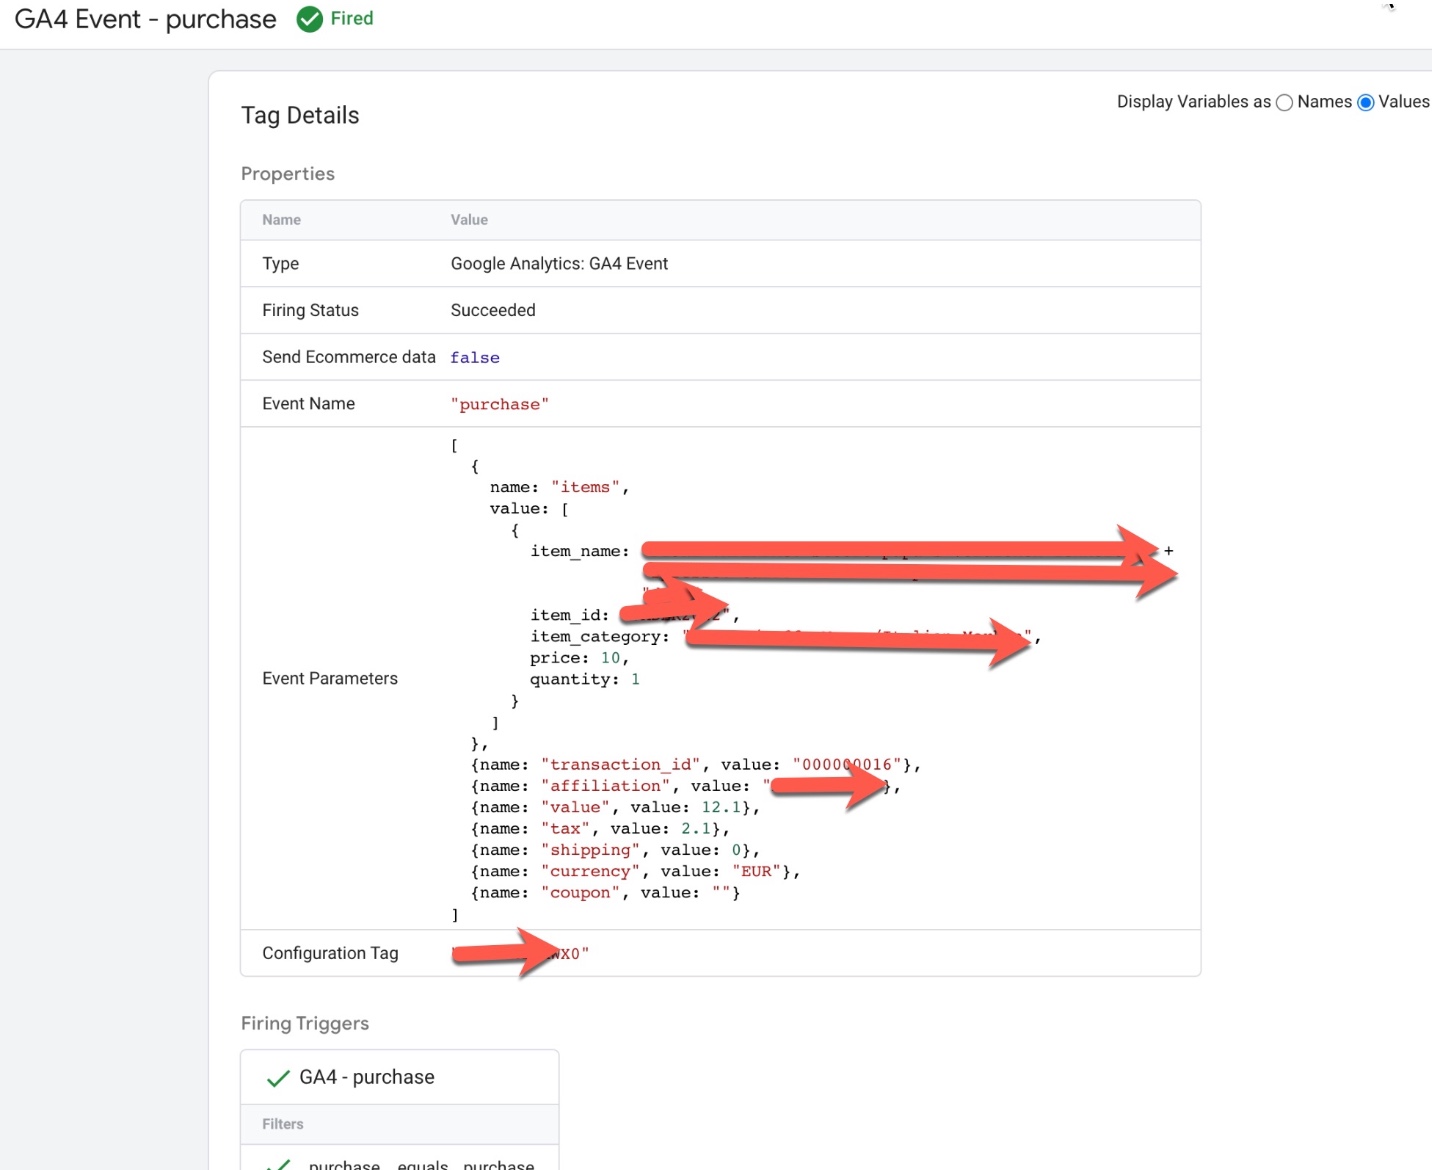
‘purchase’ event in Google Analytics 4: The purchase event in Google Analytics 4 (GA4) is used to track when a user completes a purchase on an ecommerce website. This event can be used to understand how users are interacting with the checkout feature and can provide insights into the checkout conversion rate, average order value, and other metrics.
To track the ‘purchase‘ event in GA4, you will need to add the event code to your website’s HTML or JavaScript. The event code typically includes parameters such as the event name (‘purchase‘), the products that were purchased, the transaction ID, and any additional information such as the order value and shipping cost.
For example, the following code snippet shows an example of how to track a ‘purchase’ event in GA4:
gtag('event', 'purchase', {
  'transaction_id': 'T12345',
  'affiliation': 'Google Store',
  'value': '120.00',
  'tax': '12.00',
  'shipping': '10.00',
  'items': [
    {
      'item_id': 'P12345',
      'item_name': 'Android Warhol T-Shirt',
      'item_brand': 'Google',
      'item_category': 'Apparel',
      'item_variant': 'black',
      'price': '29.20',
      'quantity': '1'
    },
    {
      'item_id': 'P54321',
      'item_name': 'Google Pixel Phone',
      'item_brand': 'Google',
      'item_category': 'Electronics',
      'item_variant': 'black',
      'price': '799.00',
      'quantity': '1'
    }
  ]
});
GA4 “purchase” data layer using Google Tag Manager:The ‘purchase’ event in Google Analytics 4 (GA4) can be used to track when a user completes a purchase on an ecommerce website using a data layer. This event can be used to understand how users are interacting with the checkout feature and can provide insights into the checkout conversion rate, average order value, and other metrics.
To track the ‘purchase’ event in GA4 using a data layer, you will need to create a data layer object on your website’s pages and push data into it when a user completes a purchase. For example, when a user completes a purchase, the following data could be pushed into the data layer:
dataLayer.push({
  'event': 'purchase',
  'transaction_id': 'T12345',
  'affiliation': 'Google Store',
  'value': '120.00',
  'tax': '12.00',
  'shipping': '10.00',
  'items': [
    {
      'id': 'P12345',
      'name': 'Android Warhol T-Shirt',
      'brand': 'Google',
      'category': 'Apparel',
      'variant': 'black',
      'price': '29.20',
      'quantity': '1'
    },
    {
      'id': 'P54321',
      'name': 'Google Pixel Phone',
      'brand': 'Google',
      'category': 'Electronics',
      'variant': 'black',
      'price': '799.00',
      'quantity': '1'
    }
  ]
});
Once the data is in the data layer, you can then configure GA4 to listen for the ‘purchase’ event and use the data to track purchase views and other ecommerce metrics.
Implementing Google Analytic GA4 Enhanced Ecommerce Analytics using Google Tag Manager
Warning: If you do n’t know about javascript or do n’t have developing knowledge then do n’t try to Implementation Google Analytics 4 (GA4) Enhanced Ecommerce Tracking for Google Tag Manager that can broke your site, Cart and other functionality
Disclaimer: Google tag manager belongs to Google property For Contact: mappchero@gmail.com
I am available for Hire on Freelancer: Freelancer.com
I am available for Hire on Upwork: Upwork.com
I am available for Hire on Peopleperhour: Peopleperhour.com
I am available for Hire on Guru: Guru.com

