Automatically Track IFrame YouTube videos with UPVUE PLAYER (Captions and transcripts include hearing impaired and second-language viewers) using Google Tag Manager
Iframe YouTube videos event tracking with UPVUE PLAYER (Captions and transcripts include hearing impaired and second-language viewers) using Google Tag Manager.
If you are looking youtube video tracking using Google Tag Manager Like Iframe YouTube Video, Pop Up youtube video tracking and Track IFrame YouTube videos with UPVUE PLAYER.
Step 1. Create the YouTube is Present Macro with UPVUE PLAYER using Google Tag Manager
Macro Name: YouTube is Present for UPVUE PLAYER using Google Tag Manager
Macro Type: Custom Javascript
Custom Javascript: See below in Screen
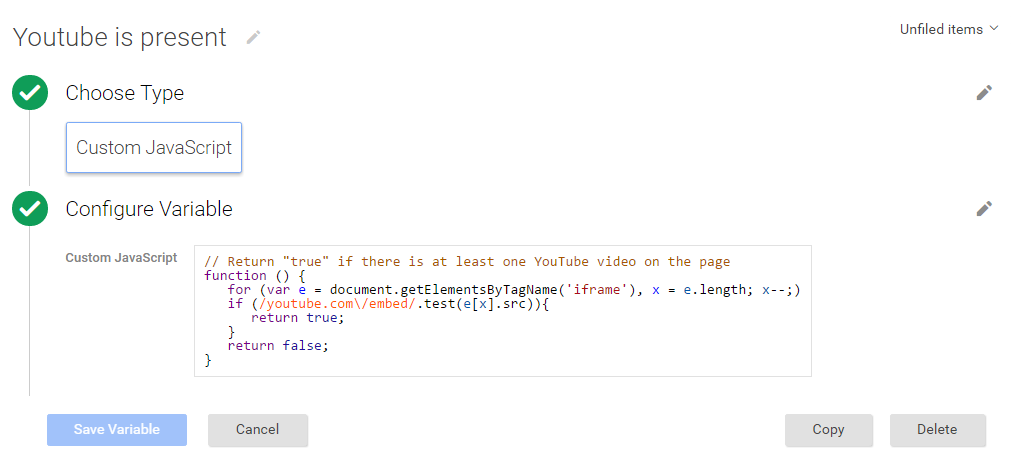
Tracking YouTube Presence using Google Tag Manager
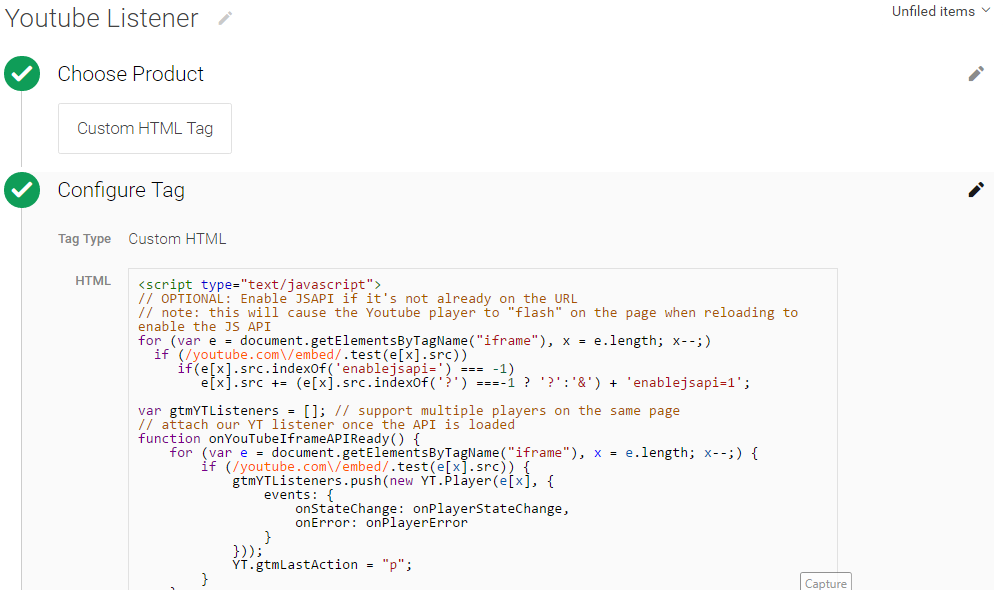
Step 2. Track IFrame YouTube videos with UPVUE PLAYER using Google Tag Manager
Tag Name: YouTube Listener to IFrame YouTube videos with UPVUE PLAYER Google Tag Manager
Tag Type: Custom HTML Tag
Note: You need to modify below HTML Code according to Youtube Video using Like Iframe YouTube Video, Pop Up youtube video tracking and Track IFrame YouTube videos with UPVUE PLAYER.
<script type=”text/javascript”>
for (var e = document.getElementsByTagName(“iframe”), x = e.length; x–;)
if (/youtube.com\/embed/.test(e[x].src))
if(e[x].src.indexOf(‘enablejsapi=’) === -1)
e[x].src += (e[x].src.indexOf(‘?’) ===-1 ? ‘?’:’&’) + ‘enablejsapi=1’;
var gtmYTListeners = [];
function onYouTubeIframeAPIReady() {
for (var e = document.getElementsByTagName(“iframe”), x = e.length; x–;) {
if (/youtube.com\/embed/.test(e[x].src)) {
gtmYTListeners.push(new YT.Player(e[x], {
events: {
onStateChange: onPlayerStateChange,
onError: onPlayerError
}
}));
YT.gtmLastAction = “p”;
}
}
}
function onPlayerStateChange(e) {
e[“data”] == YT.PlayerState.PLAYING && setTimeout(onPlayerPercent, 1000, e[“target”]);
var video_data = e.target[“getVideoData”](),
label = ‘ ‘+video_data.title;
if (e[“data”] == YT.PlayerState.PLAYING && YT.gtmLastAction == “p”) {
dataLayer.push({
event: “youtube”,
action: “play”,
label: label
});
YT.gtmLastAction = “”;
}
if (e[“data”] == YT.PlayerState.PAUSED) {
dataLayer.push({
event: “youtube”,
action: “pause”,
label: label
});
YT.gtmLastAction = “p”;
}
}
function onPlayerError(e) {
dataLayer.push({
event: “error”,
action: “GTM”,
label: “youtube:” + e
})
}
// report the % played if it matches 0%, 25%, 50%, 75% or completed
function onPlayerPercent(e) {
if (e[“getPlayerState”]() == YT.PlayerState.PLAYING) {
var t = e[“getDuration”]() – e[“getCurrentTime”]() <= 1.5 ? 1 : (Math.floor(e[“getCurrentTime”]() / e[“getDuration”]() * 4) / 4).toFixed(2); if (!e[“lastP”] || t > e[“lastP”]) {
var video_data = e[“getVideoData”](),
label = ‘ ‘+video_data.title;
e[“lastP”] = t;
dataLayer.push({
event: “youtube”,
action: t * 100 + “%”,
label: label
})
}
e[“lastP”] != 1 && setTimeout(onPlayerPercent, 1000, e);
}
}
window.onbeforeunload = function (e) {
var e = e || window.event;
// For IE and Firefox prior to version 4
if(e)
e.returnValue = ‘na’;
// For Safari
return ‘na’;
};
window.onbeforeunload = trackYTUnload;
function trackYTUnload() {
for (var i = 0; i < gtmYTplayers.length; i++)
if (gtmYTlisteners[i].getPlayerState() === 1) { // playing
var video_data = gtmYTlisteners[i][‘getVideoData’](),
label = ‘ ‘+video_data.title;
dataLayer.push({
event: ‘youtube’,
action: ‘exit’,
label: label
});
}
}
// load the Youtube JS api and get going
var j = document.createElement(“script”),
f = document.getElementsByTagName(“script”)[0];
j.src = “//www.youtube.com/iframe_api”;
j.async = true;
f.parentNode.insertBefore(j, f);
</script>
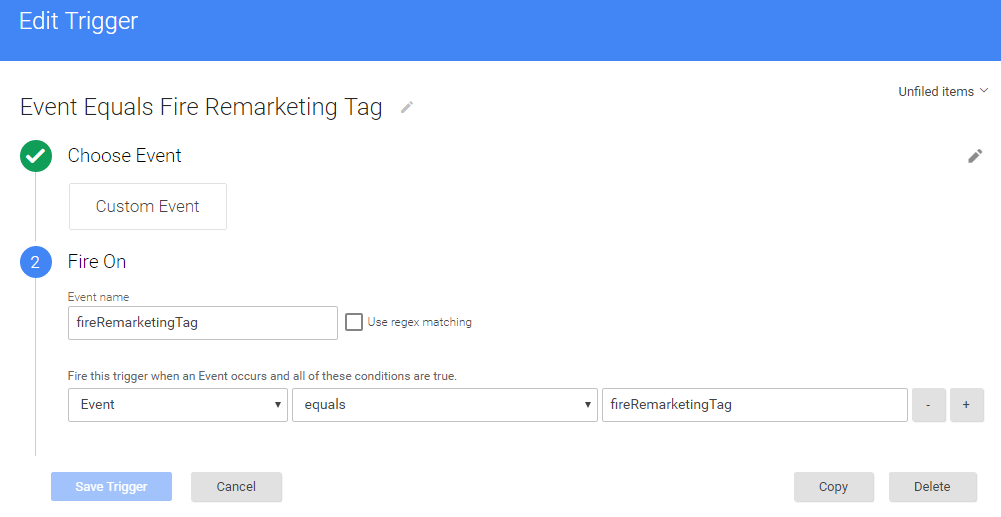
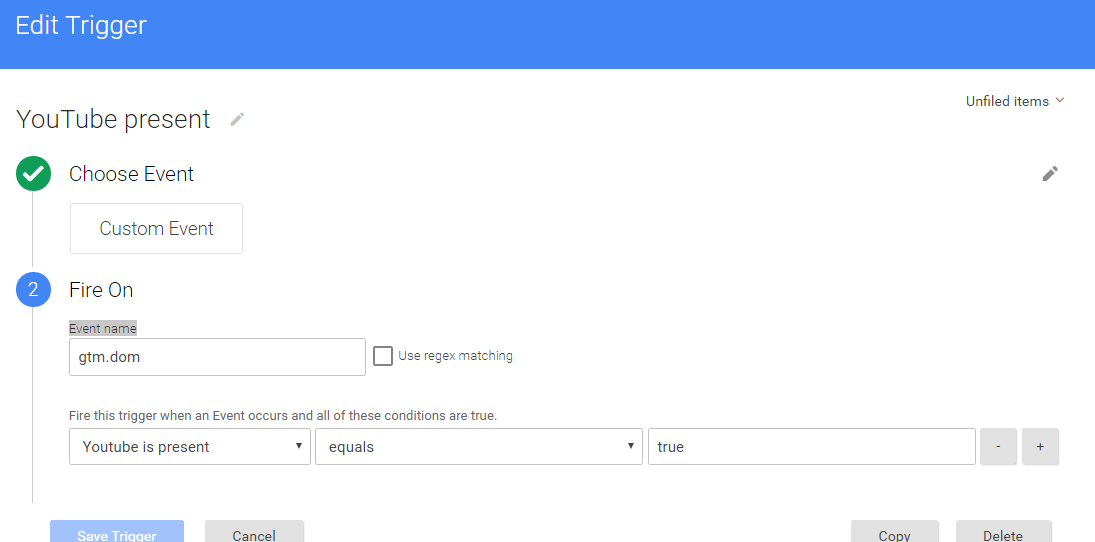
Firing Rules
Rule Name: YouTube present
Conditions:
{Event name equals gtm.dom
{{YouTube is Present}} equals true
Step 3. Create Macros for Event Action, Event Category, and Event Label Iframe Youtube Video with UPVUE PLAYER using Google Tag Manager
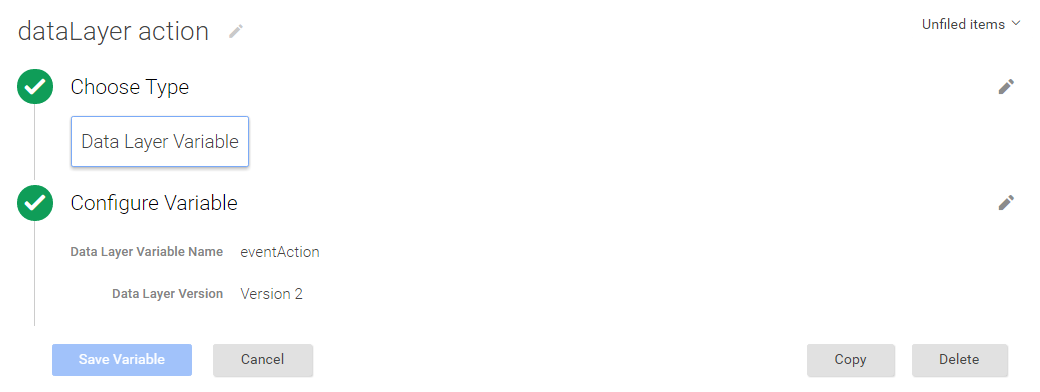
A: Event Action Macro using Iframe Youtube Video with UPVUE PLAYER using Google Tag Manager
Macro Name: dataLayer action
Macro Type: Data Layer Variable
Data Layer Variable Name: eventAction
Data Layer Version: Version 2
Default Value: (blank)
B: Event Category Macro using Iframe Youtube Video with UPVUE PLAYER using Google Tag Manager
Macro Name: dataLayer category
Macro Type: Data Layer Variable
Data Layer Variable Name: eventCategory
Data Layer Version: Version 2
Default Value: (blank)
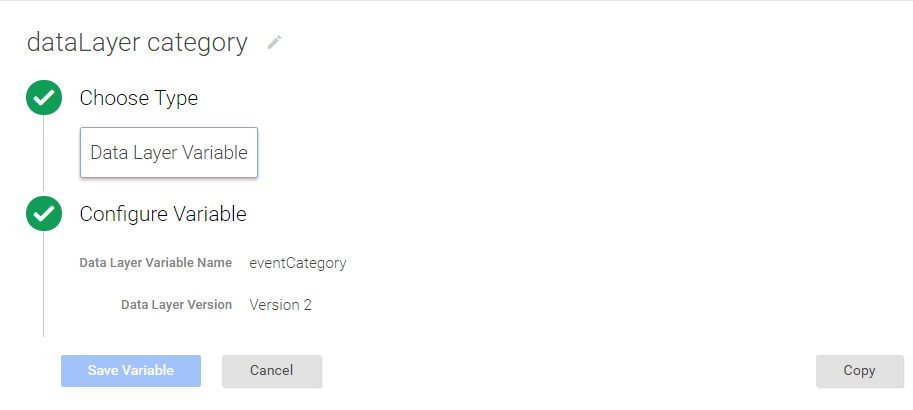
Event Category Macro using Iframe Youtube Video with UPVUE PLAYER using Google Tag Manager
C: Event Label Macro Iframe Youtube Video with UPVUE PLAYER using Google Tag Manager
Macro Name: dataLayer label
Macro Type: Data Layer Variable
Data Layer Variable Name: eventLabel
Data Layer Version: Version 2
Default Value: (blank)
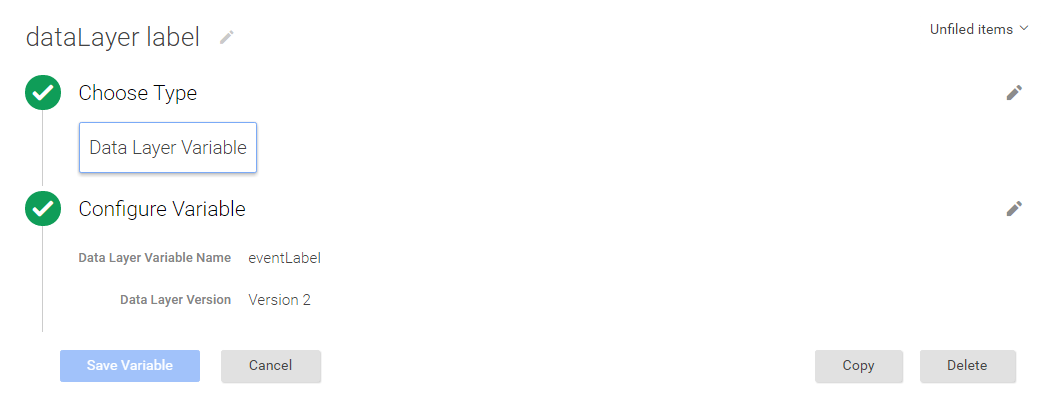
Event Label Macro Iframe Youtube Video with UPVUE PLAYER using Google Tag Manager
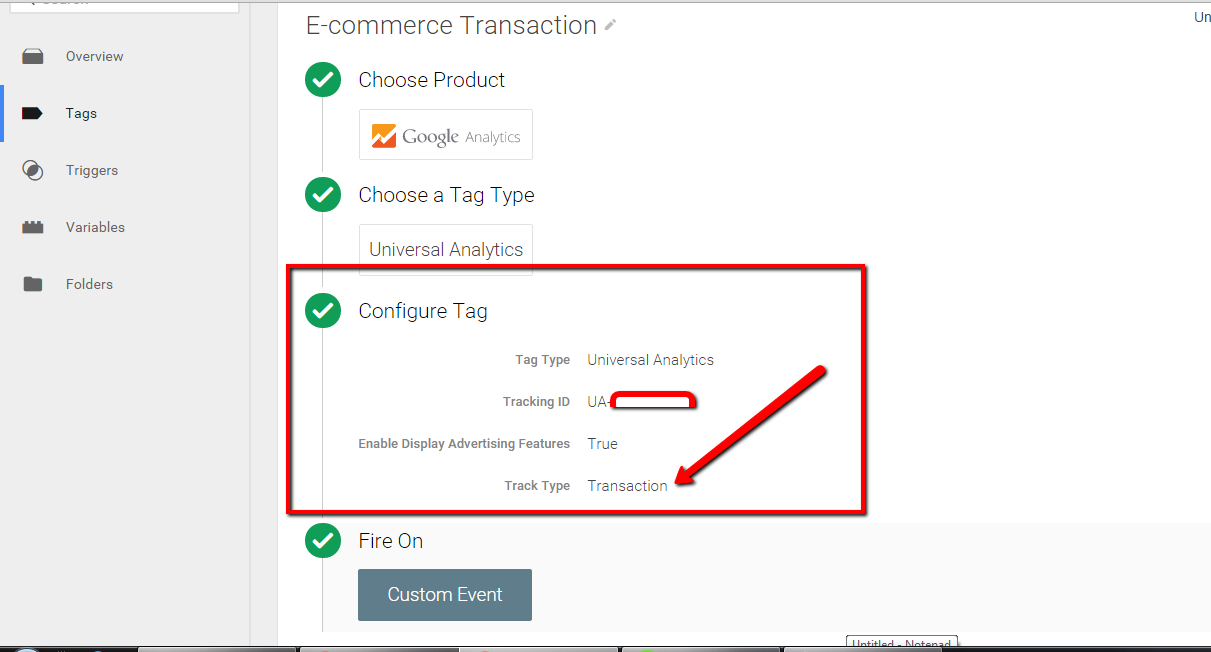
Step 4. Create UA Youtube Event – UA Tag & Check for YouTube Event Rule Iframe Youtube Video with UPVUE PLAYER using Google Tag Manager
Tag Name: UA YouTube Video Tracking – Video Page
Tag Type: Universal Analytics
Tracking ID: (your Google Analytics ID)
Track Type: Event
Event Tracking Parameters:
Category: {{dataLayer category}}
Action: {{dataLayer label}}
Label: {{dataLayer action}}
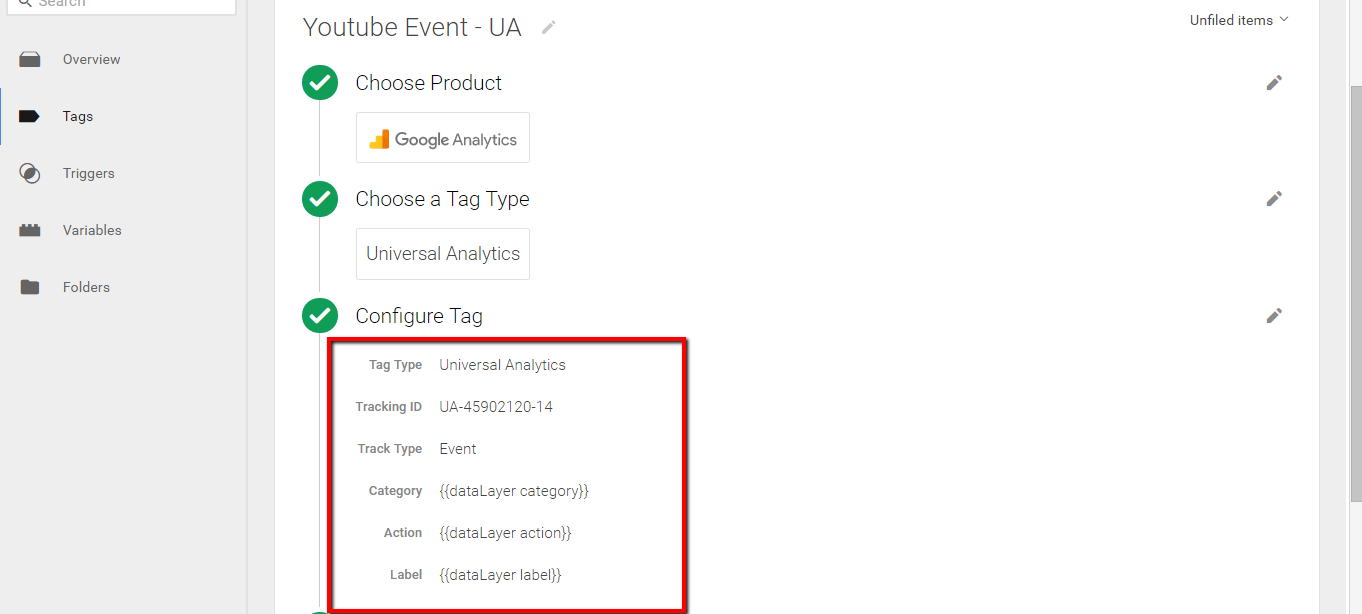
Tag Setup for YouTube Video Pop Tracking
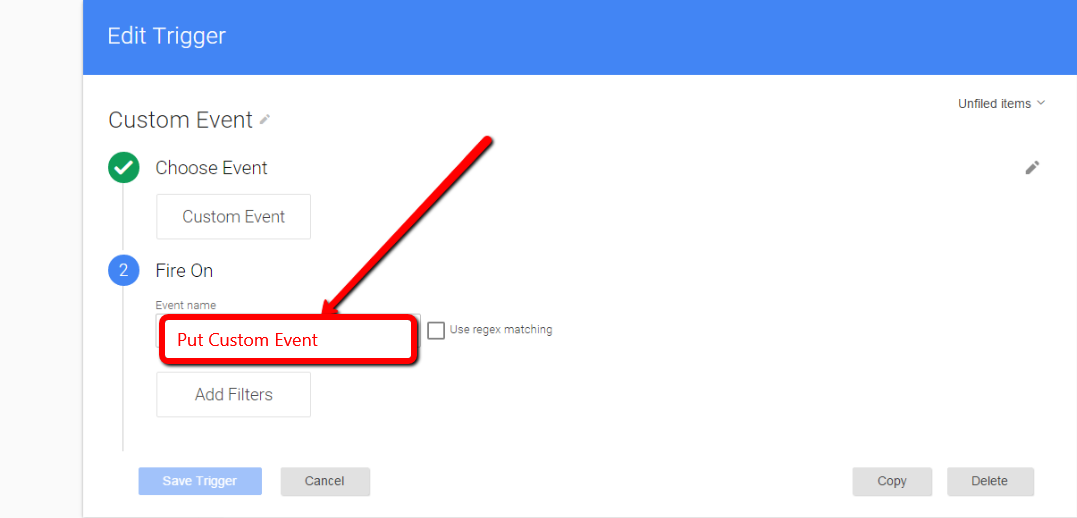
Firing Rules
Rule Name: YouTube event
Fire On
Event name equals youtube
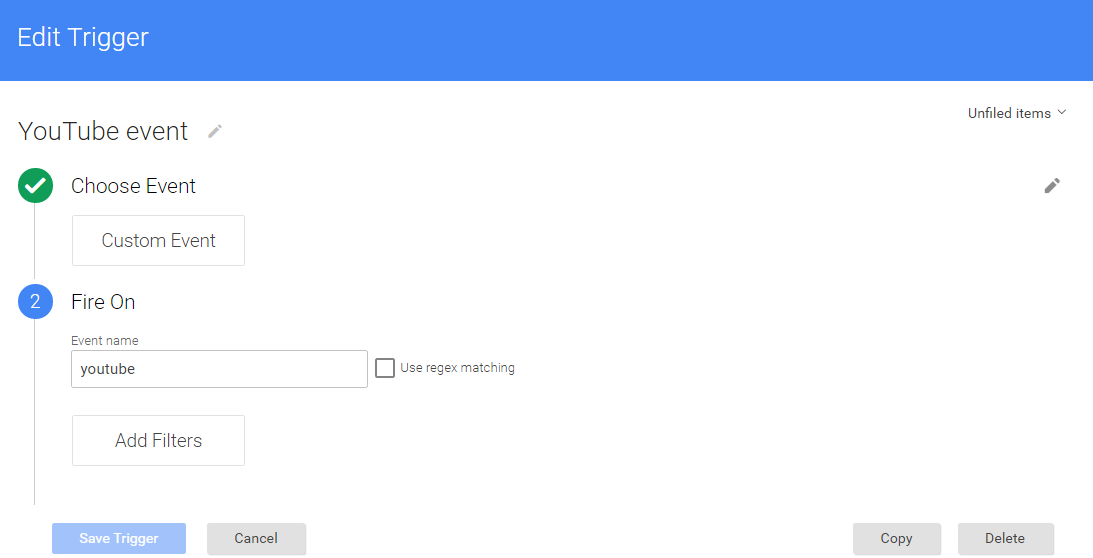
Custom Even Tracking for Youbube Video
Step 5. Check iframe Youtube with UPVUE PLAYER using Google Tag Manage into Google Analytics Real-Time Report
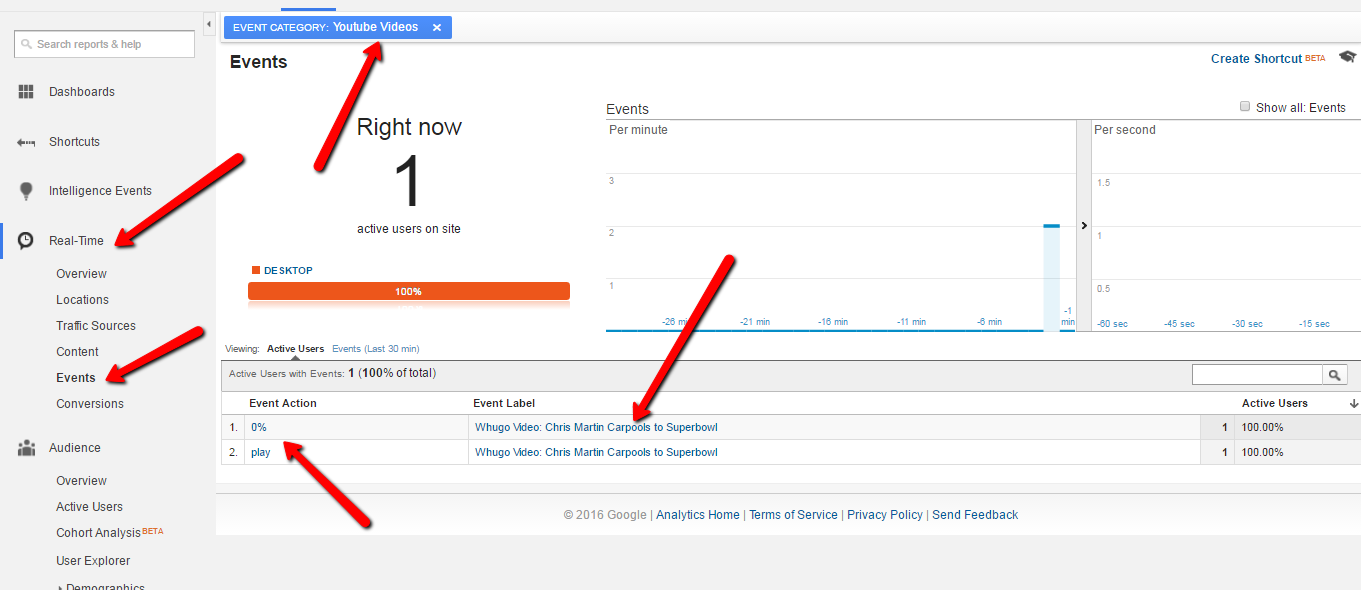
Real Time YouTube Video Tracking
Warning:if you do n’t know about javascript or do n’t have developing knowledge then do n’t try to implement on iframe Youtube with UPVUE PLAYER using Google Tag Manager that can broke your site, Cart and other functionality
Disclaimer: Google tag manager belongs to Google property
For Contact: mappchero@gmail.com
I am avaible for Hire on Freelancer: Freelancer.com
I am avaible for Hire on Upwork: Upwork.com
I am avaible for Hire on Peopleperhour: Peopleperhour.com
I am avaible for Hire on Guru: Guru.com
No Fields Found.