Google Analytics 4 (GA4) Ecommerce Tracking for Commerce7

Standard

Connect Google Analytics 4 (GA4) With Commerce7 Ecommerce Tracking using Google Tag Manager

GA4 eCommerce tracking for Commerce7 allows you to track and analyze the behavior of users on your eCommerce website. With this data, you can gain insights into your customers’ purchasing patterns, track the effectiveness of marketing campaigns, and optimize your website’s design and functionality to improve conversion rates and increase revenue.

GA4 eCommerce tracking can provide a wide range of information, including the number of transactions, revenue, product performance, and user behavior leading up to a purchase. This can help you identify trends and opportunities to improve the user experience and increase sales.

Google Analytics 4 (GA4) eCommerce tracking for Commerce7 is important because it allows you to measure and analyze the performance of your eCommerce website in a comprehensive and detailed way.

GA4 eCommerce tracking provides a range of valuable insights, including:

Conversion tracking: GA4 allows you to track and measure the number of transactions, revenue, and other key performance indicators (KPIs) related to eCommerce sales. This information can help you understand how your website is performing, identify areas for improvement, and track the effectiveness of marketing campaigns.

User behavior tracking: GA4 enables you to track how users interact with your eCommerce website, including their behavior leading up to a purchase. This information can help you understand how users navigate your site, which products are most popular, and which pages are causing users to leave without making a purchase.

Audience insights: GA4 provides detailed audience insights, including demographics, interests, and behaviors. This information can help you better understand your target audience, identify opportunities for new products or services, and improve your overall marketing strategy.

Data-driven decision making: By providing a wide range of data and insights, GA4 enables you to make data-driven decisions that can help you grow your eCommerce business. This can help you optimize your website for better user experience, improve your marketing strategy, and ultimately increase sales and revenue.

Integrate Google Analytics 4 with Commerce7

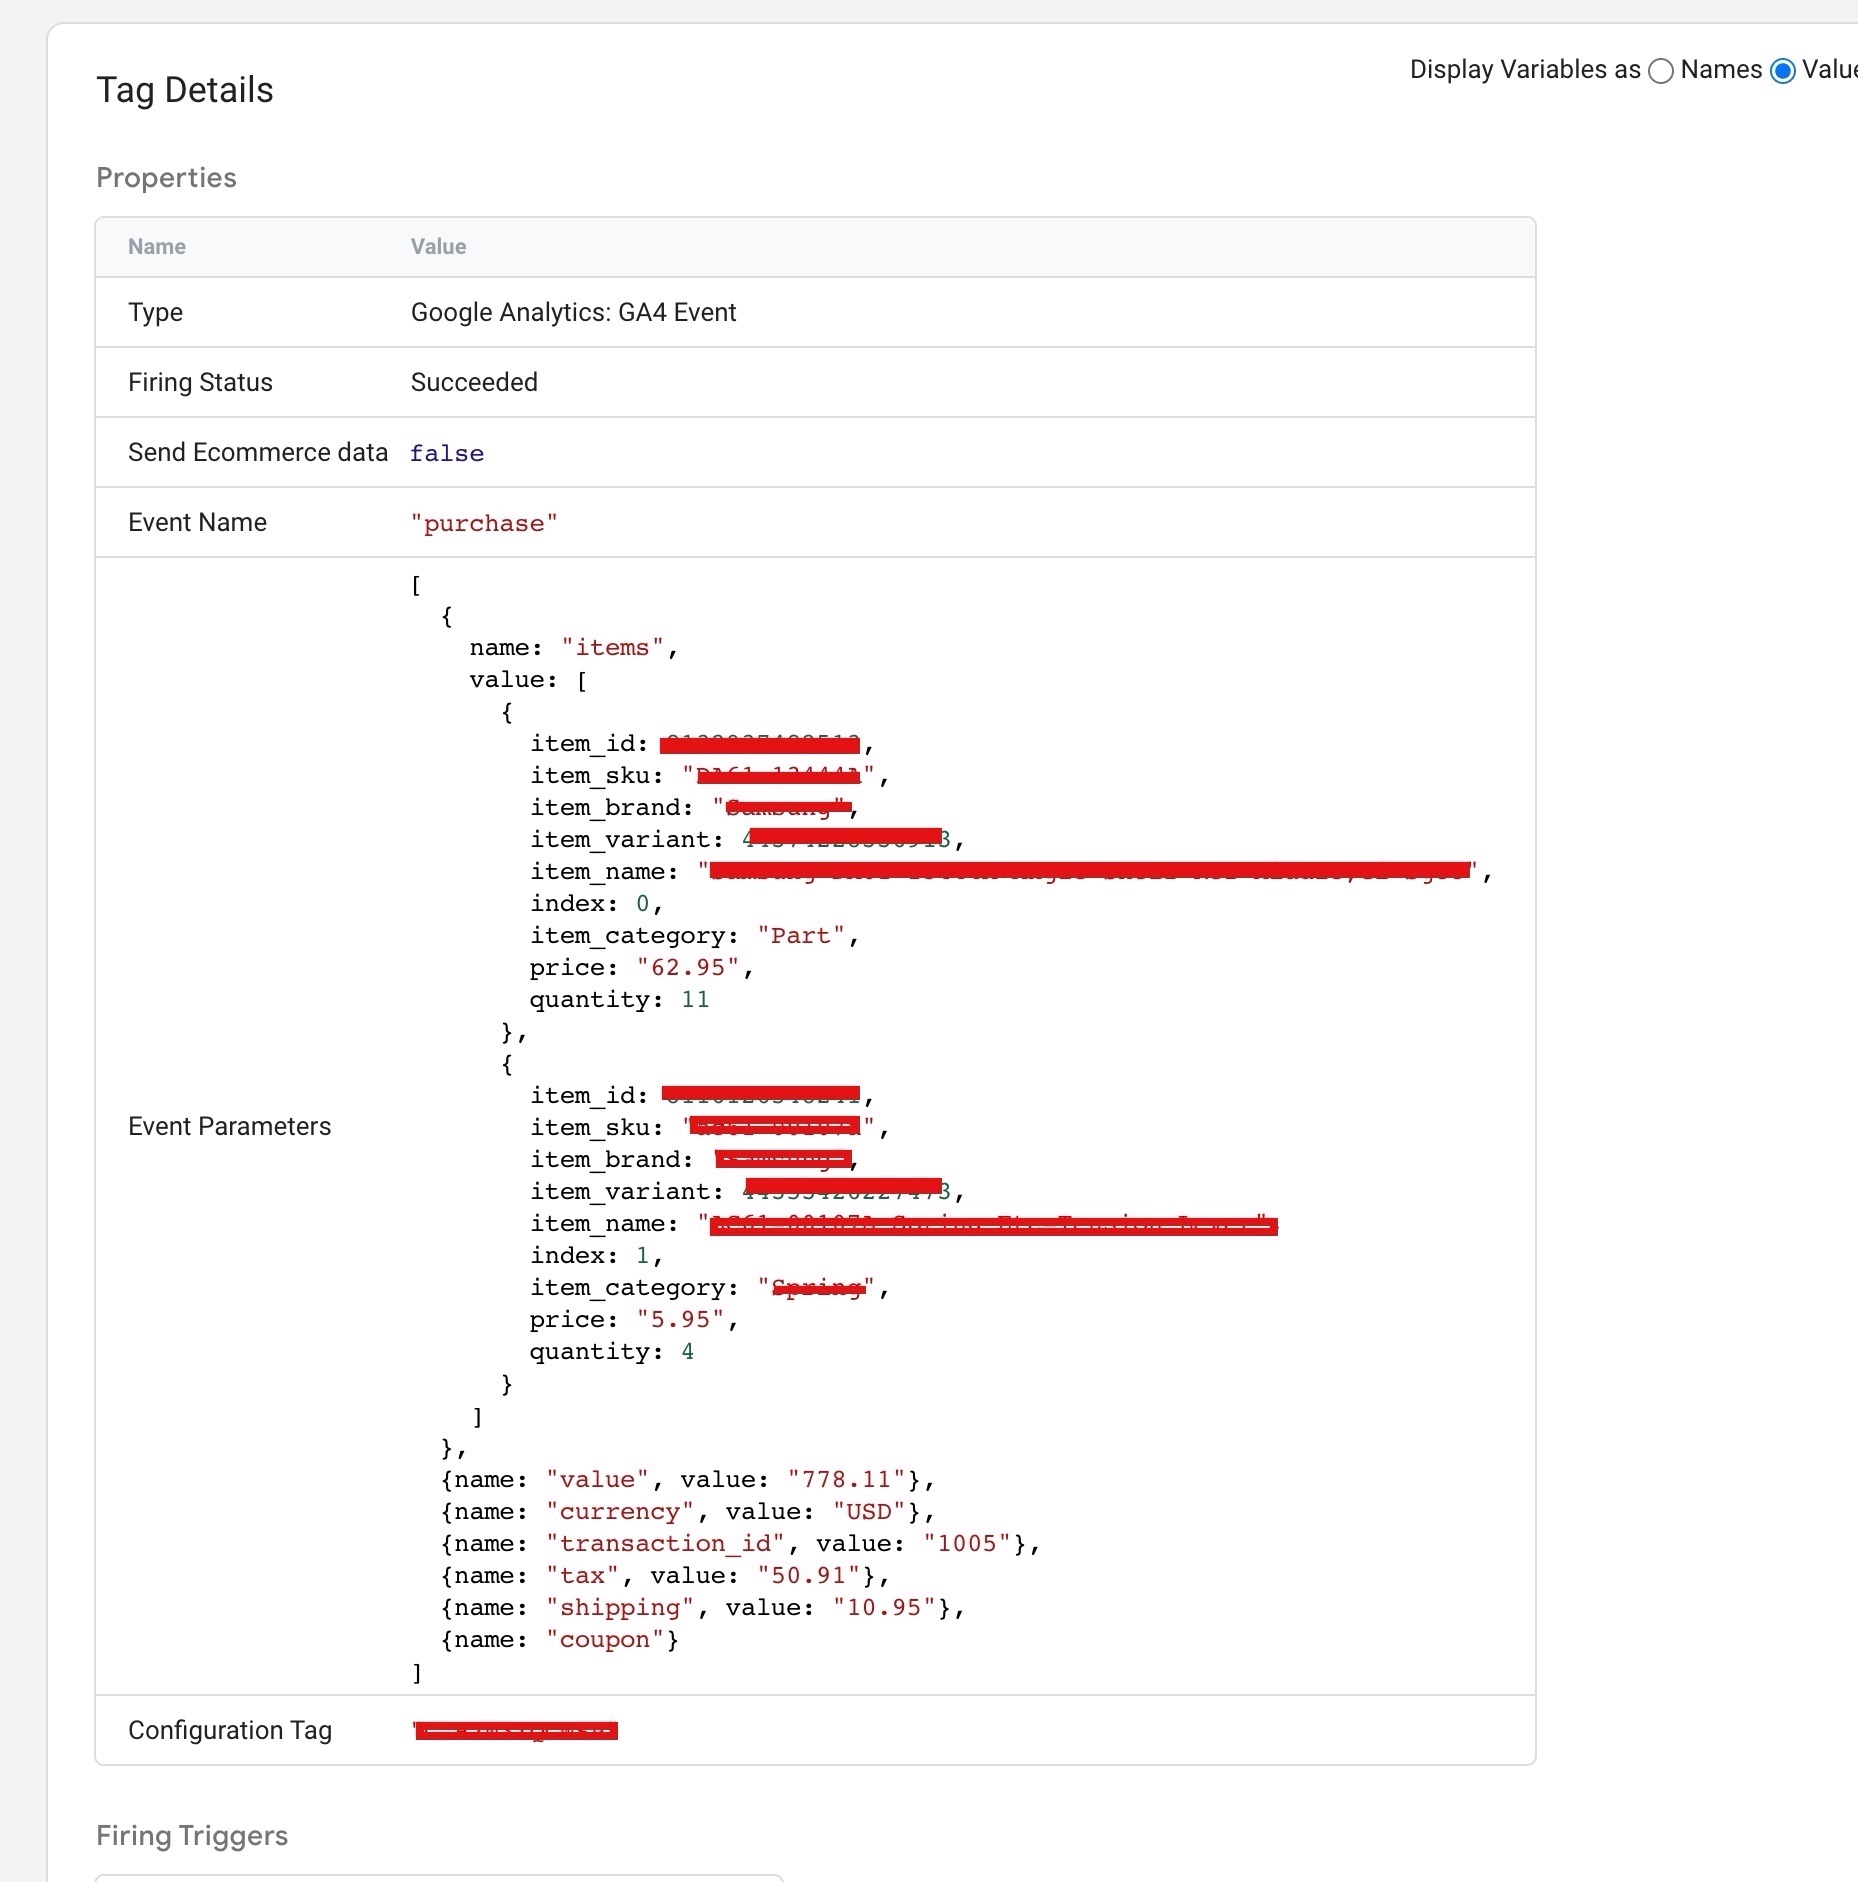
Custom Purchase Data Layers Events to Configure GA4 for Commerce7 using Google Tag Manager

Warning: If you do n’t know about javascript or do n’t have developing knowledge then do n’t try to Google Analytics 4 (GA4) Ecommerce Tracking for Commerce7 that can broke your site, Cart and other functionality 

Disclaimer: Google tag manager belongs to Google property 

For Contact: mappchero@gmail.com

I am available for Hire on Freelancer: Freelancer.com

I am available for Hire on Upwork: Upwork.com

I am available for Hire on Peopleperhour: Peopleperhour.com

I am available for Hire on Guru: Guru.com

Set Up Google Analytics 4 (GA4) eCommerce Tracking for uCommerce

Standard

Google Analytics 4 (GA4) Ecommerce Tracking for uCommerce using Google Tag Manager

GA4 eCommerce tracking for uCommerce is important because it allows you to track and analyze customer behavior on your online store. With GA4 eCommerce tracking, you can get insights into how users interact with your website, what products they view and purchase, and what steps they take in the checkout process. This information can help you optimize your online store and improve the user experience, resulting in increased sales and revenue.

Specifically, GA4 eCommerce tracking allows you to:

  1. Track customer behavior throughout the entire customer journey, from product view to purchase.

2. Monitor key metrics such as revenue, conversion rate, and average order value.

3. Analyze user behavior and optimize your website to improve the user experience and increase sales.

4. Use advanced features such as funnel analysis, user-centric analysis, and predictive metrics to gain deeper insights into customer behavior and optimize your marketing efforts.

To set up GA4 eCommerce tracking for uCommerce using a data layer in Google Tag Manager, you can follow these general steps:

  1. Create a GA4 property in Google Analytics and get the Measurement ID.

2. Install the GA4 tracking code on your uCommerce website.

3. Set up enhanced ecommerce in uCommerce and enable the GA4 tracking.

4. Add the uCommerce data layer to your website, including the relevant ecommerce events and parameters.

5. Set up a GA4 tag in Google Tag Manager, using the Measurement ID and the uCommerce data layer.

6. Set up triggers to fire the GA4 tag on relevant ecommerce events, such as product detail views, add to cart, and purchase events.

7. Test the tracking and make sure data is being sent to GA4.

8. Analyze the ecommerce data in GA4 reports to gain insights into user behavior and optimize your online store.

Using Google Tag Manager and a data layer can make the process of setting up GA4 ecommerce tracking more streamlined and flexible. The data layer allows you to capture and pass ecommerce data from uCommerce to Google Tag Manager (GTM), which can then be mapped to GA4 ecommerce events and parameters. This allows for more granular tracking and customization, as well as easier maintenance and updates in the future.

Set up GA4 ecommerce events for uCommerce

Google Analytics 4 Integration for uCommerce using Google Tag Manager 

Warning: If you do n’t know about javascript or do n’t have developing knowledge then do n’t try to Set Up Google Analytics 4 eCommerce Tracking for uCommerce that can broke your site, Cart and other functionality 

Disclaimer: Google tag manager belongs to Google property 

For Contact: mappchero@gmail.com

I am available for Hire on Freelancer: Freelancer.com

I am available for Hire on Upwork: Upwork.com

I am available for Hire on Peopleperhour: Peopleperhour.com

I am available for Hire on Guru: Guru.com

Magento Google Analytics 4 (GA4) Ecommerce Tracking using Google Tag Manager

Standard

Set Up Magento  GA4 (Google Analytics 4) eCommerce Tracking Data Layer Push Using Google Tag Manager

Magento GA4 eCommerce tracking is a method of tracking eCommerce data in Magento using Google Analytics 4 (GA4). With GA4 eCommerce tracking, you can track and analyze customer behavior and transactions on your Magento website to gain insights that can help you improve your eCommerce business.

GA4 eCommerce tracking allows you to see important metrics, such as revenue, conversion rates, and average order value, and can help you identify trends and opportunities for optimization. It also allows you to track specific user actions, such as adding items to a cart, initiating checkout, and completing purchases.

To implement GA4 eCommerce tracking in Magento, you need to set up a GA4 property in your Google Analytics account and configure the tracking code on your Magento site. This involves setting up a data layer to collect eCommerce data and creating triggers and tags to send this data to Google Analytics.

The Magento GA4 eCommerce Tracking Data Layer is a set of variables and values that contain information about customer behavior and transactions on your Magento site. This data is used to populate the eCommerce tracking events and parameters in Google Analytics 4.

To set up the data layer using Google Tag Manager (GTM), you’ll need to do the following:

  1. Install the GTM code on your Magento site.

2. Create a data layer in GTM that contains the eCommerce data you want to track. This can include information about product impressions, product detail views, add-to-carts, purchases, and more.

3. Map the data layer variables to the appropriate GA4 eCommerce tracking parameters in your GTM tags. For example, you might map the “product ID” variable in the data layer to the “item_id” parameter in your GA4 Purchase tag.

4. Test your implementation to make sure that the data is being collected and sent to Google Analytics correctly.

By setting up a Magento GA4 eCommerce Tracking Data Layer using GTM, you can easily track and analyze customer behavior and transactions on your Magento site, and gain valuable insights to improve your eCommerce business.

Implement Google Analytics 4 (GA4) on Magento using Google Tag Manager

Warning: If you do n’t know about javascript or do n’t have developing knowledge then do n’t try to Magento Google Analytics 4 (GA4) Ecommerce Tracking using Google Tag Manager that can broke your site, Cart and other functionality 

Disclaimer: Google tag manager belongs to Google property 

For Contact: mappchero@gmail.com

I am available for Hire on Freelancer: Freelancer.com

I am available for Hire on Upwork: Upwork.com

I am available for Hire on Peopleperhour: Peopleperhour.com

I am available for Hire on Guru: Guru.com

Google Analytic (GA4) BigCommerce eCommerce Tracking with Data Layer using Google Tag Manager

Standard

Tracking BigCommerce with Google Analytics 4 (GA4) eCommerce Tracking using Google Tag Manager

BigCommerce GA4 Purchase Data Layer Tracking refers to the process of capturing and sending purchase data from a BigCommerce store to Google Analytics 4 (GA4) using the ecommerce dataLayer object. The dataLayer is a JavaScript object that can be used to send data to GA4 in real-time, allowing you to track and analyze your customers’ purchase behavior, such as revenue, tax, shipping, and product details.

To track purchase data with GA4 in BigCommerce, you can populate the dataLayer with purchase information such as product IDs, names, prices, and quantities, and then trigger a purchase event using the event key. The ecommerce object can then be used to include detailed information about the purchase, such as the revenue, tax, shipping, and coupon code.

With GA4 Purchase Data Layer Tracking, you can gain valuable insights into your customers’ purchase behavior and use that information to optimize your store and marketing campaigns for better performance and increased revenue.

To track custom purchase data with GA4 in BigCommerce using Google Tag Manager, you can use the dataLayer.push method to send custom events and parameters to Google Analytics. Here are the steps:

  1. Set up a GA4 property in your Google Analytics account and get the measurement ID.

2. In Google Tag Manager, create a new tag and select the GA4 Configuration tag type. Set the measurement ID and other options as needed.

3. In BigCommerce, go to Storefront > Script Manager and create a new script.

4. In the same tag, create a new GA4 Event tag and configure it to fire on the “purchase” event.

5. In the same tag, add a new field under the “Parameters” section and set the field name to “transaction_id”. Set the value to a variable that captures the order ID, such as “ecommerce.purchase.actionField.id”.

6. Add additional fields as needed to capture other purchase data, such as “value” and “currency”. Set the values to variables that capture the corresponding data from the ecommerce purchase dataLayer.

7. Save and publish your tag.

Note that you’ll need to have the ecommerce dataLayer populated with purchase data in order for the GA4 Event tag to fire properly

Google Analytics 4 Ecommerce BigCommerce

Bigcommerce Google Analytics 4 (GA4) Ecommerce Tracking with Google Tag Manager

Warning: If you do n’t know about javascript or do n’t have developing knowledge then do n’t try to Google Analytic (GA4) BigCommerce eCommerce Tracking with Data Layer using Google Tag Manager that can broke your site, Cart and other functionality 

Disclaimer: Google tag manager belongs to Google property 

For Contact: mappchero@gmail.com

I am available for Hire on Freelancer: Freelancer.com

I am available for Hire on Upwork: Upwork.com

I am available for Hire on Peopleperhour: Peopleperhour.com

I am available for Hire on Guru: Guru.com

Lightspeed eCom Google Analytics 4 (GA4) eCommerce Tracking without Modules/Plug in

Standard

Google Analytic 4 for Lightspeed GA4 eCommerce Tracking without moudules/Plug in using Google Tag Manager Data Layer 

Lightspeed eCom is an eCommerce platform that enables businesses to set up and manage online stores. It is part of the Lightspeed POS family of products, which includes point-of-sale software and other solutions for retail, restaurant, and hospitality businesses.

Lightspeed eCom offers a range of features and tools to help businesses create and customize their online stores, manage inventory and orders, and provide a seamless shopping experience for their customers. The platform includes features such as responsive themes, product management, order management, inventory tracking, and integrations with popular payment and shipping providers.

With Lightspeed eCom, businesses can sell online through their own website, social media platforms, marketplaces such as Amazon and eBay, and in-store with Lightspeed’s point-of-sale software. The platform is designed to be user-friendly and scalable, making it suitable for businesses of all sizes and industries.

Lightspeed eCom Google Analytics 4 (GA4) eCommerce tracking allows you to track important data related to your online store, such as revenue, transactions, and product performance. Here are the steps to set up GA4 eCommerce tracking for Lightspeed eCom:

  1. Create a new GA4 property in your Google Analytics account.

2. Obtain the Measurement ID for your GA4 property.

3. Go to your Lightspeed eCom account and navigate to the “Integrations” section.

4. Enter your GA4 Measurement ID in the “Google Analytics 4” field and save the changes.

5. Verify that your GA4 tracking code is installed on your website.

6. Verify that eCommerce tracking is enabled in your GA4 property.

7. Test your eCommerce tracking to ensure it is working correctly. 

Once you have set up GA4 eCommerce tracking for Lightspeed eCom, you will be able to track important metrics such as revenue, transactions, and product performance.

eCommerce Tracing for lightspeed ga4

Migrating Google Universal Analytics to Google Analytics 4 to Setup Lightspeed eCommerce Tracking without Modules/Plug in using Google Tag Manager

Warning: If you do n’t know about javascript or do n’t have developing knowledge then do n’t try to Lightspeed eCom Google Analytics 4 (GA4) eCommerce Tracking without Modules/Plug in that can broke your site, Cart and other functionality 

Disclaimer: Google tag manager belongs to Google property 

For Contact: mappchero@gmail.com

I am available for Hire on Freelancer: Freelancer.com

I am available for Hire on Upwork: Upwork.com

I am available for Hire on Peopleperhour: Peopleperhour.com

I am available for Hire on Guru: Guru.com

Google Analytics 4 (GA4) eCommerce Tracking for HikaShop without a Plugin

Standard

Integration Google Analytics 4 (GA4) HikaShop eCommerce Tracking for HikaShop without a Plugin

To track HikaShop eCommerce data in Google Analytics 4 using Google Tag Manager (GTM) without using modules or plugins, you can set up custom events and triggers in GTM.

First, create custom events in GTM for each eCommerce action you want to track (e.g. add to cart, purchase, etc.) and define the relevant parameters for each event (e.g. product ID, quantity, price, etc.).

Then, use the HikaShop code to trigger the custom events when the corresponding eCommerce action occurs. You can do this by adding custom data attributes to the HTML elements that trigger the eCommerce actions (e.g. add to cart button) and using these attributes to fire the appropriate GTM event.

Next, create triggers in GTM to listen for the custom data attributes and fire the corresponding custom events. For example, you might create a trigger that fires the “Add to Cart” custom event when the “data-hikashop-product-id” attribute is present on the “Add to Cart” button.

Finally, set up a GA4 tag in GTM to send the custom events to GA4. You can use the “Event” parameter to map the GTM custom event names to the GA4 event names and the “Parameters” parameter to map the GTM custom event parameters to the corresponding GA4 event parameters.

This approach requires some technical expertise but allows for more flexibility and customization than using a pre-built HikaShop module or plugin for GA4 tracking.

To track HikaShop eCommerce data in Google Analytics 4 (GA4) using a data layer and Google Tag Manager (GTM) without using a HikaShop module, you can follow these steps:

Set up a data layer in HikaShop that captures eCommerce data such as product IDs, prices, and quantities. The data layer should be formatted according to GTM conventions, with an “ecommerce” object containing “purchase”, “add_to_cart”, and other relevant actions.

Create a GTM tag to track eCommerce data in GA4. Use the “Event” parameter to specify the GTM event that corresponds to the HikaShop eCommerce action (e.g. “addToCart” or “purchase”). Use the “Parameters” parameter to map the relevant data layer variables to the corresponding GA4 event parameters (e.g. “items” for product data).

Create a GTM trigger to fire the GA4 tag when the HikaShop eCommerce action occurs. Use a custom event trigger that listens for the appropriate data layer variables (e.g. “ecommerce.action” equals “addToCart”).

Test the GA4 tag by triggering an eCommerce action in HikaShop and verifying that the data is correctly passed to GA4.

Install Google Analytics 4 (GA4) on HikaShop

Connect Google Analytics 4 (GA4) on HikaShop eCommerce Tracking without a Plugin using Google Tag Manager

Warning: If you do n’t know about javascript or do n’t have developing knowledge then do n’t try to Google Analytics 4 (GA4) eCommerce Tracking for HikaShop without a Plugin that can broke your site, Cart and other functionality 

Disclaimer: Google tag manager belongs to Google property 

For Contact: mappchero@gmail.com

I am available for Hire on Freelancer: Freelancer.com

I am available for Hire on Upwork: Upwork.com

I am available for Hire on Peopleperhour: Peopleperhour.com

I am available for Hire on Guru: Guru.com

Google Analytics 4 (GA4)Tracking Virtuemart eCommerce Tracking without a Plugin

Standard

Tracking Virtuemart eCommerce Transactions in Google Analytics 4 (GA4) without a Plugin using data layer Google Tag Manager

Google Analytics 4 (GA4) Virtuemart eCommerce Tracking without Module refers to the process of tracking eCommerce events and transactions on a Virtuemart website using GA4, without relying on a separate module or plugin. This involves setting up custom event tracking in GA4 for eCommerce-related actions such as product views, adds to cart, and purchases, and using data layer variables to capture relevant information about these events. This allows website owners to gain insights into the performance of their eCommerce store, such as which products are most popular, where customers are dropping off in the purchase funnel, and how much revenue is being generated.

Ecommerce tracking in Google Analytics 4 (GA4) for Virtuemart allows website owners to monitor and analyze user behavior related to their eCommerce store. This includes tracking sales, revenue, conversion rates, and other key performance indicators (KPIs) related to eCommerce. To implement eCommerce tracking in GA4 for Virtuemart, website owners can use a combination of manual code implementation and configuring data streams to send eCommerce data to GA4. This allows businesses to gain valuable insights into how customers interact with their store and identify areas for improvement in their eCommerce strategy.

Here are the steps to set up Google Analytics 4 (GA4) Virtuemart eCommerce tracking using a data layer and Google Tag Manager:

  1. Set up a GA4 property in your Google Analytics account and obtain the Measurement ID.

2. Install the Google Tag Manager (GTM) container on your website.

3. Set up a data layer that captures relevant eCommerce data (e.g., product ID, product name, price, quantity, etc.).

4. In GTM, create a new tag and select the “Google Analytics: GA4 Configuration” tag type.

5. Configure the tag to use your GA4 Measurement ID and select the “Enhanced eCommerce” option.

6. Set up triggers that fire the tag on relevant eCommerce events (e.g., product views, add to cart, purchases, etc.).

7. Test the implementation using the Preview mode in GTM and verify that data is being sent to your GA4 property.

8. Publish the GTM container to make the implementation live.

Google Analytics 4 (GA4) Ecommerce Tracking for VirtueMart

VirtueMart eCommerce Tracking without Extension for Google Analytics 4 (GA4) with Google Tag Manager

Warning: If you do n’t know about javascript or do n’t have developing knowledge then do n’t try to Google Analytics 4 (GA4)Tracking Virtuemart eCommerce Tracking without a Plugin that can broke your site, Cart and other functionality 

Disclaimer: Google tag manager belongs to Google property 

For Contact: mappchero@gmail.com

I am available for Hire on Freelancer: Freelancer.com

I am available for Hire on Upwork: Upwork.com

I am available for Hire on Peopleperhour: Peopleperhour.com

I am available for Hire on Guru: Guru.com

Google Analytics 4 (GA4) eCommerce Tracking for Joomla without a plugin

Standard

Track Joomla eCommerce using Google Analytics 4 (GA4) without a plugin with Data layer Google Tag Manager

Google Analytics 4 eCommerce tracking on Joomla is a way to track and analyze eCommerce transactions and customer behavior on a Joomla website using Google Analytics 4.

It involves adding tracking code to the website that allows Google Analytics to collect data on eCommerce transactions, including purchase value, product performance, and customer behavior.

This can help website owners to gain insights into how their eCommerce business is performing, identify areas for improvement, and make data-driven decisions to optimize their online store.

Google Analytics 4 eCommerce tracking on Joomla can be set up without using any plugin, data layer or Google Tag Manager by adding the relevant tracking code directly to the website’s header section.

To set up Google Analytics 4 (GA4) eCommerce tracking on Joomla without any module, but using a data layer and Google Tag Manager, follow these steps:

  1. Sign in to your Google Analytics account and create a new property for your website if you haven’t done so already.

2. Install Google Tag Manager on your Joomla website by adding the Google Tag Manager container code to the header section of your website’s template. You can do this by accessing the “Template Manager” in the Joomla admin panel, selecting the template you are using, and then adding the tracking code to the “Custom Code” section.

3. Create a new tag in Google Tag Manager to track eCommerce transactions. To do this, go to the “Tags” section of your Google Tag Manager account and create a new tag with the following settings:

  • Tag type: Google Analytics: GA4 Event
  • Event name: “purchase” (or another name of your choice)
  • Parameters:
            Transaction ID: {{transactionId}}
            Value: {{transactionTotal}}
            Currency: {{transactionCurrency}}
            Items: {{transactionProducts}}

4. Create a new trigger in Google Tag Manager to fire the eCommerce transaction tag on the “Thank You” page that customers see after completing a purchase. To do this, go to the “Triggers” section of your Google Tag Manager account and create a new trigger with the following settings:

  • Trigger type: Page View
  • Configure trigger:

5. Page URL contains: “/checkout/complete” (or the URL of your “Thank You” page)
Add the data layer to your Joomla website’s checkout process by adding the following code to the “Thank You” page:

Make sure to replace the sample data in this code with the actual transaction details for your website.

Test your eCommerce tracking by placing a test order on your website and verifying that the transaction data is being recorded in your Google Analytics account. You can also use the Real-Time reports in Google Analytics 4 (GA4) to check if the tag is firing correctly.

Google Analytics 4 eCommerce Tracking for Joomla

Tracking Joomla eCommerce Transactions in Google Analytics 4 (GA4) without a plugin

Warning: If you do n’t know about javascript or do n’t have developing knowledge then do n’t try to Google Analytics 4 (GA4) eCommerce Tracking for Joomla without a plugin that can broke your site, Cart and other functionality 

Disclaimer: Google tag manager belongs to Google property 

For Contact: mappchero@gmail.com

I am available for Hire on Freelancer: Freelancer.com

I am available for Hire on Upwork: Upwork.com

I am available for Hire on Peopleperhour: Peopleperhour.com

I am available for Hire on Guru: Guru.com

Google Analytics 4 (GA4) eCommerce for Drupal without a pre-built plugin

Standard

Drupal eCommerce Tracking in Google Analytics 4 (GA4) without a pre-built plugin using Google Tag Manager

Google Analytics 4 (GA4) eCommerce Tracking can be implemented on Drupal without a pre-built plugin by adding the GA4 tracking code to the website’s code and using the Google Analytics Enhanced Measurement plugin to collect eCommerce data. This involves setting up custom events and parameters to track product views, clicks, and purchases, as well as enabling Enhanced Measurement for more accurate tracking of eCommerce actions. It may also involve creating custom reports and configuring data exports in Google Analytics.

Google Analytics 4 (GA4) is the latest version of Google’s web analytics platform. It offers eCommerce tracking features to help businesses measure and analyze their online sales performance.

To set up GA4 eCommerce tracking on Drupal without a pre-built plugin, you would need to manually add the GA4 tracking code to your website’s source code. You can use Drupal’s hook system to add custom code to your website.

Once the tracking code is installed, you would need to set up eCommerce tracking in the GA4 admin console, which involves configuring various settings and parameters to track eCommerce events and user behavior on your website.

To implement Google Analytics 4 (GA4) eCommerce tracking on Drupal using Google Tag Manager (GTM) without a plugin, you would need to do the following:

  1. Set up a GA4 property in your Google Analytics account.

2. Set up GA4 Enhanced eCommerce tracking in your GA4 property.

3. Install the GTM container code on your Drupal site.

4. Create custom dataLayer variables in GTM to capture the necessary eCommerce data, such as product names, prices, and quantities.

5. Create a GTM tag to send the eCommerce data to GA4. Use the “GA4 Event” tag type, and configure the tag to send the appropriate eCommerce parameters and values.

6. Create a GTM trigger to fire the GA4 eCommerce tag when an eCommerce transaction occurs on your site.

7. Test the GA4 eCommerce tracking implementation to ensure it is working correctly.

Set up Google Analytics 4 (GA4) on Drupal

Implement Google Analytics 4 for E-commerce on Drupal without pre-built plugin using Google Tag Manager

Warning: If you do n’t know about javascript or do n’t have developing knowledge then do n’t try to Google Analytics 4 (GA4) eCommerce for Drupal without a pre-built plugin without Plugin or Plugins that can broke your site, Cart and other functionality 

Disclaimer: Google tag manager belongs to Google property 

For Contact: mappchero@gmail.com

I am available for Hire on Freelancer: Freelancer.com

I am available for Hire on Upwork: Upwork.com

I am available for Hire on Peopleperhour: Peopleperhour.com

I am available for Hire on Guru: Guru.com

Tracking Ruby on Rails GA4 eCommerce Purchases without Plugin

Standard

Setup Ruby on Rails Google Analytics 4 (GA4) with Google Tag Manager without Plugin

Google Analytics 4 eCommerce Tracking on Ruby on Rails without a plugin refers to the process of implementing eCommerce tracking in a Ruby on Rails application using Google Analytics 4 without relying on third-party plugins or libraries.

This can be accomplished by using the Google Analytics Measurement Protocol API to send data directly to Google Analytics. To do this, developers must create HTTP requests with the appropriate parameters and send them to the Measurement Protocol endpoint.

Alternatively, Google Tag Manager can be used to implement eCommerce tracking without relying on plugins. This involves setting up a Google Tag Manager container, adding the Google Analytics 4 tag, and configuring ecommerce tracking parameters and triggers. Developers must also add data layer variables to pages and push ecommerce data to the data layer on relevant pages.

To implement Google Analytics 4 eCommerce tracking on Ruby on Rails without a plugin using Google Tag Manager, you can follow these steps:

  1. Set up a Google Tag Manager container and add the Google Analytics 4 tag to it.

2. In the Google Analytics 4 tag, enable the ecommerce tracking feature and set up your product and transaction parameters.

3. In your Ruby on Rails application, add the Google Tag Manager container code to your pages.

4. Add data layer variables to your pages that capture the necessary ecommerce data, such as product IDs, transaction IDs, and total transaction value.

5. Push the ecommerce data to the data layer on relevant pages, such as product detail pages and checkout pages.

6. Use Google Tag Manager to create triggers that fire the Google Analytics 4 tag when ecommerce events occur.

7. Test your implementation by placing test orders and verifying that the ecommerce data is being tracked correctly in Google Analytics.

Setup Ruby on Rails Google Analytics 4 (GA4)

Ruby on Rails Google Analytics 4 eCommerce Tracking Purchases without Plugin with Google Tag Manager

Warning: If you do n’t know about javascript or do n’t have developing knowledge then do n’t try to Setup Ruby on Rails Google Analytics 4 (GA4) with Google Tag Manager without Plugin or Plugins that can broke your site, Cart and other functionality 

Disclaimer: Google tag manager belongs to Google property 

For Contact: mappchero@gmail.com

I am available for Hire on Freelancer: Freelancer.com

I am available for Hire on Upwork: Upwork.com

I am available for Hire on Peopleperhour: Peopleperhour.com

I am available for Hire on Guru: Guru.com