Tracking Google Analytics 4 (GA4) Hubspot Forms Submission using Google Tag Manager

Standard

Conversions Tracking HubSpot Forms Submission in Google Analytics 4 (GA4) using Google Tag Manager

Tracking HubSpot Form Submissions in Google Analytics 4 (GA4) allows businesses to gather valuable insights into how users interact with their forms and make data-driven decisions to improve the user experience. To track form submissions in GA4, you need to set up GA4 tracking on your website and integrate it with HubSpot forms using Google Tag Manager (GTM).

HubSpot form submissions refer to the process of filling out and submitting a form on a website that is powered by the HubSpot platform. When a user submits a form, the data they entered is collected and stored in HubSpot, where it can be used for various purposes, such as lead generation, marketing automation, and sales enablement.

To track HubSpot forms in Google Analytics 4 (GA4), you can follow these steps:

  • Create a GA4 property and a GA4 tag in Google Tag Manager (GTM).
  • Add the GA4 tag to your website.
  • Copy the HubSpot form tracking code from your HubSpot account and paste it into GTM.
  • Create a trigger in GTM to track form submissions in GA4.
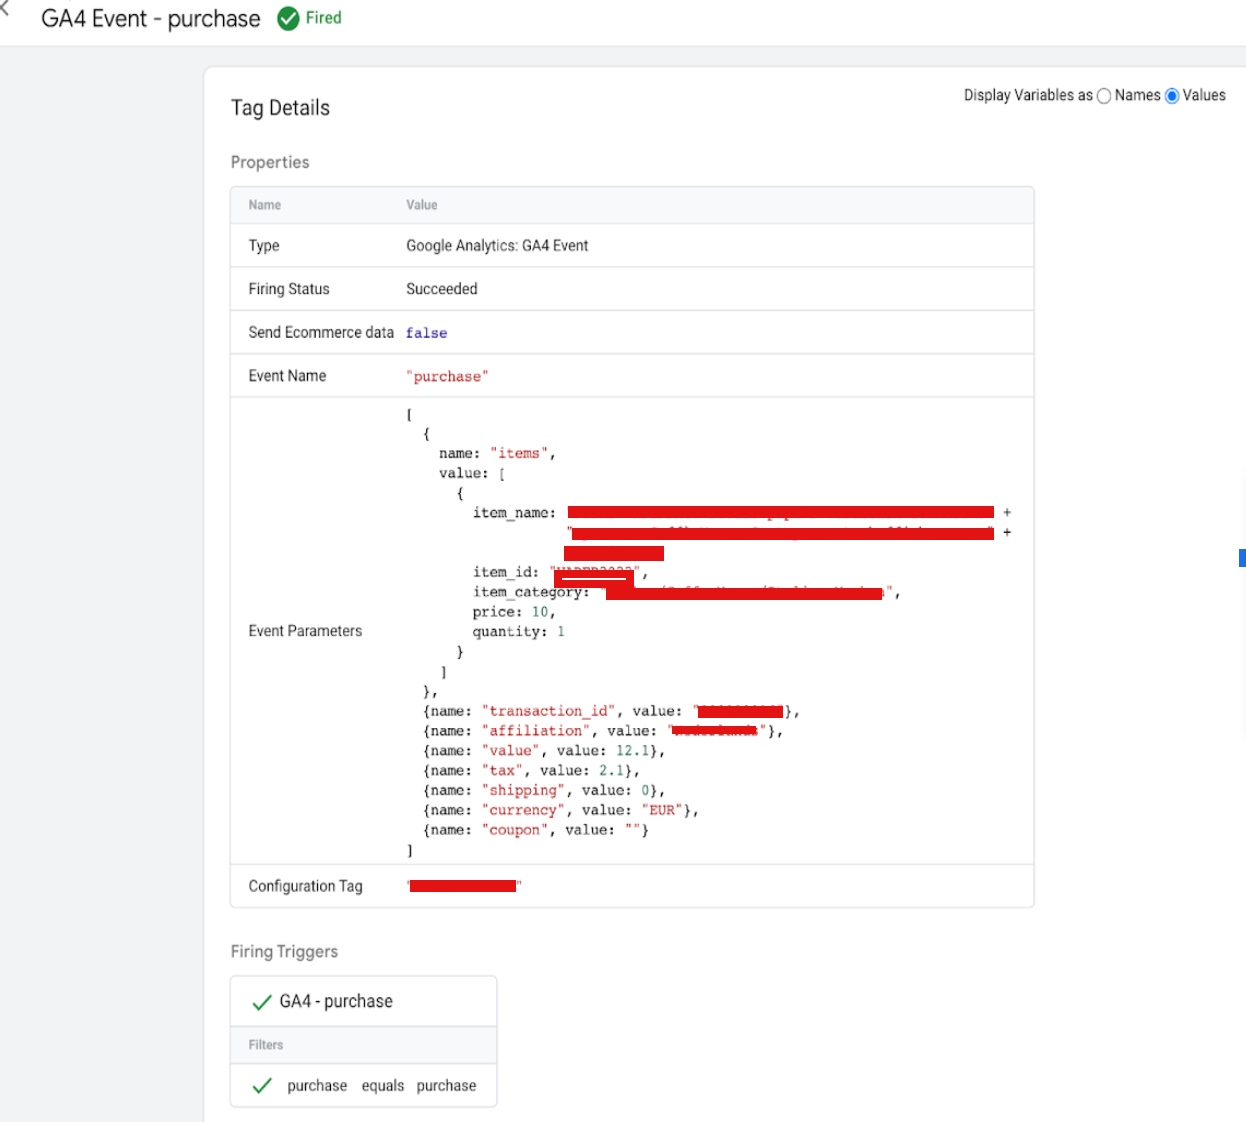
  • Test the form submissions in GA4 by navigating to the “Events” report.

Here’s an example of a trigger in GTM to track form submissions in GA4:

  • Go to GTM and click on “Triggers.”
  • Click on the “New” button to create a new trigger.
  • Give the trigger a name, such as “HubSpot Form Submission.”
  • Select “Custom Event” as the trigger type.
  • Enter “formSubmission” as the event name.
  • Save the trigger.

Here is an example of a HubSpot data layer script code that can be used to push form submission data to the data layer:

<script>
  hbspt.forms.create({
    target: '#your-form-container',
    onFormSubmit: function($form) {
      var data = {
        event: 'form_submission',
        form_id: $form.attr('id'),
        form_name: $form.find('.hs-form-name').text().trim()
      };
      window.dataLayer = window.dataLayer || [];
      window.dataLayer.push(data);
    }
  });
</script>

This script pushes a data object to the data layer when a form submission is confirmed. The data object contains information about the form ID and form name, which can be used in GTM tags and triggers.

Note: This is a basic example, and you can modify it to include additional information about the form submission such as field values, user information, and more. You will need to replace “your-portal-id” and “your-form-id” with the actual values from your HubSpot account.

Disclaimer: Google tag manager belongs to Google property 

For Contact: mappchero@gmail.com

I am available for Hire on Freelancer: Freelancer.com

I am available for Hire on Upwork: Upwork.com

I am available for Hire on Peopleperhour: Peopleperhour.com

I am available for Hire on Guru: Guru.com

Gravity Forms Submission Google Analytic 4 Event using Google Tag Manager

Standard

Track Gravity Forms Google Analytic 4 (GA4) With Google Tag Manager

Gravity Forms Tracking refers to the process of collecting and analyzing data about form submissions made using the Gravity Forms plugin for WordPress. This data can be used to gain insights into how users interact with your forms, such as the number of submissions, form fields that are being used, and common user paths. The tracking data can be used to optimize and improve the user experience, making it easier for users to complete forms and providing you with valuable insights into your website and audience. There are different methods to track Gravity Forms submissions, such as using Google Analytics, Google Tag Manager, custom code, or built-in tracking features within Gravity Forms.

GA4 Gravity Forms Tracking refers to the process of tracking Gravity Forms submissions in Google Analytics 4 (GA4). This allows you to gather information about form submissions and use that data to gain insights into how users interact with your forms. By tracking form submissions in GA4, you can see how many submissions were made, which form fields were used, and common user paths, among other things. This information can be used to optimize and improve the user experience, making it easier for users to complete forms and providing you with valuable insights into your website and audience. To track Gravity Forms submissions in GA4, you can use the Gravity Forms Google Analytics Add-On or a custom solution that integrates GA4 with Gravity Forms.

To use the Gravity Forms Data Layer script with Google Tag Manager (GTM), you can follow these steps:

  • Create a GTM container.
  • Install the GTM code on your WordPress website.
  • Create a data layer variable in GTM to access the Gravity Forms data.
  • Use the Gravity Forms Data Layer script to push form submission data to the data layer.
  • Create a tag in GTM to track the form submissions.
  • Verify the form submissions in Google Analytics 4 (GA4)by navigating to the “Events” report.

By using the Gravity Forms Data Layer script with GTM, you can access detailed information about form submissions and use it to create custom tags and triggers to track specific events and activities.

Here is an example of a Gravity Forms data layer script code that can be used to push form submission data to the data layer:

<script>
  if (!isReload) {
    var data = {
      event: 'form_submission',
      form_id: formId,
      form_name: jQuery('#gform_' + formId + ' .gform_title').text().trim()
    };
    window.dataLayer = window.dataLayer || [];
    window.dataLayer.push(data);
  }
});
</script>

This script pushes a data object to the data layer when a form submission is confirmed. The data object contains information about the form ID and form name, which can be used in GTM tags and triggers.

Note: This is a basic example, and you can modify it to include additional information about the form submission such as field values, user information, and more.

Disclaimer: Google tag manager belongs to Google property 

For Contact: mappchero@gmail.com

I am available for Hire on Freelancer: Freelancer.com

I am available for Hire on Upwork: Upwork.com

I am available for Hire on Peopleperhour: Peopleperhour.com

I am available for Hire on Guru: Guru.com

Set Up a Google Analytic 4 (GA4) Form Submission Conversion With Google Tag Manager

Standard

Track Form Submissions Conversion Using Google Analytics 4 (GA4) With Google Tag Manager

GA4 form submission refers to the tracking of form submissions in Google Analytics 4 (GA4). GA4 is the latest version of Google’s web analytics tool, and it allows you to track form submissions as events in real-time. This provides you with valuable data about the effectiveness of your forms and helps you make data-driven decisions to optimize your forms and improve your results.

To track form submissions in GA4, you need to install the GA4 tracking code on your website and create a conversion goal in GA4 based on the form submission event. You can also use Google Tag Manager to send the form submission data to GA4 and improve the accuracy of your tracking.

By tracking form submissions in GA4, you can see how many form submissions were made, what their values were, and which pages and campaigns generated the most form submissions. This information can help you make data-driven decisions to improve your forms, increase conversions, and ultimately drive more success for your business.

To set up a GA4 form submission conversion with Google Tag Manager, follow these steps:

  • Create a GA4 property: If you haven’t already done so, create a GA4 property in Google Analytics and install the GA4 tracking code on your website.
  • Set up a trigger in GTM: In Google Tag Manager, create a trigger that will fire when the form is submitted. This trigger will typically be based on a DOM event, such as “Form Submission.”
  • Create a GA4 event tag: In Google Tag Manager, create a GA4 event tag that will send the form submission data to GA4. Configure the tag to use the trigger you created in step 2, and set the event category, action, and label to reflect the form submission.
  • Set up the conversion in GA4: In GA4, create a conversion goal based on the form submission event. Make sure that the conversion goal is set up to track form submissions as events, not pageviews.
  • Preview and publish: Preview the GTM container to make sure the form submission data is being sent to GA4 correctly. If everything looks good, publish the container to make the form submission conversion tracking live on your website.
  • Verify the conversion data: In GA4, verify that the form submissions are being tracked as conversions. This data will be available in the Conversions report, which will show you how many form submissions were recorded and what their values were.

By following these steps, you should be able to set up form submission conversion tracking in GA4 using Google Tag Manager.

Warning: If you do n’t know about javascript or do n’t have developing knowledge then do n’t try to Set Up a Google Analytic 4 (GA4) Form Submission Conversion With Google Tag Manager that can broke your site, Cart and other functionality 

Disclaimer: Google tag manager belongs to Google property 

For Contact: mappchero@gmail.com

I am available for Hire on Freelancer: Freelancer.com

I am available for Hire on Upwork: Upwork.com

I am available for Hire on Peopleperhour: Peopleperhour.com

I am available for Hire on Guru: Guru.com

Ninja Form Submission Google Analytic 4 Event using Google Tag Manager

Standard

Set Up Ninja Forms Submission Event Google Analytic 4 (GA4) Tracking using Google Tag Manager

Tracking Ninja Forms conversions allows you to measure the effectiveness of your forms in converting visitors into leads or customers. There are several ways to track Ninja Forms conversions, including using Google Tag Manager (GTM) and Google Analytics 4 (GA4), and using JavaScript events.

With GTM, you can create a “Form Submission” trigger that fires when a Ninja Form is submitted, and then create a tag for the appropriate tracking code (such as Google Analytics or GA4) that fires on that trigger.

With GA4, you can use the “nfFormSubmit” event to track Ninja Forms conversions. This event is triggered when a form is submitted, and you can add GA4 event tracking code to run when the event is fired.

In both cases, you need to make sure that the tracking code is installed on your site and the script runs after the GA4 tracking code.

To track Ninja Forms conversions with Google Analytics 4 (GA4) using JavaScript events, you can use the “nfFormSubmit” event that is triggered when a form is submitted. Here’s an example of how you can set this up:

  1. Add the following JavaScript code to your Google Tag Manager 
document.addEventListener( 'nfFormSubmit', function( event ) {
    'event_category': 'Form',
    'event_label': 'Ninja Form'
  });
}, false );

Replace ‘event_category’ and ‘event_label’ values with the appropriate value for your implementation. Make sure that GA4 tracking code is installed on your site and the script runs after the GA4 tracking code. Once you have added the tracking code, the “nfFormSubmit” event will fire whenever a Ninja Form is submitted, and the GA4 event code will run.

Warning: If you do n’t know about javascript or do n’t have developing knowledge then do n’t try to Ninja Form Submission Google Analytic 4 Event using Google Tag Manager that can broke your site, Cart and other functionality 

Disclaimer: Google tag manager belongs to Google property 

For Contact: mappchero@gmail.com

I am available for Hire on Freelancer: Freelancer.com

I am available for Hire on Upwork: Upwork.com

I am available for Hire on Peopleperhour: Peopleperhour.com

I am available for Hire on Guru: Guru.com

Create a Remarketing Audience in Google Analytics 4 (GA4)

Standard

Built a Custom Remarketing Audience with Google Ads in Google Analytics 4 (GA4)

In Google Analytics 4 (GA4), an Audience is a group of users who share similar characteristics or behavior. Audiences can be created based on different criteria, such as demographics, interests, or engagement. Audiences can be used to better understand your users and to create targeted marketing campaigns.

There are two types of Audiences in GA4:

  1. Predefined Audiences: These are audiences that are automatically created by GA4 based on certain criteria, such as users who have made a purchase or users who have visited the website from a specific geographic location.

2. Custom Audiences: These are audiences that you create yourself based on any combination of user properties and events. For example, you could create an audience of users who have viewed a specific page on your website or who have a certain value for a user property.

Once you have created an audience, you can use it to analyze the behavior and characteristics of that group of users and to create targeted marketing campaigns. You can also use audiences to create segments in GA4, which allow you to compare the behavior of different groups of users.

Audiences can be used in conjunction with GA4’s new feature such as Smart Goals, that helps you to understand your website’s conversion rate and to optimize your marketing campaigns. Additionally, you can use GA4’s integration with Google Ads to create targeted ads that reach specific audiences.

Creating an audience in Google Analytics 4 (GA4) is a way to segment and group users based on certain characteristics, such as behavior or demographics. This can be done by using the Audiences feature in the GA4 property. Here are the steps to create an audience:

  1. Go to the GA4 property and select the Audiences tab from the navigation menu.

2. Click the “+ Create Audience” button.

3. Select the type of audience you want to create. There are several options, including based on behavior, demographics, or custom criteria.

4. Define the audience by setting the criteria for inclusion. For example, if you’re creating an audience of users who have made a purchase on your website, you can set the criteria to include users who have completed a purchase event.

5. Give your audience a name and save it.

6. You can now use this audience to segment your reports and analyze the behavior of users within that audience. Additionally, you can use this audience to retargeting or personalize your marketing campaigns.

Warning: If you do n’t know about javascript or do n’t have developing knowledge then do n’t try to Create a Remarketing Audience in Google Analytics 4 (GA4) that can broke your site, Cart and other functionality 

Disclaimer: Google tag manager belongs to Google property 

For Contact: mappchero@gmail.com

I am available for Hire on Freelancer: Freelancer.com

I am available for Hire on Upwork: Upwork.com

I am available for Hire on Peopleperhour: Peopleperhour.com

I am available for Hire on Guru: Guru.com


Install Google Analytics 4 (GA4) on Squarespace

Standard

Switch to Google Analytics 4 on a Squarespace using Google Tag Managaer

Google Analytics 4 (GA4) is a new version of Google Analytics that replaces the Universal Analytics (UA) tracking code. GA4 is designed to provide a more integrated and user-friendly experience for tracking website and app data, and includes new features such as cross-device tracking, automated insights, and enhanced ecommerce tracking.

Squarespace is a web content management and website building platform. It provides users with an intuitive drag-and-drop interface for building websites, as well as powerful e-commerce tools for creating online stores. Squarespace offers a range of templates and design options, making it easy for users to create a unique and professional-looking website without the need for coding skills. The platform also includes features such as analytics, SEO optimization, and integrated hosting, making it a complete solution for website creation and management. Squarespace is widely used by individuals, small businesses, and organizations for creating and managing websites for personal, portfolio, and e-commerce purposes.

To install Google Analytics 4 (GA4) on Squarespace:

  1. Create a GA4 property in your Google Analytics account.
  2. Copy the GA4 tracking code from the GA4 property in Google Analytics.
  3. Log into Squarespace and navigate to the “Settings” panel.
  4. Click on “Advanced” and then “Code Injection”.
  5. Paste the GA4 tracking code into the “Header” code injection section.
  6. Save the changes.
  7. Verify the installation by checking the real-time reports in GA4.

To enable ecommerce tracking in Google Analytics 4 (GA4) on Squarespace:

he Squarespace data layer is a JavaScript object that provides information about the content, behavior, and context of a website. The data layer is designed to provide a common interface for passing data between the website and various marketing and analytics tools, including Google Analytics.

The data layer collects information about page views, product information, and events, and makes this data available to other tools through a standardized format. This allows website owners to track and analyze user behavior on their site, and use this information to make informed decisions about website optimization and marketing campaigns.

The Squarespace data layer is implemented on a site-by-site basis, and can be customized to meet the specific needs of each website. To use the data layer, a website owner would typically install the necessary tracking code and configure their analytics or marketing tools to receive data from the data layer.

Warning: If you do n’t know about javascript or do n’t have developing knowledge then do n’t try to Install Google Analytics 4 (GA4) on Squarespace without module that can broke your site, Cart and other functionality 

Disclaimer: Google tag manager belongs to Google property 

For Contact: mappchero@gmail.com

I am available for Hire on Freelancer: Freelancer.com

I am available for Hire on Upwork: Upwork.com

I am available for Hire on Peopleperhour: Peopleperhour.com

I am available for Hire on Guru: Guru.com


Google Analytics 4 (GA4) Enhanced Ecommerce Tracking for VirtueMart

Standard

 Google Analytics 4 Enhanced Ecommerce Tracking for VirtueMart using Google Tag Manager

VirtueMart GA4 ecommerce tracking refers to the process of tracking and analyzing customer behavior on an ecommerce website using Google Analytics 4 (GA4) and the VirtueMart e-commerce platform. VirtueMart is an open-source e-commerce solution for Joomla! websites, it allows you to create and manage an online store.

To enable GA4 ecommerce tracking on a VirtueMart website, you will need to set up a GA4 property and add the GA4 tracking code to your website. You can then use GA4 events and enhanced ecommerce tracking to track user behavior, conversion, and revenue on your VirtueMart website.

Integrate GA4 tracking with your VirtueMart website. These data Layer will typically allow you to easily add the GA4 tracking code to your website and provide additional features for tracking ecommerce data in GA4.

Install the GA4 tracking code on your website by following the instructions in the GA4 setup wizard.

  1. Create a GA4 ecommerce tracking data layer variable in GTM by going to the “Variables” section and clicking on the “New” button. Select the “Data Layer Variable” option and enter the name of the variable that will be used to store the ecommerce data (e.g. “transactionData”).

2. Install the GA4 ecommerce tracking data lalyer  for VirtueMart 

3. Configure the plugin by entering your GA4 tracking ID and setting other options such as currency and transaction data. The data layer GA4 should push the transaction data to the data layer variable you created in step 2.

4. Create a GA4 ecommerce tracking tag in GTM by going to the “Tags” section and clicking on the “New” button. Select the “GA4 Configuration” tag type and enter your GA4 tracking ID. In the “Tracking” section, select the “Ecommerce” option and enter the data layer variable name you created in step 2 (e.g. “transactionData”).

5. Test the ecommerce tracking by making a purchase on your website and checking the “Conversions” > “Ecommerce” section in GA4 to see if the transaction data is being collected correctly.

After ensuring that the ecommerce tracking is working correctly, you can set up goals and segments in GA4 to analyze and optimize your ecommerce performance.

Conversion Tracking for VirtueMart

Add Google Analytics 4 (GA4) With VirtueMart

Warning: If you do n’t know about javascript or do n’t have developing knowledge then do n’t try to Google Analytics 4 (GA4) Enhanced Ecommerce Tracking for VirtueMart without module that can broke your site, Cart and other functionality 

Disclaimer: Google tag manager belongs to Google property 

For Contact: mappchero@gmail.com

I am available for Hire on Freelancer: Freelancer.com

I am available for Hire on Upwork: Upwork.com

I am available for Hire on Peopleperhour: Peopleperhour.com

I am available for Hire on Guru: Guru.com


GA4 Event Track Contact Form 7 with Google Tag Manager

Standard

GA4 Event Contact Form 7 Event Tracking with Google Tag Manager

Tracking Contact Form 7 conversions allows you to measure the effectiveness of your forms in converting visitors into leads or customers. There are several ways to track Contact Form 7 conversions, including using Google Tag Manager (GTM) and Google Analytics 4 (GA4), and using JavaScript events.

With GTM, you can create a “Form Submission” trigger that fires when a Contact Form 7 form is submitted, and then create a tag for the appropriate tracking code (such as Google Analytics or GA4) that fires on that trigger.

With GA4, you can use the “wpcf7submit” event to track Contact Form 7 conversions. This event is triggered when a form is submitted, and you can add GA4 event tracking code to run when the event is fired.

To track Contact Form 7 conversions with Google Analytics 4 (GA4) using JavaScript events, you can use the “wpcf7submit” event that is triggered when a form is submitted. Here’s an example of how you can set this up:

  1. Add the following JavaScript code to your WordPress site using Google Tag Manager
document.addEventListener( 'wpcf7submit', function( event ) {
  // Your tracking code here
}, false );

2. Replace “// Your tracking code here” with the appropriate tracking code for the service you are using. For example, if you are using Google Analytics, you can add the following code:

ga('send', 'event', 'Form', 'submit', 'Contact Form 7');

3. Make sure that GA4 tracking code is installed on your site and the script runs after the GA4 tracking code.

4. Once you have added the tracking code, the “wpcf7submit” event will fire whenever a Contact Form 7 form is submitted, and the GA4 event code will run.

Warning: If you do n’t know about javascript or do n’t have developing knowledge then do n’t try to GA4 Event Contact Form 7 Event Tracking with Google Tag Manager without module that can broke your site, Cart and other functionality 

Disclaimer: Google tag manager belongs to Google property 

For Contact: mappchero@gmail.com

I am available for Hire on Freelancer: Freelancer.com

I am available for Hire on Upwork: Upwork.com

I am available for Hire on Peopleperhour: Peopleperhour.com

I am available for Hire on Guru: Guru.com

Volusion Google analytics4 (GA4) eCommerce Tracking

Standard

Setup Google Analytics 4 (GA4) Enhanced E-commerce Tracking on Volusion using Google Tag Manager

In order to track eCommerce purchases on a Volusion website using Google Analytics 4 (GA4), you will need to set up an event with the event name “purchase”. This can be done by creating a new event in your GA4 property, and configuring it to track when a purchase is made on your website. You will also need to add the appropriate tracking code to your Volusion website, which will allow GA4 to collect data on the purchase event.

You can also add the purchase event in the Volusion platform by adding the GA4 tracking code to your store and configuring it to send events for purchase. The event name for purchase should be set as ‘purchase’ or ‘transaction’ in order to identify the purchase event in GA4.

A data layer is a concept used in Google Analytics 4 (GA4) to collect and organize data from a website. In the case of a Volusion website, the data layer is a JavaScript object that is used to pass information about the website and its visitors to GA4. This information can include details about the page being viewed, the products being viewed or purchased, and any other relevant information about the user’s interactions with the website.

To implement a data layer on a Volusion website, you will need to create a JavaScript object that contains the data you want to collect, and then add it to the website’s code. This can be done by adding the data layer code to the website’s global script, or by adding it to specific pages or templates as needed.

Once the data layer is in place, it can be used to send data to GA4 by using the GA4 tracking code. This will allow you to track and analyze the data in GA4, such as product data, purchase data, user data, and more.

In order to track eCommerce transactions on a Volusion website using Google Analytics 4 (GA4), you will need to add the GA4 tracking code to your website and configure it to send eCommerce data to GA4. This process typically involves the following steps:

  • Create a GA4 property for your website if you haven’t already done so.
  • Get the GA4 tracking code for your website by going to the GA4 property and clicking on the “Admin” button.
  • Add the GA4 tracking code to the header of your Volusion website. This can be done by editing the global script or by adding the code to specific pages or templates as needed.
  • Once the GA4 tracking code is in place, you will need to configure it to send eCommerce data to GA4. This can be done by setting up eCommerce tracking in the GA4 property, and by adding eCommerce tracking code to your Volusion website.
  • Make sure that you have implemented the data layer correctly in order to send the eCommerce data correctly to GA4
  • Test the tracking by making a purchase on your website and then verifying the data in the GA4 property.

When implementing eCommerce tracking on a Volusion website using Google Analytics 4 (GA4), it’s important to include specific data layer variables in order to send the correct information to GA4. These variables should be included in the data layer JavaScript object that is used to pass information about the website and its visitors to GA4.

The specific data layer variables that should be included for eCommerce tracking on a Volusion website include:

ecommerce“: This variable should be set to an object that contains information about theeCommerce transaction, such as the transaction ID, revenue, and any relevant product information.

event“: This variable should be set to “purchase” in order to indicate that a purchase has been made.

eventCallback“: This variable is a function that is called after the purchase event is sent to GA4.

eventTimeout“: This variable is used to specify the amount of time, in milliseconds, that the eventCallback function should wait before being called.

items“: This variable should be set to an array of objects that contain information about the products that were purchased, such as the product ID, name, price, and quantity.

These variables should be included in the data layer, and passed to GA4 using the GA4 tracking code. This will allow you to track and analyze eCommerce data in GA4, such as product data, purchase data, and user data.

Google Analytics 4 (GA4) Ecommerce Tracking in Volusion

Java Script Install Google Analytics 4 (GA4) Enhanced E-Commerce Tracking Volusion Store using Google Tag Manager

Warning: If you do n’t know about javascript or do n’t have developing knowledge then do n’t try to Volusion Google analytics4 (GA4) eCommerce Tracking without module that can broke your site, Cart and other functionality 

Disclaimer: Google tag manager belongs to Google property 

For Contact: mappchero@gmail.com

I am available for Hire on Freelancer: Freelancer.com

I am available for Hire on Upwork: Upwork.com

I am available for Hire on Peopleperhour: Peopleperhour.com

I am available for Hire on Guru: Guru.com


OpenCart Enhanced E-Commerce Tracking in Google Analytics (GA4)

Standard

In Google Analytics 4 (GA4), the OpenCart Enhanced eCommerce data layer variables are used to track specific events related to ecommerce activity on your website. These events can include things like product views, add to cart, and purchase transactions.

Here are some examples of the events that can be tracked using the GA4 OpenCart Enhanced eCommerce data layer variables:

Product View: This event is triggered when a user views a product on your website. The data layer variable may include information such as the product ID, name, and price.

Add to Cart: This event is triggered when a user adds a product to their shopping cart. The data layer variable may include information such as the product ID, name, and quantity added.

Purchase: This event is triggered when a user completes a purchase on your website. The data layer variable may include information such as the transaction ID, total revenue, and product details.

Checkout: This event is triggered when a user starts the checkout process. The data layer variable may include information such as the products in the cart, total cost and tax.

Refund: This event is triggered when a refund is processed. The data layer variable may include information such as the transaction ID, the products and the amount refunded.

When you use GA4 OpenCart Enhanced eCommerce data layer, it pushes the information from your store to the GA4 data layer object. This allows you to track ecommerce activity in GA4 and gain more detailed insights about user behavior on your website.

Here’s an example of how you can use the data layer to track a purchase event in OpenCart Enhanced E-Commerce Tracking using GA4:

dataLayer.push({
  'event': 'purchase',
  'transaction_id': '12345',
  'value': '100',
  'tax': '10',
  'shipping': '5',
  'items': [{
    'item_id': 'product1',
    'item_name': 'Product 1',
    'item_category': 'category1',
    'price': '50',
    'quantity': '1'
  },
  {
    'item_id': 'product2',
    'item_name': 'Product 2',
    'item_category': 'category2',
    'price': '30',
    'quantity': '1'
  }]
});
Google Analytics 4 Enhanced Ecommerce Tracking for OpenCart

Google Analytics 4 (GA4) Enhanced Ecommerce Tracking for OpenCart using Google Tag Manager

Warning: If you do n’t know about javascript or do n’t have developing knowledge then do n’t try to OpenCart Enhanced E-Commerce Tracking in Google Analytics (GA4) without module that can broke your site, Cart and other functionality 

Disclaimer: Google tag manager belongs to Google property 

For Contact: mappchero@gmail.com

I am available for Hire on Freelancer: Freelancer.com

I am available for Hire on Upwork: Upwork.com

I am available for Hire on Peopleperhour: Peopleperhour.com

I am available for Hire on Guru: Guru.com