Set Up Ecommerce Magento 2 GA4 (Google Analytics 4) Using Google Tag Manager

Standard

When you connect Google Analytics 4 (GA4) to your Magento 2 store, GA4 will automatically collect data on e-commerce transactions, including purchase events. The purchase event in GA4 is triggered when a user completes a purchase on your store and it’s considered a conversion event.

When a purchase is made, Magento sends the following information to GA4:

  • Product information (name, SKU, etc.)
  • Quantity
  • Revenue
  • Tax
  • Shipping costs
  • Coupon code

This information is used to populate the e-commerce reports in GA4, which provide insights into sales performance, user behavior, and revenue.

In addition, you can also set up custom purchase events in GA4 to track specific information about the purchase, such as the shipping method or payment method used.

To set up a custom purchase event in GA4, you will need to use the GA4 measurement API and the dataLayer. The dataLayer is a JavaScript object that allows you to pass information from your website or application to GA4.

The purchase event in GA4 can be tracked by triggering the ‘purchase’ event and passing the relevant information about the purchase to the dataLayer.

It is important to note that you will need to have the GA4 tracking code installed on your Magento store, and to have implemented the GA4 e-commerce tracking code on your “Thank you” page, where the purchase is confirmed.

When a purchase is made, Magento sends the following information to GA4:

  • Product information (name, SKU, etc.)
  • Quantity
  • Revenue
  • Tax
  • Shipping costs
  • Coupon code

This information is used to populate the e-commerce reports in GA4, which provide insights into sales performance, user behavior, and revenue.

In addition, you can also set up custom purchase events in GA4 to track specific information about the purchase, such as the shipping method or payment method used.

To set up a custom purchase event in GA4, you will need to use the GA4 measurement API and the dataLayer. The dataLayer is a JavaScript object that allows you to pass information from your website or application to GA4.

The purchase event in GA4 can be tracked by triggering the ‘purchase’ event and passing the relevant information about the purchase to the dataLayer.

It is important to note that you will need to have the GA4 tracking code installed on your Magento 2 store, and to have implemented the GA4 e-commerce tracking code on your “Thank you” page, where the purchase is confirmed.

Magento 2 Google Analytics 4 (GA4)

Set Up Magento 2 GA4 (Google Analytics 4) Using Google Tag Manager

Warning: If you do n’t know about javascript or do n’t have developing knowledge then do n’t try to Set Up Ecommerce Magento 2 GA4 (Google Analytics 4) Using Google Tag Manager that can broke your site, Cart and other functionality 

Disclaimer: Google tag manager belongs to Google property 

For Contact: mappchero@gmail.com

I am available for Hire on Freelancer: Freelancer.com

I am available for Hire on Upwork: Upwork.com

I am available for Hire on Peopleperhour: Peopleperhour.com

I am available for Hire on Guru: Guru.com

Google Analytics (GA4) Ecommerce Tracking For Shopify using Google Tag Manager

Standard

Google Analytics 4 (GA4) is the latest version of Google Analytics that provides more advanced features for tracking user behavior on your website. GA4 also has built-in integration with Shopify, which allows you to easily track e-commerce transactions on your online store.

To set up GA4 tracking on your Shopify store, you will need to create a GA4 property and then connect it to your Shopify store. Once the connection is established, GA4 will automatically collect data on user behavior and e-commerce transactions on your store.

You can track various e-commerce events such as product views, add to cart, and purchase transactions. GA4 will also automatically create e-commerce reports that provide insights into user behavior and sales performance on your store.

You can also set up custom events in GA4 to track specific actions on your store, such as button clicks, form submissions, and more. This will allow you to track user interactions that are not automatically tracked by GA4 and Shopify.

It is important to note that you will need to have the GA4 tracking code installed on your Shopify store, and to have implemented the GA4 e-commerce tracking code on your “Thank you” page, where the purchase is confirmed.

When you connect Google Analytics 4 (GA4) to your Shopify store, GA4 will automatically collect data on e-commerce transactions, including purchase events. The purchase event in GA4 is triggered when a user completes a purchase on your store and it’s considered a conversion event.

When a purchase is made, Shopify sends the following information to GA4:

  • Product information (name, SKU, etc.)
  • Quantity
  • Revenue
  • Tax
  • Shipping costs
  • Coupon code

This information is used to populate the e-commerce reports in GA4, which provide insights into sales performance, user behavior, and revenue.

In addition, you can also set up custom purchase events in GA4 to track specific information about the purchase, such as the shipping method or payment method used.

To set up a custom purchase event in GA4, you will need to use the GA4 measurement API and the dataLayer. The dataLayer is a JavaScript object that allows you to pass information from your website or application to GA4.

The purchase event in GA4 can be tracked by triggering the ‘purchase’ event and passing the relevant information about the purchase to the dataLayer.


GA4 Ecommerce Tracking For Shopify

Setting up Ecommerce Google Analytics 4 (GA4) on Shopify using Google Tag Manager

Warning: If you do n’t know about javascript or do n’t have developing knowledge then do n’t try to Google Analytics (GA4) Ecommerce Tracking For Shopify that can broke your site, Cart and other functionality 

Disclaimer: Google tag manager belongs to Google property 

For Contact: mappchero@gmail.com

I am available for Hire on Freelancer: Freelancer.com

I am available for Hire on Upwork: Upwork.com

I am available for Hire on Peopleperhour: Peopleperhour.com

I am available for Hire on Guru: Guru.com

GA4 ecommerce (Google Tag Manager) Send GA4 Purchase events

Standard

To send GA4 purchase events using Google Tag Manager (GTM), you will need to set up an GA4 property, create a GA4 ecommerce tag in GTM, and configure triggers to fire the tag when a purchase event occurs on your website.

Here are the specific steps for sending GA4 purchase events using GTM:

  1. Set up an GA4 property and get the GA4 measurement ID.
  2. Create a new GA4 ecommerce tag in GTM.
  3. Configure the tag to send data to the GA4 property using the measurement ID.
  4. Set up the triggers in GTM to fire the tag when a purchase event occurs on your website, such as when a “thank you” page is loaded after a purchase is made.
  5. To make sure that your data is accurate, you should also set up variables in GTM to capture ecommerce data such as transaction id, revenue, and product data.
  6. In the GA4 ecommerce tag make sure to call the GA4 ecommerce purchase event method, this is what triggers the purchase event.
  7. Publish the container and verify that the purchase events are being sent to GA4.

When sending a purchase event to Google Analytics 4 (GA4) using the GA4 ecommerce tag in Google Tag Manager (GTM), you can include various parameters to provide more information about the purchase. The purchase event in GA4 requires the following parameters:

  • transaction_id: A unique identifier for the transaction
  • revenue: The total revenue for the transaction
  • currency: The currency of the revenue
  • items: An array of objects representing the items in the transaction, including the following properties: name, item_id, price, quantity.

Here’s an example of how you might set up the purchase event in GTM:

dataLayer.push({
  event: "purchase",
  ecommerce: {
  'transaction_id': '{{transactionId}}',
  'value': {{totalRevenue}},
  'currency': '{{currency}}',
  'items': [
    {
      'item_name': '{{itemName}}',
      'item_id': '{{itemId}}',
      'price': {{itemPrice}},
      'quantity': {{itemQuantity}}
    },
    {
      'item_name': '{{itemName2}}',
      'item_id': '{{itemId2}}',
      'price': {{itemPrice2}},
      'quantity': {{itemQuantity2}}
    }
  ]
});

In this example, the purchase event is set up to use variables in GTM to capture the transaction id, total revenue, currency, and item data. These variables can be set up in GTM to pull data from the data layer or from the website’s HTML.

GA4 eCommerce Purchase Event

Purchase Event Parameters in Google Analytics 4 (GA4) using Google Tag Manager

Warning: If you do n’t know about javascript or do n’t have developing knowledge then do n’t try to GA4 ecommerce (Google Tag Manager) Send GA4 Purchase events that can broke your site, Cart and other functionality 

Disclaimer: Google tag manager belongs to Google property  For Contact: mappchero@gmail.com

I am available for Hire on Freelancer: Freelancer.com

I am available for Hire on Upwork: Upwork.com

I am available for Hire on Peopleperhour: Peopleperhour.com

I am available for Hire on Guru: Guru.com

Remove URL Query Parameters in GA4 using Google Tag Manager

Standard

Exclude URL Query Parameters in Google Analytics 4 (GA4) using Google Tag Manager

In Google Analytics 4 (GA4), you can remove URL query parameters from your page URLs by using the “Exclude URL Query Parameters” feature. Here’s how you can set it up:

  1. Go to your GA4 property and select the “Data Streams” tab.

2. Click on the “Edit” button next to the data stream for which you want to exclude query parameters.

3. Scroll down to the “Advanced settings” section, and find the “Exclude URL Query Parameters” field.

4. In the “Exclude URL Query Parameters” field, enter the names of the query parameters you want to exclude, separated by commas. For example, if you want to exclude “utm_source” and “utm_campaign” parameters, you would enter “utm_source, utm_campaign” in the field.

5. Click the “Save” button to save your changes.

After you have set this up, GA4 will no longer include the specified query parameters in the URLs it tracks. This can help to simplify your data and make it easier to analyze. Additionally it can help to reduce the number of unique pages in your report.

It’s possible to remove URL query parameters in Google Analytics 4 (GA4) using Google Tag Manager (GTM). Here’s an overview of the process:

  1. Create a new variable in GTM, of the type “URL”, and name it “Page Path”.

2. Create a new variable of the type “Custom JavaScript” and name it “Clean URL”

3. In the “Custom JavaScript” variable, use the following code:

function(){
  var pagePath = {{Page Path}};
  var queryString = pagePath.split("?")[1];
  if(queryString){
    var params = queryString.split("&");
    var newParams = [];
    for(var i = 0; i < params.length; i++){
      var param = params[i].split("=")[0];
      if(param != "utm_source" && param != "utm_medium" && param != "utm_campaign"){
        newParams.push(params[i]);
      }
    }
    var cleanUrl = pagePath.split("?")[0] + "?" + newParams.join("&");
    return cleanUrl;
  }else{
    return pagePath;
  }
}

This code will take the current page path, split it at the “?” character, and remove any query parameters that you specify in the if statement, in this case “utm_source”, “utm_medium” and “utm_campaign”.

4. Edit your GA4 page view tag in GTM, and in the “Page” field, select the “Clean URL” variable that you just created.

5. Publish your container changes.

By doing this, you are telling GA4 to use the “Clean URL” variable as the page value, which will exclude the specified query parameters from your page URLs

It’s important to note that this process will change the way data is presented in your GA4 reports, but it will not affect your data collection, it will just help you to simplify your data and make it easier to analyze. Additionally it can help to reduce the number of unique pages in your report.

Warning: If you do n’t know about javascript or do n’t have developing knowledge then do n’t try to Remove URL Query Parameters in GA4 using Google Tag Manager for Google Tag Manager that can broke your site, Cart and other functionality 

Disclaimer: Google tag manager belongs to Google property  For Contact: mappchero@gmail.com

I am available for Hire on Freelancer: Freelancer.com

I am available for Hire on Upwork: Upwork.com

I am available for Hire on Peopleperhour: Peopleperhour.com

I am available for Hire on Guru: Guru.com

Google Analytics 4 (GA4) Enhanced Ecommerce Tracking for Google Tag Manager

Standard

Configuring Google Analytics 4 (GA4) Enhanced Ecommerce using Google Tag Manager

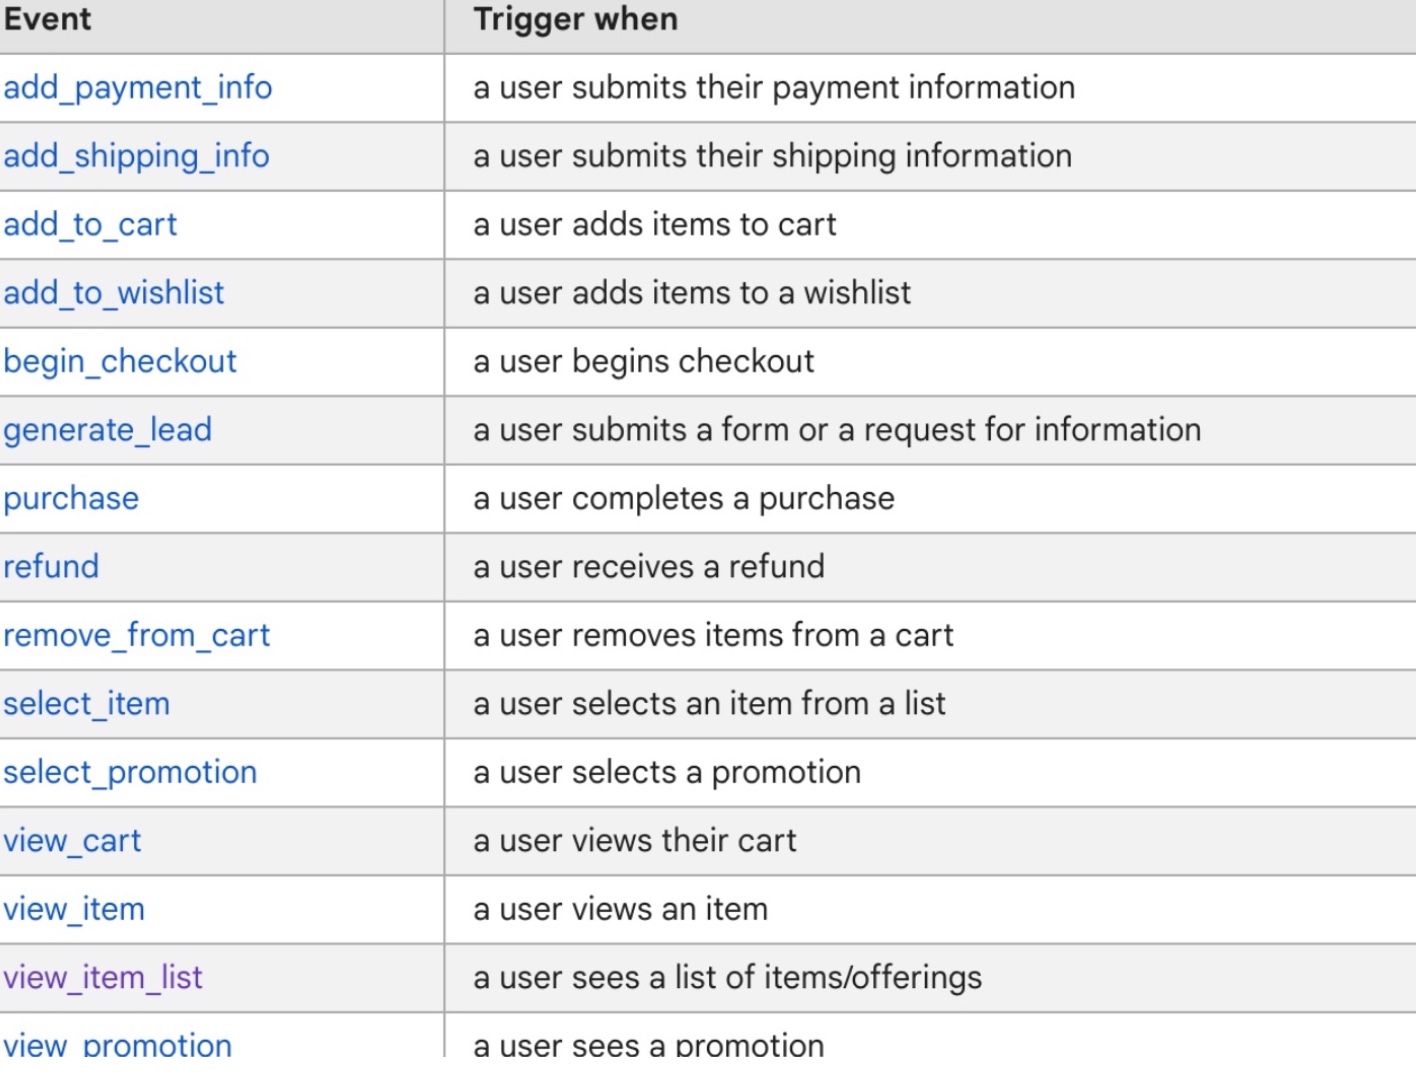
Enhanced ecommerce tracking is a feature in Google Analytics 4 (GA4) that allows businesses and website owners to track and analyze various aspects of their ecommerce performance in more detail. Some of the key features of enhanced ecommerce tracking include:

  1. Product data: GA4 allows you to track detailed information about products, such as product name, category, price, and quantity. This data can be used to analyze which products are most popular and which are driving the most revenue.

2. Shopping behavior: GA4 provides insights into how users interact with products on your website, such as add-to-cart events, product views, and checkout steps. This data can be used to optimize the user experience and increase conversions.

3. Checkout behavior: GA4 allows you to track the entire checkout process, including the steps leading up to a purchase and any issues that may arise during the checkout process. This data can be used to identify and fix common roadblocks that users encounter during checkout.

4. Refunds and returns: GA4 allows you to track refunds and returns and understand the reasons behind them.

5. Custom dimensions and metrics: GA4 allows you to create custom dimensions and metrics to track additional data points that are specific to your business. This can include data such as customer loyalty or product popularity.

6. Funnel analysis: GA4 allows you to set up and track user journeys through your website, including the steps leading up to a purchase. This can help you identify where users are dropping off in the process and make changes to improve conversions.

7. Machine learning: GA4 uses machine learning to automatically identify and alert you to important insights in your data, such as sudden changes in customer behavior.

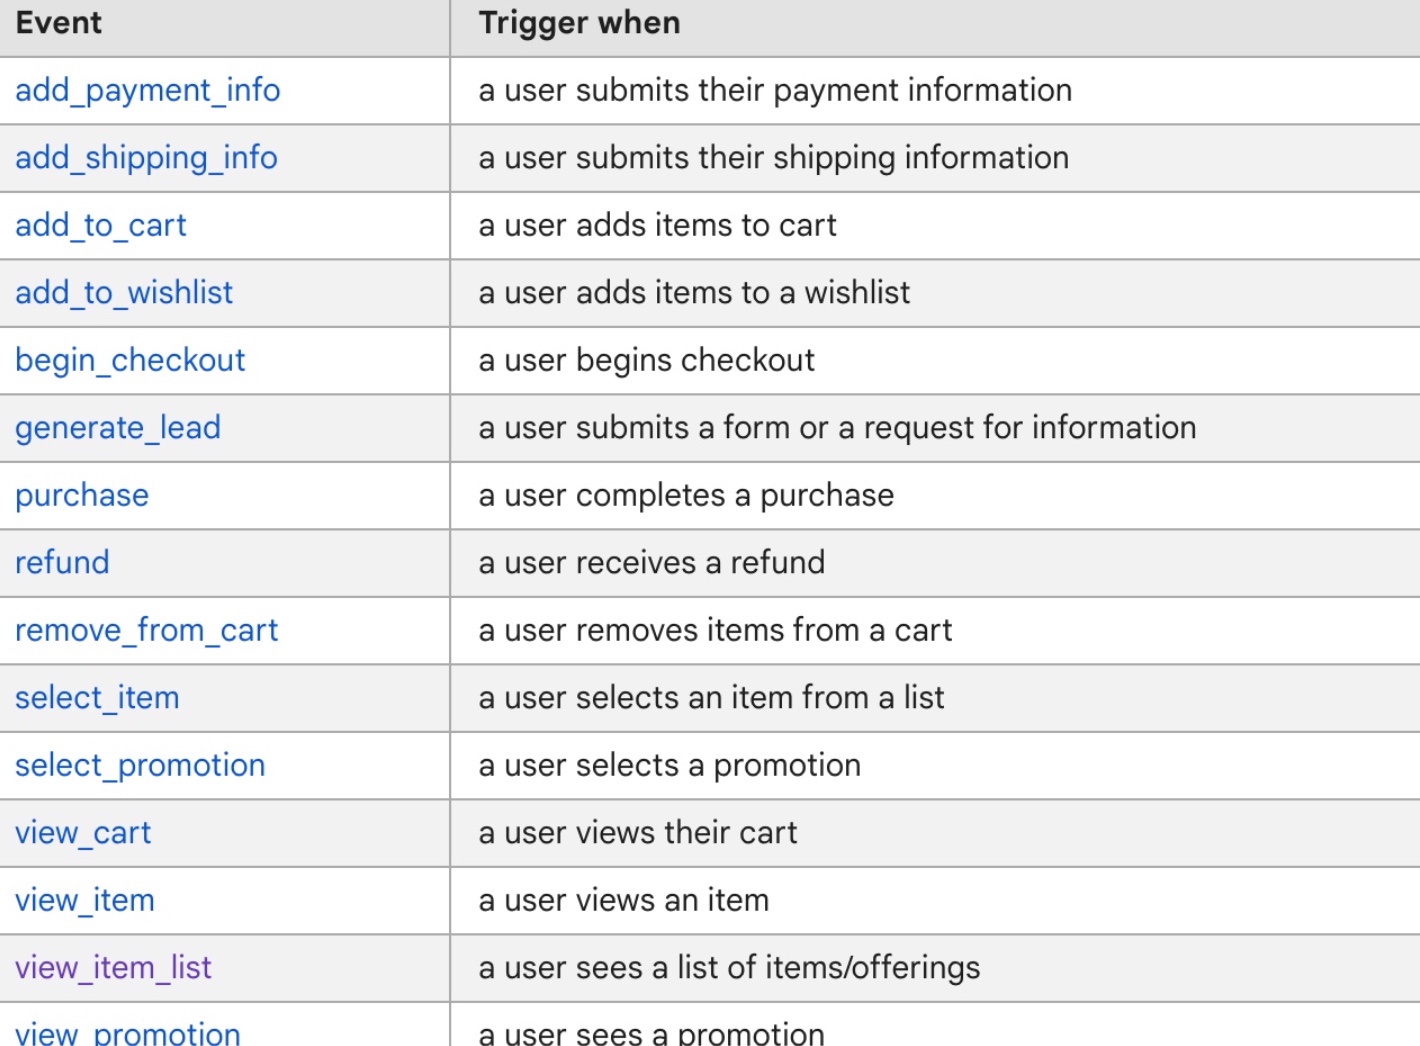
Setting up ecommerce events in Google Analytics 4 (GA4) involves a few steps:

  1. Add the GA4 ecommerce tracking code to your website: The ecommerce tracking code should be added to the pages of your website where users complete transactions. The code typically includes parameters such as transaction details, product details and any additional information such as the product category.
    2. Configure ecommerce events: Once the ecommerce tracking code is in place, you can configure specific ecommerce events such as “add_to_cart” and “purchase” to track user interactions with products on your site.

3. Test ecommerce tracking: To ensure that your ecommerce tracking code is working correctly, you can use the GA4 Debugger tool to verify that the tracking code is sending data to your GA4 property. You can also review the ecommerce reports in GA4 to confirm that data is being collected correctly.

4. Analyze ecommerce data: Once your ecommerce events are set up and configured, you can start analyzing the data in your GA4 reports. This includes metrics such as revenue, transactions, and conversion rate, as well as data on individual products and product categories.

5. Create goals: You can create goals in GA4 to track important ecommerce events such as purchase or checkout completion.

6. Segmentation: You can segment your ecommerce data by different dimensions such as product category, channel or custom dimensions to get deeper insights.

Google Analytics 4 Enhanced Ecommerce tracking

Google Analytics 4 (GA4) with Enhanced Ecommerce Tracking via Google Analytics 4 using Google Tag Manager

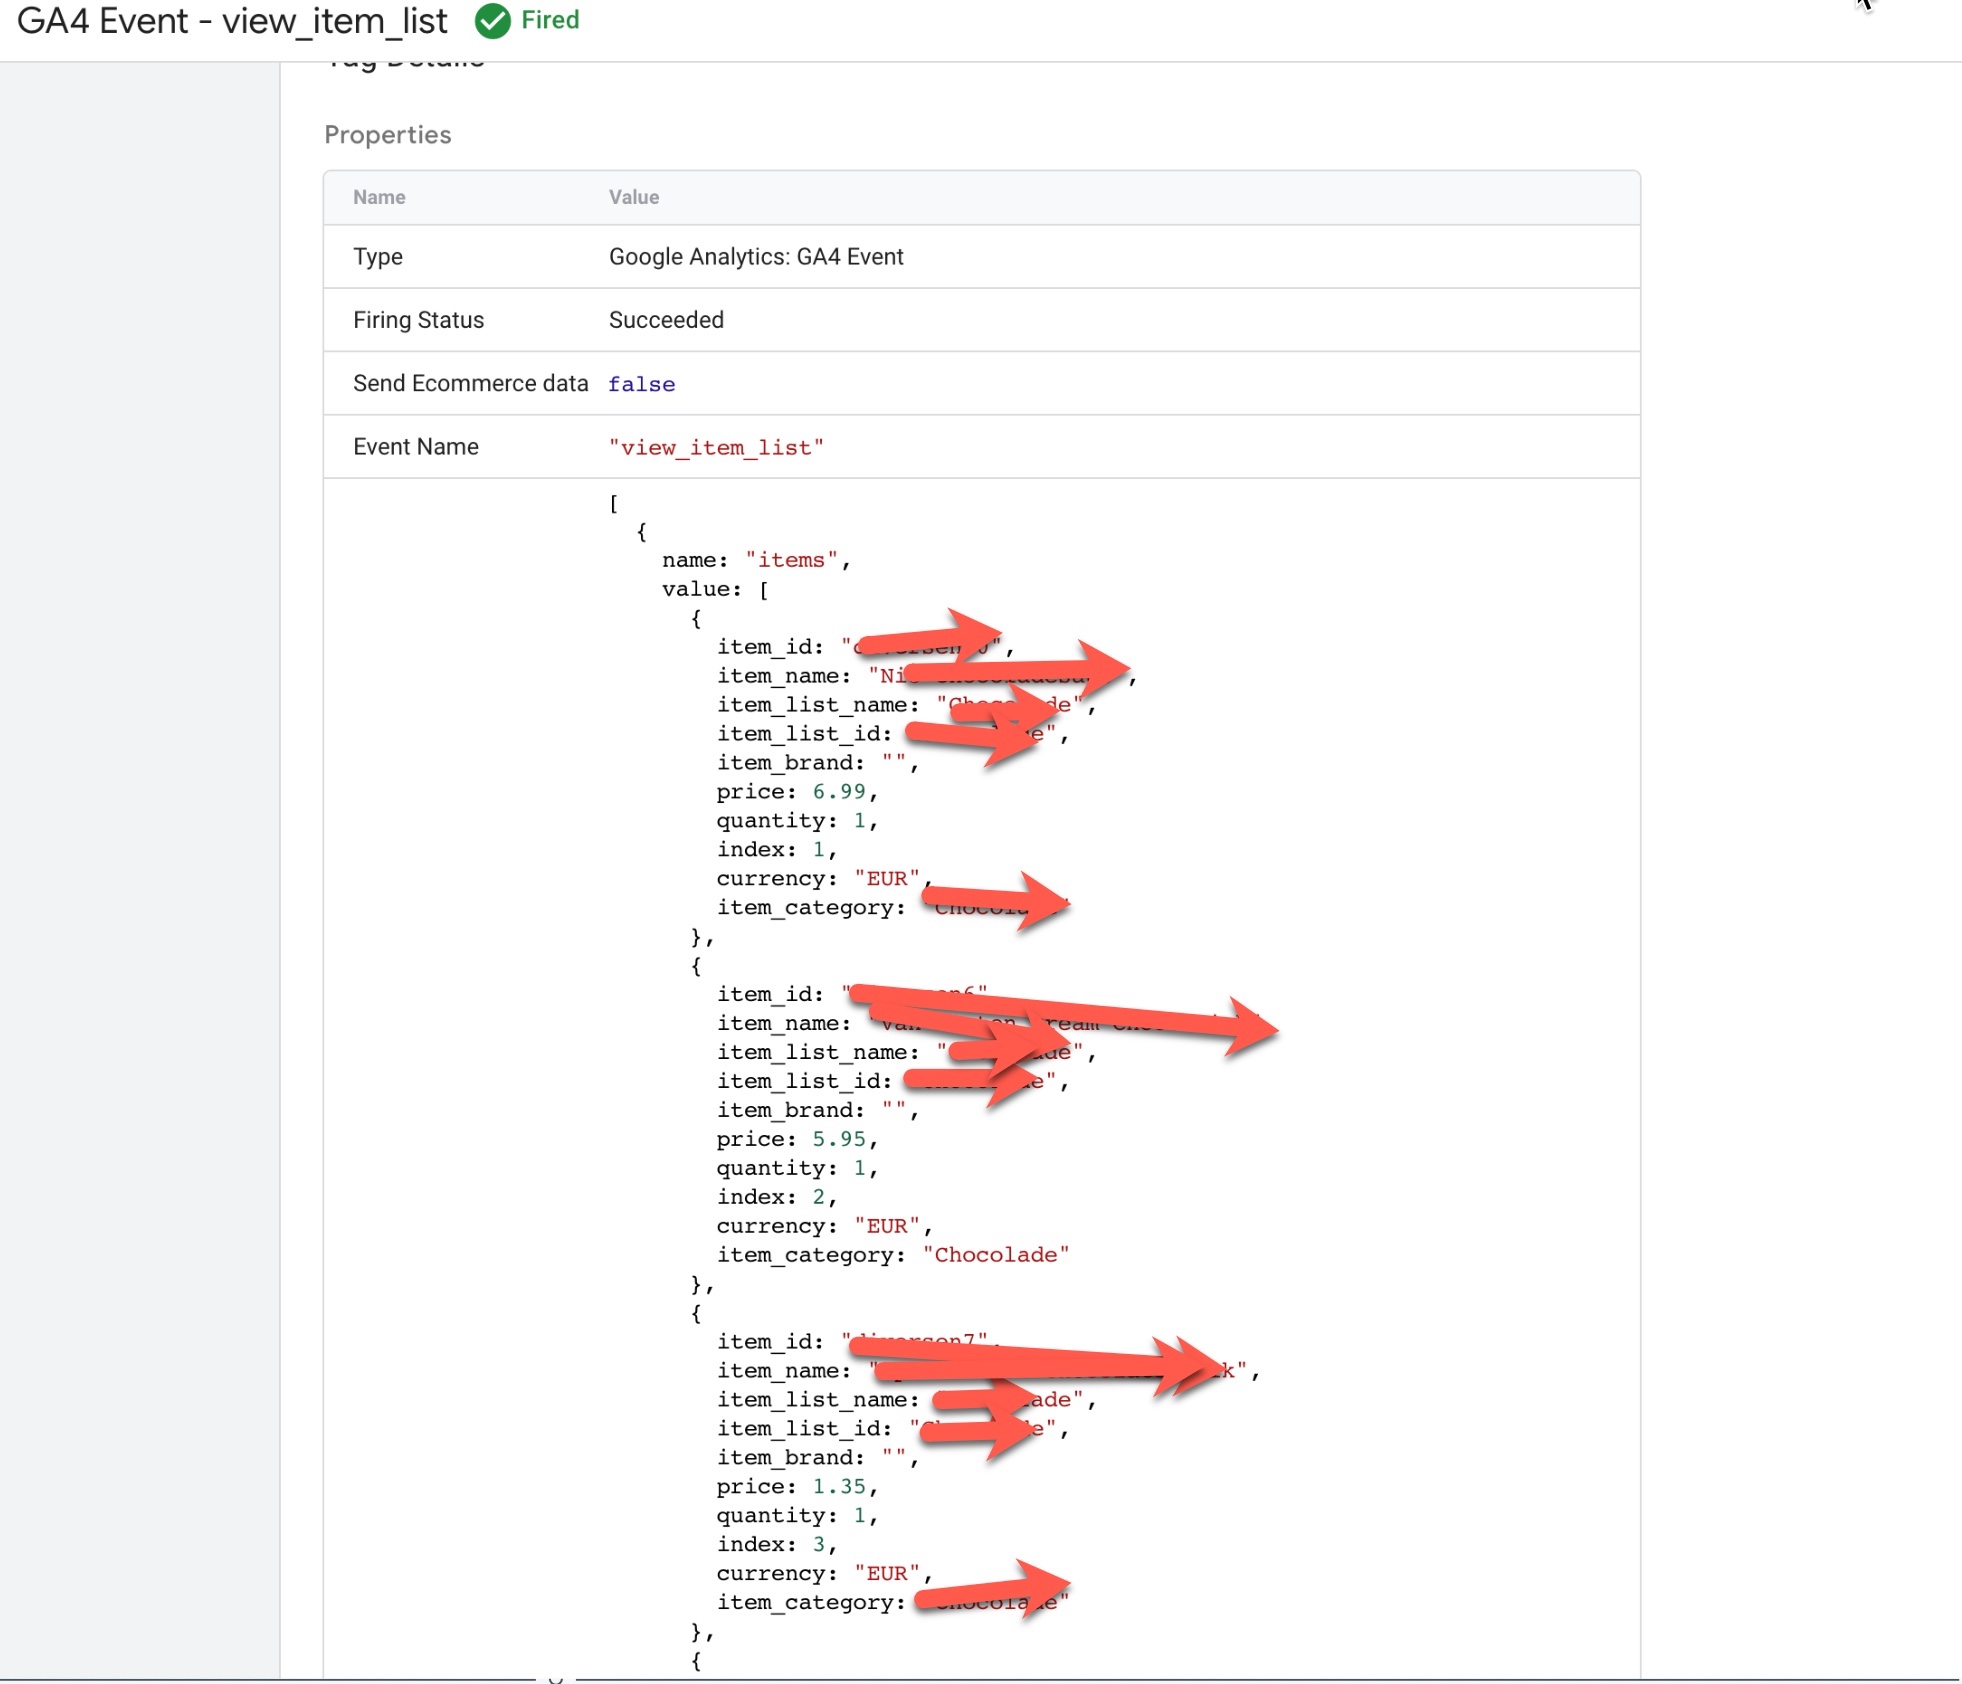
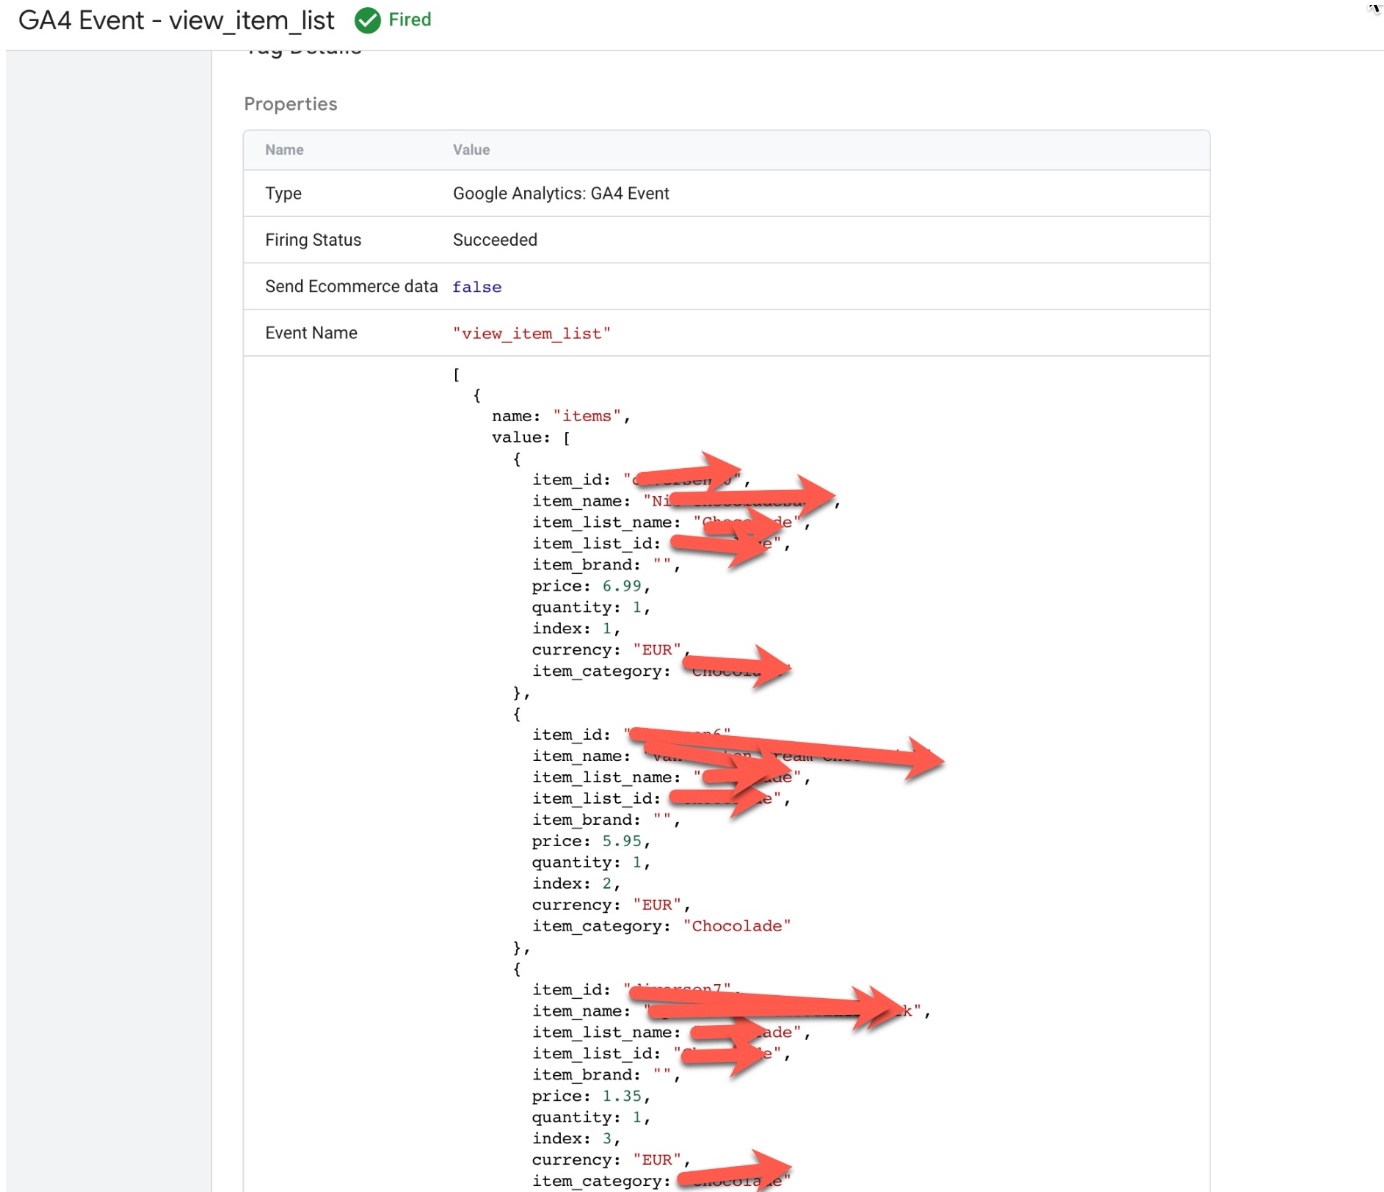
GA4 “view_item_list” using Google Tag Manager: In Google Analytics 4 (GA4), the view_item_list event can be used in conjunction with a data layer to track and analyze ecommerce data. A data layer is a JavaScript object that contains information about the page and its content, as well as any user interactions or events that occur on the page. This information can be passed to GA4 through the tracking code, and can be used to track specific ecommerce events such as product views, add-to-cart actions, and purchases.

To set up the ‘view_item_list’ event using a data layer, you will need to create a data layer object on your website’s pages and push data into it when a user views a list of items. For example, when a user views a list of products, the following data could be pushed into the data layer:

dataLayer.push({ 
'event': 'view_item_list',
'items': [ {
      'item_id': 'P12345',
      'item_name': 'Android Warhol T-Shirt',
      'list_name': 'Popular Products',
      'item_brand': 'Google',
      'item_category': 'Apparel',
      'item_variant': 'black',
      'index': 0,
      'price': '29.20',
      'quantity': '1'
    },
    {
      'item_id': 'P67890',
      'item_name': 'Flame Challenger Hoodie',
      'list_name': 'Popular Products',
      'item_brand': 'Google',
      'item_category': 'Apparel',
      'item_variant': 'red',
      'index': 1,
      'price': '49.99',
      'quantity': '1'
    }
  ]
});

Once the data is in the data layer, you can then configure GA4 to listen for the view_item_list event and use the data to track product views and other ecommerce metrics.

It’s important to keep in mind that the data in the data layer should be in a specific format, and it should be well-structured, otherwise GA4 will not be able to process it.

Using a data layer in conjunction with GA4 events can provide more detailed and accurate ecommerce data, and can help you to gain deeper insights into user behavior and product performance.

‘view_item_list’ event in Google Analytics 4: The ‘view_item_list’ event in Google Analytics 4 (GA4) is used to track when a user views a list of items on an ecommerce website. This event can be used to understand how users are interacting with different product listings and can provide insights into which products are most popular or which product lists are driving the most conversions.

To track the ‘view_item_list‘ event in GA4, you will need to add the event code to your website’s HTML or JavaScript. The event code typically includes parameters such as the event name (‘view_item_list‘), the products that were viewed, and any additional information such as the product category.

gtag('event', 'view_item_list', {
  'items': [
    {
      'item_id': 'P12345',
      'item_name': 'Android Warhol T-Shirt',
      'item_list_name': 'Popular Products',
      'item_brand': 'Google',
      'item_category': 'Apparel',
      'item_variant': 'black',
'index': 0, 'price': '29.20', 'quantity': '1' }, { 'item_id': 'P67890', 'item_name': 'Flame Challenger Hoodie', 'item_list_name': 'Popular Products', 'item_brand': 'Google', 'item_category': 'Apparel', 'item_variant': 'red',
'index': 1, 'price': '49.99', 'quantity': '1' } ] });
GA4 (Google Analytics 4) Ecommerce Tracking

Setting Up Enhanced Ecommerce ‘view_item_list’ in Google Analytics 4 using Google Tag Manager

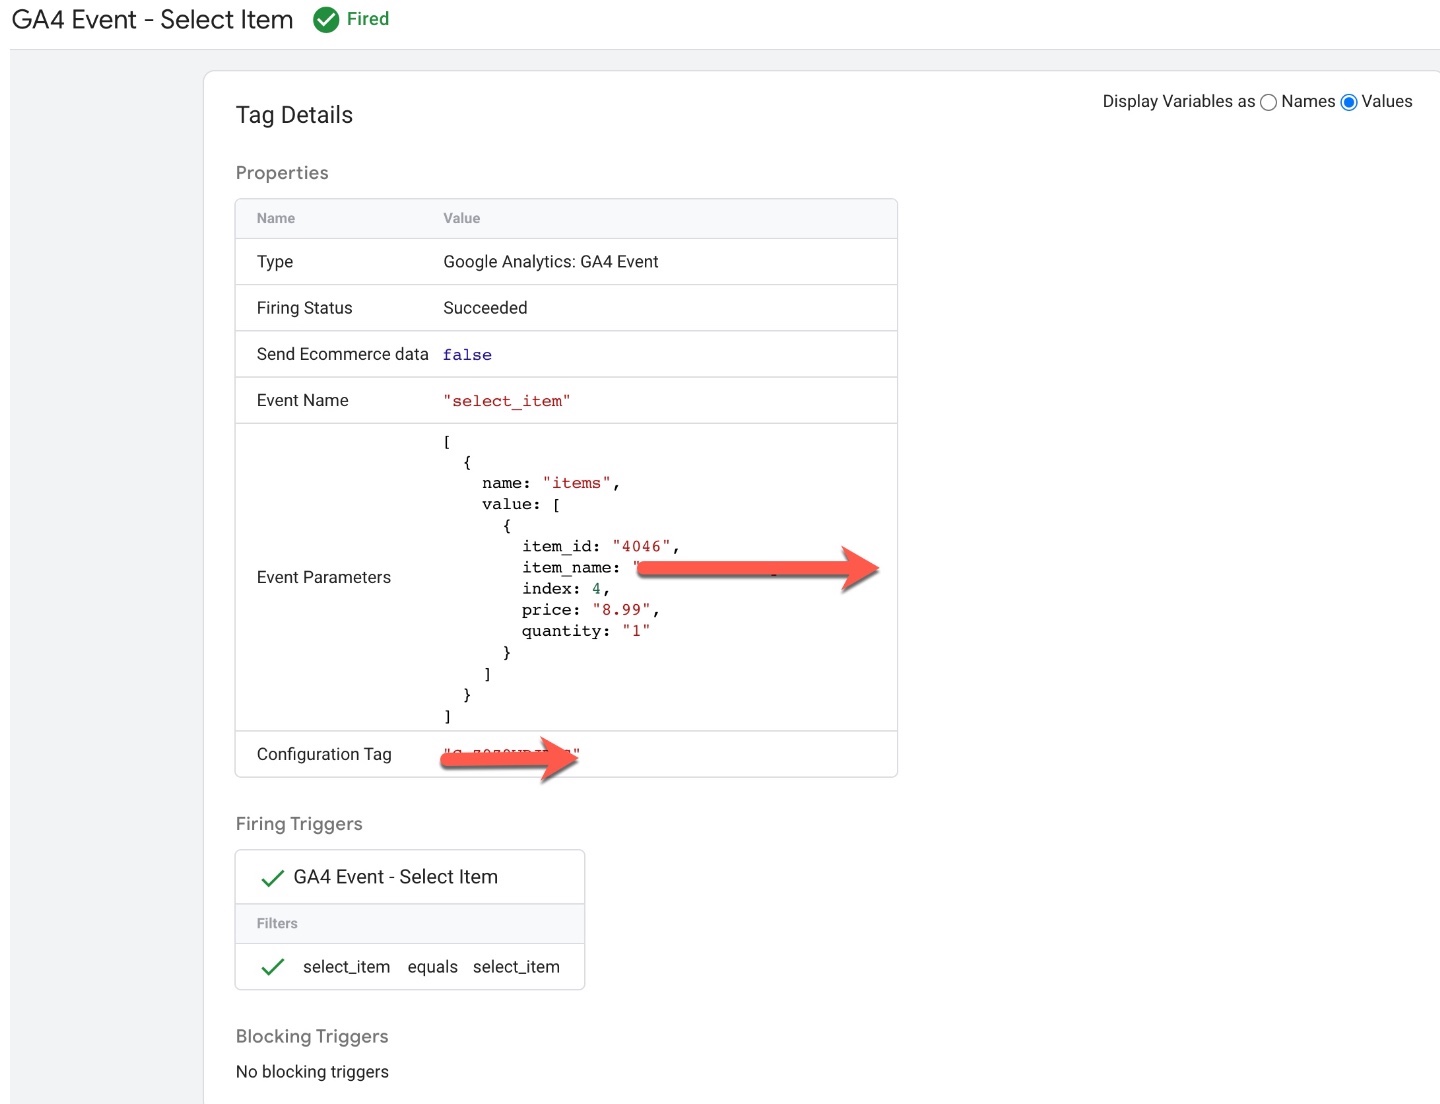
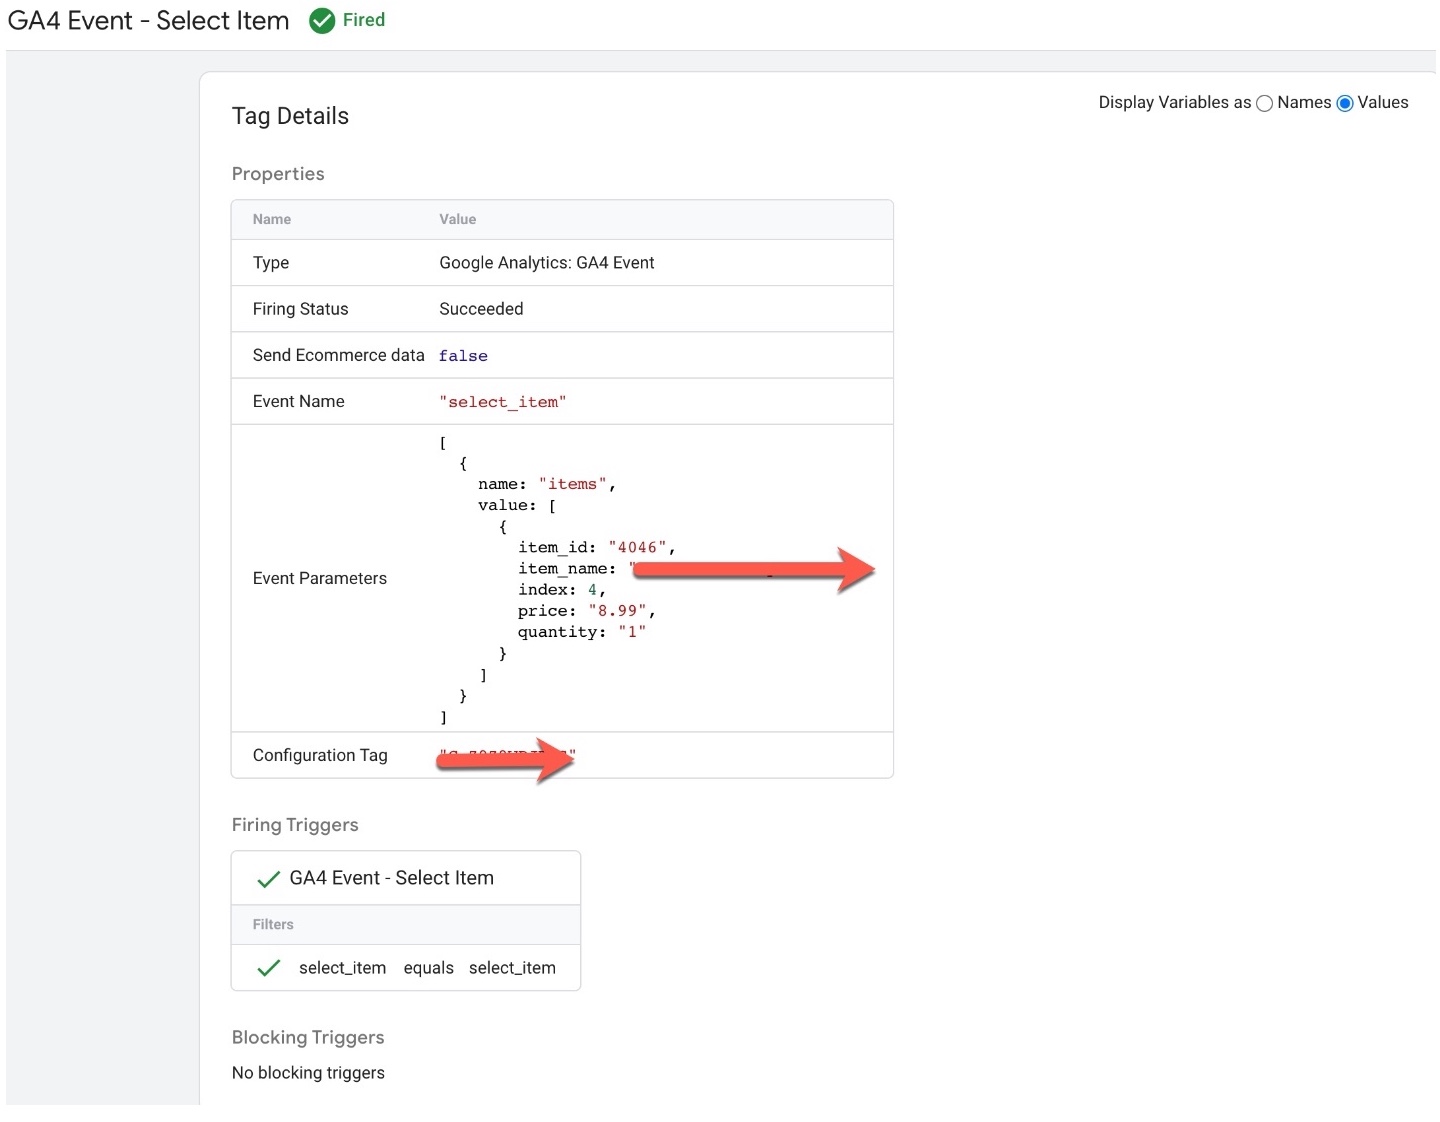
GA4 “select_item event” using Google Tag Manager: The ‘select_item‘ event in Google Analytics 4 (GA4) can be used to track when a user selects an item on an ecommerce website. This event can be used to understand how users are interacting with different products and can provide insights into which products are most popular or which are driving the most conversions.

To track the ‘select_item’ event in GA4 using a data layer, you will need to create a data layer object on your website’s pages and push data into it when a user selects an item. For example, when a user selects a product, the following data could be pushed into the data layer:

dataLayer.push({
  'event': 'select_item',
  'items': [
    {
      'id': 'P12345',
      'name': 'Android Warhol T-Shirt',
      'brand': 'Google',
      'category': 'Apparel',
      'variant': 'black',
      'price': '29.20',
      'quantity': '1'
    }
  ]
});

Once the data is in the data layer, you can then configure GA4 to listen for the view_item event and use the data to track product views and other ecommerce metrics.

It’s important to keep in mind that the data in the data layer should be in a specific format, and it should be well-structured, otherwise GA4 will not be able to process it.

Using a data layer in conjunction with GA4 events can provide more detailed and accurate ecommerce data, and can help you to gain deeper insights into user behavior and product performance.

‘select_item’ event in Google Analytics 4: The ‘select_item‘ event in Google Analytics 4 (GA4) is used to track when a user selects an item on an ecommerce website. This event can be used to understand how users are interacting with different products and can provide insights into which products are most popular or which are driving the most conversions.

To track the ‘select_item’ event in GA4, you will need to add the event code to your website’s HTML or JavaScript. The event code typically includes parameters such as the event name (‘select_item’), the product that was selected, and any additional information such as the product category.

For example, the following code snippet shows an example of how to track a select_item event in GA4:

gtag('event', 'select_item', {
  'items': [
    {
      'item_id': 'P12345',
      'item_name': 'Android Warhol T-Shirt',
      'item_brand': 'Google',
      'item_category': 'Apparel',
      'item_variant': 'black',
      'price': '29.20',
      'quantity': '1'
    }
  ]
});

Once the event is set up correctly, it will start sending data to your GA4 property and you will be able to view the event in the GA4 reports.

Google Analytics 4 eCommerce

Google Analytics 4 eCommerce ‘select_item’ Event Tracking using Google Tag Manager

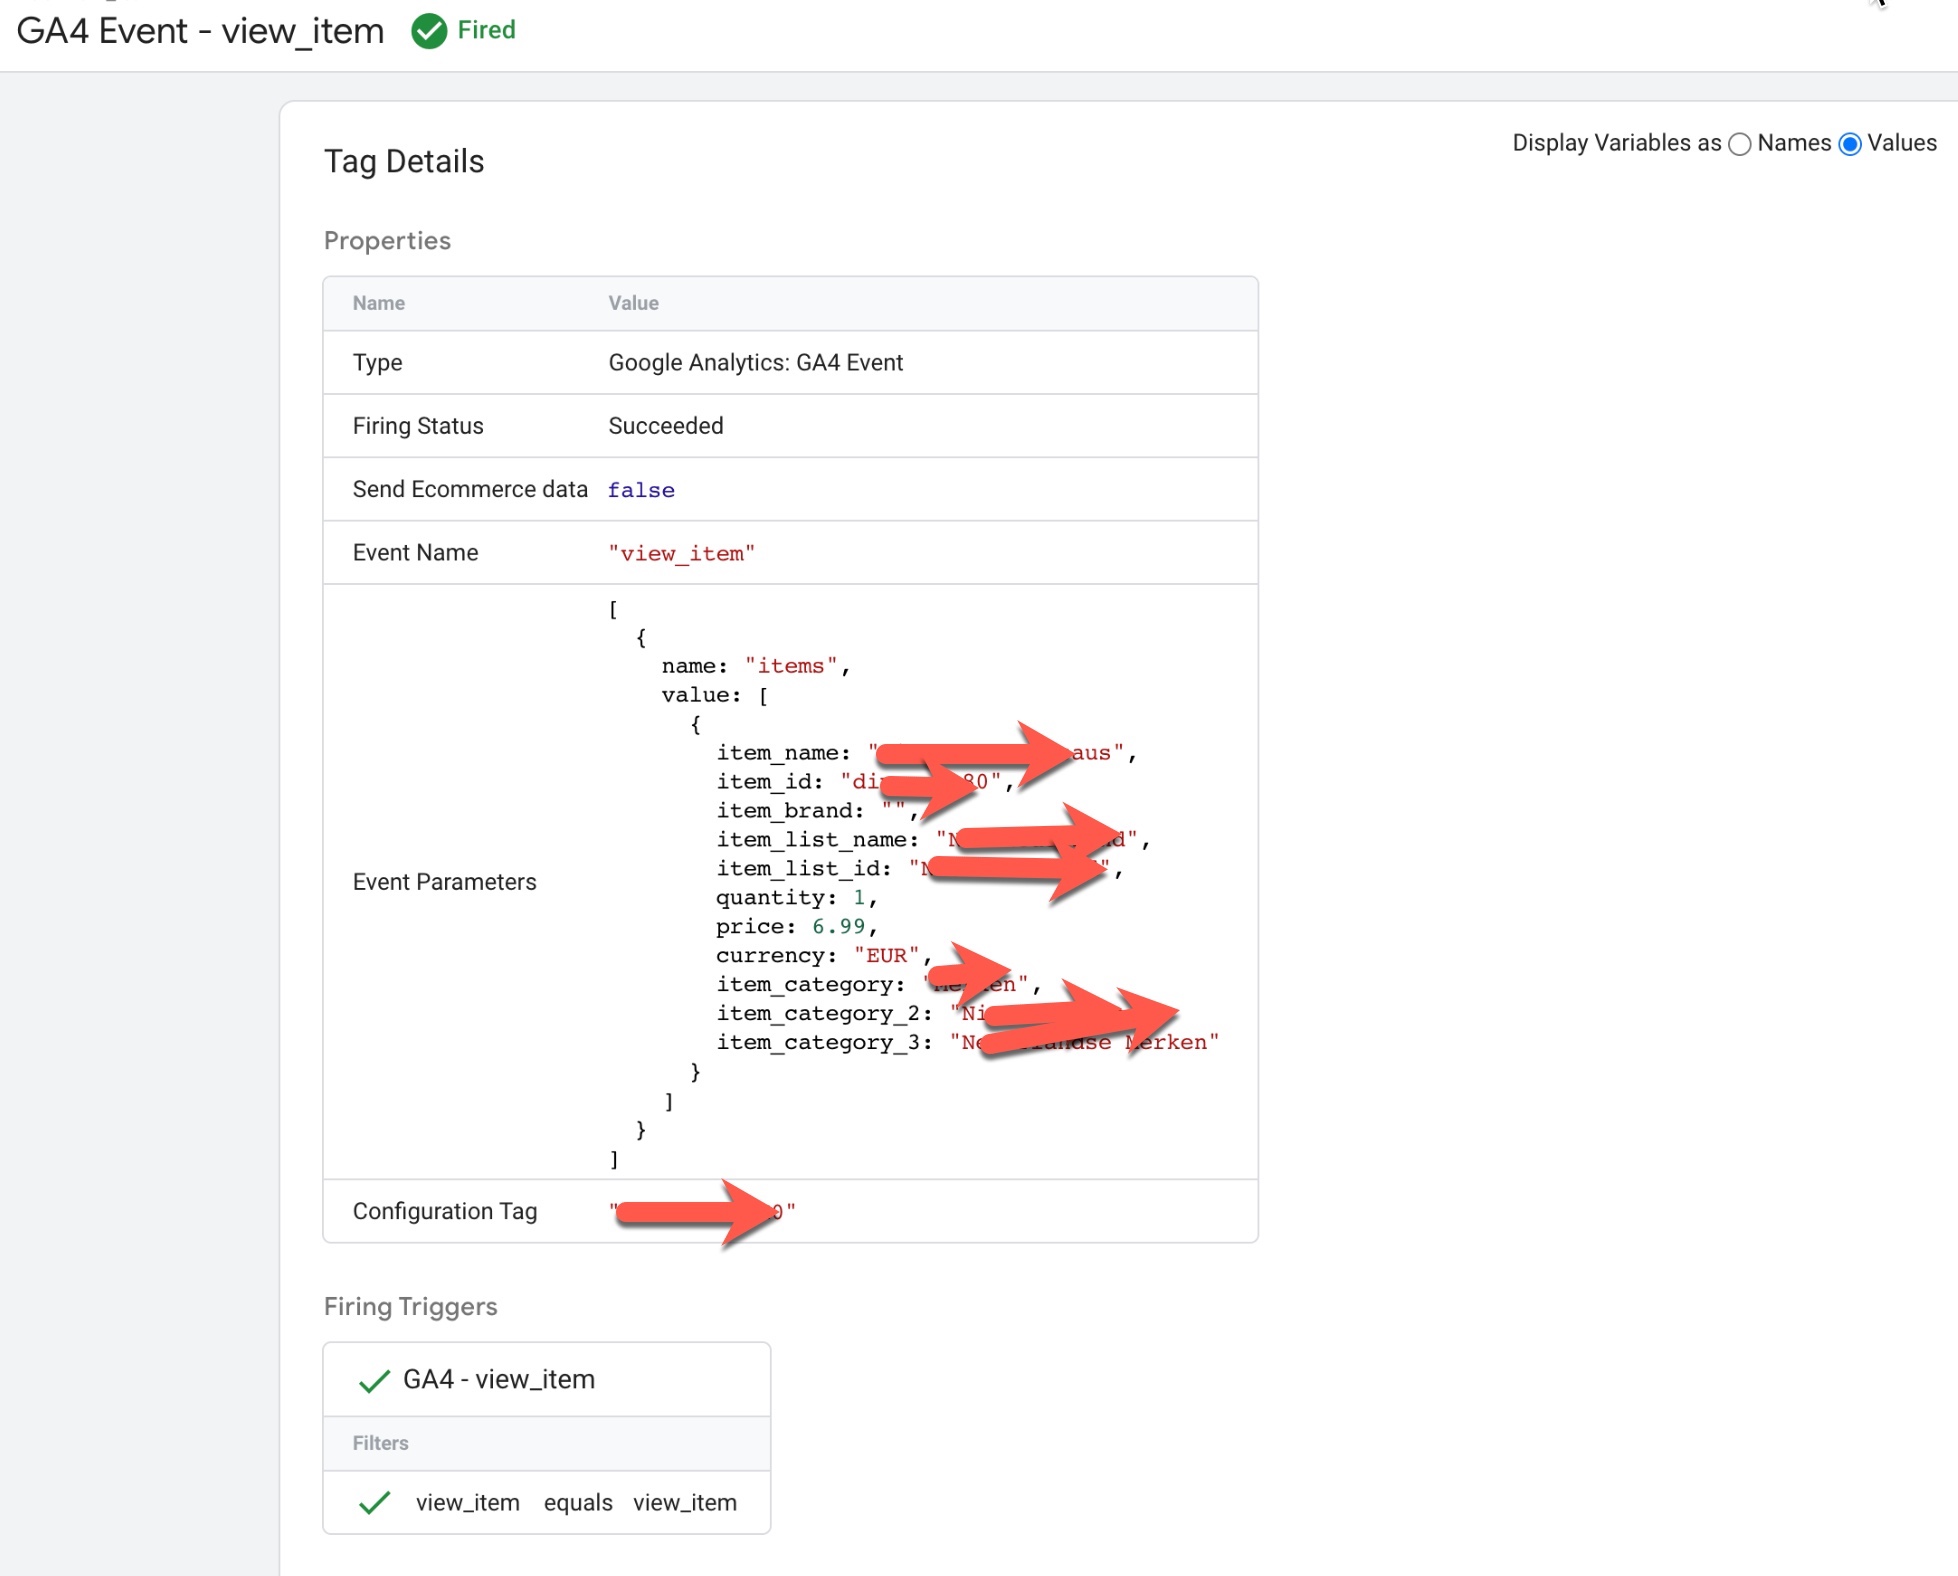
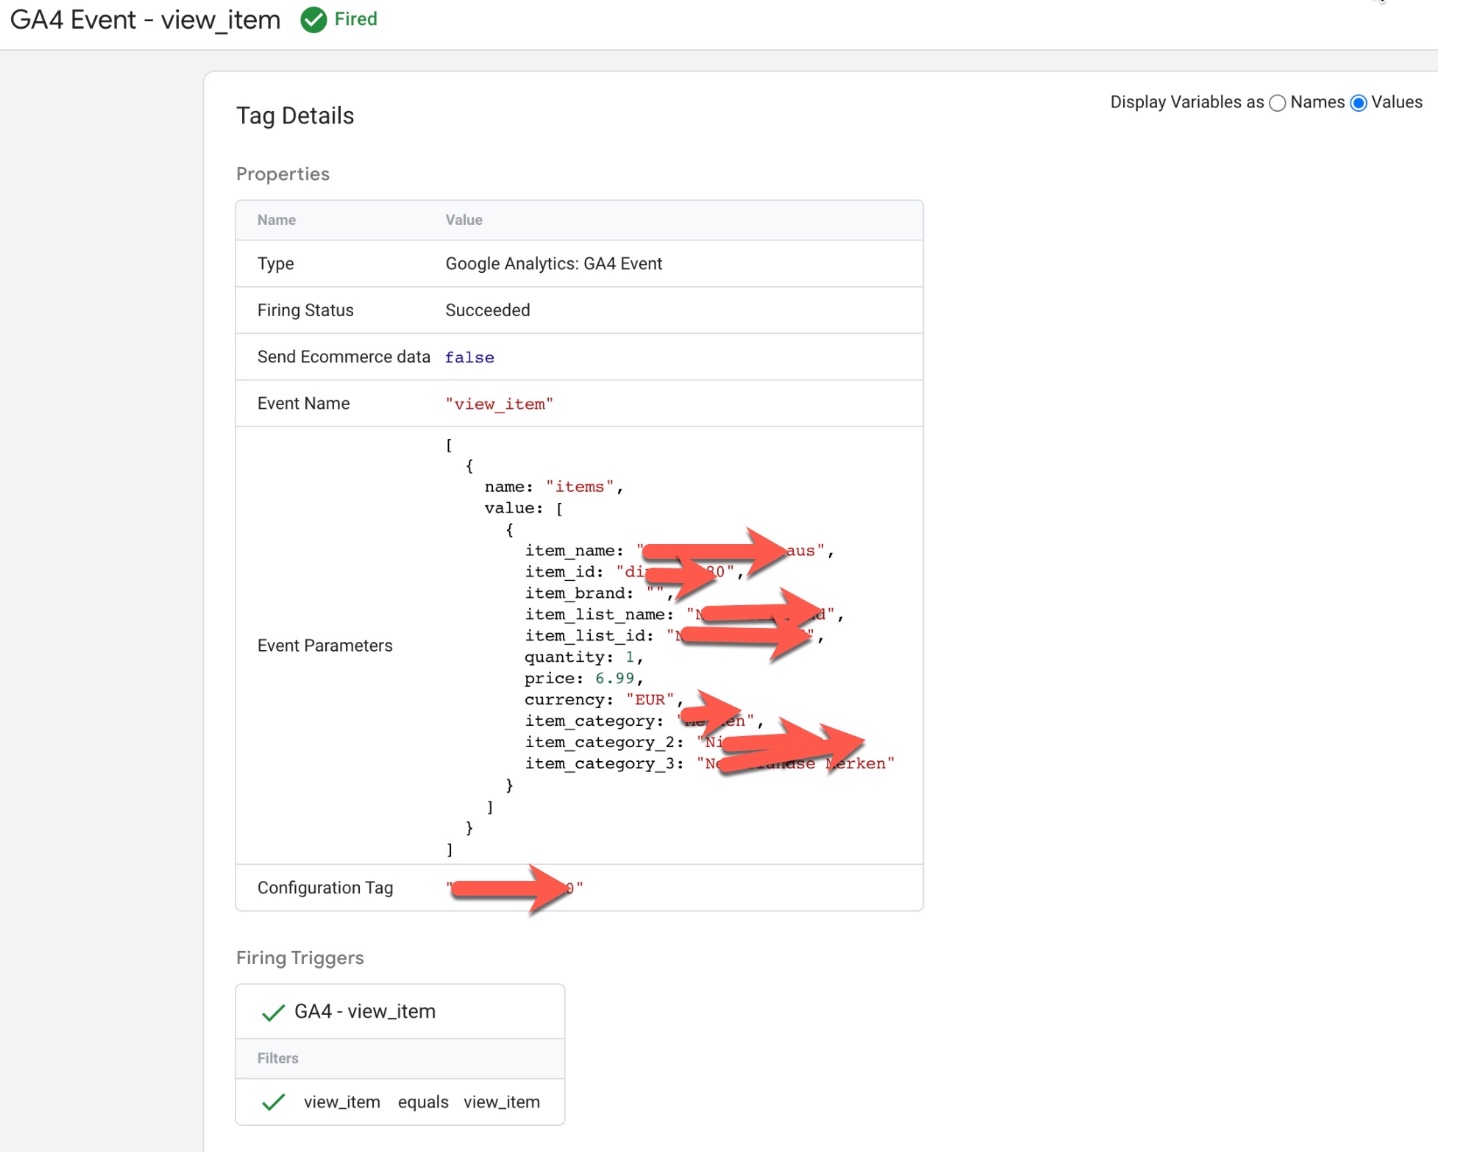
GA4 “view_item” data layer using Google Tag Manager: The ‘view_item‘ event in Google Analytics 4 (GA4) can be used to track when a user views a specific item on an ecommerce website. This event can be used to understand how users are interacting with different products and can provide insights into which products are most popular or which are driving the most conversions.

To track the ‘view_item’ event in GA4 using a data layer, you will need to create a data layer object on your website’s pages and push data into it when a user views an item. For example, when a user views a product, the following data could be pushed into the data layer:

dataLayer.push({
  'event': 'view_item',
  'items': [
    {
      'item_id': 'P12345',
      'item_name': 'Android Warhol T-Shirt',
      'item_brand': 'Google',
      'item_category': 'Apparel',
      'item_variant': 'black',
      'price': '29.20',
      'quantity': '1'
    }
  ]
});

Once the data is in the data layer, you can then configure GA4 to listen for the view_item event and use the data to track product views and other ecommerce metrics.

‘view_item’ event in Google Analytics 4: The ‘view_item’ event in Google Analytics 4 (GA4) is used to track when a user views a specific item on an ecommerce website. This event can be used to understand how users are interacting with different products and can provide insights into which products are most popular or which are driving the most conversions.

To track the ‘view_item’ event in GA4, you will need to add the event code to your website’s HTML or JavaScript. The event code typically includes parameters such as the event name (view_item), the product that was viewed, and any additional information such as the product category.

For example, the following code snippet shows an example of how to track a view_item event in GA4:

gtag('event', 'view_item', {
  'items': [
    {
      'item_id': 'P12345',
      'item_name': 'Android Warhol T-Shirt',
      'item_brand': 'Google',
      'item_category': 'Apparel',
      'item_variant': 'black',
      'price': '29.20',
      'quantity': '1'
    }
  ]
});

Once the event is set up correctly, it will start sending data to your GA4 property and you will be able to view the event in the GA4 reports.

Enhanced Ecommerce Reports Google Analytics 4 (GA4)

Track Enhanced Ecommerce Events with Google Analytics 4 (GA4)using Google Tag Manager

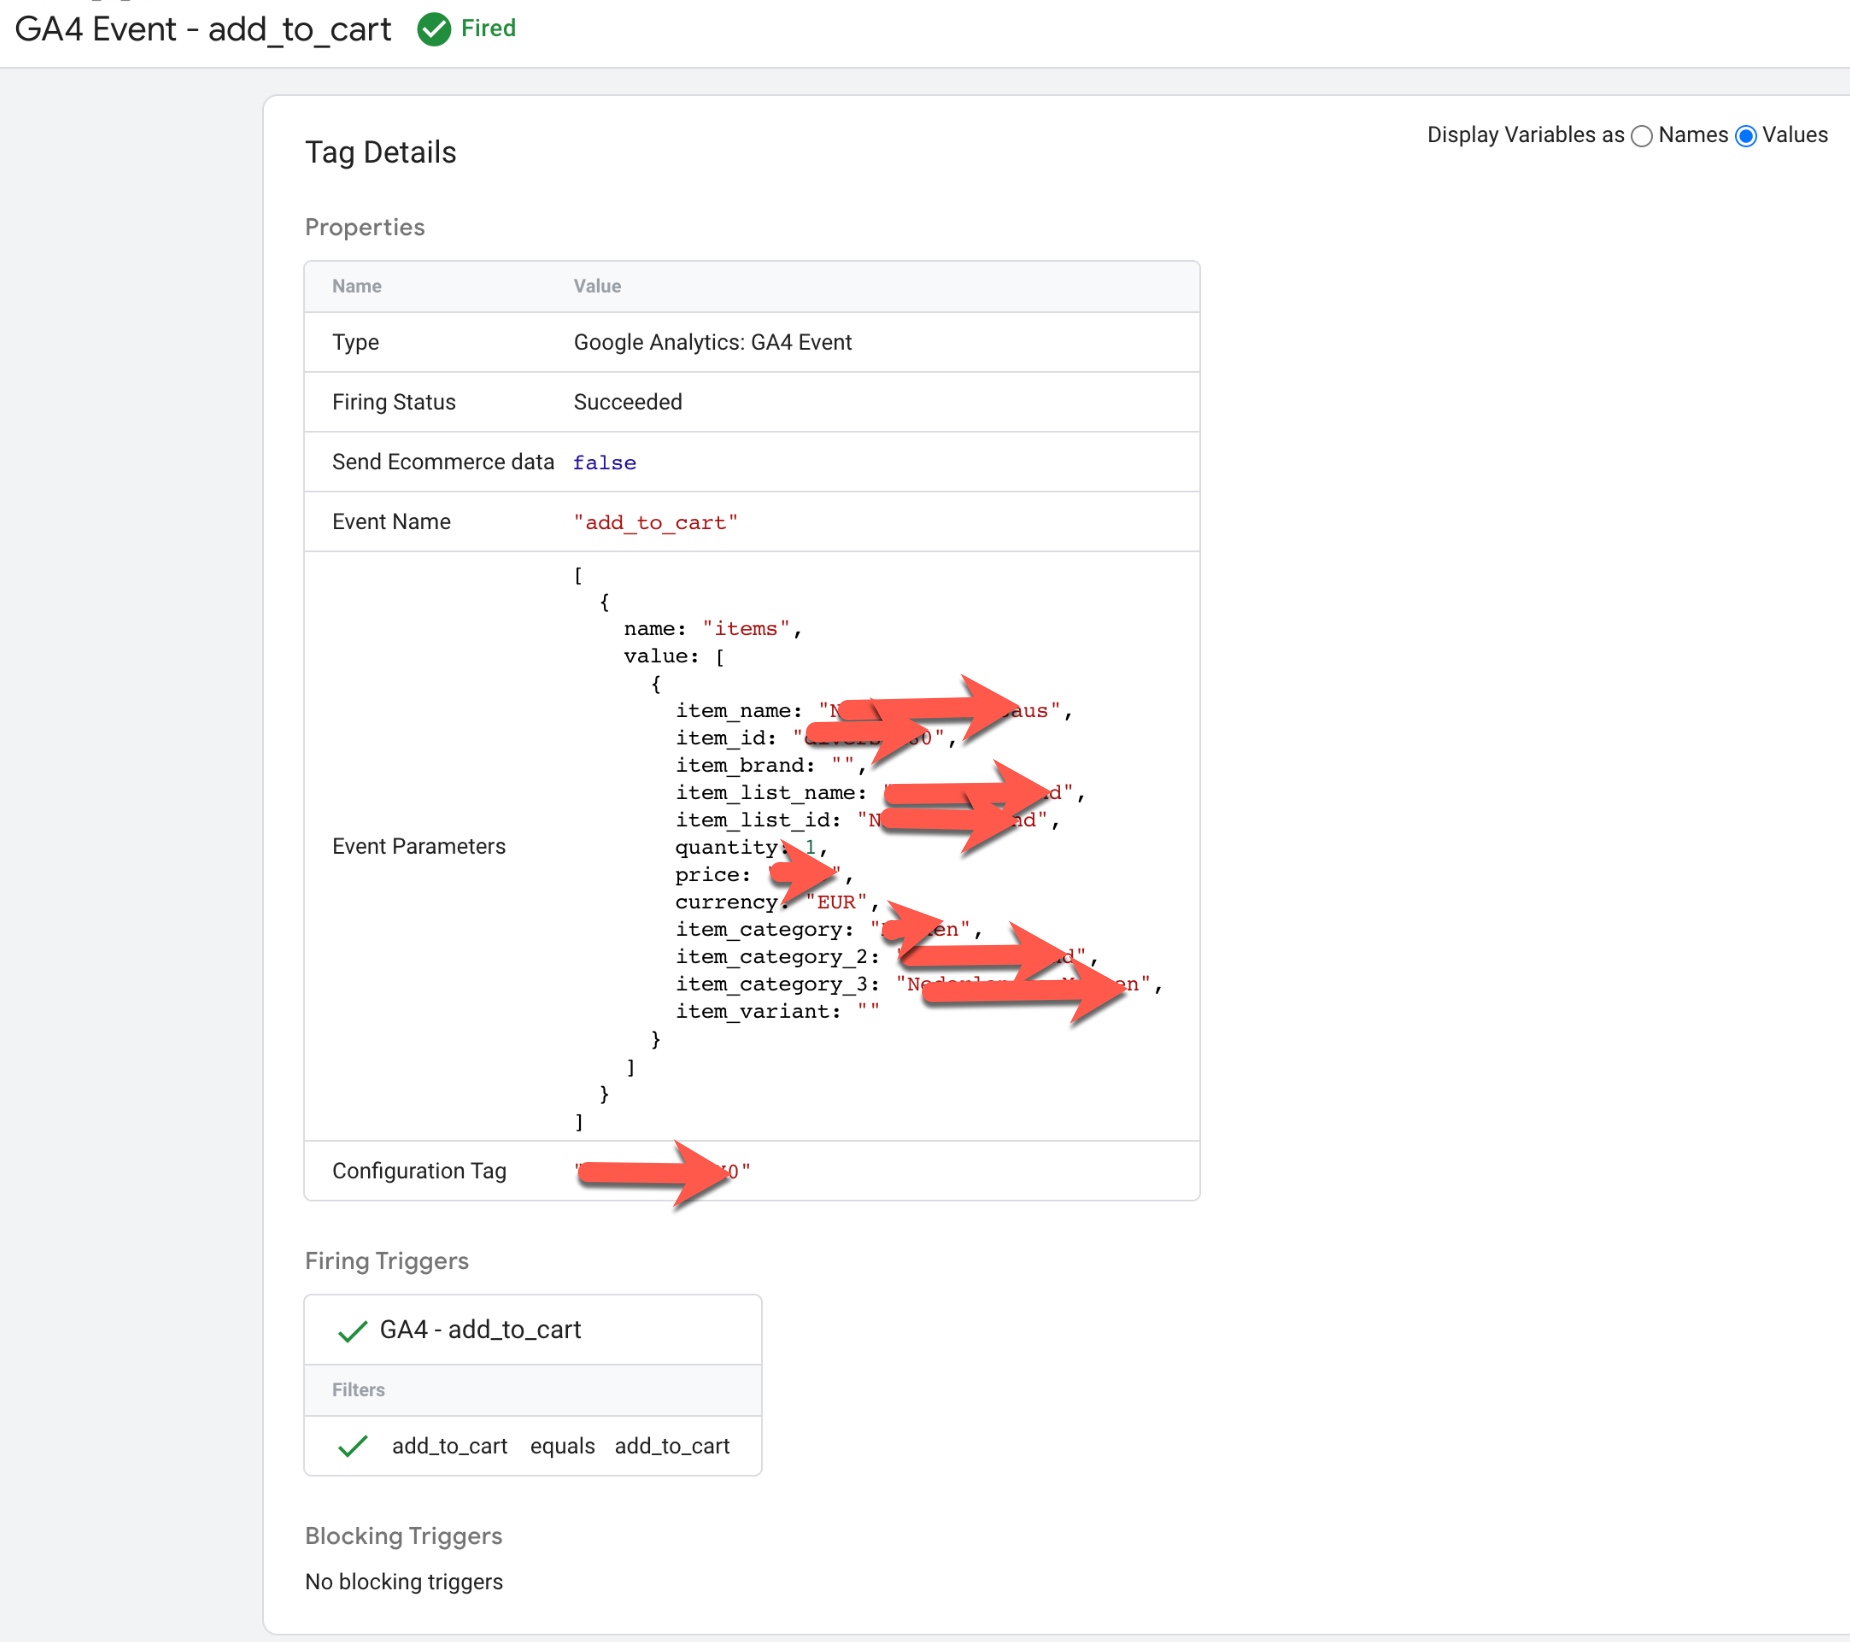
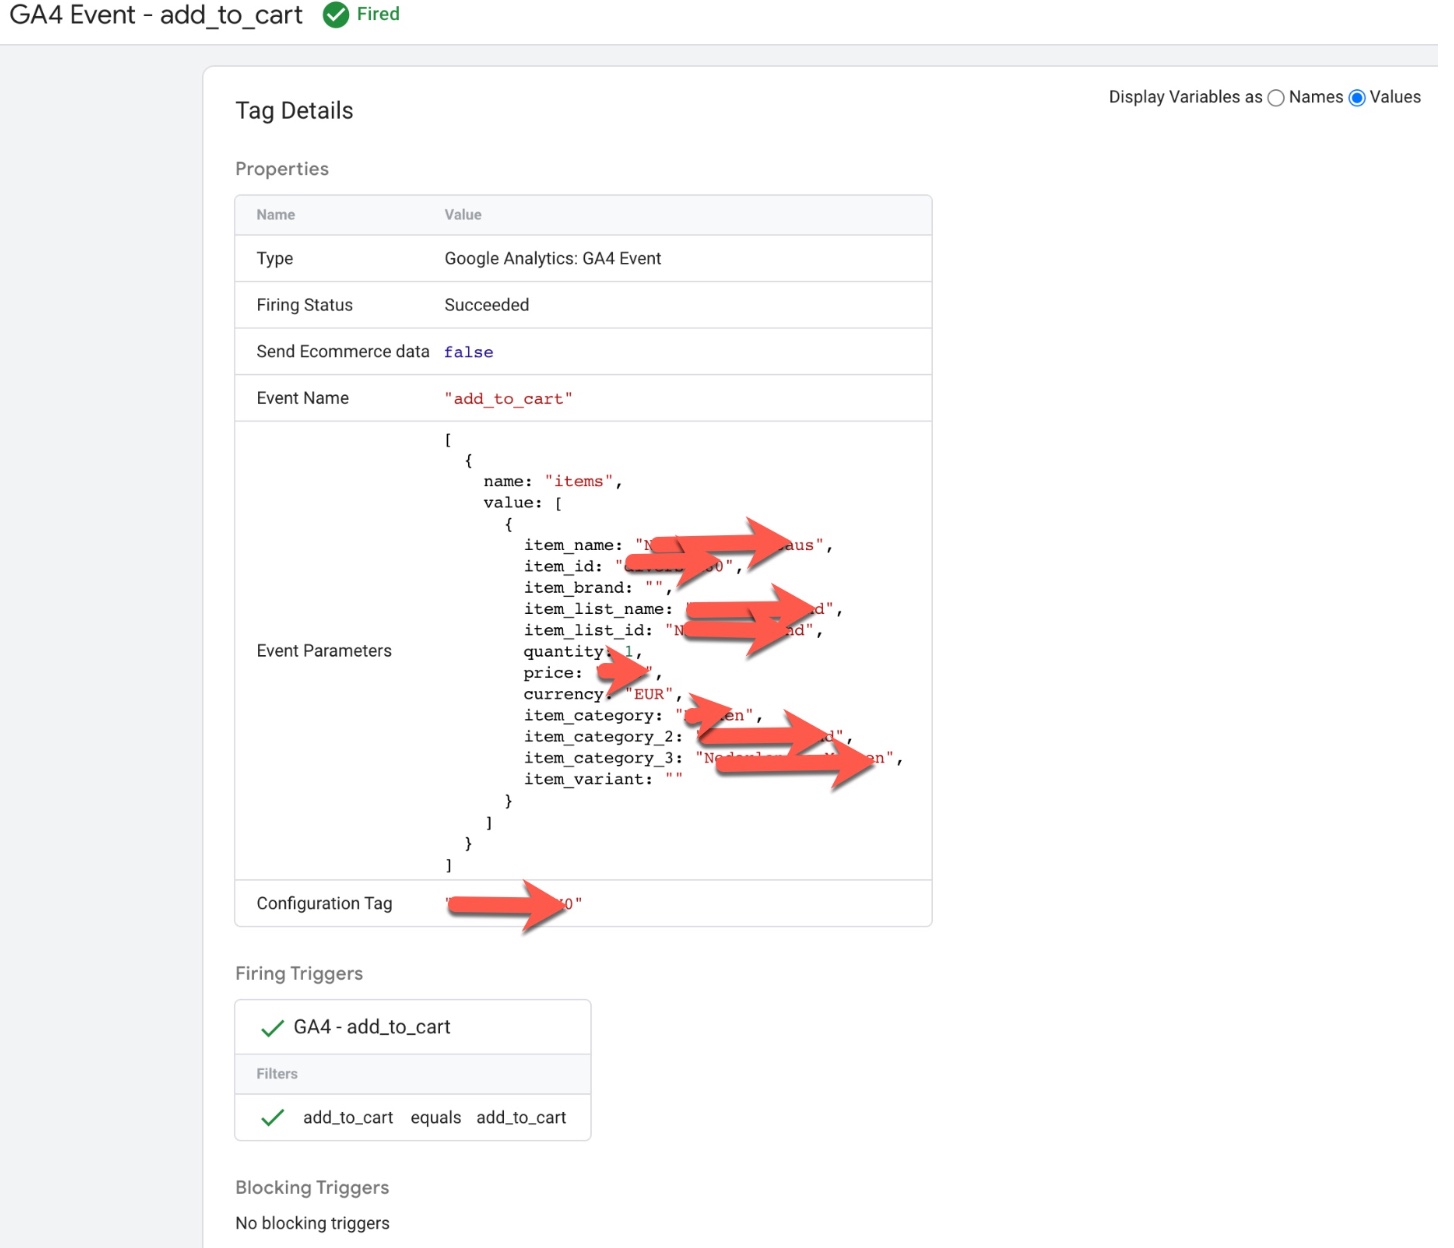
‘add_to_cart’ event in Google Analytics 4: The ‘add_to_cart‘ event in Google Analytics 4 (GA4) is used to track when a user adds an item to their cart on an ecommerce website. This event can be used to understand how users are interacting with different products and can provide insights into which products are most popular or which are driving the most conversions.

To track the ‘add_to_cart’ event in GA4, you will need to add the event code to your website’s HTML or JavaScript. The event code typically includes parameters such as the event name (‘add_to_cart‘), the product that was added to the cart, and any additional information such as the product category.

For example, the following code snippet shows an example of how to track a add_to_cart event in GA4:

gtag('event', 'add_to_cart', {
  'items': [
    {
      'item_id': 'P12345',
      'item_name': 'Android Warhol T-Shirt',
      'item_brand': 'Google',
      'item_category': 'Apparel',
      'item_variant': 'black',
      'price': '29.20',
      'quantity': '1'
    }
  ]
});

Once the event is set up correctly, it will start sending data to your GA4 property and you will be able to view the event in the GA4 reports.

GA4 “Add_to_cart” data layer using Google Tag Manager: The ‘add_to_cart’ event in Google Analytics 4 (GA4) can be used to track when a user adds an item to their cart on an ecommerce website using a data layer. This event can be used to understand how users are interacting with different products and can provide insights into which products are most popular or which are driving the most conversions.

To track the ‘add_to_cart’ event in GA4 using a data layer, you will need to create a data layer object on your website’s pages and push data into it when a user adds an item to their cart.

For example, when a user adds a product to their cart, the following data could be pushed into the data layer:

dataLayer.push({
  'event': 'add_to_cart',
  'items': [
    {
      'item_id': 'P12345',
      'item_name': 'Android Warhol T-Shirt',
      'item_brand': 'Google',
      'item_category': 'Apparel',
      'item_variant': 'black',
      'price': '29.20',
      'quantity': '1'
    }
  ]
});

Once the data is in the data layer, you can then configure GA4 to listen for the ‘add_to_cart’ event and use the data to track product views and other ecommerce metrics.


 GA4 Enhanced Ecommerce Parameters

Leverage GA4 for Enhanced Ecommerce Tracking using Google Tag Manager

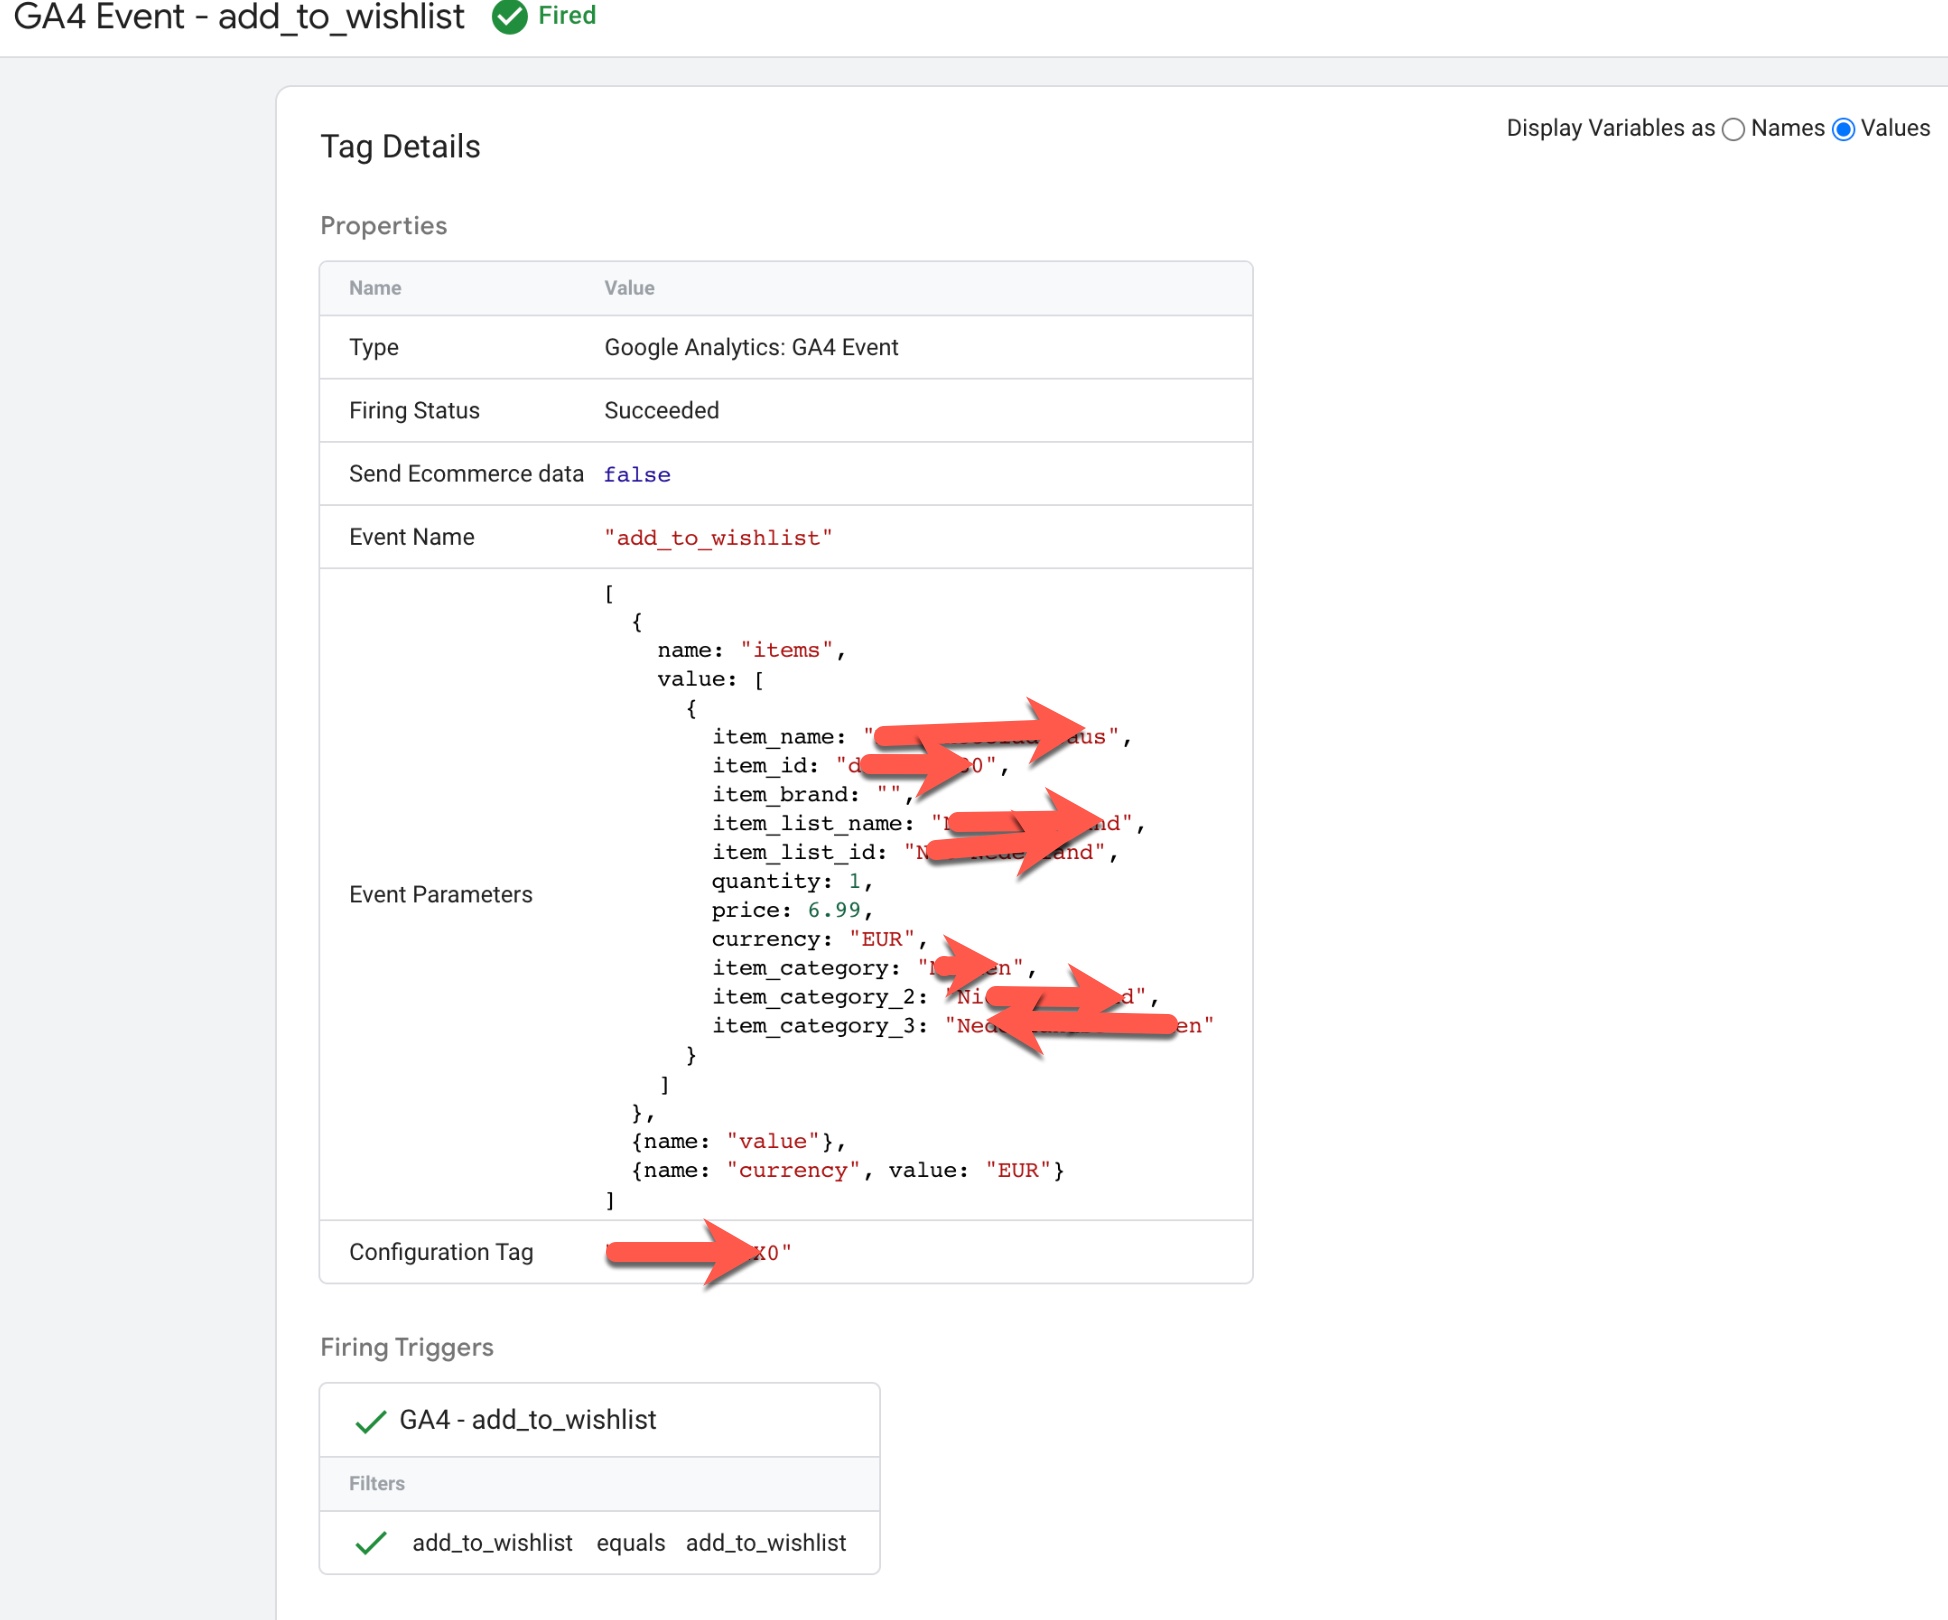
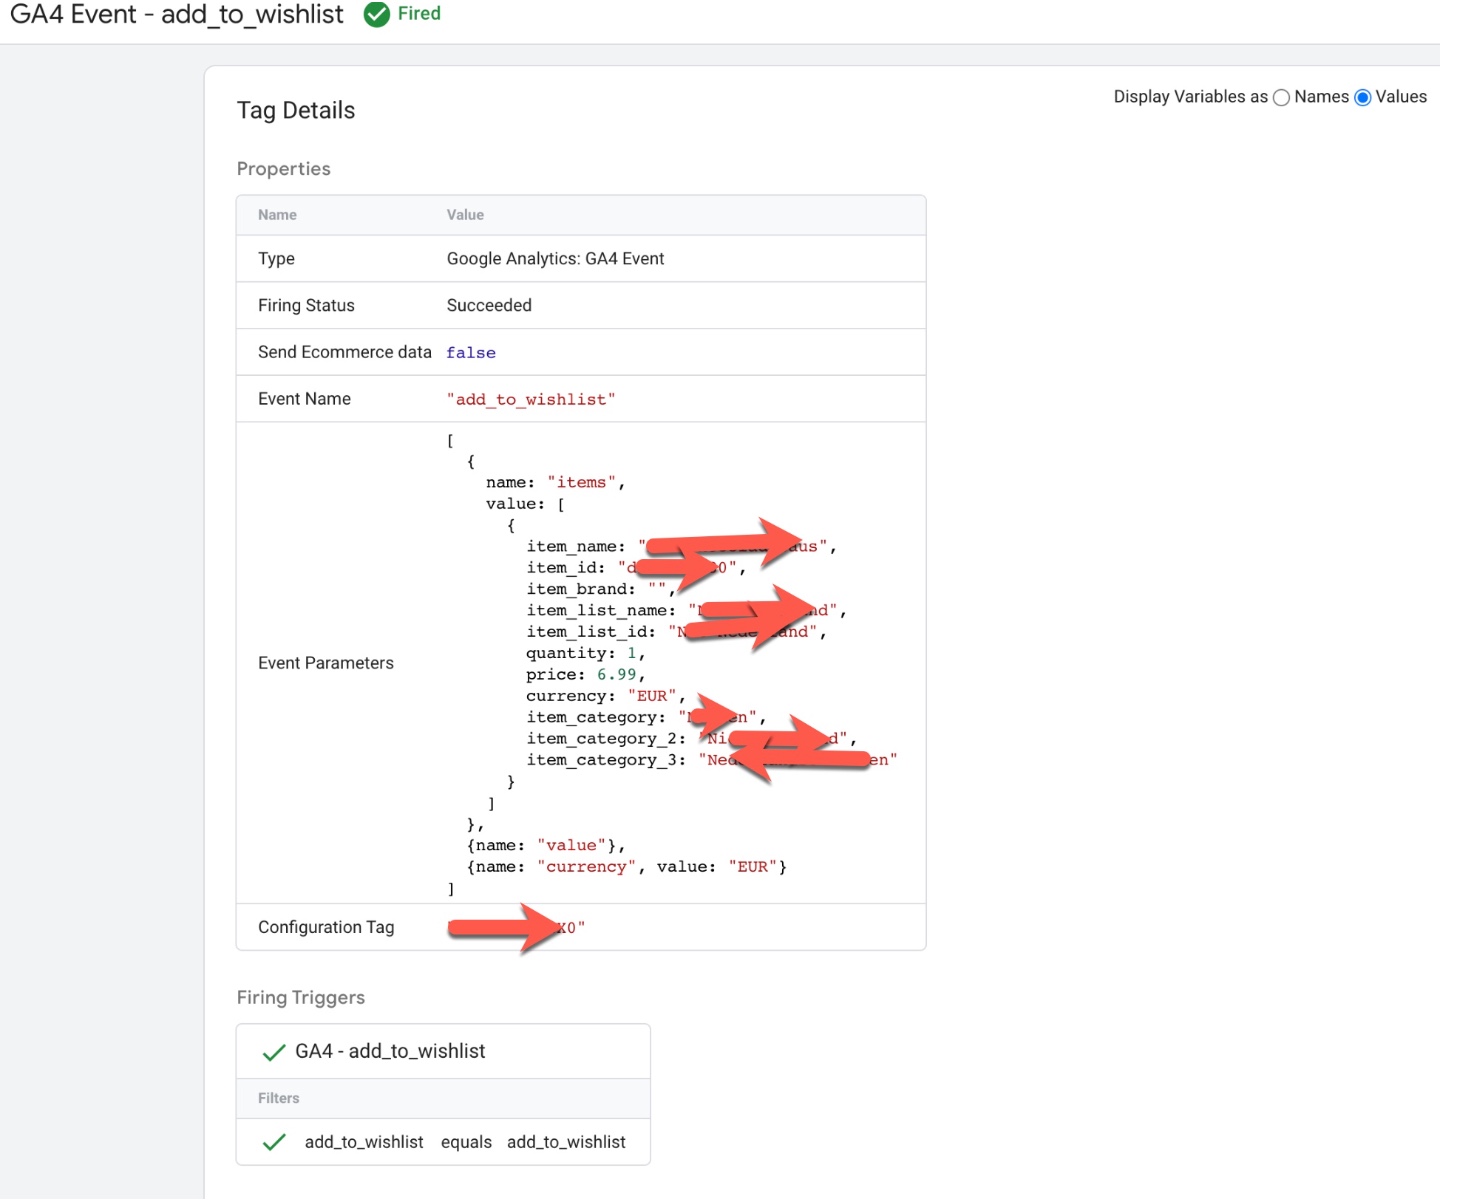
‘add_to_wishlist’ event in Google Analytics 4: The ‘add_to_wishlist‘ event in Google Analytics 4 (GA4) is used to track when a user adds an item to their wishlist on an ecommerce website. This event can be used to understand how users are interacting with different products and can provide insights into which products are most popular or which are being saved by users for future purchase.

To track the ‘add_to_wishlist‘ event in GA4, you will need to add the event code to your website’s HTML or JavaScript. The event code typically includes parameters such as the event name (‘add_to_wishlist‘), the product that was added to the wishlist, and any additional information such as the product category.

For example, the following code snippet shows an example of how to track a ‘add_to_wishlist’ event in GA4:

gtag('event', 'add_to_wishlist', {
  'items': [
    {
      'item_id': 'P12345',
      'item_name': 'Android Warhol T-Shirt',
      'item_brand': 'Google',
      'item_category': 'Apparel',
      'item_variant': 'black',
      'price': '29.20',
      'quantity': '1'
    }
  ]
});

Once the event is set up correctly, it will start sending data to your GA4 property and you will be able to view the event in the GA4 reports.

GA4 “add_to_wishlist” data layer using Google Tag Manager: The ‘add_to_wishlist‘ event in Google Analytics 4 (GA4) can be used to track when a user adds an item to their wishlist on an ecommerce website using a data layer. This event can be used to understand how users are interacting with different products and can provide insights into which products are most popular or which are being saved by users for future purchase.

To track the ‘add_to_wishlist‘ event in GA4 using a data layer, you will need to create a data layer object on your website’s pages and push data into it when a user adds an item to their wishlist. For example, when a user adds a product to their wishlist, the following data could be pushed into the data layer:

dataLayer.push({
  'event': 'add_to_wishlist',
  'items': [
    {
      'item_id': 'P12345',
      'item_name': 'Android Warhol T-Shirt',
      'item_brand': 'Google',
      'item_category': 'Apparel',
      'item_variant': 'black',
      'price': '29.20',
      'quantity': '1'
    }
  ]
});

Once the data is in the data layer, you can then configure GA4 to listen for the add_to_wishlist event and use the data to track product views and other ecommerce metrics.

GA4 Ecommerce and Purchase Event Setup

Integrating Google Analytics (GA4) Enhanced Ecommerce using Google Tag Manager

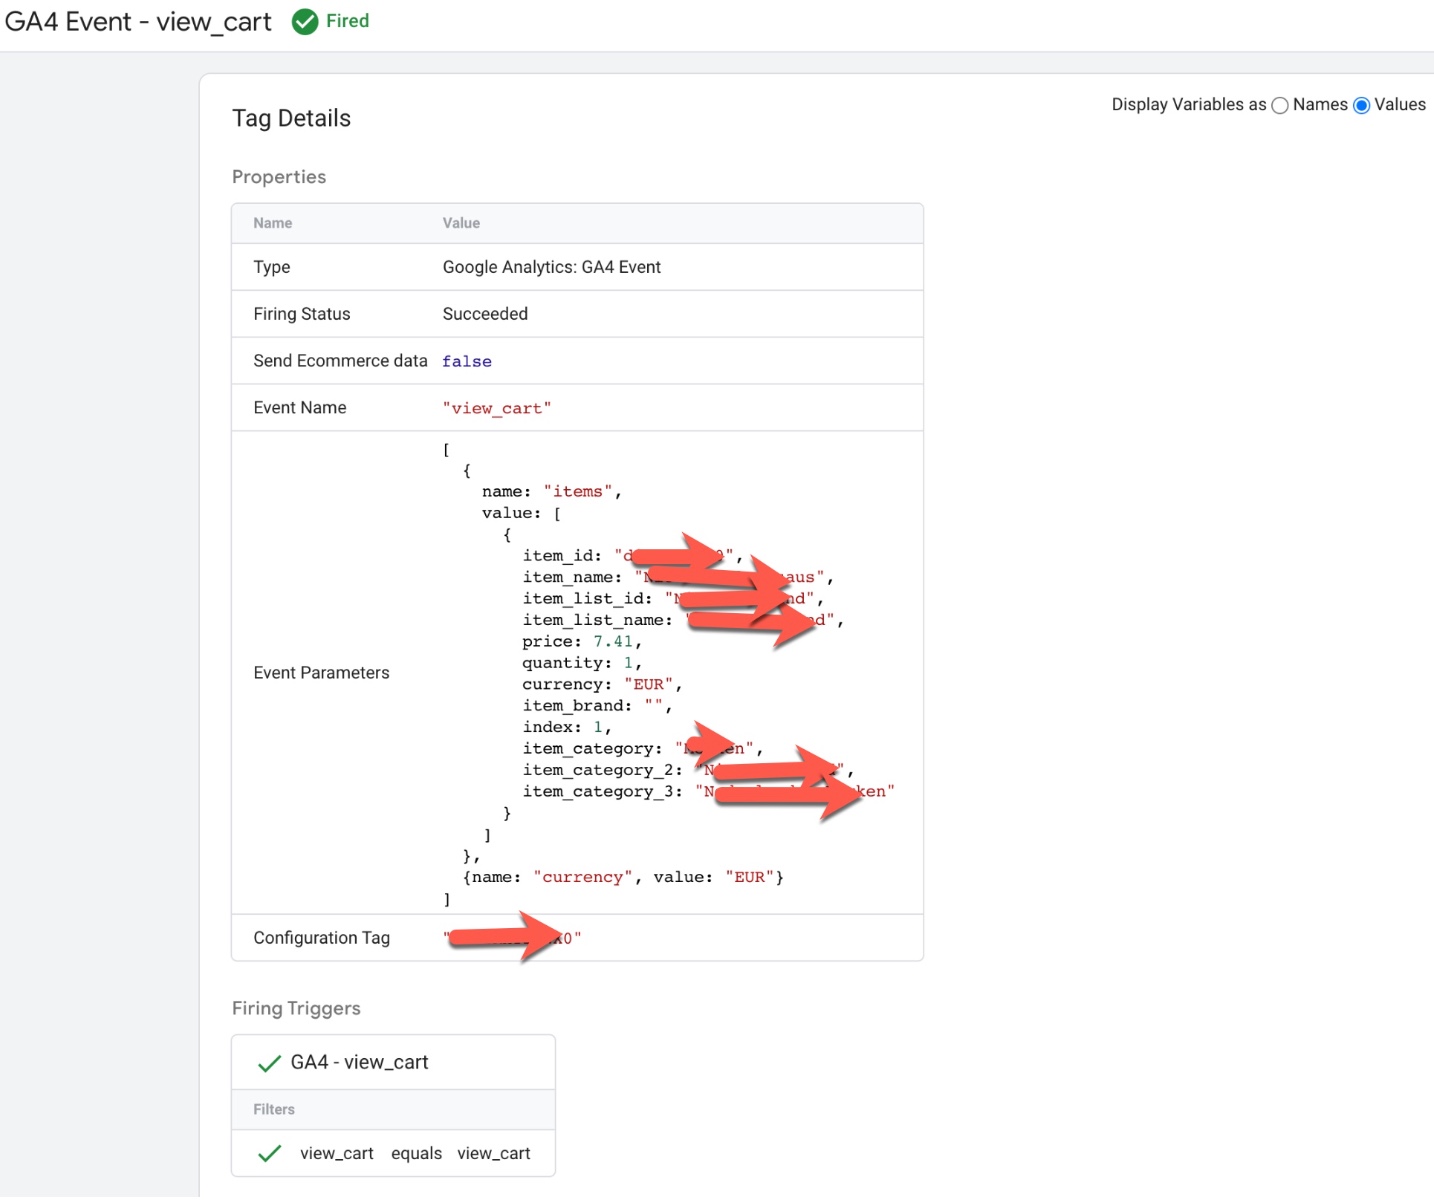
GA4 “view_cart” data layer using Google Tag Manager: The ‘view_cart’ event in Google Analytics 4 (GA4) can be used to track when a user views their cart on an ecommerce website using a data layer. This event can be used to understand how users are interacting with the cart feature and can provide insights into the cart abandonment rate, average items per cart, and other metrics.

To track the ‘view_cart’ event in GA4 using a data layer, you will need to create a data layer object on your website’s pages and push data into it when a user views their cart.

For example, when a user views their cart, the following data could be pushed into the data layer:

dataLayer.push({
  'event': 'view_cart',
  'items': [
    {
      'item_id': 'P12345',
      'item_name': 'Android Warhol T-Shirt',
      'item_brand': 'Google',
      'category': 'Apparel',
      'item_variant': 'black',
      'price': '29.20',
      'quantity': '1'
    },
    {
      'item_id': 'P54321',
      'item_name': 'Google Pixel Phone',
      'item_brand': 'Google',
      'item_category': 'Electronics',
      'item_variant': 'black',
      'price': '799.00',
      'quantity': '1'
    }
  ],
  'value': 828.20
});

Once the data is in the data layer, you can then configure GA4 to listen for the ‘view_cart’ event and use the data to track cart views and other ecommerce metrics. 

‘view_cart’ event in Google Analytics 4: The ‘view_cart’ event in Google Analytics 4 (GA4) is used to track when a user views their cart on an ecommerce website. This event can be used to understand how users are interacting with the cart feature and can provide insights into the cart abandonment rate, average items per cart and other metrics.

To track the ‘view_cart’ event in GA4, you will need to add the event code to your website’s HTML or JavaScript. The event code typically includes parameters such as the event name (‘view_cart‘) and any additional information such as the total value of the items in the cart.

For example, the following code snippet shows an example of how to track a ‘view_cart‘ event in GA4:

gtag('event', 'view_cart', {
  'items': [
    {
      'item_id': 'P12345',
      'item_name': 'Android Warhol T-Shirt',
      'item_brand': 'Google',
      'item_category': 'Apparel',
      'item_variant': 'black',
      'price': '29.20',
      'quantity': '1'
    },
    {
      'item_id': 'P54321',
      'item_name': 'Google Pixel Phone',
      'item_brand': 'Google',
      'item_category': 'Electronics',
      'item_variant': 'black',
      'price': '799.00',
      'quantity': '1'
    }
  ],
  'value': 828.20
});
GA4 Enhanced Ecommerce Tracking Setup

Revenue Measurement with GA4 eCommerce Tracking using Google Tag Manager

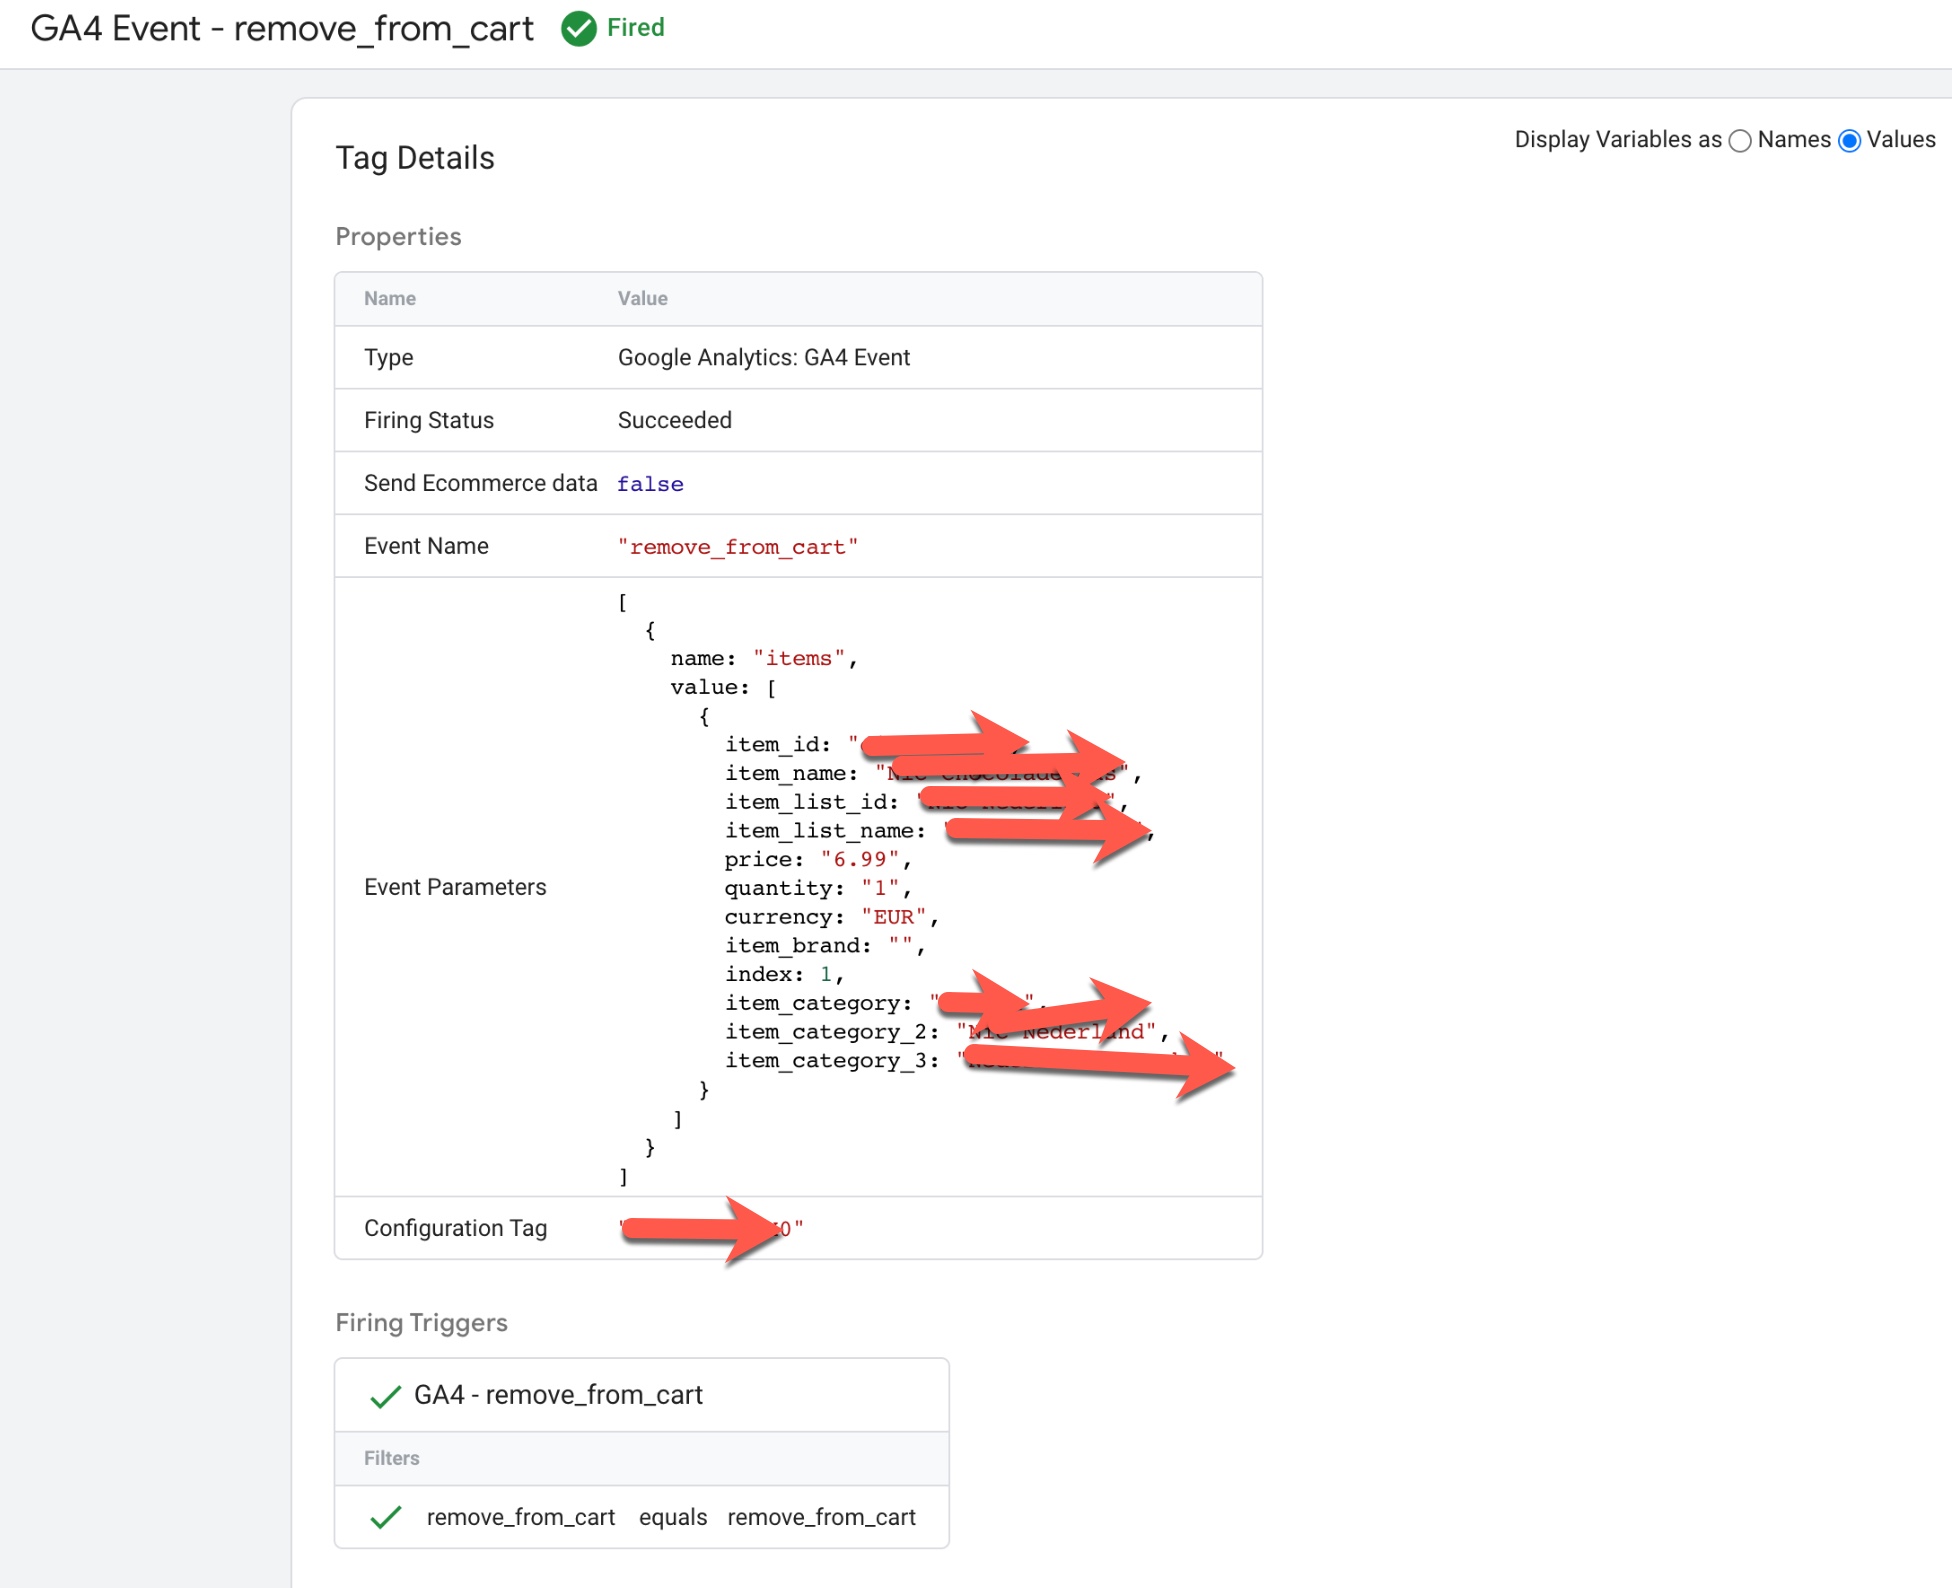
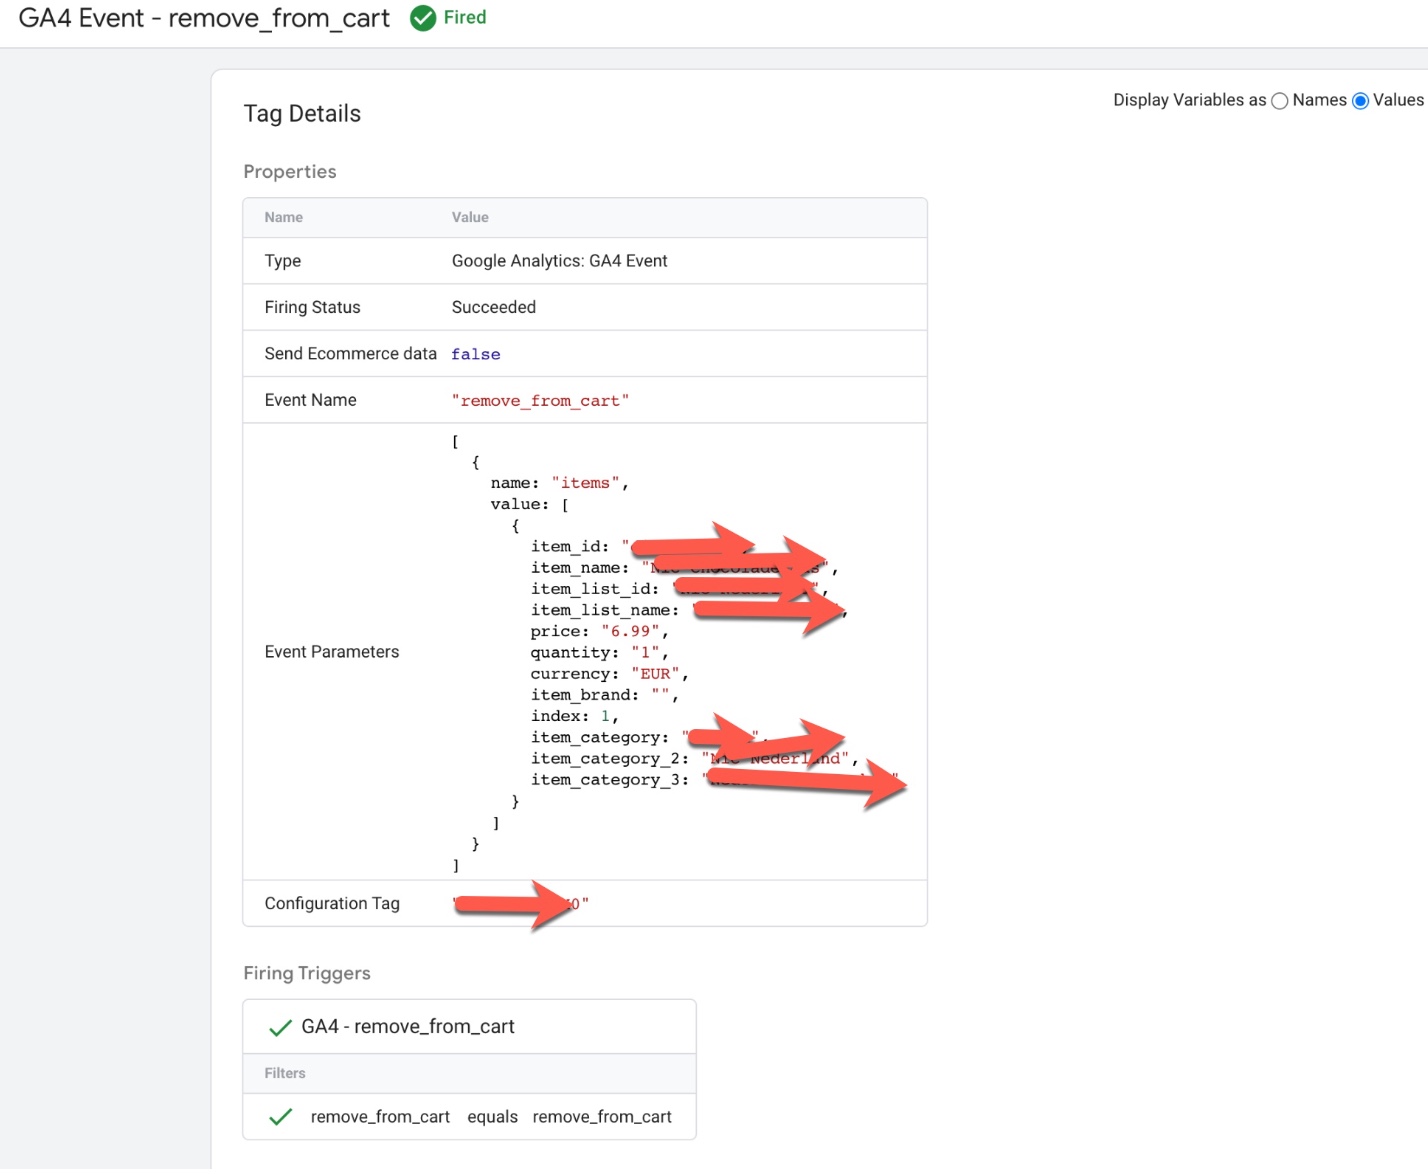
‘remove_from_cart’ event in Google Analytics 4: The ‘remove_from_cart’ event in Google Analytics 4 (GA4) is used to track when a user removes an item from their cart on an ecommerce website. This event can be used to understand how users are interacting with the cart feature and can provide insights into the cart abandonment rate, average items per cart, and other metrics.

To track the ‘remove_from_cart’ event in GA4, you will need to add the event code to your website’s HTML or JavaScript. The event code typically includes parameters such as the event name (‘remove_from_cart’), the product that was removed from the cart, and any additional information such as the product category.

For example, the following code snippet shows an example of how to track a ‘remove_from_cart’ event in GA4:

gtag('event', 'remove_from_cart', {
  'items': [
    {
      'item_id': 'P12345',
      'item_name': 'Android Warhol T-Shirt',
      'item_brand': 'Google',
      'item_category': 'Apparel',
      'item_variant': 'black',
      'price': '29.20',
      'quantity': '1'
    }
  ]
});

Once the event is set up correctly, it will start sending data to your GA4 property and you will be able to view the event in the GA4 reports.

GA4 “remove_from_cart” data layer using Google Tag Manager:  The ‘remove_from_cart’ event in Google Analytics 4 (GA4) can be used to track when a user removes an item from their cart on an ecommerce website using a data layer. This event can be used to understand how users are interacting with the cart feature and can provide insights into the cart abandonment rate, average items per cart, and other metrics.

To track the ‘remove_from_cart’ event in GA4 using a data layer, you will need to create a data layer object on your website’s pages and push data into it when a user removes an item from their cart. For example, when a user removes a product from their cart, the following data could be pushed into the data layer:

dataLayer.push({
  'event': 'remove_from_cart',
  'items': [
    {
      'item_id': 'P12345',
      'item_name': 'Android Warhol T-Shirt',
      'item_brand': 'Google',
      'item_category': 'Apparel',
      'item_variant': 'black',
      'price': '29.20',
      'quantity': '1'
    }
  ]
});
Set up a purchase event GA4

UA ecommerce implementation to populate GA4 ecommerce events using Google Tag Manager

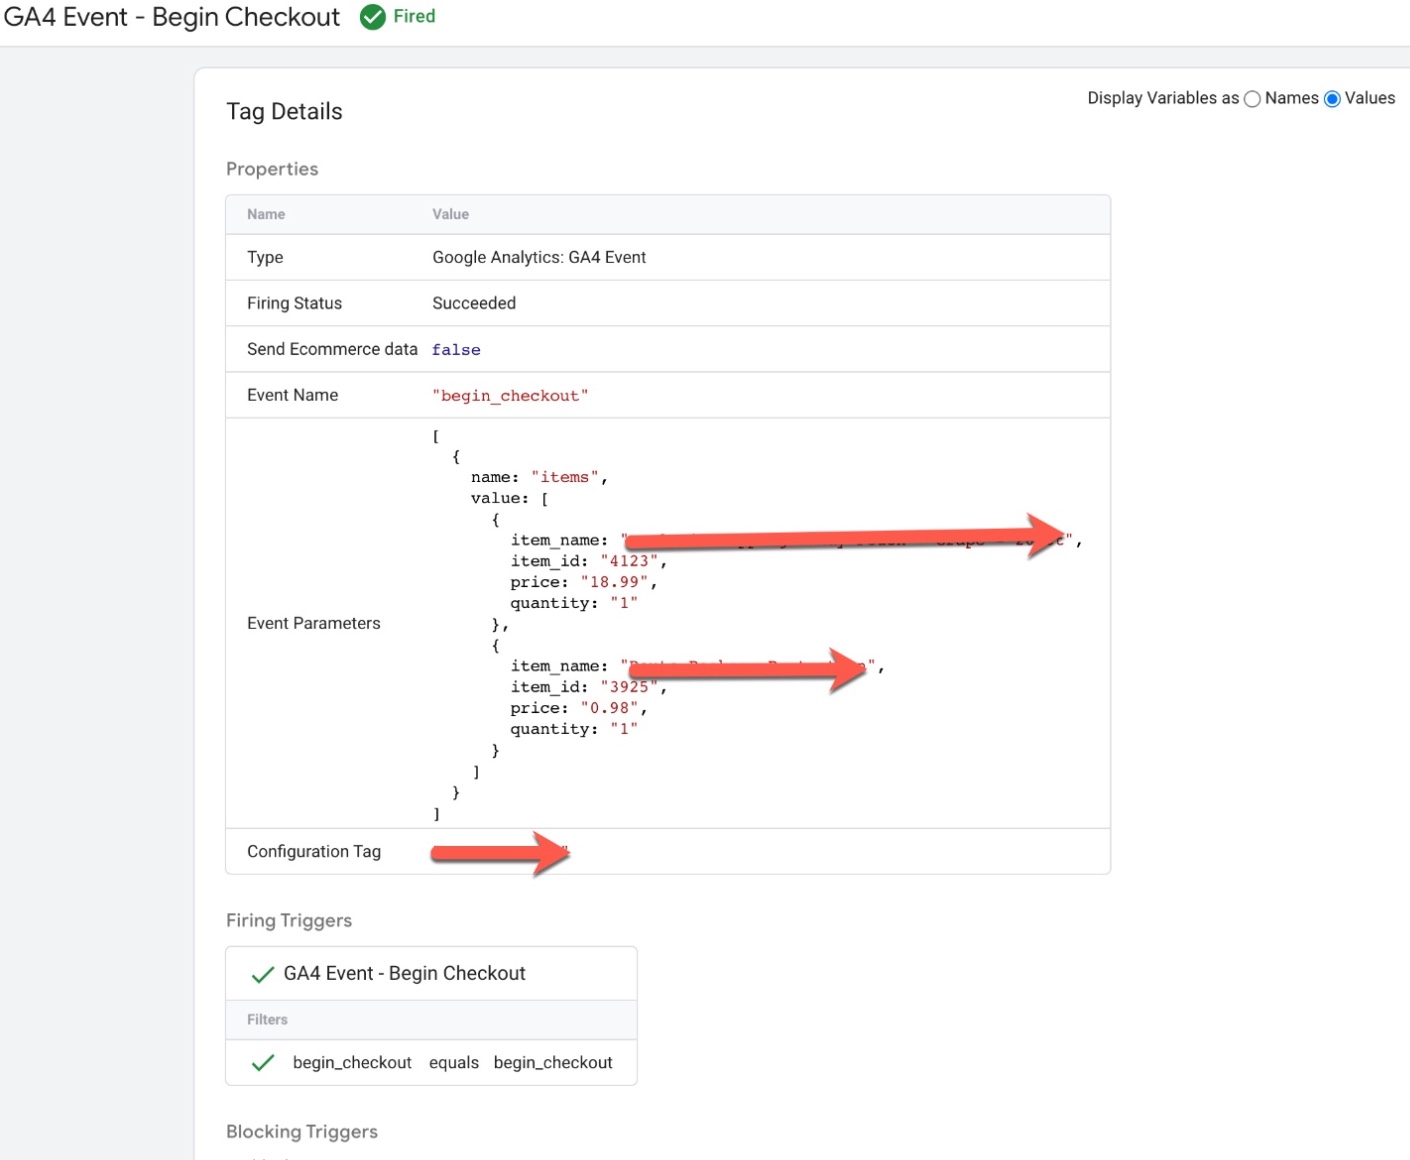
‘begin_checkout’ event in Google Analytics 4: The ‘begin_checkout’ event in Google Analytics 4 (GA4) is used to track when a user begins the checkout process on an ecommerce website. This event can be used to understand how users are interacting with the checkout feature and can provide insights into the checkout conversion rate, average order value and other metrics.

To track the ‘begin_checkout’ event in GA4, you will need to add the event code to your website’s HTML or JavaScript. The event code typically includes parameters such as the event name (‘begin_checkout’), the products that are included in the order, and any additional information such as the total value of the order.

For example, the following code snippet shows an example of how to track a ‘begin_checkout’ event in GA4:

gtag('event', 'begin_checkout', {
  'items': [
    {
      'item_id': 'P12345',
      'item_name': 'Android Warhol T-Shirt',
      'item_brand': 'Google',
      'item_category': 'Apparel',
      'item_variant': 'black',
      'price': '29.20',
      'quantity': '1'
    },
    {
      'item_id': 'P54321',
      'item_name': 'Google Pixel Phone',
      'item_brand': 'Google',
      'item_category': 'Electronics',
      'item_variant': 'black',
      'price': '799.00',
      'quantity': '1'
    }
  ],
  'value': 828.20
});

Once the event is set up correctly, it will start sending data to your GA

GA4 “begin_checkout” data layer using Google Tag Manager: The ‘begin_checkout’ event in Google Analytics 4 (GA4) can be used to track when a user begins the checkout process on an ecommerce website using a data layer. This event can be used to understand how users are interacting with the checkout feature and can provide insights into the checkout conversion rate, average order value and other metrics.

To track the ‘begin_checkout‘ event in GA4 using a data layer, you will need to create a data layer object on your website’s pages and push data into it when a user begins the checkout process.

For example, when a user begins the checkout process, the following data could be pushed into the data layer:

dataLayer.push({
  'event': 'begin_checkout',
  'items': [
    {
      'item_id': 'P12345',
      'item_name': 'Android Warhol T-Shirt',
      'item_brand': 'Google',
      'item_category': 'Apparel',
      'item_variant': 'black',
      'price': '29.20',
      'quantity': '1'
    },
    {
      'item_id': 'P54321',
      'item_name': 'Google Pixel Phone',
      'item_brand': 'Google',
      'item_category': 'Electronics',
      'item_variant': 'black',
      'price': '799.00',
      'quantity': '1'
    }
  ],
  'value': 828.20,
});

Once the data is in the data layer, you can then configure GA4 to listen for the ‘begin_checkout’ event and use the data to track checkout views and other ecommerce metrics.

Track Events with Google Analytics 4

Setup Google Analytics 4, GA4 Ecommerce Tracking using Google Tag Manager

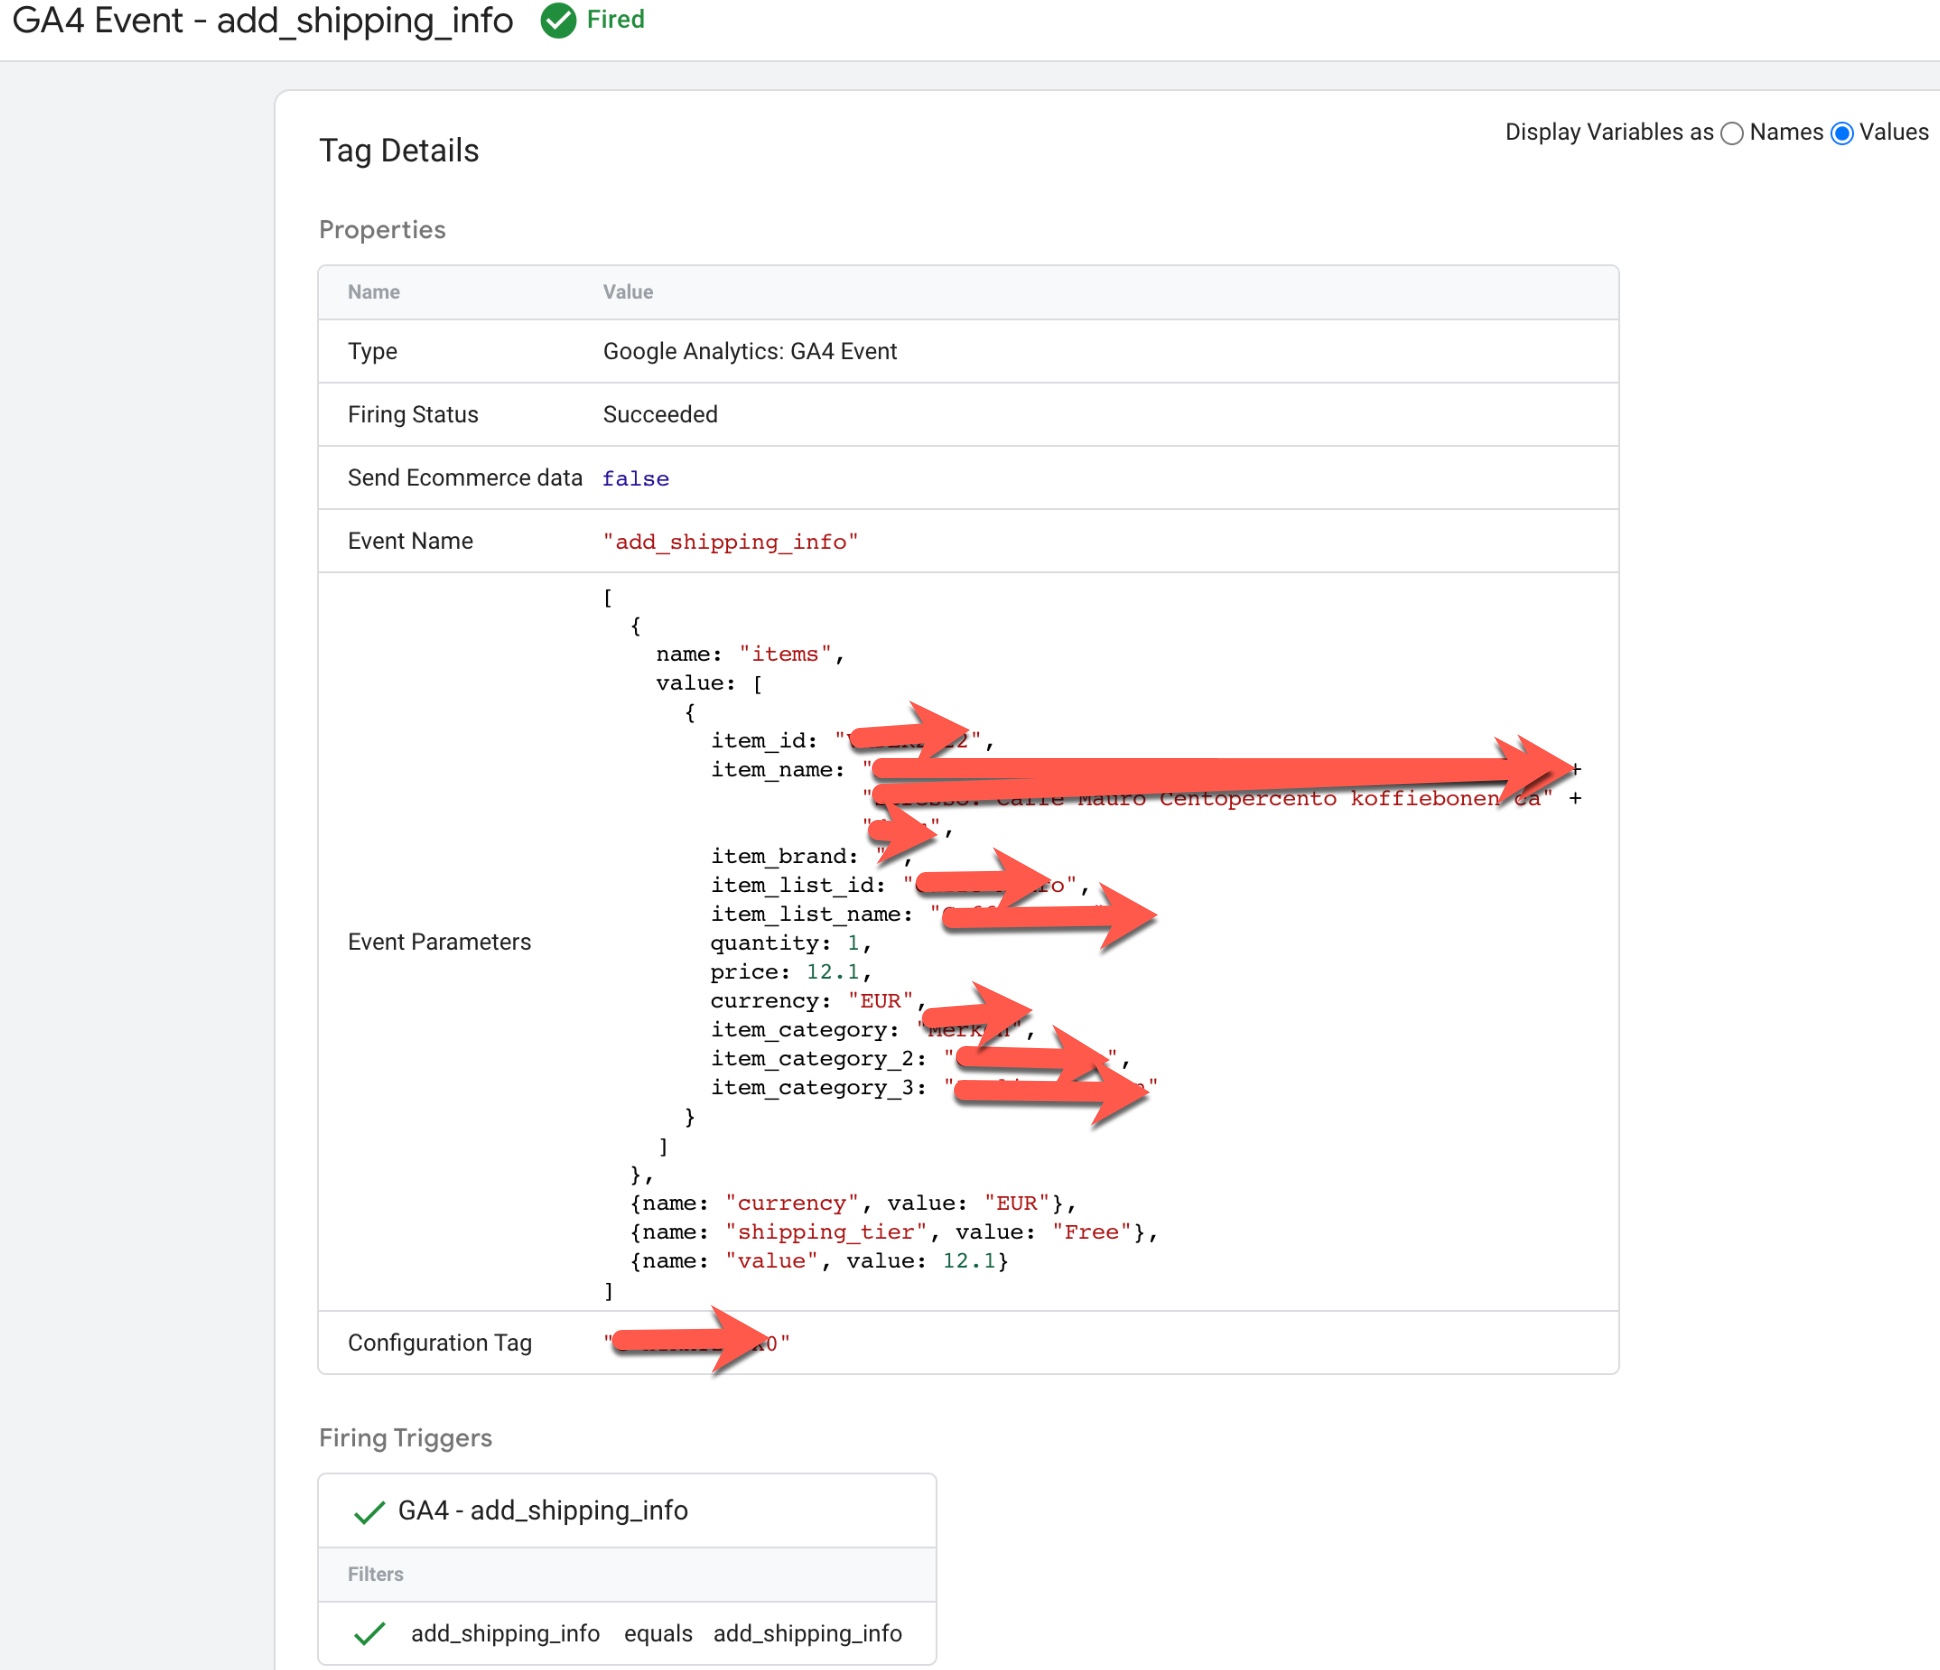
‘add_shipping_info’ event in Google Analytics 4: The ‘add_shipping_info’ event in Google Analytics 4 (GA4) is used to track when a user enters their shipping information during the checkout process on an ecommerce website. This event can be used to understand how users are interacting with the checkout feature and can provide insights into the checkout conversion rate, average order value, and other metrics.

To track the ‘add_shipping_info’ event in GA4, you will need to add the event code to your website’s HTML or JavaScript. The event code typically includes parameters such as the event name (‘add_shipping_info’) and any additional information such as the shipping address and method.

For example, the following code snippet shows an example of how to track a ‘add_shipping_info’ event in GA4:

gtag('event', 'add_shipping_info', {
  'items': [
    {
      'item_id': 'P12345',
      'item_name': 'Android Warhol T-Shirt',
      'item_brand': 'Google',
      'item_category': 'Apparel',
      'item_variant': 'black',
      'price': '29.20',
      'quantity': '1'
    },
    {
      'item_id': 'P54321',
      'item_name': 'Google Pixel Phone',
      'item_brand': 'Google',
      'item_category': 'Electronics',
      'item_variant': 'black',
      'price': '799.00',
      'quantity': '1'
    }
  ],
  'value': 828.20,
  'shipping_tier': "FedEx Ground"
});

Once the event is set up correctly, it will start sending data to your GA4 property and you will be able to view the event in the GA4 reports.

GA4 “add_shipping_info” data layer using Google Tag Manager: The ‘add_shipping_info’ event in Google Analytics 4 (GA4) can be used to track when a user enters their shipping information during the checkout process on an ecommerce website using a data layer. This event can be used to understand how users are interacting with the checkout feature and can provide insights into the checkout conversion rate, average order value, and other metrics.

To track the ‘add_shipping_info’ event in GA4 using a data layer, you will need to create a data layer object on your website’s pages and push data into it when a user enters their shipping information.

For example, when a user enters their shipping information, the following data could be pushed into the data layer:

dataLayer.push({
  'event': 'add_shipping_info',
  'items': [
    {
      'item_id': 'P12345',
      'item_name': 'Android Warhol T-Shirt',
      'item_brand': 'Google',
      'item_category': 'Apparel',
      'item_variant': 'black',
      'price': '29.20',
      'quantity': '1'
    },
    {
      'item_id': 'P54321',
      'item_name': 'Google Pixel Phone',
      'item_brand': 'Google',
      'item_category': 'Electronics',
      'item_variant': 'black',
      'price': '799.00',
      'quantity': '1'
    }
  ],
  'value': 828.20,
  'shipping_tier': "FedEx Ground"
});
 GA4 Ecommerce Tracking Implementation

Transfer E-commerce Data From Universal Analytics to GA4 using Google Tag Manager

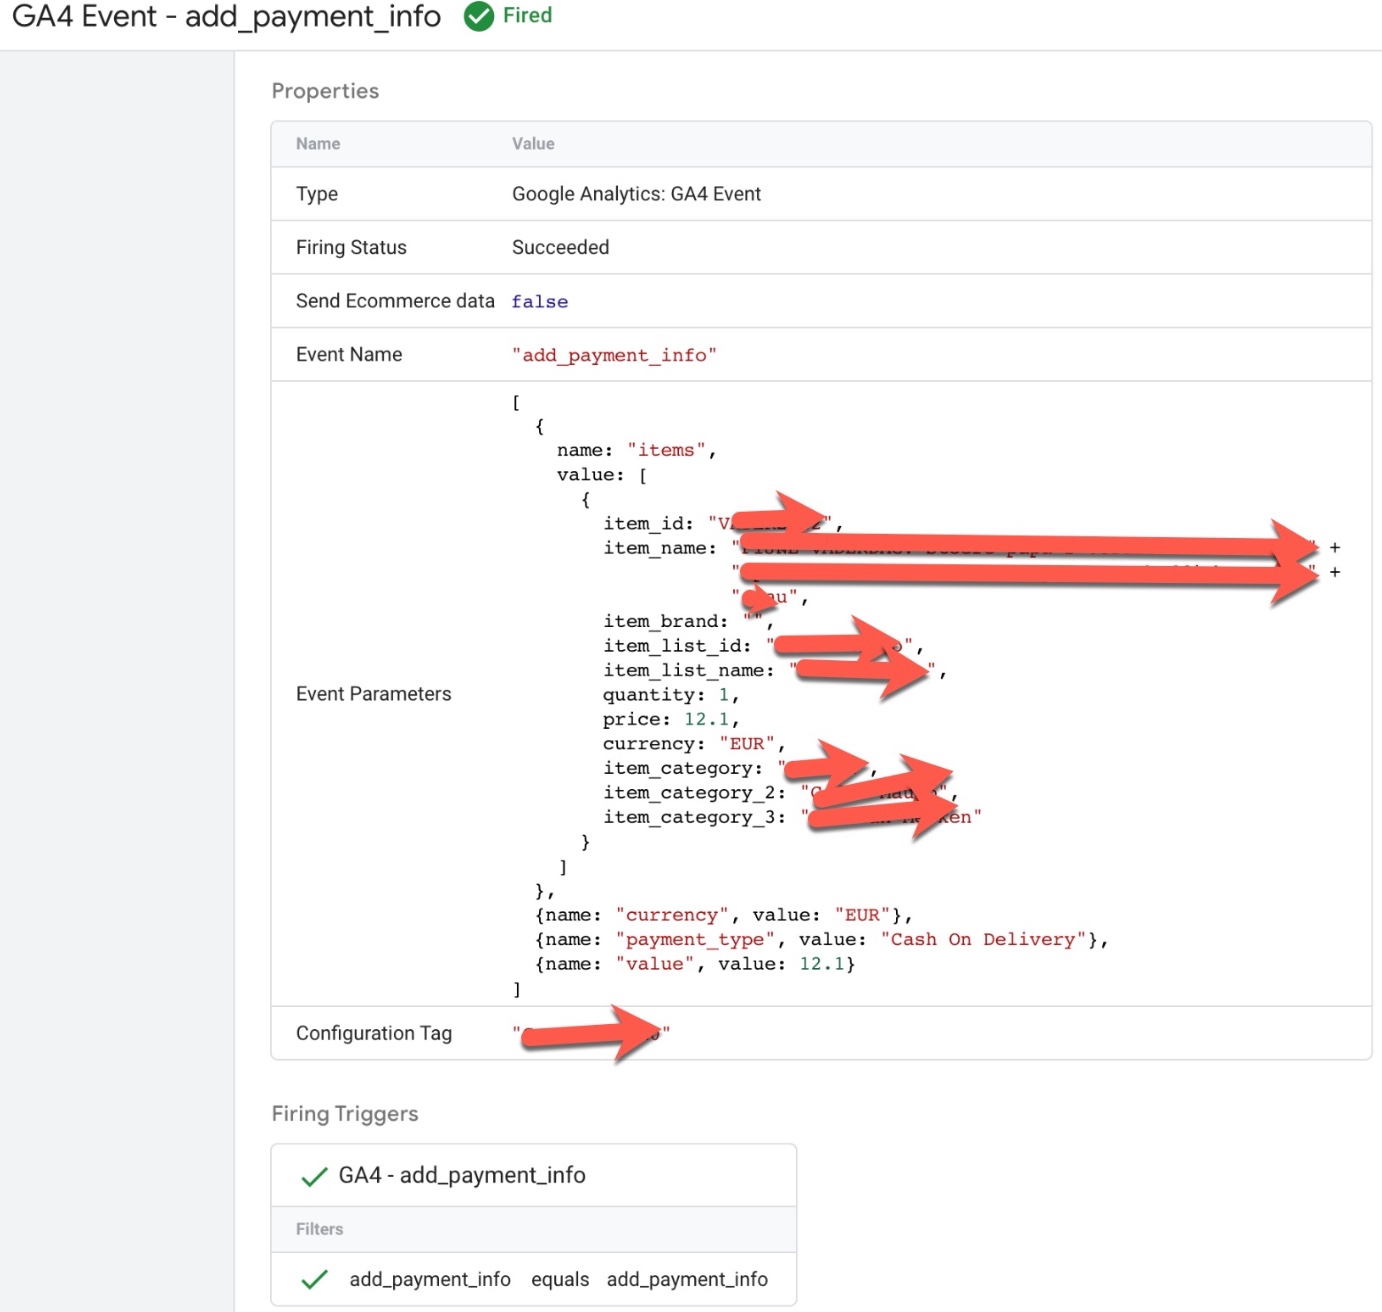
‘add_payment_info’ event in Google Analytics 4: The ‘add_payment_info’ event in Google Analytics 4 (GA4) is used to track when a user enters their payment information during the checkout process on an ecommerce website. This event can be used to understand how users are interacting with the checkout feature and can provide insights into the checkout conversion rate, average order value, and other metrics.

To track the ‘add_payment_info’ event in GA4, you will need to add the event code to your website’s HTML or JavaScript. The event code typically includes parameters such as the event name (‘add_payment_info’) and any additional information such as the payment method and transaction ID.

gtag('event', 'add_payment_info', {
  'items': [
    {
      'item_id': 'P12345',
      'item_name': 'Android Warhol T-Shirt',
      'item_brand': 'Google',
      'item_category': 'Apparel',
      'item_variant': 'black',
      'price': '29.20',
      'quantity': '1'
    },
    {
      'item_id': 'P54321',
      'item_name': 'Google Pixel Phone',
      'item_brand': 'Google',
      'item_category': 'Electronics',
      'item_variant': 'black',
      'price': '799.00',
      'quantity': '1'
    }
  ],
  'value': 828.20,
  'payment_type': "Visa"
});

GA4 “add_payment_info” data layer using Google Tag Manager: The ‘add_payment_info’ event in Google Analytics 4 (GA4) can be used to track when a user enters their payment information during the checkout process on an ecommerce website using a data layer. This event can be used to understand how users are interacting with the checkout feature and can provide insights into the checkout conversion rate, average order value, and other metrics.

To track the ‘add_payment_info’ event in GA4 using a data layer, you will need to create a data layer object on your website’s pages and push data into it when a user enters their payment information. For example, when a user enters their payment information, the following data could be pushed into the data layer:

dataLayer.push({
  'event': 'add_payment_info',
  'items': [
    {
      'item_id': 'P12345',
      'item_name': 'Android Warhol T-Shirt',
      'item_brand': 'Google',
      'item_category': 'Apparel',
      'item_variant': 'black',
      'price': '29.20',
      'quantity': '1'
    },
    {
      'item_id': 'P54321',
      'item_name': 'Google Pixel Phone',
      'item_brand': 'Google',
      'item_category': 'Electronics',
      'item_variant': 'black',
      'price': '799.00',
      'quantity': '1'
    }
  ],
  'value': 828.20,
  'payment_type': "Visa"
});

Once the data is in the data layer, you can then configure GA4 to listen for the ‘add_payment_info’ event and use the data to track payment information views and other ecommerce metrics.

Event and Conversion Tracking

Setting Up Event and Conversion Tracking in GA4 using Google Tag Manager

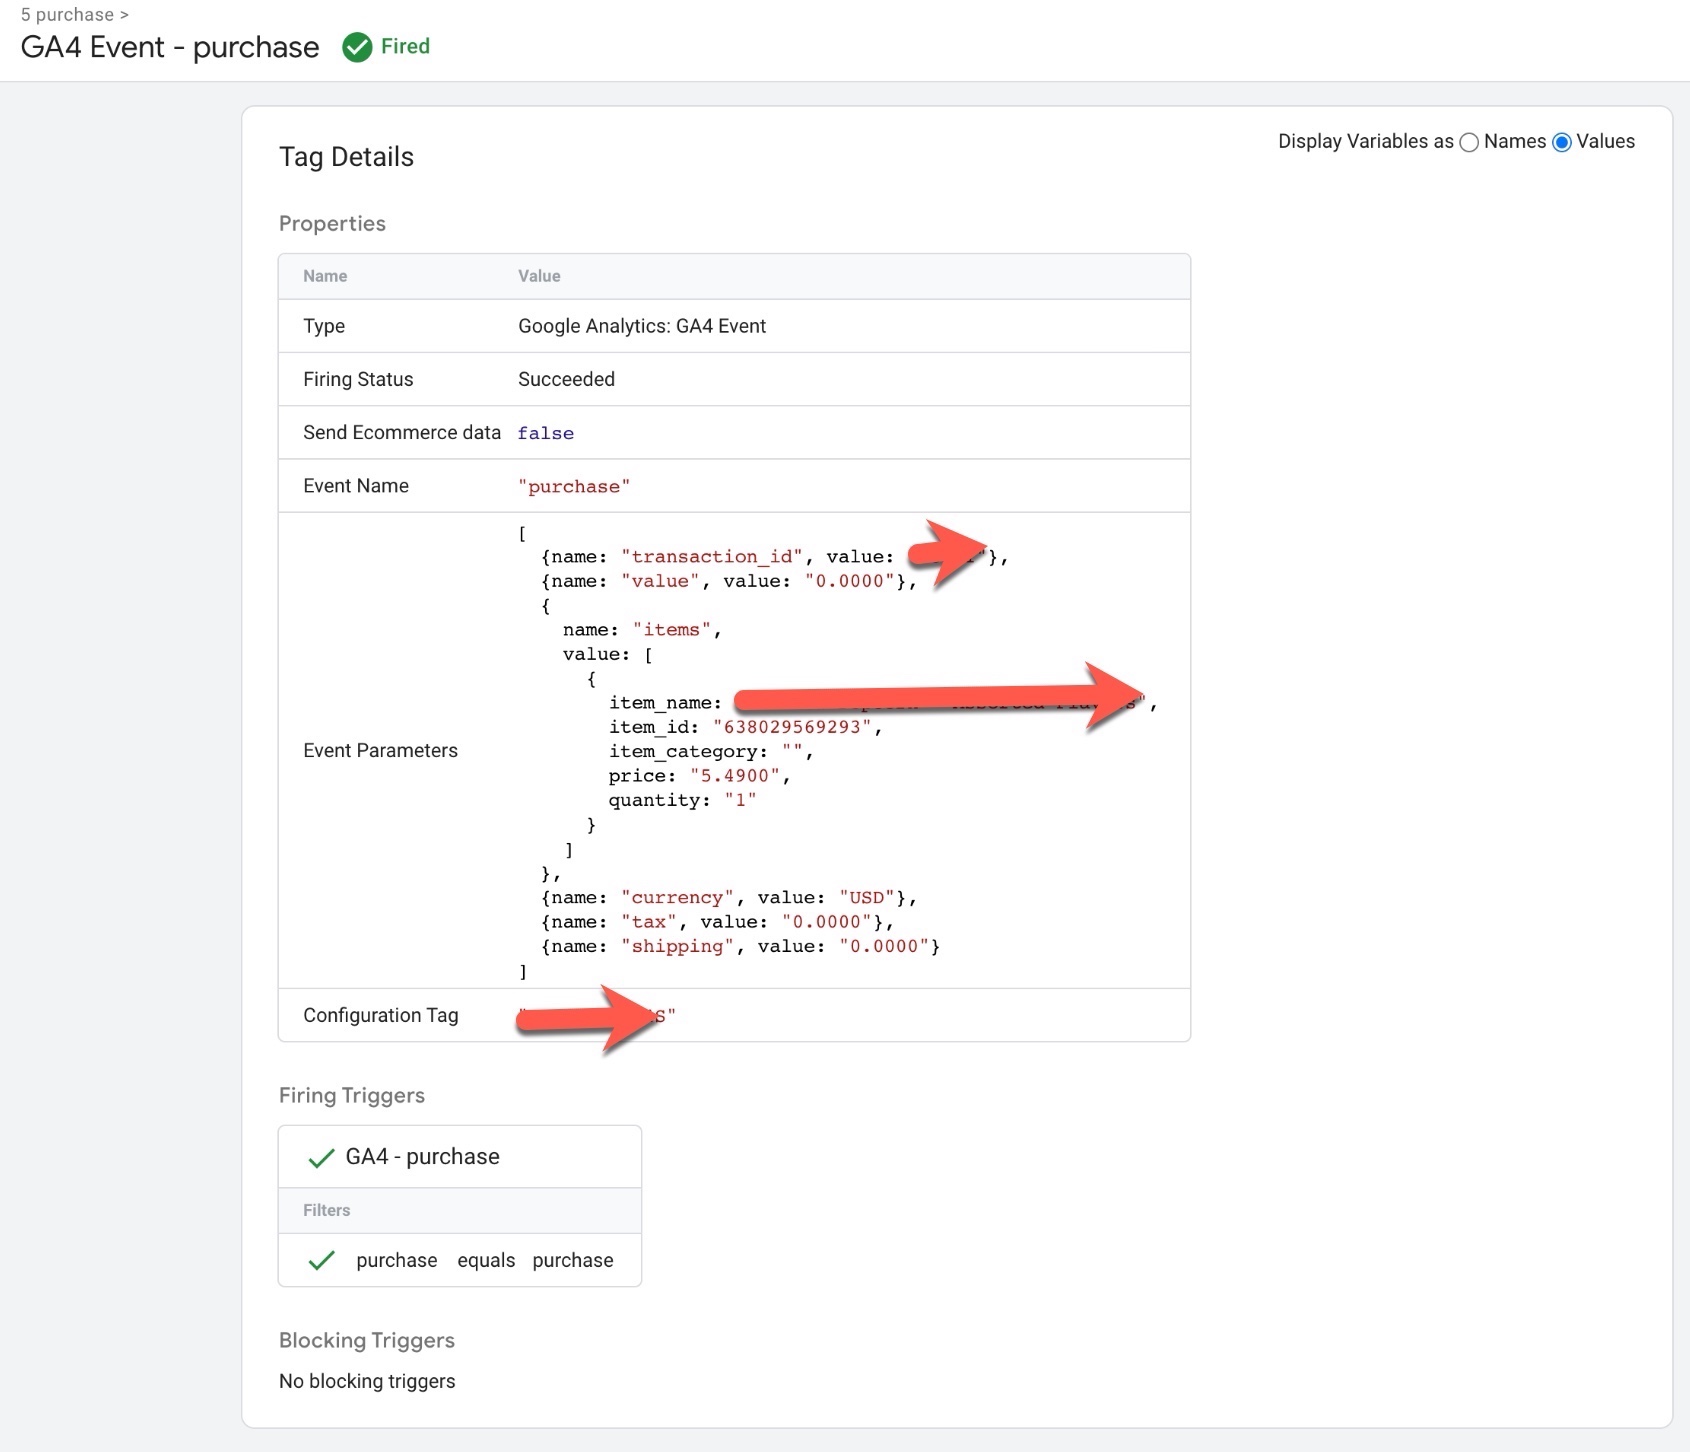
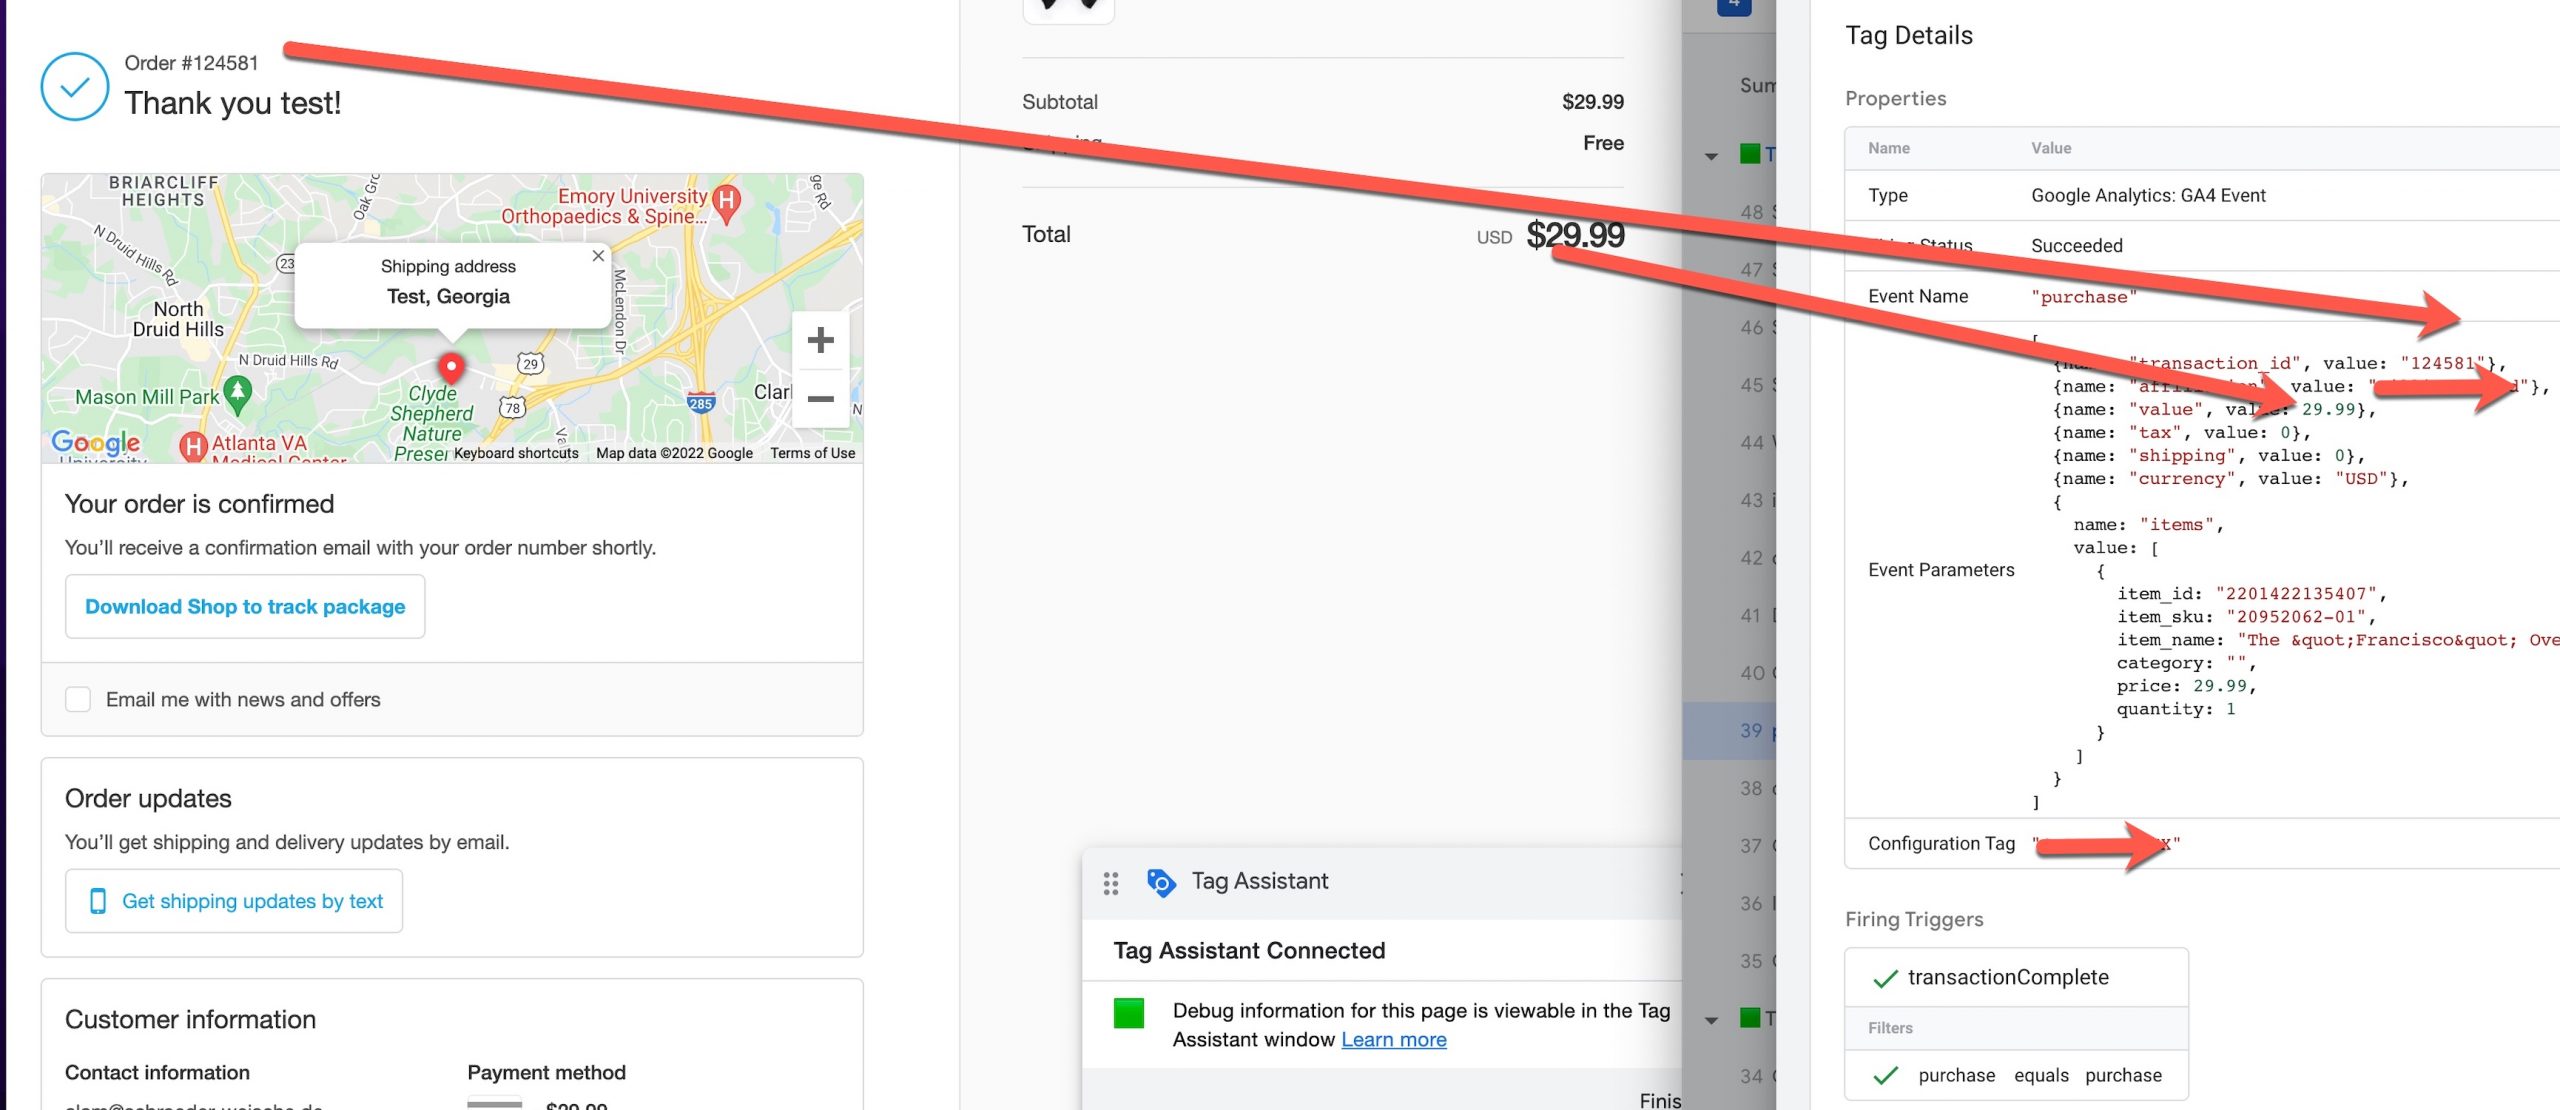
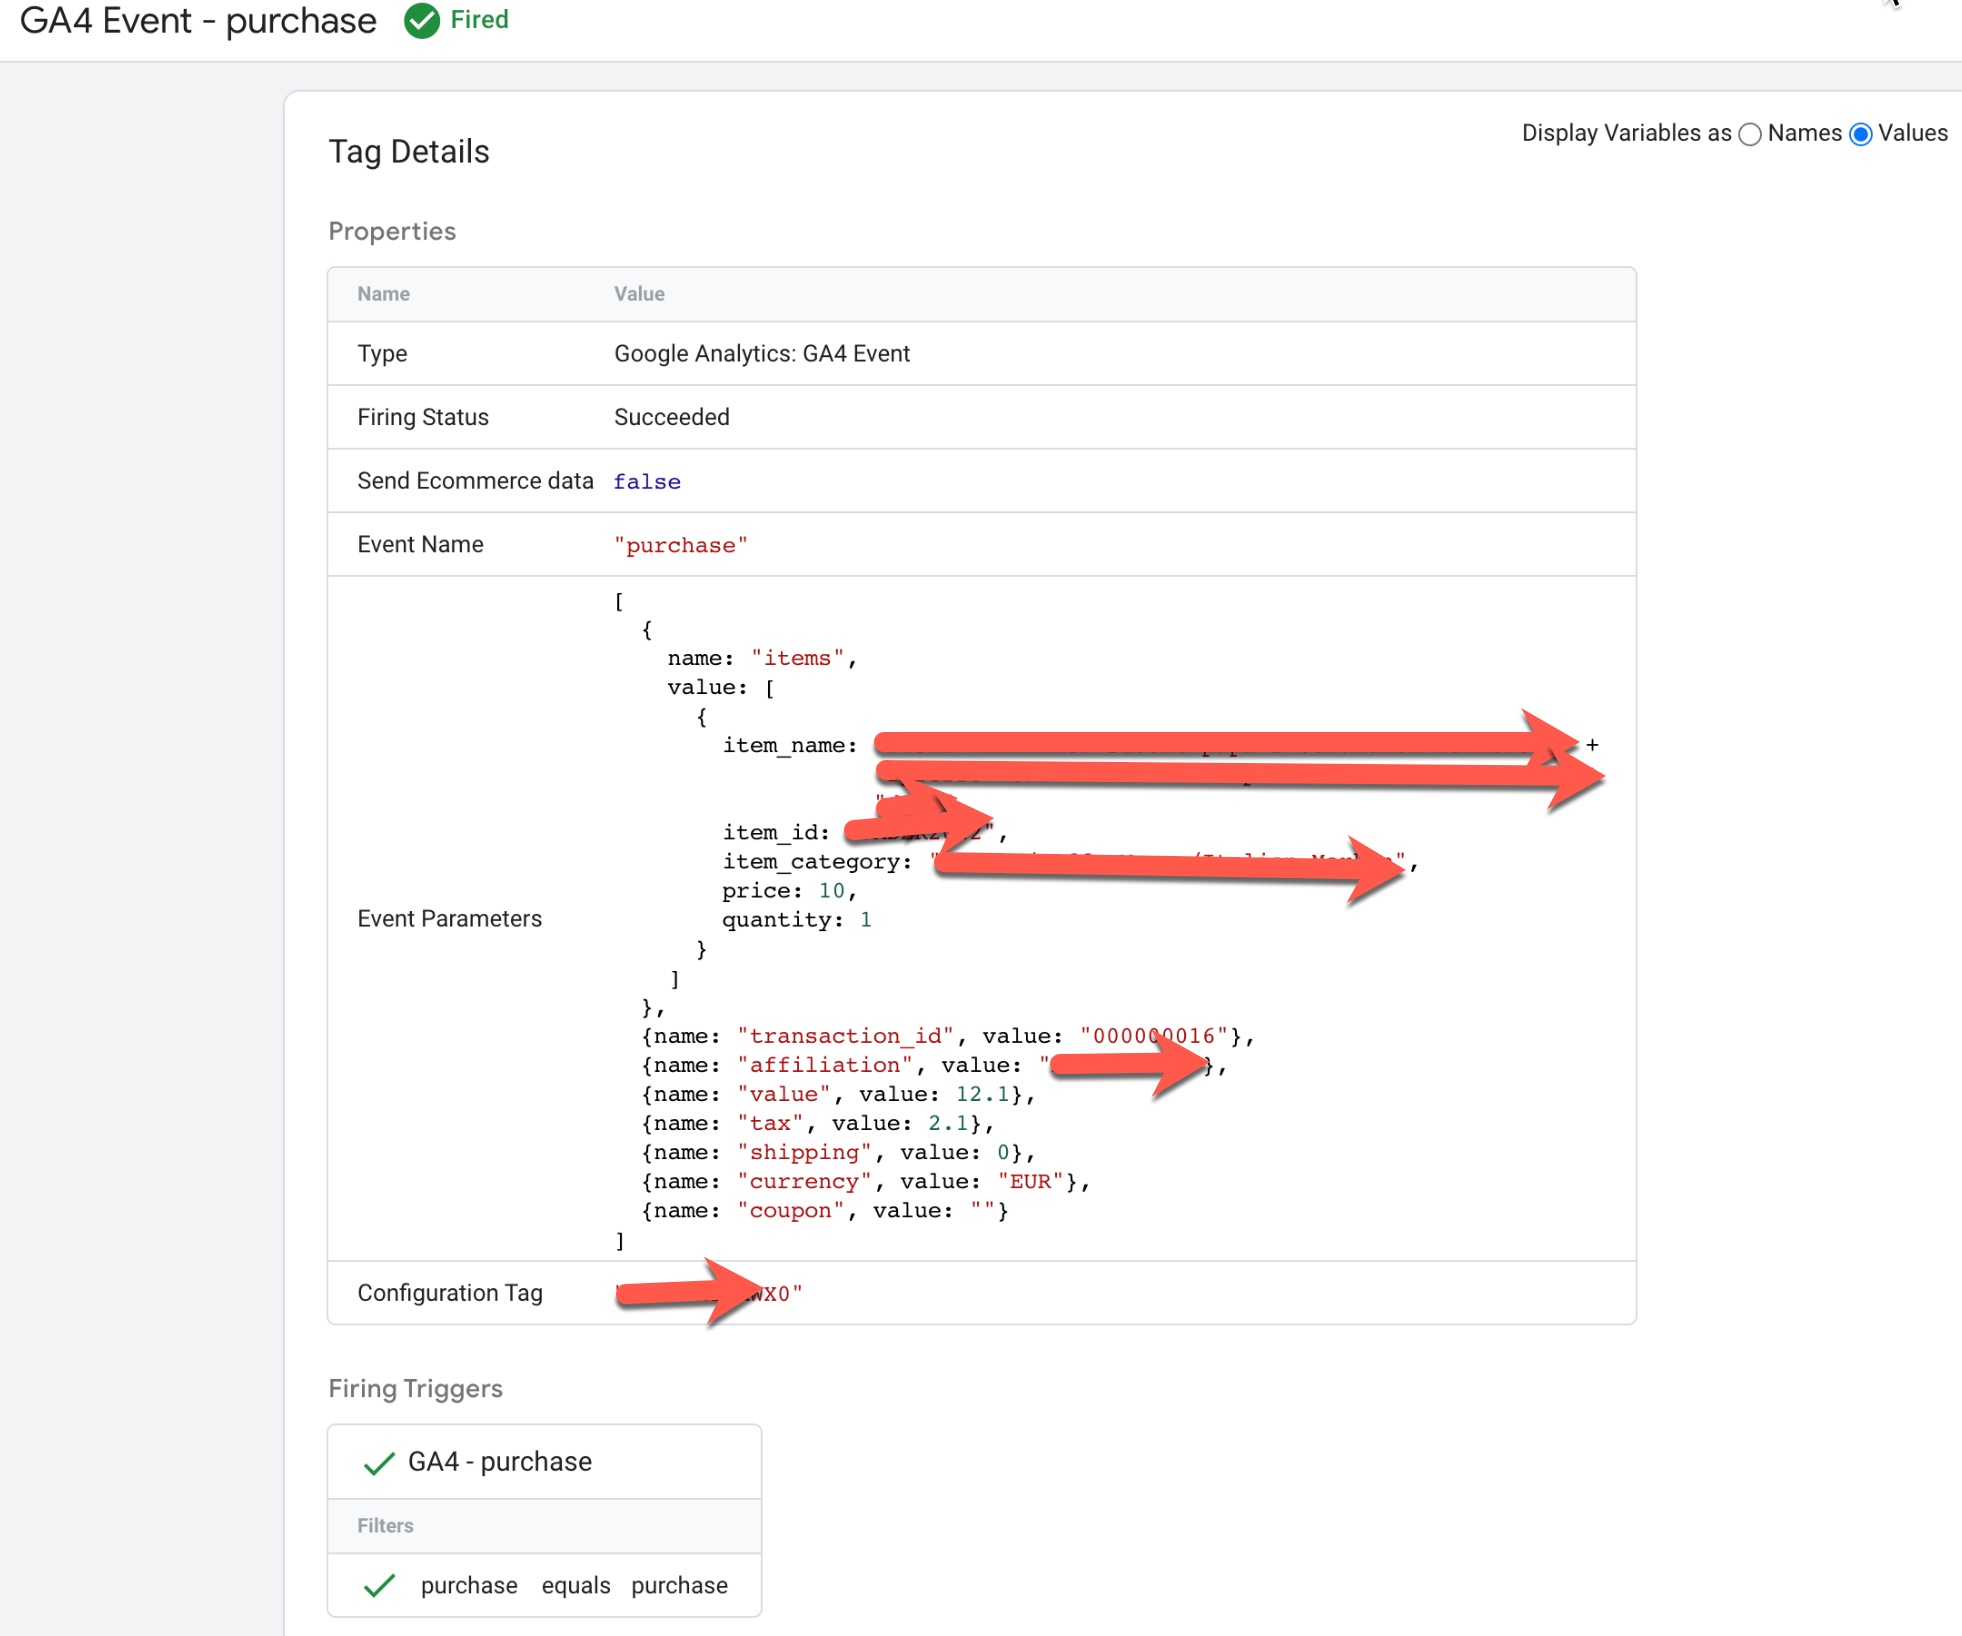
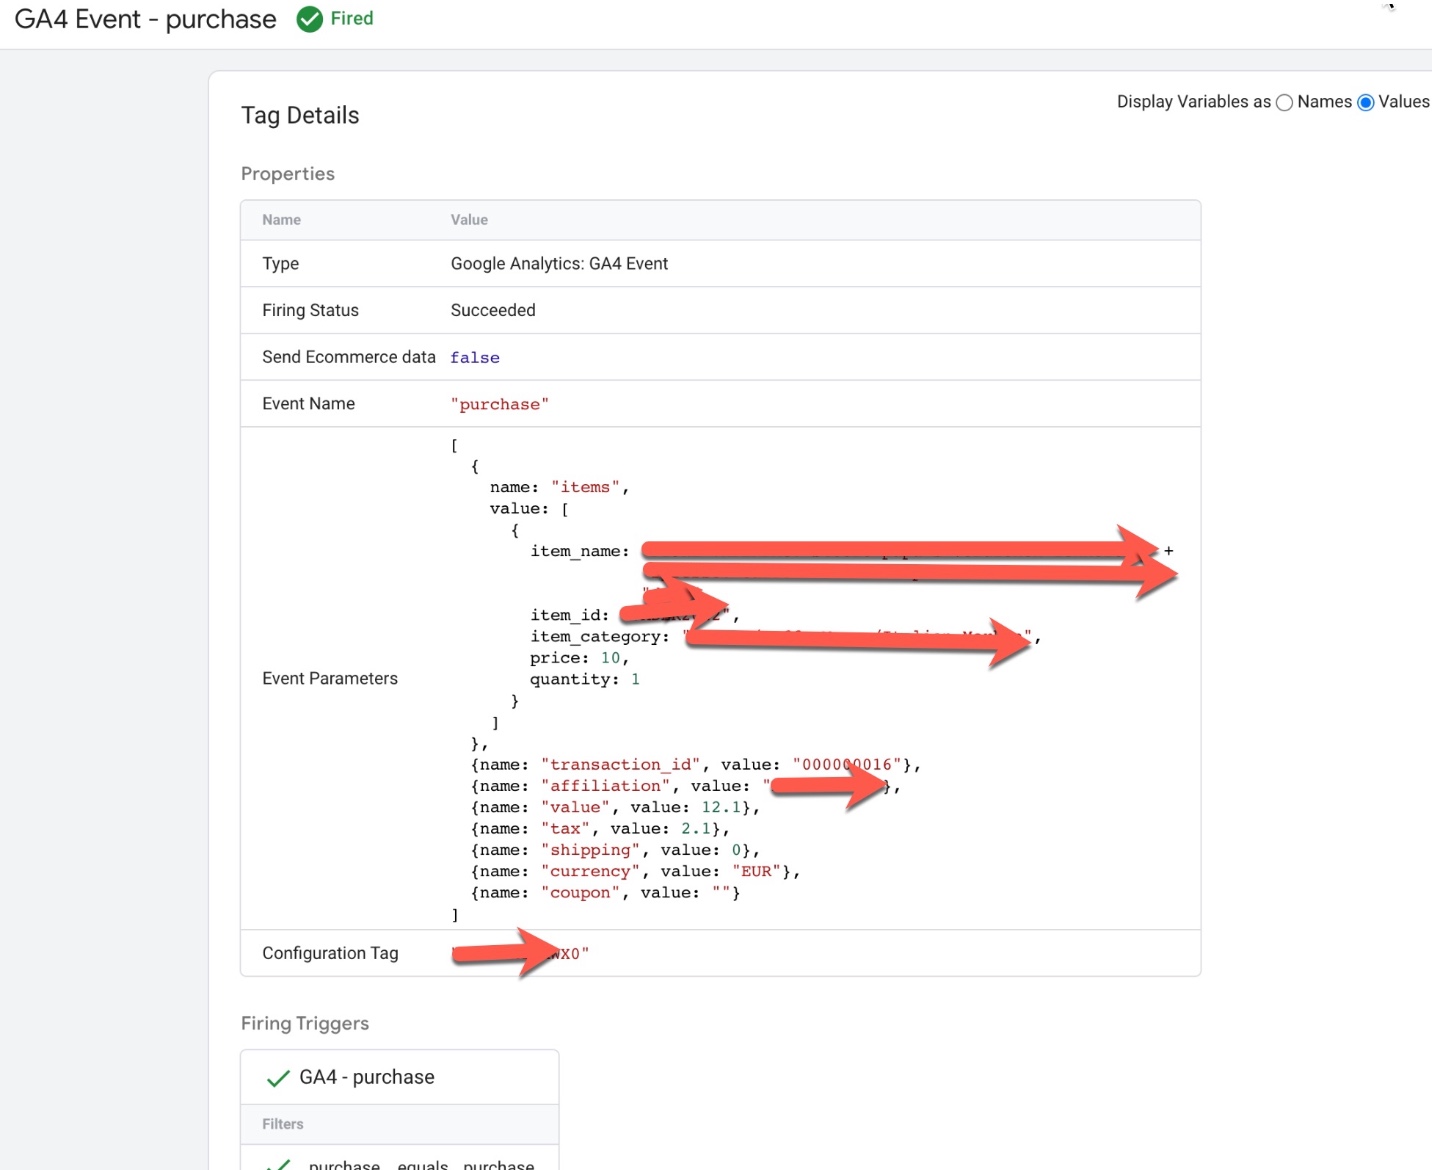
‘purchase’ event in Google Analytics 4: The purchase event in Google Analytics 4 (GA4) is used to track when a user completes a purchase on an ecommerce website. This event can be used to understand how users are interacting with the checkout feature and can provide insights into the checkout conversion rate, average order value, and other metrics.

To track the ‘purchase‘ event in GA4, you will need to add the event code to your website’s HTML or JavaScript. The event code typically includes parameters such as the event name (‘purchase‘), the products that were purchased, the transaction ID, and any additional information such as the order value and shipping cost.

For example, the following code snippet shows an example of how to track a ‘purchase’ event in GA4:

gtag('event', 'purchase', {
  'transaction_id': 'T12345',
  'affiliation': 'Google Store',
  'value': '120.00',
  'tax': '12.00',
  'shipping': '10.00',
  'items': [
    {
      'item_id': 'P12345',
      'item_name': 'Android Warhol T-Shirt',
      'item_brand': 'Google',
      'item_category': 'Apparel',
      'item_variant': 'black',
      'price': '29.20',
      'quantity': '1'
    },
    {
      'item_id': 'P54321',
      'item_name': 'Google Pixel Phone',
      'item_brand': 'Google',
      'item_category': 'Electronics',
      'item_variant': 'black',
      'price': '799.00',
      'quantity': '1'
    }
  ]
});

GA4 “purchase” data layer using Google Tag Manager:The ‘purchase’ event in Google Analytics 4 (GA4) can be used to track when a user completes a purchase on an ecommerce website using a data layer. This event can be used to understand how users are interacting with the checkout feature and can provide insights into the checkout conversion rate, average order value, and other metrics.

To track the ‘purchase’ event in GA4 using a data layer, you will need to create a data layer object on your website’s pages and push data into it when a user completes a purchase. For example, when a user completes a purchase, the following data could be pushed into the data layer:

dataLayer.push({
  'event': 'purchase',
  'transaction_id': 'T12345',
  'affiliation': 'Google Store',
  'value': '120.00',
  'tax': '12.00',
  'shipping': '10.00',
  'items': [
    {
      'id': 'P12345',
      'name': 'Android Warhol T-Shirt',
      'brand': 'Google',
      'category': 'Apparel',
      'variant': 'black',
      'price': '29.20',
      'quantity': '1'
    },
    {
      'id': 'P54321',
      'name': 'Google Pixel Phone',
      'brand': 'Google',
      'category': 'Electronics',
      'variant': 'black',
      'price': '799.00',
      'quantity': '1'
    }
  ]
});

Once the data is in the data layer, you can then configure GA4 to listen for the ‘purchase’ event and use the data to track purchase views and other ecommerce metrics.

Measuring transactions GA4 Enhanced Ecommerce

Implementing Google Analytic GA4 Enhanced Ecommerce Analytics using Google Tag Manager

Warning: If you do n’t know about javascript or do n’t have developing knowledge then do n’t try to Implementation Google Analytics 4 (GA4) Enhanced Ecommerce Tracking for Google Tag Manager that can broke your site, Cart and other functionality 

Disclaimer: Google tag manager belongs to Google property  For Contact: mappchero@gmail.com

I am available for Hire on Freelancer: Freelancer.com

I am available for Hire on Upwork: Upwork.com

I am available for Hire on Peopleperhour: Peopleperhour.com

I am available for Hire on Guru: Guru.com

Implementing Google Analytics 4 on your Website using Google Tag Manager

Standard

Implementation & Configuration Google Analytics 4 on your Website

Google Analytics 4 (GA4) is the latest version of Google’s web analytics platform. It includes new features such as machine learning-powered insights, cross-device measurement, and improved data privacy controls. GA4 also includes a new set of metrics and dimensions, as well as new reporting options. It also allows to integrate with other Google’s products like BigQuery, Google Tag Manager and Google Optimize. Overall, GA4 is designed to provide a more comprehensive and actionable understanding of a website’s performance and audience.

Google Analytics 4 (GA4) is a web analytics tool that allows businesses and website owners to track and analyze various aspects of their website’s performance. Some of the main uses of GA4 include:

  1. Tracking website traffic: GA4 allows you to see how many people are visiting your website, where they are coming from, and how they are interacting with your site.

2. Analyzing audience behavior: GA4 provides information about your website’s visitors, including demographics, interests, and behavior patterns.

3. Measuring conversions: GA4 allows you to set up and track goals, such as form submissions or e-commerce transactions, to see how well your website is performing in terms of converting visitors into customers.

4. Understanding customer journeys: GA4 provides insights into how users navigate through your website and what actions they take.

5. Optimizing website performance: GA4 provides data and insights that can be used to optimize your website’s design, content, and overall user experience.

6. Integrating with other Google products: GA4 can be integrated with other Google products such as BigQuery, Google Tag Manager, and Google Optimize to provide more advanced analytics and optimization capabilities.

Implementing Google Analytics 4 (GA4) on a website involves a few steps:

  1. Create a GA4 property: To start using GA4, you will first need to create a GA4 property within your Google Analytics account. This will generate a tracking code that you will need to add to your website.

2. Add the GA4 tracking code to your website: Once you have your GA4 property set up, you will need to add the tracking code to your website. This can be done by adding the code to the header of your website’s pages, or by using a tag management system like Google Tag Manager.

3. Configure your GA4 property: After adding the tracking code to your website, you will need to configure your GA4 property. This includes setting up any goals or events you want to track, such as form submissions or e-commerce transactions.

4. Verify your GA4 tracking code: To ensure that your GA4 tracking code is working correctly, you can use the GA4 Debugger tool to verify that the tracking code is sending data to your GA4 property.

5. Reviewing the data: Once your GA4 property is set up and configured, you can start reviewing the data in your GA4 reports. This includes metrics such as website traffic, user behavior, and conversions.

6. Integrate with other Google products: You can integrate GA4 with other Google products such as BigQuery, Google Tag Manager, and Google Optimize to provide more advanced analytics and optimization capabilities.

Google Analytics 4 (GA4) Migration Checklist using Google Tag Manager

Standard

Migrating from Universal Analytics (UA) to Google Analytics 4 (GA4) can be a complex process, so it’s important to have a plan in place to ensure a smooth transition. Here is a checklist of items to consider when migrating to GA4:

Setting up advanced conversions in Google Analytics 4 (GA4) involves creating custom conversion events and configuring them to match your business goals. Here are some general steps for setting up advanced conversions in GA4:

  1. Review your current UA tracking setup: Review your current UA tracking code and data collection methods to ensure that they are accurate and complete.
  2. Create a new GA4 property: Create a new GA4 property in your Google Analytics account and configure the property settings according to your needs.
  3. Implement the GA4 tracking code: Replace the existing UA tracking code with the GA4 tracking code on your website.
  4. Import historical data: Import historical data from your UA property to your GA4 property to keep your historical data in the new GA4 property.
  5. Configure your GA4 property: Configure your GA4 property with the same views and filters that you have in your UA property.
  6. Test the GA4 tracking code and data: Test your GA4 tracking code and data to ensure that it is collecting data correctly.
  7. Monitor your GA4 data: Monitor your GA4 data for a few weeks to ensure that it is accurate and complete.
  8. Update any custom code: Update any custom code that uses the UA tracking code to use the GA4 tracking code.
  9. Update any integrations: Update any integrations that use the UA tracking code to use the GA4 tracking code.
  10. Delete your UA property: Once you have confirmed that your GA4 data is accurate and complete, you can then delete your UA property and rely on GA4 for your website analytics.
  11. Set up goals in your GA4 property for the custom conversion events you’ve created.
  12. Analyze your custom conversion data to gain insights into the performance of your website and identify areas for improvement.
  13. Optimize your website and marketing strategies based on the insights gained from your custom conversion data.

Disclaimer: Google tag manager belongs to Google property 

For Contact: mappchero@gmail.com

I am available for Hire on Freelancer: Freelancer.com

I am available for Hire on Upwork: Upwork.com

I am available for Hire on Peopleperhour: Peopleperhour.com

I am available for Hire on Guru: Guru.com

Migrating from Universal Analytics (UA) to Google Analytics 4 (GA4) using Google Tag Manager

Standard

Google Analytics 4 (GA4) is the latest version of Google Analytics, which is a web analytics service offered by Google that tracks and reports website traffic. It is a powerful tool that allows you to understand how users interact with your website, including what pages they visit, how long they stay on your site, and what actions they take.

Unlike Universal Analytics (UA), GA4 is built on a new data model that focuses on user-centric and event-based data collection, providing a more accurate and complete picture of user behavior. It also has a new set of features and functionalities such as:

  • Automatic and enhanced tracking capabilities: GA4 automatically collects data on user interactions such as clicks, scrolls, and form submissions, without the need for custom code.
  • Improved cross-device and cross-platform tracking: GA4 allows you to track users across different devices and platforms, giving you a more holistic view of user behavior.
  • Machine learning-based insights: GA4 uses machine learning to provide insights and predictions about user behavior, such as which users are likely to convert or churn.
  • Built-in privacy controls: GA4 includes built-in privacy controls that allow you to manage user data in compliance with regulations such as GDPR and CCPA.

GA4 also provides new features such as conversion measurement, audiences, and enhanced data governance and data management capabilities.

Overall, Google Analytics 4 provides a more advanced and powerful analytics tool that can help you to gain deeper insights into user behavior, improve your website’s performance, and drive better business results.

Migrating from Universal Analytics (UA) to Google Analytics 4 (GA4) involves several steps:

  1. Create a new GA4 property in your Google Analytics account.
  2. Set up GA4 tracking on your website. This will typically involve adding a new tracking code to your website’s pages.
  3. Configure your GA4 property settings and data streams. This will include setting up event tracking, creating custom dimensions and metrics, and configuring data governance settings.
  4. Import historical data from your UA property into your GA4 property. This can be done using the GA4 import feature.
  5. Update any third-party tools or integrations that you use to work with your GA data, such as Google Tag Manager, Data Studio, or BigQuery.
  6. Test and verify that your GA4 tracking is working correctly by reviewing the data in the GA4 reports and comparing it to your UA data.
  7. Once you are satisfied that your GA4 tracking is working correctly, you can then disable your UA tracking.

It’s important to note that migrating from UA to GA4 can be a complex process and may require technical expertise. Therefore, it’s recommended to have a developer or technical SEO expert to help you with this process. Also, It’s important to have a plan for testing and validation before, during and after the migration.

Disclaimer: Google tag manager belongs to Google property 

For Contact: mappchero@gmail.com

I am available for Hire on Freelancer: Freelancer.com

I am available for Hire on Upwork: Upwork.com

I am available for Hire on Peopleperhour: Peopleperhour.com

I am available for Hire on Guru: Guru.com


Set Up Ruby on Rails GA4 (Google Analytics 4) Using Google Tag Manager

Standard

Implementation Enhanced Ecommerce Google Analytics 4 (GA4) on Ruby on Rails with Google Tag Manager

Recently once of client asks to implement GA4 Enhanced eCommerce tracking in Ruby on Rails using Google Tag Manager and wrote a data layer on Ruby on Rails store or exiting data layer converted into GA4 Data Layer Formate for Ruby on Rails

Ruby on Rails Googl Analytics 4

Setting up Google Analytics 4 (GA4) with Ruby on Rails using Google Tag Manager

Ruby on Rails GA4 Events Tracking via GTM Enhanced Ecommerce Tracking using Google Tag Manager 

Paste this code as high in the <head> of the page as possible:

<!– Google Tag Manager –>

<script>(function(w,d,s,l,i){w[l]=w[l]||[];w[l].push({‘gtm.start’:
new Date().getTime(),event:’gtm.js’});var f=d.getElementsByTagName(s)[0],
j=d.createElement(s),dl=l!=’dataLayer’?’&l=’+l:”;j.async=true;j.src=
‘https://www.googletagmanager.com/gtm.js?id=’+i+dl;f.parentNode.insertBefore(j,f);
})(window,document,’script’,’dataLayer’,’GTM-XXXX’);</script>
<!– End Google Tag Manager –>

Additionally, paste this code immediately after the opening <body> tag:
<!– Google Tag Manager (noscript) –>
<noscript><iframe src=”https://www.googletagmanager.com/ns.html?id=GTM-XXXX”
height=”0″ width=”0″ style=”display:none;visibility:hidden”></iframe></noscript>
<!– End Google Tag Manager (noscript) –>

Note: Make you will replace GTM Tracking Code with your GTM ID XXXXX

Ruby on Rails GA4 Enhanced Ecommerce Events for view_item_list: To Track when user reach out category pages where list of product listed on the Page for GA4 (Google Analytics 4) Enhanced Ecommerce Tracking for Ruby on Rails using Google Tag Manager

Google Analytics 4 Ruby on Rails Integration

Install Google Analytics 4 (GA4) on Ruby on Rails using Google Tag Manager

Ruby on Rails GA4 Enhanced Ecommerce Events for select_item: To Track when user click on list of product listed on the pages using GA4 Enhanced Ecommerce Tracking for Ruby on Rails Via Google Tag Manager

GA4 For Ruby on Rails

Google Analytics for Ruby on Rails (GA4) using Google Tag Manager

Ruby on Rails GA4 Enhanced Ecommerce Events for view_item: To Track when user visit a product details page using GA4 Enhanced Ecommerce Tracking for Ruby on Rails Via Google Tag Manager

Ruby on Rails GA4 Data Layer

Google Analytics 4 for Ruby on Rails integrated using Google Tag Manager

Ruby on Rails GA4 Enhanced Ecommerce Events for add_to_cart: To Track when user visit a product details page then Click on AddtoCart using GA4 Enhanced Ecommerce Tracking for Ruby on Rails using Google Tag Manager

Google Analytics for Ruby on Rails (GA4)

Integrate Google Analytics 4 for Ruby on Rails using Google Tag Manager

Ruby on Rails GA4 Enhanced Ecommerce Events for add_to_wishlist: To Track when Add a product into Add to Wishlist using GA4 Enhanced Ecommerce Tracking for Ruby on Rails Via Google Tag Manager

Add Google Analytics 4 to Ruby on Rails

Ruby on Rails Migrate from Google Universal Analytics to GA4 using Google Tag Manager

Ruby on Rails GA4 Enhanced Ecommerce Events for view_cart: To Track when user entered to View Cart using GA4 Enhanced Ecommerce Tracking for Ruby on Rails Via Google Tag Manager

Google Analytics 4 in Ruby on Rails

Google Analytics 4 (GA4) Setup & Configuration in Ruby on Rails using Google Tag Manager

Ruby on Rails GA4 Enhanced Ecommerce Events for remove_from_Cart: To Track when user remove a product from cart to remove_from_Cart using GA4 Enhanced Ecommerce Tracking for Ruby on Rails using Google Tag Manager

Google Analytics 4 Ruby on Rails

Google Tag Manager for Ruby on Rails GA4

Ruby on Rails GA4 Enhanced Ecommerce Events for begin_checkout: To Track when user entered to begin_checkout using GA4 Enhanced Ecommerce Tracking for Ruby on Rails Via Google Tag Manager 

Ruby on Rails Enhanced Ecommerce tracking in GA4

Correctly set up Google Analytics 4 (GA4) for Ruby on Rails using Google Tag Manager

Ruby on Rails GA4 Enhanced Ecommerce Events for add_shipping_info: To Track when user entered to selected a Shipping Method using GA4 Enhanced Ecommerce Tracking for Ruby on Rails Via Google Tag Manager

Google Analytics 4 ecommerce Ruby on Rails

Integrate Google Analytics 4 with Ruby on Rails using Google Tag Manager

Ruby on Rails GA4 Enhanced Ecommerce Events for add_payment_info: To Track when user entered to selected a Payment Method using GA4 Enhanced Ecommerce Tracking for Ruby on Rails Via Google Tag Manager

Google Analytics 4 Ruby on Rails Integration

Google Analytics 4 Data layer on the Ruby on Rails Order Page using Google Tag Manager

Ruby on Rails GA4 Enhanced Ecommerce Events for purchase: To Track when user completed purchase using GA4 Enhanced Ecommerce Tracking for Ruby on Rails Via Google Tag Manager

Integrate Google Analytics GA4 with Ruby on Rails

Google Analytics 4 / GA4 Enhanced Ecommerce tracking for Ruby on Rails using Google Tag Manager

Warning: If you do n’t know about javascript or do n’t have developing knowledge then do n’t try to Implementation Enhanced Ecommerce Google Analytics 4 (GA4) on Ruby on Rails that can broke your site, Cart and other functionality 

Disclaimer: Google tag manager belongs to Google property 

For Contact: mappchero@gmail.com

I am available for Hire on Freelancer: Freelancer.com

I am available for Hire on Upwork: Upwork.com

I am available for Hire on Peopleperhour: Peopleperhour.com

I am available for Hire on Guru: Guru.com


Setup Google Analytics 4 (GA4) Ecommerce Tracking for Joomla using Google Tag Manager

Standard

Set Up Joomla GA4(Google Analytic 4) Enhanced eCommerce Tracking using Google Tag Manager

Recently once of client ask me to implement a Joomla Enhanced eCommerce Tracking for GA4 using Google Tag Manager and Wrote a Data Layer on the Joomla website and rest configured through Google Tag Manager to work for GA4 Joomla Enhanced eCommerce Tracking and GA4 Event Purchase event.

Google Analytics 4 (GA4) with Joomla Enhanced eCommerce

Joomla Google Analytics 4 Ecommerce Tracking using Google Tag Manager

Joomla GA4(Google Analytic 4) Enhanced Ecommerce Tracking using Google Tag Manager 

Paste this code as high in the <head> of the page as possible:

<!– Google Tag Manager –>

<script>(function(w,d,s,l,i){w[l]=w[l]||[];w[l].push({‘gtm.start’:
new Date().getTime(),event:’gtm.js’});var f=d.getElementsByTagName(s)[0],
j=d.createElement(s),dl=l!=’dataLayer’?’&l=’+l:”;j.async=true;j.src=
‘https://www.googletagmanager.com/gtm.js?id=’+i+dl;f.parentNode.insertBefore(j,f);
})(window,document,’script’,’dataLayer’,’GTM-XXXX’);</script>
<!– End Google Tag Manager –>

Additionally, paste this code immediately after the opening <body> tag:
<!– Google Tag Manager (noscript) –>
<noscript><iframe src=”https://www.googletagmanager.com/ns.html?id=GTM-XXXX”
height=”0″ width=”0″ style=”display:none;visibility:hidden”></iframe></noscript>
<!– End Google Tag Manager (noscript) –>

Note: Make you will replace GTM Tracking Code with your GTM ID XXXXX

Joomla GA4 Enhanced Ecommerce Events for view_item_list: To Track when user reach out category pages where list of product listed on the Page for GA4 (Google Analytics 4) Enhanced Ecommerce Tracking for Joomla using Google Tag Manager

Google Analytics 4 Joomla Ecommerce Tracking

Set Up Joomla Google Analytics 4 (GA4) Ecommerce Tracking via GTM

Joomla GA4 Enhanced Ecommerce Events for select_item: To Track when user click on list of product listed on the pages using GA4 Enhanced Ecommerce Tracking for Joomla Via Google Tag Manager

GA4 Joomla Enhanced eCommerce Google Analytics 4

Add Google Analytics 4 (GA4) With Joomla using Google Tag Manager

Joomla GA4 Enhanced Ecommerce Events for view_item: To Track when user visit a product details page using GA4 Enhanced Ecommerce Tracking for Joomla Via Google Tag Manager 

Google Analytics 4 (GA4) Joomla

Advanced Joomla Google Analytics 4 (GA4) e-Commerce Tracking using Google Tag Manager

Joomla GA4 Enhanced Ecommerce Events for add_to_cart: To Track when user visit a product details page then Click on AddtoCart using GA4 Enhanced Ecommerce Tracking for Joomla Via Google Tag Manager 

Enabling Google Analytics 4 for Joomla

Google Analytics 4 Ecommerce Tracking for Joomla

Joomla GA4 Enhanced Ecommerce Events for add_to_wishlist: To Track when Add a product into Add to Wishlist using GA4 Enhanced Ecommerce Tracking for Joomla Via Google Tag Manager

Events Joomla eCommerce in Google Analytics 4 (GA4)

Joomla GA4 Ecommerce Purchase Event Setup using Google Tag Manager

Joomla GA4 Enhanced Ecommerce Events for view_cart: To Track when user entered to View Cart using GA4 Enhanced Ecommerce Tracking for Joomla Via Google Tag Manager

Joomla Google Analytics 4 (GA4)

Track Events with Joomla Google Analytics 4 (GA4) using Google Tag Manager

Joomla GA4 Enhanced Ecommerce Events for remove_from_Cart: To Track when user remove a product from cart to remove_from_Cart using GA4 Enhanced Ecommerce Tracking for Joomla using Google Tag Manager

Joomla Ecommerce tracking on Google Analytics 4

Setup with Joomla GA4 (Google Analytics 4) using Googel Tag Manager

Joomla GA4 Enhanced Ecommerce Events for begin_checkout: To Track when user entered to begin_checkout using GA4 Enhanced Ecommerce Tracking for Joomla Via Google Tag Manager

Setup Joomla GA4 (Google Analytics 4)

Connect Google Analytics 4 to Joomla using Google Tag Manager

Joomla GA4 Enhanced Ecommerce Events for add_shipping_info: To Track when user entered to selected a Shipping Method using GA4 Enhanced Ecommerce Tracking for Joomla Via Google Tag Manager

GA4 Enhanced Ecommerce with Joomla Pushing Data

Joomla Google Analytics 4 for Google Tag Manager

Joomla GA4 Enhanced Ecommerce Events for add_payment_info: To Track when user entered to selected a Payment Method using GA4 Enhanced Ecommerce Tracking for Joomla Via Google Tag Manager

Connect Google Analytics 4 (GA4) to Joomla

Google Analytics 4 (GA4) for Joomla using Google Tag Manager

Joomla GA4 Enhanced Ecommerce Events for purchase: To Track when user completed purchase using GA4 Enhanced Ecommerce Tracking for Joomla Via Google Tag Manager

Purcahse Google Analytics 4 (GA4) Joomla

Implement Google Analytics 4 (GA4) on Joomla using Google Tag Manager

Warning: If you do n’t know about javascript or do n’t have developing knowledge then do n’t try to Joomla GA4 Enhanced Ecommerce Events using Google Tag Manager that can broke your site, Cart and other functionality 

Disclaimer: Google tag manager belongs to Google property  

For Contact: mappchero@gmail.com

I am available for Hire on Freelancer: Freelancer.com

I am available for Hire on Upwork: Upwork.com

I am available for Hire on Peopleperhour: Peopleperhour.com

I am available for Hire on Guru: Guru.com