Google Analytics 4 (GA4) Integration Enhanced Ecommerce with BigCommerce

Standard

Google Analytics 4 (GA4) Integration Enhanced Ecommerce with BigCommerce is a way of setting up and tracking ecommerce data in Google Analytics 4. Enhanced Ecommerce tracking allows you to track detailed information about user interactions on your ecommerce website, such as product views, add-to-carts, and purchases. By integrating GA4 with BigCommerce, you can ensure that this data is accurately recorded and analyzed in your GA4 reports.

The integration involves setting up a data layer on your BigCommerce website that captures the relevant ecommerce data and passes it to GA4 via Google Tag Manager (GTM). This data can then be used to gain deeper insights into your customers’ shopping behavior, identify which products are most popular, and optimize your marketing efforts.

Setting up GA4 Integration Enhanced Ecommerce with BigCommerce requires some technical knowledge, but there are step-by-step guides available online to help you through the process. Once set up, you can use GA4’s advanced reporting capabilities to gain deeper insights into your ecommerce performance and improve your online sales.

Google Analytics 4 (GA4) Integration Enhanced Ecommerce with BigCommerce is important for ecommerce businesses for several reasons:

Accurate tracking of ecommerce data: Enhanced Ecommerce tracking allows you to track detailed information about user interactions on your ecommerce website, such as product views, add-to-carts, and purchases. By integrating GA4 with BigCommerce, you can ensure that this data is accurately recorded and analyzed in your GA4 reports.

Better understanding of customer behavior: By tracking ecommerce data, you can gain a better understanding of your customers’ shopping behavior and preferences. This information can be used to optimize your website design, product offerings, and marketing efforts.

Improved marketing optimization: Enhanced Ecommerce tracking can help you identify which marketing channels and campaigns are driving the most sales and revenue. By integrating GA4 with BigCommerce, you can optimize your marketing efforts based on this data and improve your ROI.

Advanced reporting capabilities: GA4 provides more advanced reporting capabilities than previous versions of Google Analytics, including machine learning-powered insights and predictive analytics. By integrating GA4 with BigCommerce, you can take advantage of these features to gain deeper insights into your online sales and customer behavior.

Integrating Google Analytics 4 (GA4) Enhanced Ecommerce with BigCommerce using Google Tag Manager (GTM) is a great option if you want to have more flexibility and control over your tracking. Here are the steps to set it up:

  1. Create a GA4 property: If you haven’t already done so, you’ll need to create a GA4 property in your Google Analytics account.

2. Set up Google Tag Manager: If you haven’t already done so, you’ll need to set up Google Tag Manager for your BigCommerce store.

3. Set up a data layer: In order to pass data from your BigCommerce store to GA4, you’ll need to set up a data layer. This is a JavaScript object that stores information about user interactions on your site, such as product views, add-to-carts, and purchases.

4. Configure your BigCommerce triggers: In GTM, create triggers to track user interactions on your BigCommerce site, such as product views, add-to-carts, and purchases.

5. Map your data layer to GA4: In GTM, create a new variable for each piece of data you want to track, such as product ID, product name, and product price. Map these variables to the corresponding GA4 fields under “Enhanced Ecommerce Settings” in your GA4 tag.

6. Test your setup: Preview and test your GTM setup to ensure that data is being passed correctly from your BigCommerce site to GA4.

With these steps completed, you should now be able to view Enhanced Ecommerce data in your GA4 reports. This will include information such as product views, add-to-carts, and purchases, as well as detailed funnel analysis to help you identify any areas of your online store that may need optimization.

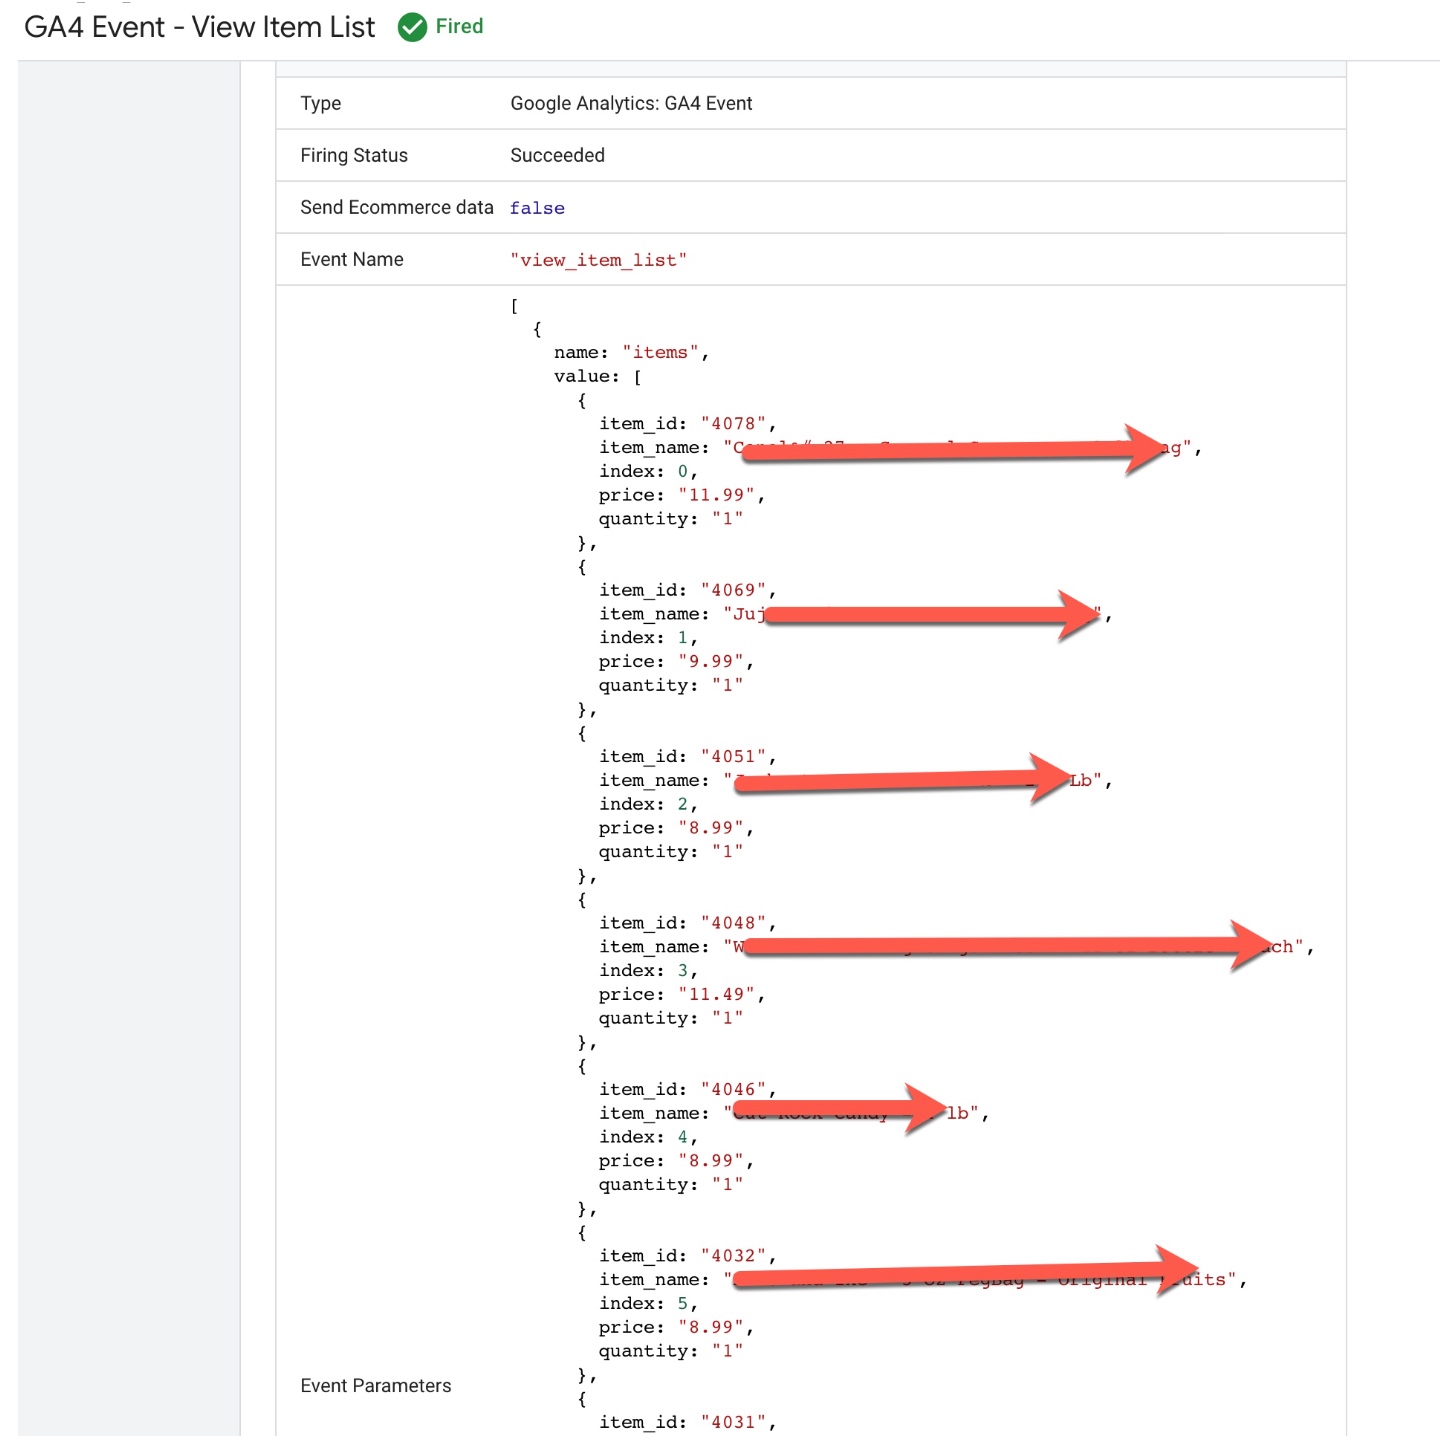
In BigCommerce, you can use the “view_item_list” event to track when a user views a list of products, such as a category page or search results page. You can use this data to understand which products are most popular and which categories are getting the most traffic, as well as to optimize your site’s navigation and product display.

Bigcommerce Google Analytics 4 (GA4)

 Setting Up GA4 Enhanced eCommerce Tracking for BigCommerce

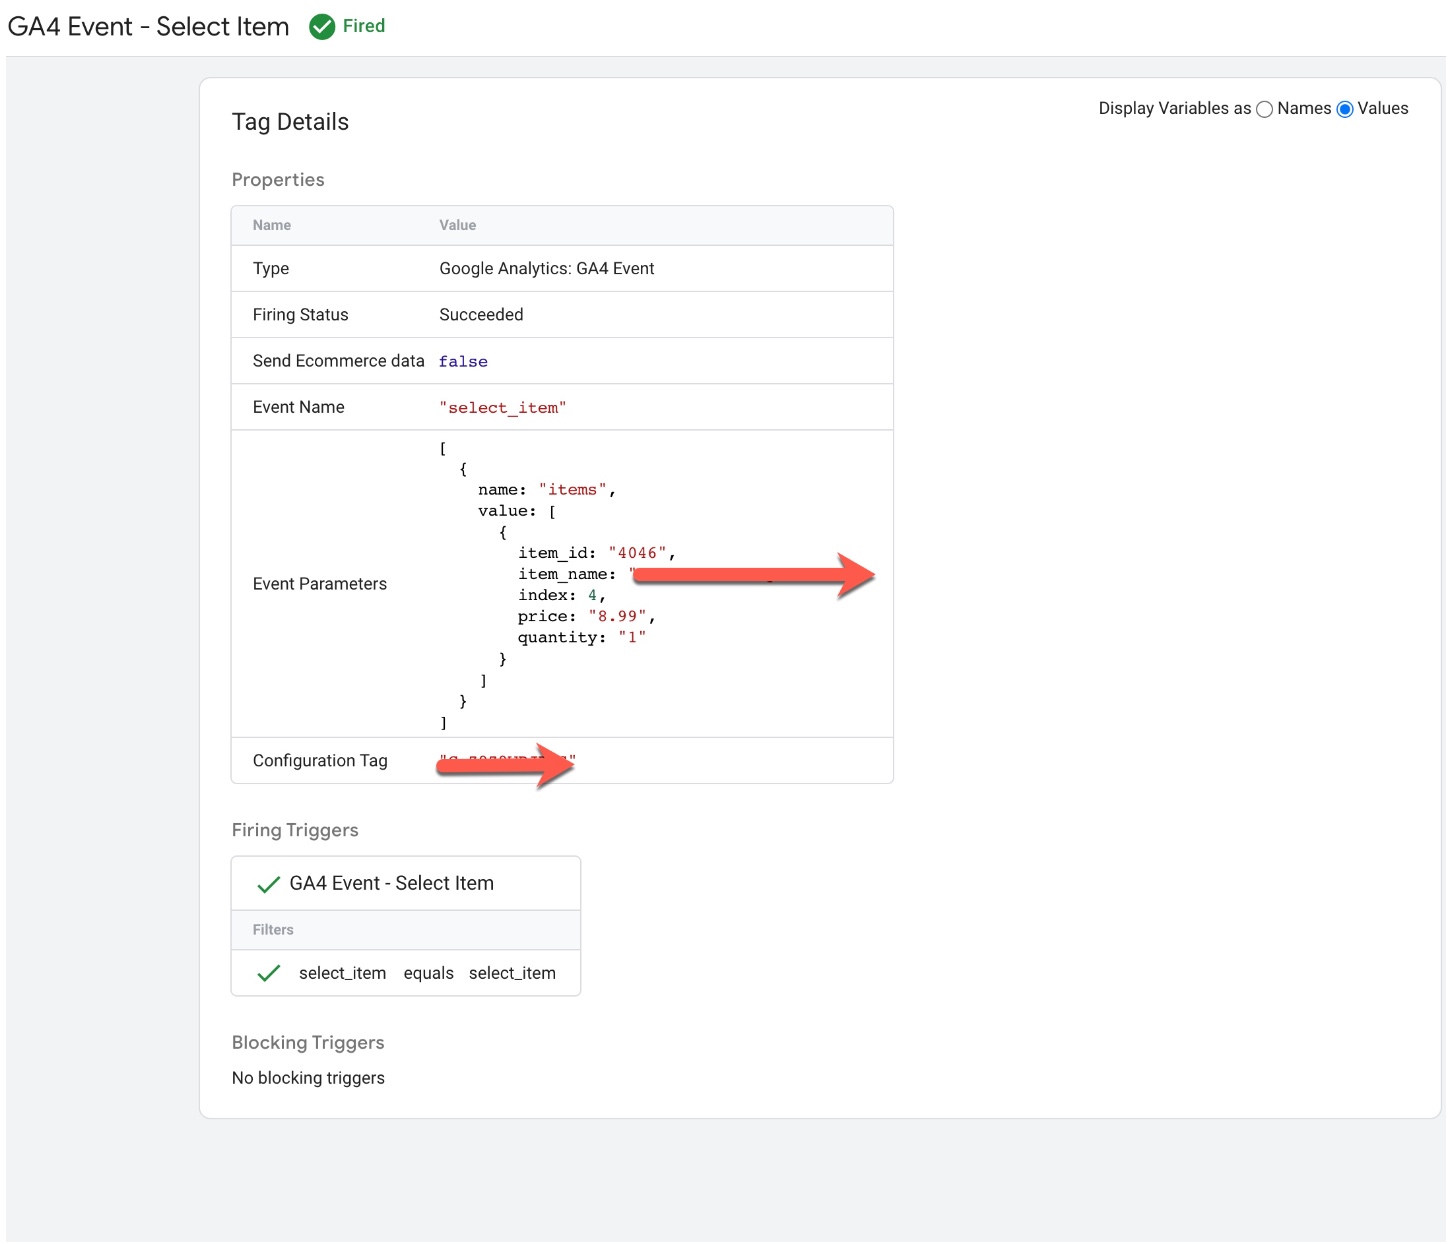
In BigCommerce, you can use the “select_item” event to track when a user selects a product on a category page, search results page, or product page. This event can help you understand which products are being viewed and selected the most, and which product attributes (such as color or size) are the most popular.

bigcommerce enhanced conversion tracking

Tracking Enhanced Ecommerce With Google Analytics 4 (GA4) in BigCommerce

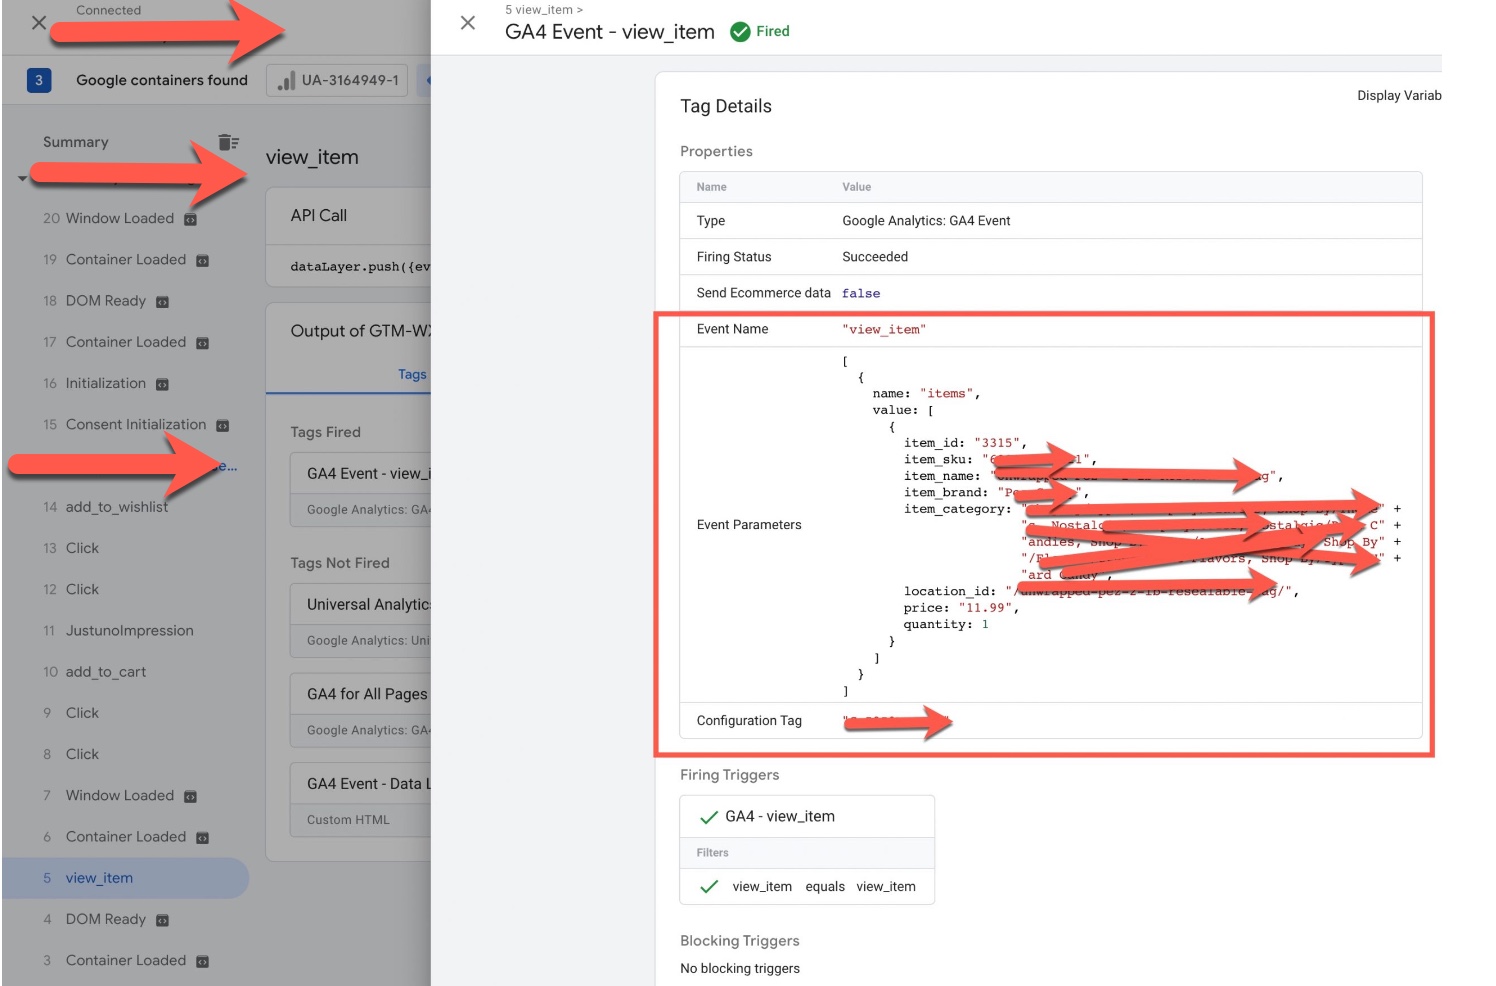
In BigCommerce, you can use the “view_item” event to track when a user views a product detail page. This event can help you understand which products are being viewed the most, how long users spend on each product page, and which product attributes (such as color or size) are the most popular.

BigCommerce Google Analytics 4 (GA4) through Google Tag Manager

BigCommerce Google Analytics 4 (GA4) Enhanced Ecommerce Tracking (GTM)

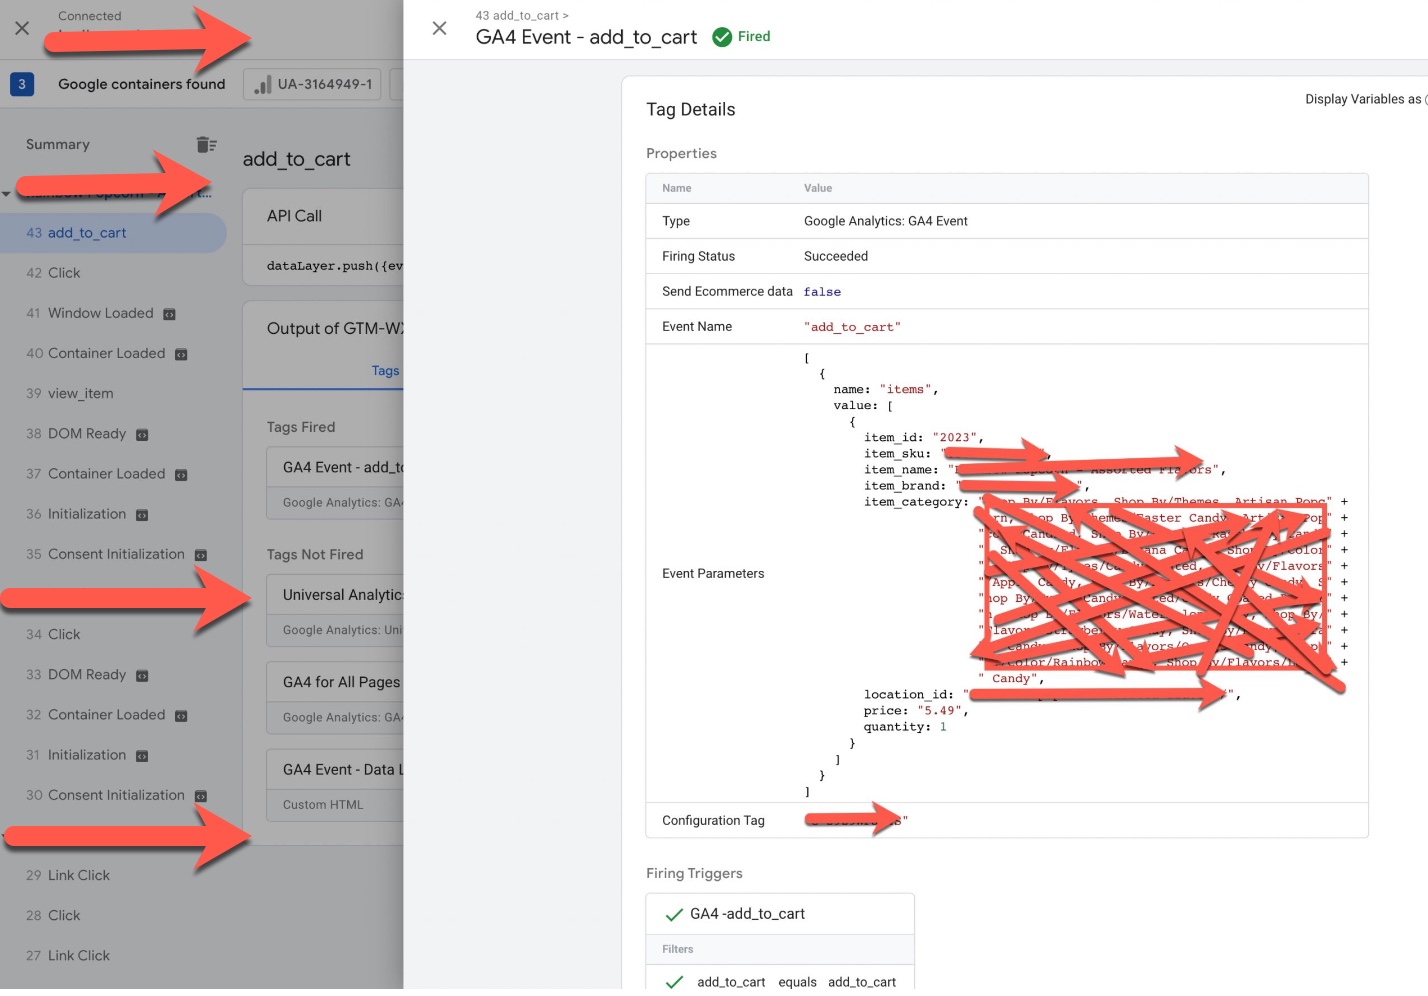
In BigCommerce, you can use the “add_to_cart” event to track when a user adds a product to their shopping cart. This event can help you understand which products are being added to carts the most, how often users are abandoning their carts, and which product attributes (such as color or size) are the most popular.

Install Google Analytics 4 (GA4) on BigCommerce

Google Analytics 4 (GA4) BigCommerce Integration Enhanced Ecommerce using Google Tag Manager

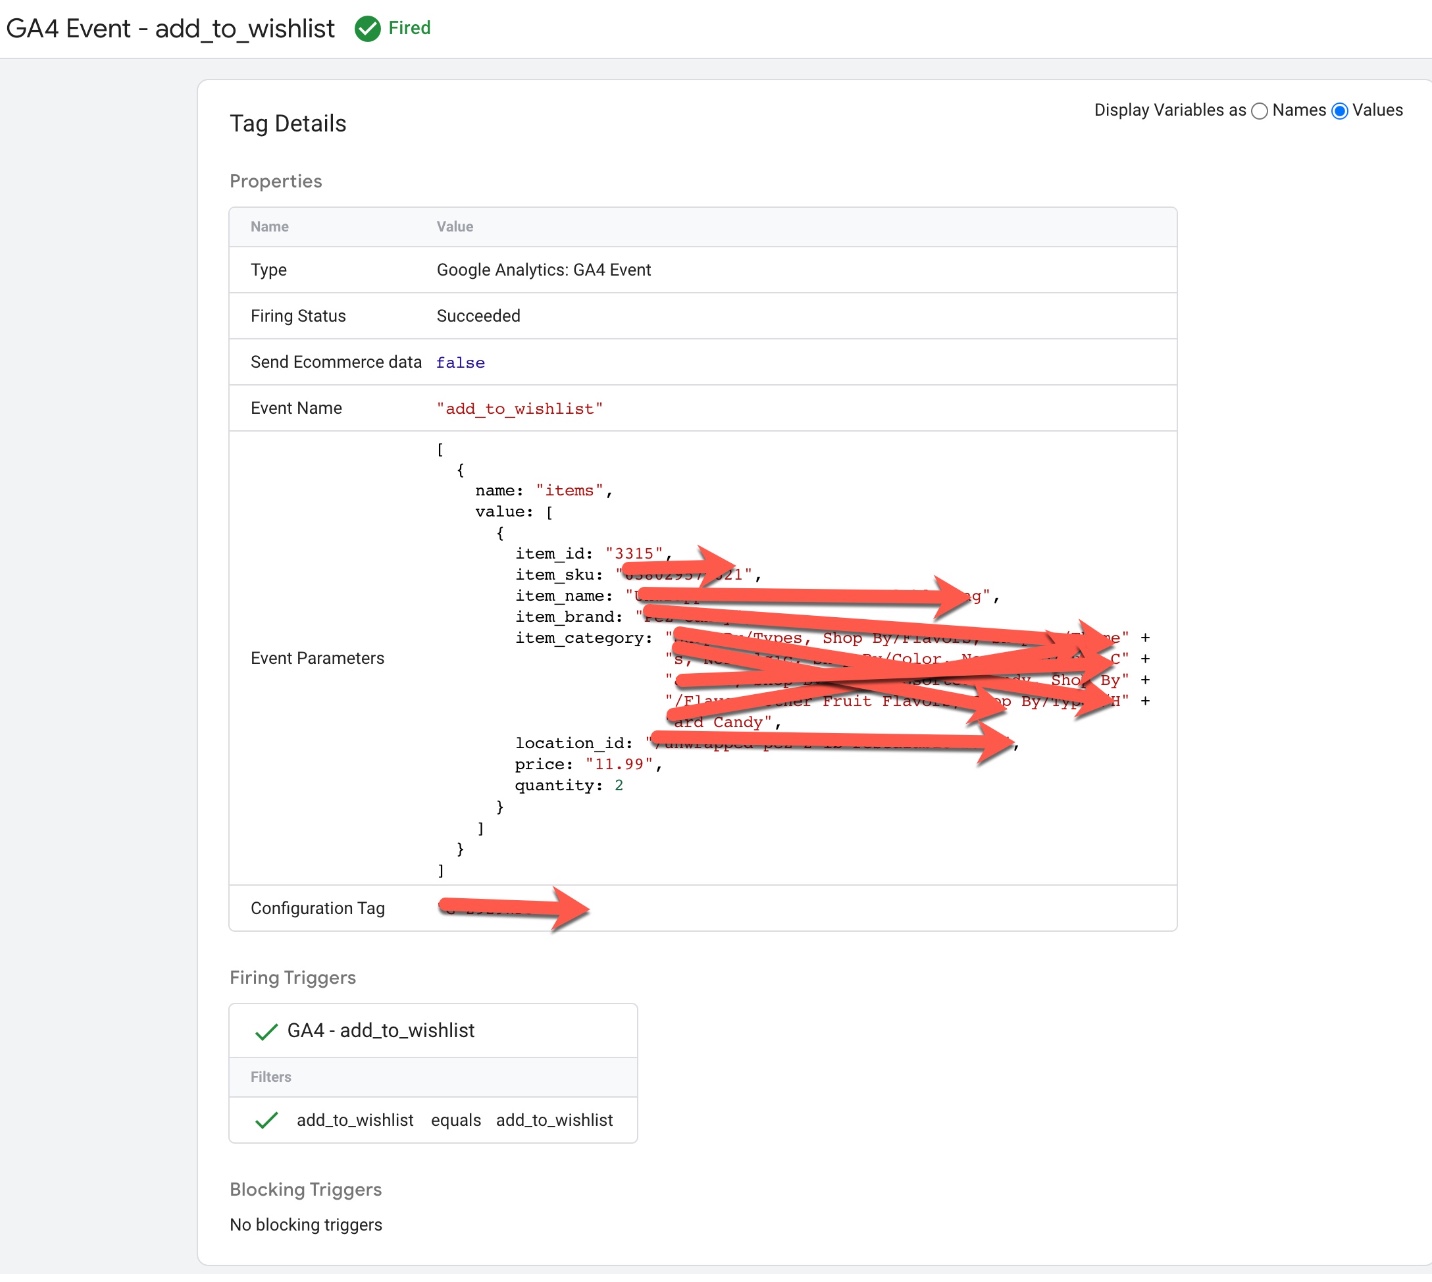
In BigCommerce, you can use the “add_to_wishlist” event to track when a user adds a product to their wishlist. This event can help you understand which products are being added to wishlists the most, which users are adding products to wishlists, and how often users are coming back to their wishlist to complete a purchase.

Connect Google Analytics 4 to BigCommerce

Implement Google Analytics 4 (GA4) for Enhanced E-commerce on BigCommerce

In BigCommerce, you can use the “view_cart” event to track when a user views their shopping cart. This event can help you understand how many users are adding products to their cart, how often they’re viewing their cart, and how many users are abandoning their carts.

BigCommerce GA4 Google Tag Manager Enhanced Ecommerce Tracking

Setup BigCommerce Enhanced Ecommerce GA4 using Google Tag Manager

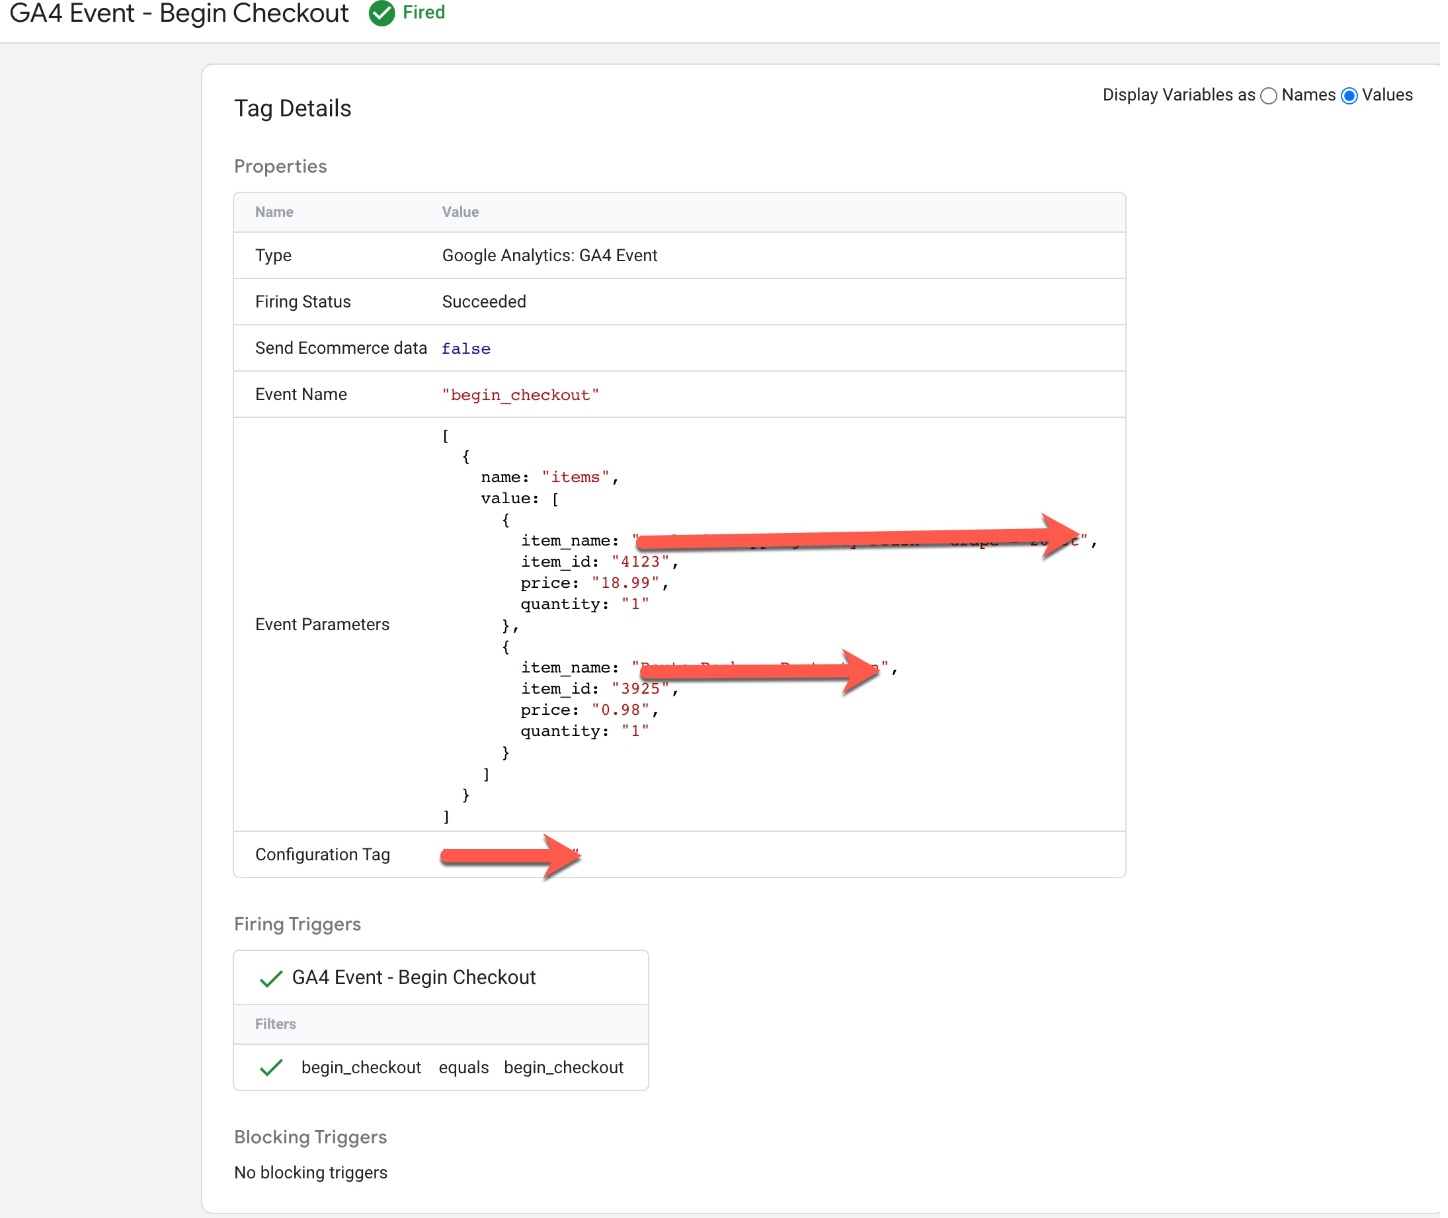
In BigCommerce, you can use the “begin_checkout” event to track when a user starts the checkout process. This event can help you understand how many users are starting the checkout process, how many steps are in your checkout flow, and how long it takes for users to complete the checkout process.

GA4 Upgrade Enhanced Ecommerce for BigCommerce

Google Analytics 4 (GA4) Enhanced eCommerce Tracking set up for BigCommerce using Google Tag Manager

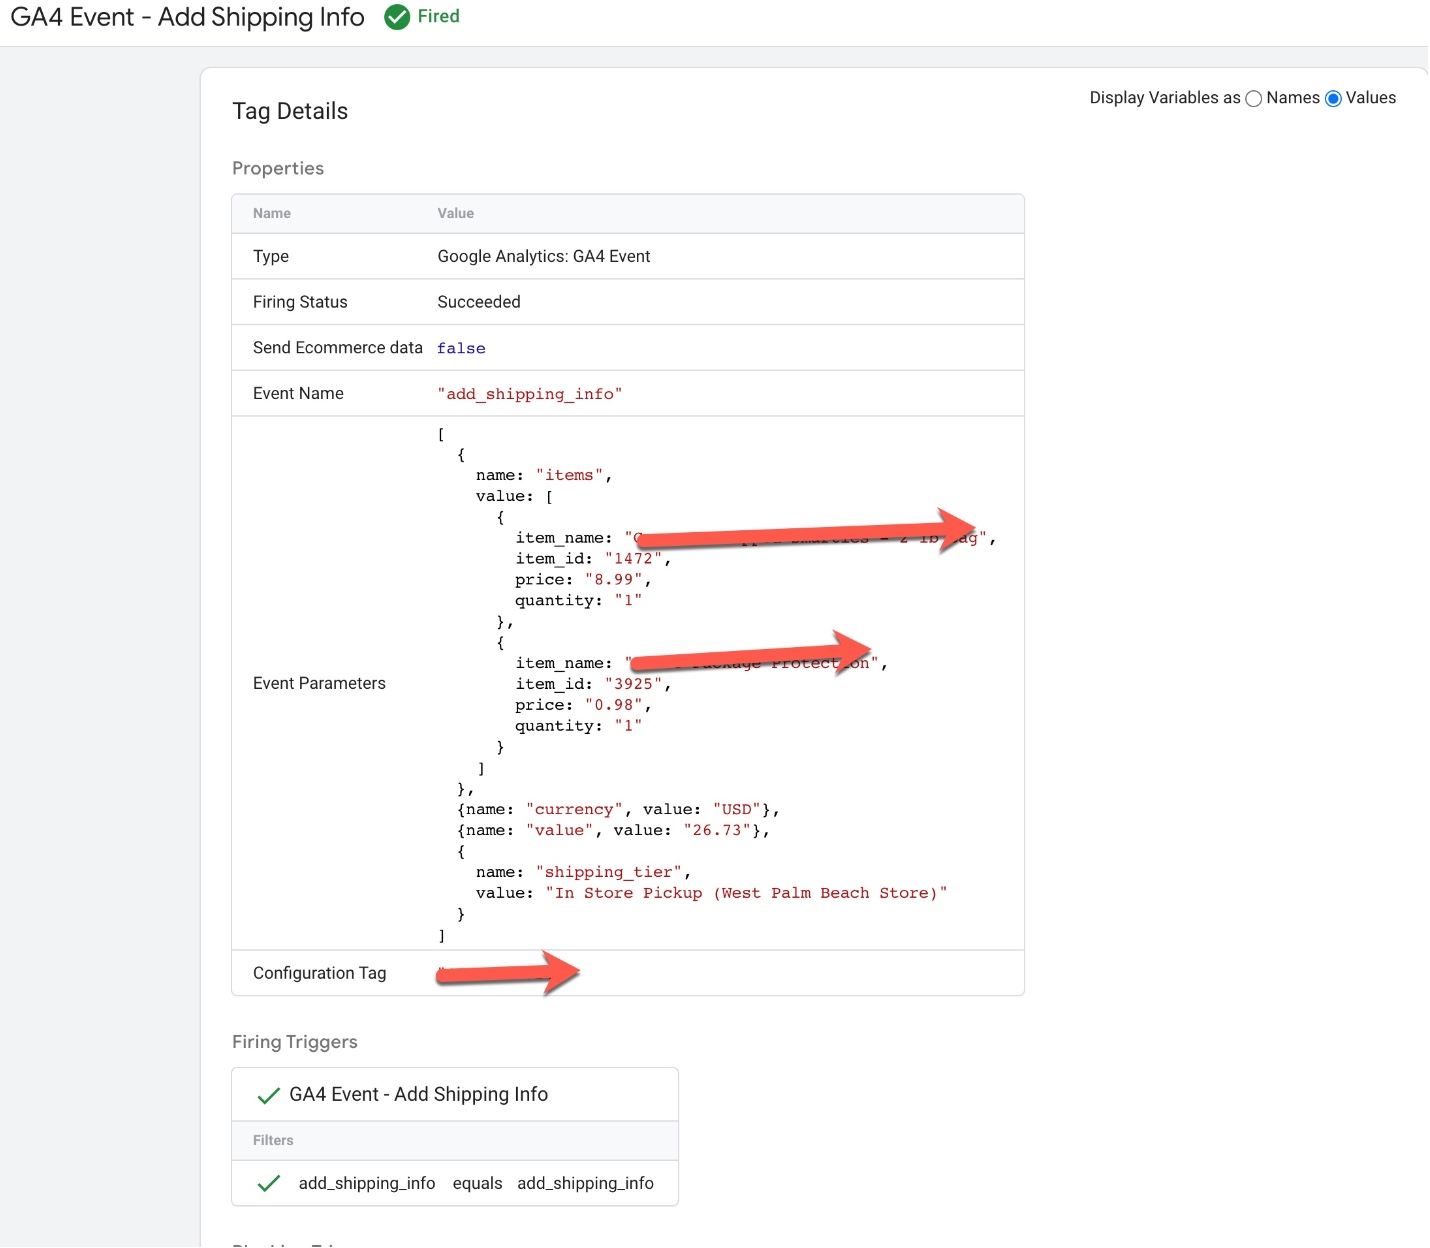
In BigCommerce, you can use the “add_shipping_info” event to track when a user enters their shipping information during the checkout process. This event can help you understand how many users are adding shipping information, how many users are abandoning the checkout process at this stage, and how long it takes for users to enter their shipping information.

Add Google Analytics 4 (GA4) to BigCommerce

Switching to Google Analytics 4 (GA4) Enhanced eCommerce Tracking for BigCommerce

In BigCommerce, you can use the “add_payment_info” event to track when a user enters their payment information during the checkout process. This event can help you understand how many users are adding payment information, how many users are abandoning the checkout process at this stage, and how long it takes for users to enter their payment information.

Upgrade to GA4 Enhanced eCommerce Tracking for BigCommerce

Switch from Universal Analytics to Google Analytics 4 (GA4) Enhanced eCommerce Tracking for BigCommerce

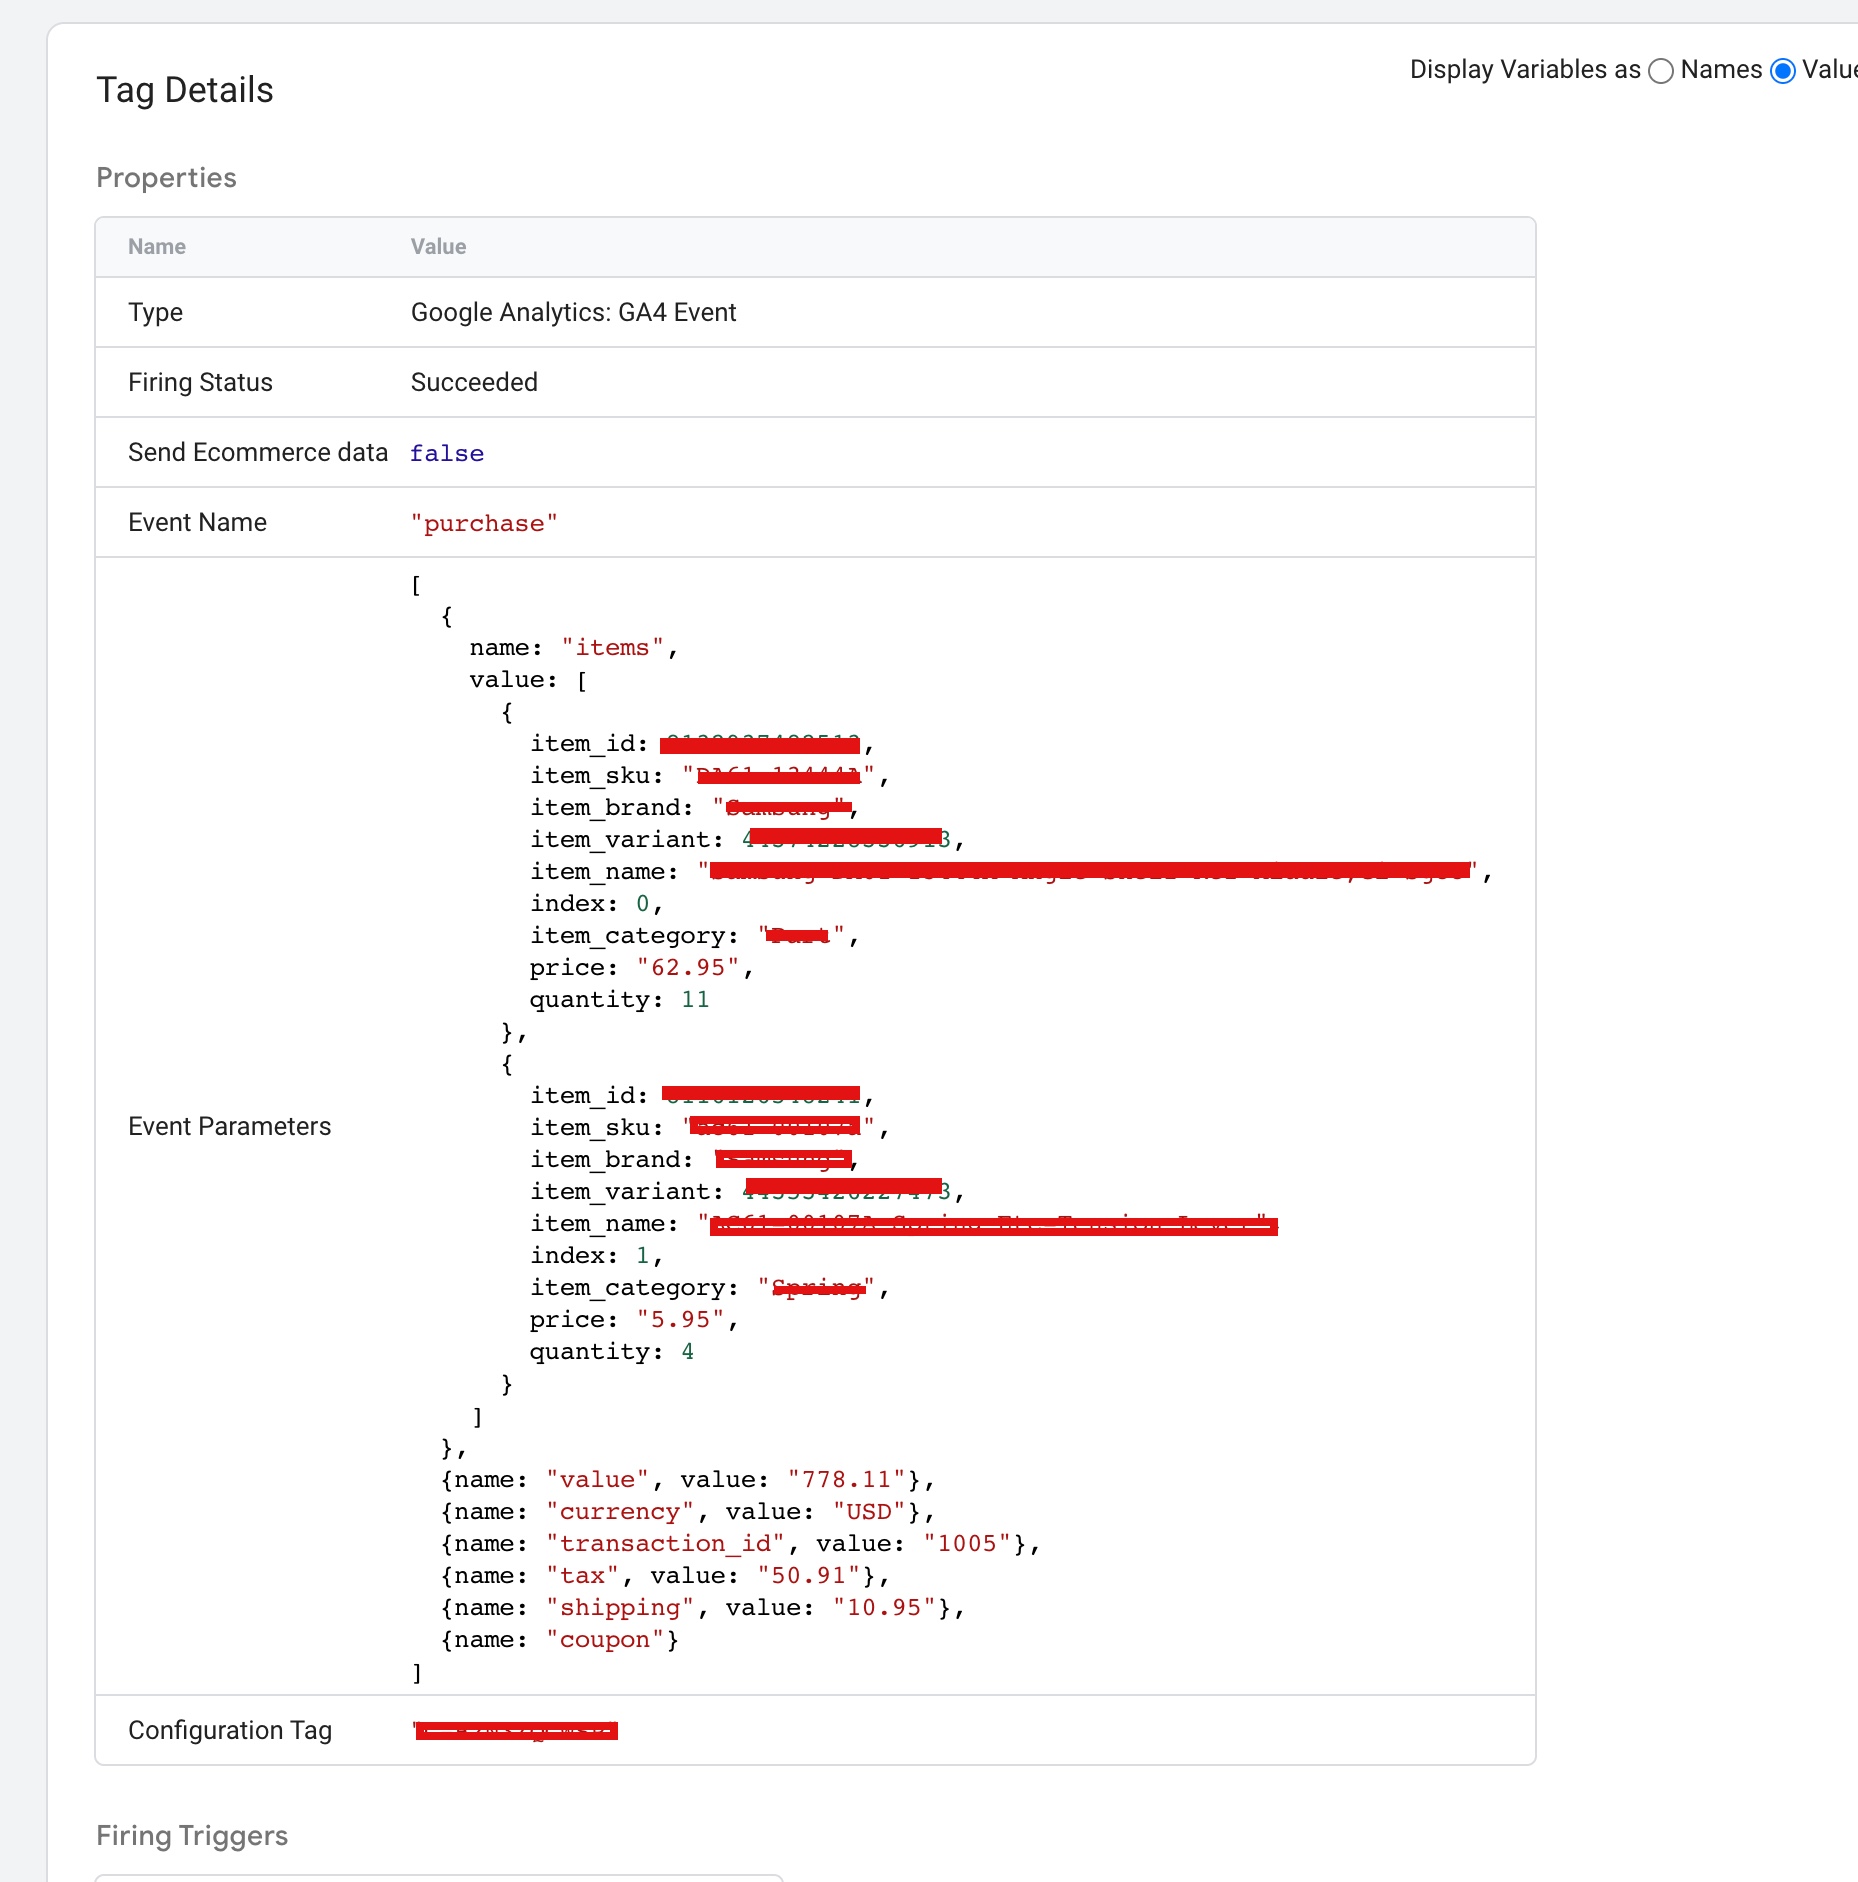
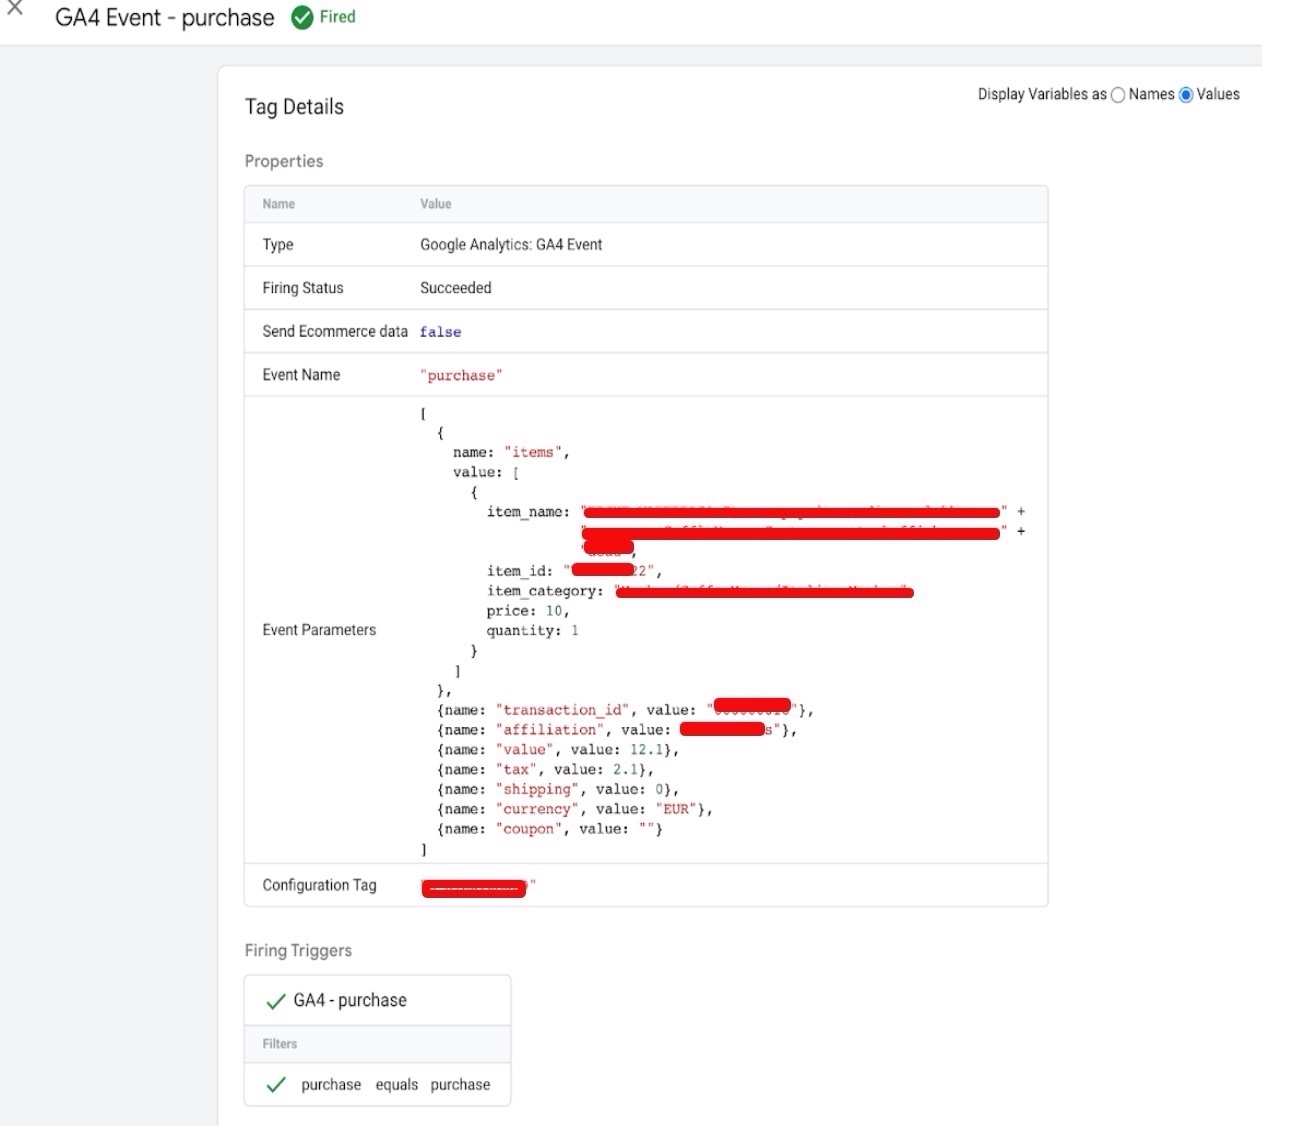
In BigCommerce, you can use the “purchase” event to track when a user completes a purchase on your website. This event can help you understand how many users are completing purchases, how much revenue your website is generating, and what products are being purchased.

Google Analytics 4 Integration for BigCommerce

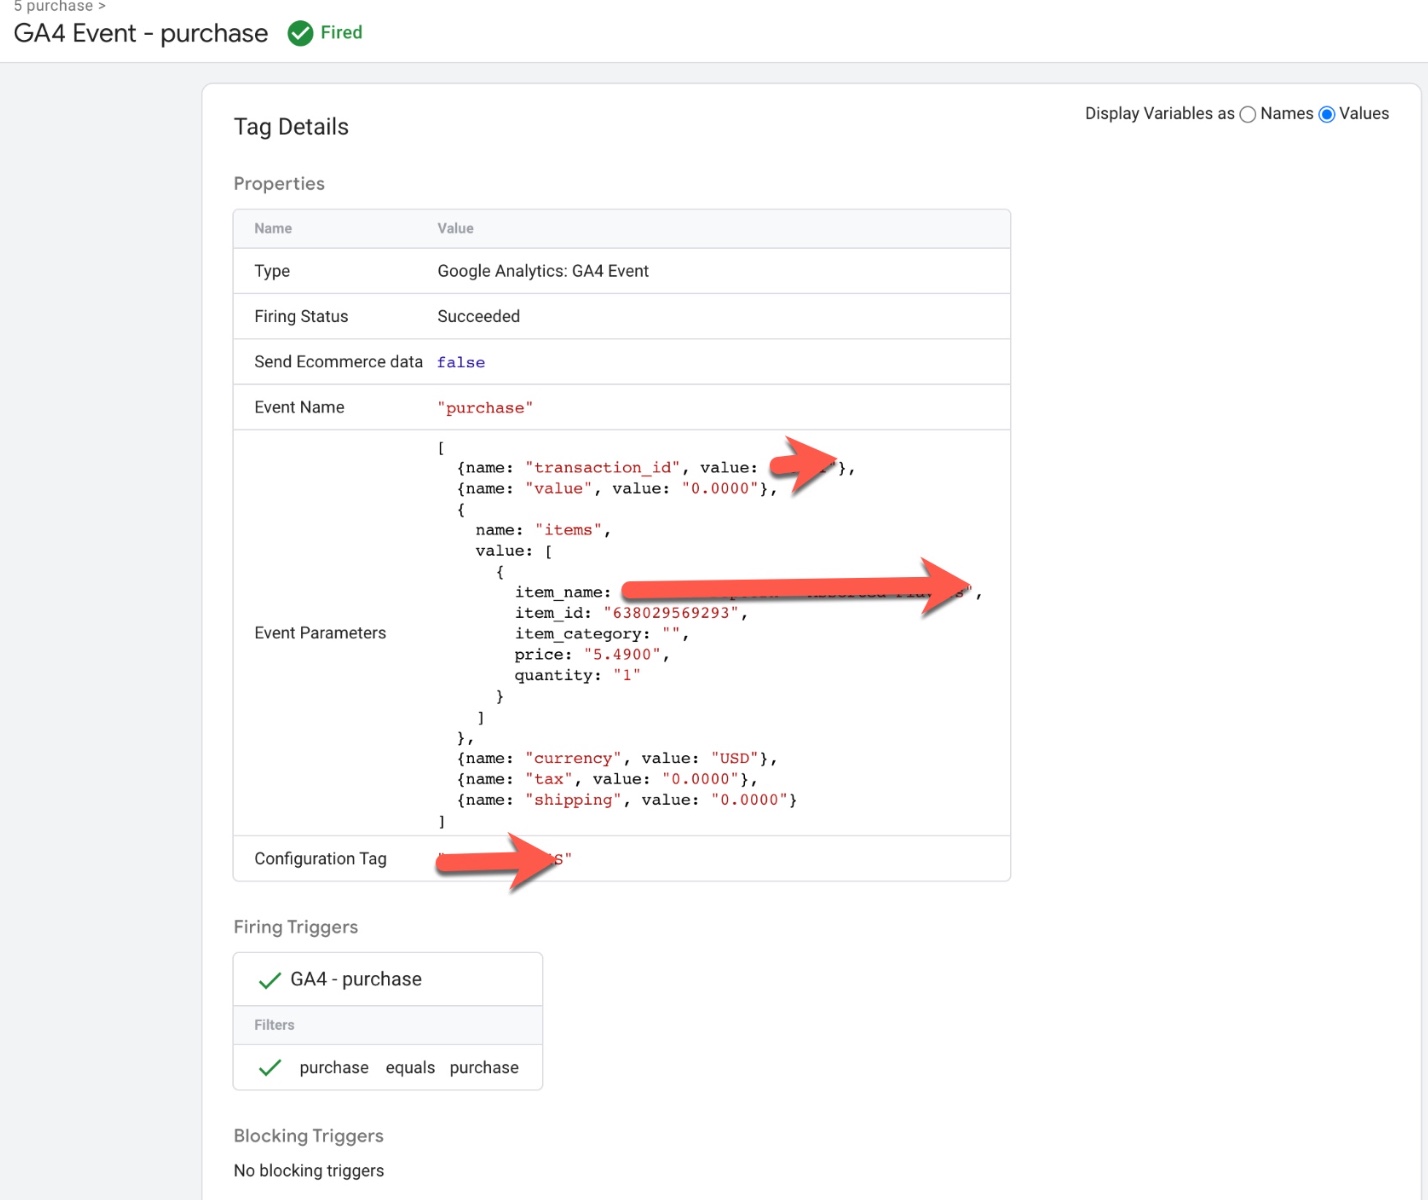
Google Analytics 4 (GA4) Purchase Event Tracking for Enhanced eCommerce Tracking for BigCommerce using Google Tag Manager

Warning: If you don’t know about javascript or don’t have developing knowledge then don’t try to Google Analytics 4 (GA4) Integration Enhanced Ecommerce with BigCommerce that can break your site, Cart and other functionality 

Disclaimer: Google tag manager belongs to Google property 

For Contact: mappchero@gmail.com

I am available for Hire on Freelancer: Freelancer.com

I am available for Hire on Upwork: Upwork.com

I am available for Hire on Peopleperhour: Peopleperhour.com

I am available for Hire on Guru: Guru.com

Google Analytics 4 (GA4) Ecommerce Tracking for NetSuite

Standard

Leverage Google Analytic 4 (GA4) for eCommerce Tracking, Reporting & Analysis for NetSuite

Google Analytics 4 (GA4) Ecommerce Tracking for NetSuite is a solution that enables NetSuite users to track ecommerce activities on their website using Google Analytics 4. With this solution, businesses can gain insights into their customers’ behavior, such as which products are popular, how much revenue is generated from each transaction, and how long it takes for customers to make a purchase.

The solution involves integrating NetSuite with Google Analytics 4 and setting up ecommerce tracking in the GA4 interface. Once set up, businesses can track ecommerce activities, such as product views, add-to-carts, and purchases, directly within NetSuite and see the data in their GA4 reports.

This solution can help businesses optimize their ecommerce strategy by identifying areas for improvement, such as which products are underperforming or which parts of the checkout process are causing customers to abandon their carts. With this information, businesses can make data-driven decisions to improve their ecommerce performance and ultimately increase revenue.

There are several benefits to using Google Analytics 4 (GA4) Ecommerce Tracking for NetSuite:

Gain insights into customer behavior: By tracking ecommerce activities on your website, you can gain valuable insights into your customers’ behavior, such as which products are popular, how much revenue is generated from each transaction, and how long it takes for customers to make a purchase.

Optimize your ecommerce strategy: With data on which products are underperforming or which parts of the checkout process are causing customers to abandon their carts, you can make data-driven decisions to improve your ecommerce performance and ultimately increase revenue.

Improve the customer experience: By analyzing customer behavior, you can identify areas where the customer experience can be improved, such as by simplifying the checkout process or offering more relevant product recommendations.

Track performance over time: By tracking ecommerce activities over time, you can see how your ecommerce performance is changing and identify trends or patterns that may impact your business.

Better attribution: By using GA4 ecommerce tracking, you can better understand which marketing channels are driving revenue and optimize your marketing efforts accordingly.

Overall, Google Analytics 4 Ecommerce Tracking for NetSuite can provide valuable insights and help businesses optimize their ecommerce strategy to increase revenue and improve the customer experience.

To set up Google Analytics 4 ecommerce tracking for NetSuite, you’ll need to follow these general steps:

  1. Create a Google Analytics 4 property and set up ecommerce tracking in the GA4 interface.

2. In NetSuite, go to Customization > SuiteBundler > Search & Install Bundles and search for the “Google Analytics 4 Ecommerce Tracking” bundle. Install it and follow the installation instructions.

3. Once the bundle is installed, go to Customization > SuiteBundler > List > Google Analytics 4 Ecommerce Tracking and click “Configure.”

4. Enter your GA4 measurement ID, which can be found in your GA4 property settings, into the “Measurement ID” field in NetSuite.

5. In NetSuite, go to Lists > Accounting > Items and select an item you want to track in GA4 ecommerce. Scroll down to the “GA4 Ecommerce Tracking” tab and enter the relevant information, such as the product name, SKU, and price.

6. Repeat step 5 for each item you want to track.

7. Go to your website and make a purchase using one of the items you’ve set up for tracking. Once the transaction has processed, check your GA4 ecommerce reports to ensure that the data is being tracked correctly.

Note: This is a general guide, and the specific steps may vary depending on your NetSuite version and GA4 setup. You may need additional configuration or customization to ensure that your ecommerce tracking is set up correctly.

Set up GA4 and ecommerce via GTM for NetSuite

NetSuite Google Analytics 4 (GA4) eCommerce Tracking using Google Tag Manager

Warning: If you don’t know about javascript or don’t have developing knowledge then don’t try to Track Google Analytics 4 (GA4) Ecommerce Purchase Tracking for NetSuite that can break your site, Cart and other functionality 

Disclaimer: Google tag manager belongs to Google property 

For Contact: mappchero@gmail.com

I am available for Hire on Freelancer: Freelancer.com

I am available for Hire on Upwork: Upwork.com

I am available for Hire on Peopleperhour: Peopleperhour.com

I am available for Hire on Guru: Guru.com

Google Analytics 4 (GA4) Ecommerce Tracking For 3DCart

Standard

Integrate Google Analytics 4 (GA4) with 3DCart for Ecommerce Tracking using Google Tag Manager

Google Analytics 4 (GA4) Ecommerce tracking for 3dcart with data layer using Google Tag Manager (GTM) is a way to track ecommerce transactions on your 3dcart store using the latest version of Google Analytics, GA4. This method of tracking allows you to gather more detailed data on user behavior and transactions, such as product views, add to cart, and purchase events.

A data layer is a JavaScript object that contains information about user interactions on your website. By using a data layer, you can pass ecommerce data to GTM and GA4 without the need for custom coding. This makes it easier to set up and manage your ecommerce tracking, as you can add or remove tags and variables as needed.

Google Tag Manager (GTM) is a free tool from Google that allows you to manage and deploy marketing and analytics tags on your website without needing to access your website’s code directly. By using GTM, you can set up tags and triggers to track specific events on your website, such as ecommerce transactions.

By using GA4 ecommerce tracking for 3dcart with a data layer and GTM, you can gather more detailed data on your ecommerce transactions, which can help you better understand your customers and optimize your marketing efforts.

There are several benefits to using Google Analytics 4 (GA4) ecommerce tracking for 3dcart with a data layer using Google Tag Manager (GTM):

More Detailed Ecommerce Tracking: GA4 ecommerce tracking provides more detailed data on user behavior and transactions, such as product views, add to cart, and purchase events. This allows you to better understand your customers and optimize your marketing efforts.

Flexible Data Layer: By using a data layer, you can easily pass ecommerce data to GTM and GA4 without the need for custom coding. This makes it easier to set up and manage your ecommerce tracking, as you can add or remove tags and variables as needed.

Easy Implementation: GTM allows you to manage and deploy marketing and analytics tags on your website without needing to access your website’s code directly. This makes it easy to set up and manage GA4 ecommerce tracking, even if you don’t have a lot of technical expertise.

Cross-Platform Tracking: GA4 ecommerce tracking allows you to monitor user behavior across multiple devices and platforms, providing you with a more complete view of your customer journey. This can help you identify trends and opportunities for optimization.

Enhanced Reporting: GA4 provides enhanced reporting features, such as the ability to create custom metrics and dimensions, which allows you to analyze your ecommerce data in greater detail.

In summary, using GA4 ecommerce tracking for 3dcart with a data layer using GTM can help you better understand your customers and optimize your marketing efforts.

Setting up Google Analytics 4 (GA4) ecommerce tracking for your 3dcart store using a data layer and Google Tag Manager (GTM) can provide a more streamlined and flexible way of tracking ecommerce data. Here are the steps to follow:

  1. Set up a GA4 property in your Google Analytics account if you haven’t already done so.

2. Enable enhanced ecommerce tracking in your 3dcart store by going to Settings > General > Ecommerce Settings and setting “Enable Enhanced Ecommerce” to “Yes.”

3. Create a data layer in your 3dcart store. A data layer is a JavaScript object that contains information about user interactions on your website, such as product views, add to cart, and purchase. To create a data layer, add the following code to your website’s HTML head section:

4. Set up GA4 ecommerce events in GTM. In GTM, create a new tag and choose “Google Analytics: GA4 Event” as the tag type. Configure the tag with the following settings:

  • Event name: The name of the event you want to track, such as “Add to Cart” or “Purchase”.
  • Event Parameters: These are the specific ecommerce parameters you want to track, such as “product_id”, “product_name”, “quantity”, and “value”. You can use the data layer variables to populate these parameters. For example, to track the product ID, you would use the variable {{DLV – product_id}}.

5. Set up triggers for your GA4 ecommerce events. Triggers tell GTM when to fire your GA4 ecommerce tags. For example, you could create a trigger that fires when the “Add to Cart” button is clicked, or when the “Purchase” button is clicked and the order is completed.

6. Test your GA4 ecommerce tracking. Once you have set up your GA4 ecommerce tags and triggers, test your website by adding products to your cart and completing a purchase. Check your GA4 property to make sure that the events are being tracked correctly.

In summary, using GA4 ecommerce tracking for 3dcart with a data layer using GTM can help you better understand your customers and optimize your marketing efforts. It provides more detailed tracking, flexible implementation, and enhanced reporting features, making it an effective tool for ecommerce businesses.

integrate Google Analytics 4 (GA4) in 3dcart store

Enable Google Analytics 4 (GA4) Enhanced Ecommerce in 3dcart store using Google Tag Manager

Warning: If you do n’t know about javascript or do n’t have developing knowledge then do n’t try to Track Google Analytics 4 (GA4) Ecommerce Purchase Tracking For 3DCart for Weebly that can broke your site, Cart and other functionality 

Disclaimer: Google tag manager belongs to Google property 

For Contact: mappchero@gmail.com

I am available for Hire on Freelancer: Freelancer.com

I am available for Hire on Upwork: Upwork.com

I am available for Hire on Peopleperhour: Peopleperhour.com

I am available for Hire on Guru: Guru.com

Google Analytics 4 (GA4) Ecommerce Tracking for 1ShoppingCart

Standard

Configure Google Analytics 4 (GA4) Ecommerce Tracking in 1ShoppingCart using Google Tag Manager

Google Analytics 4 Ecommerce Tracking is a feature that allows you to track and analyze Ecommerce data in your Google Analytics 4 property. When implemented for 1ShoppingCart, it enables you to track user interactions with your online store, such as product views, add to carts, and purchases, and gain insights into customer behavior, revenue, and other key Ecommerce metrics.

By enabling Google Analytics 4 Ecommerce Tracking for your 1ShoppingCart store, you can:

Gain insights into product performance:
You can use Ecommerce reports in Google Analytics 4 to track which products are selling well and which ones are not. This can help you optimize your product offerings and marketing strategies.

Understand customer behavior:
You can track user behavior on your store and see which pages or products are attracting the most attention. This can help you optimize your site’s user experience and make data-driven decisions.

Track revenue and sales:
You can track revenue and sales data and see which marketing campaigns or channels are driving the most revenue. This can help you optimize your marketing spend and maximize your return on investment.

Analyze checkout behavior:
You can track checkout behavior and see where customers are dropping off in the checkout process. This can help you identify and fix issues that are causing customers to abandon their carts.

There are several benefits to using Google Analytics 4 Ecommerce Tracking for 1ShoppingCart with data layer using Google Tag Manager:

Accurate tracking of Ecommerce data:
Using data layer with Google Tag Manager allows for more accurate tracking of Ecommerce data, as it ensures that data is captured consistently and accurately across all pages of your 1ShoppingCart store.

Enhanced data collection:
By using Google Tag Manager to set up Ecommerce tracking, you can collect more granular data about user behavior on your 1ShoppingCart store, such as the specific products that were added to a user’s cart or the specific step in the checkout process where a user abandoned their cart.

Customizable tracking:
Google Tag Manager provides a lot of flexibility in how Ecommerce data is tracked and collected, allowing you to customize your tracking based on your specific needs and requirements.

Simplified implementation:
Setting up Ecommerce tracking using Google Tag Manager can be a simpler process than manually adding tracking code to your 1ShoppingCart store’s templates, as it allows you to manage all of your tracking tags in one place.

Actionable insights:
By tracking Ecommerce data in Google Analytics 4, you can gain valuable insights into user behavior and revenue performance that can help you optimize your store and drive more sales and revenue.

Google Analytics 4 Ecommerce Tracking for 1ShoppingCart with data layer using Google Tag Manager is a method for tracking Ecommerce data in your 1ShoppingCart store using Google Analytics 4 and Google Tag Manager.

In this method, a data layer is used to capture Ecommerce-related data on your 1ShoppingCart store, such as product impressions, add to cart events, and purchase transactions. The data layer is then connected to Google Tag Manager, which is used to trigger Google Analytics 4 tags that send this data to your Google Analytics 4 property.

By using data layer with Google Tag Manager to track Ecommerce data in 1ShoppingCart, you can ensure that Ecommerce-related events and data are captured consistently and accurately across all pages of your store. This allows you to gain valuable insights into customer behavior and revenue performance, and optimize your store to drive more sales and revenue.

Some examples of Ecommerce data that can be tracked using Google Analytics 4 Ecommerce Tracking for 1ShoppingCart with data layer using Google Tag Manager include:

  • Product impressions: the number of times a product is viewed on your store
  • Add to cart events: when a user adds a product to their cart
  • Remove from cart events: when a user removes a product from their cart
  • Checkout start: when a user begins the checkout process
  • Checkout progress: the steps a user takes during the checkout process
  • Purchase transactions: when a user completes a purchase

To set up Google Analytics 4 Ecommerce tracking for 1ShoppingCart using Google Tag Manager, you will need to follow these steps:

Set up a Google Analytics 4 property:
If you haven’t already, create a Google Analytics 4 property in your Google Analytics account.

Enable Ecommerce tracking in your Google Analytics 4 property:
In your Google Analytics 4 property, navigate to the “Ecommerce Settings” section and toggle the “Enable Ecommerce” switch to “On”.

Set up a data stream for 1ShoppingCart:
In your Google Analytics 4 property, navigate to the “Data Streams” section and click the “Add Stream” button. Follow the prompts to set up a new data stream for 1ShoppingCart.

Set up Google Tag Manager for your 1ShoppingCart store:
In your Google Tag Manager account, create a new container and install the Google Tag Manager code on your 1ShoppingCart store.

Set up a Google Analytics 4 tag in Google Tag Manager:
In your Google Tag Manager container, create a new tag and select “Google Analytics: GA4 Configuration” as the tag type. Configure the tag with your Google Analytics 4 Measurement ID and enable Ecommerce tracking by toggling the “Enable Enhanced Ecommerce Features” switch to “On”.

Set up triggers in Google Tag Manager:
Create triggers to fire the Google Analytics 4 tag on specific Ecommerce-related events, such as “Add to Cart”, “Remove from Cart”, “Checkout Start”, and “Purchase”.

Test your setup:
After completing the above steps, perform a test transaction in 1ShoppingCart to ensure that the Ecommerce data is being tracked and sent to your Google Analytics 4 property.

Set Up 1ShoppingCart Ecommerce Tracking in GA4

Integrate Google Analytics 4 (GA4) with 1ShoppingCart for Ecommerce Tracking using Google Tag Manager

Warning: If you do n’t know about javascript or do n’t have developing knowledge then do n’t try to Track Google Analytics 4 (GA4) Ecommerce Purchase Tracking for 1ShoppingCart for Weebly that can broke your site, Cart and other functionality 

Disclaimer: Google tag manager belongs to Google property 

For Contact: mappchero@gmail.com

I am available for Hire on Freelancer: Freelancer.com

I am available for Hire on Upwork: Upwork.com

I am available for Hire on Peopleperhour: Peopleperhour.com

I am available for Hire on Guru: Guru.com

Google Analytic 4 (GA4) eCommerce Tracking for X-Cart Store

Standard

Google Analytics 4 (GA4) eCommerce Tracking with Google Tag Manager (GTM) for X-Cart store allows you to set up and track eCommerce data using GTM instead of adding the tracking code directly to your X-Cart store. This approach makes it easier to manage your tracking implementation and can provide more flexibility in terms of tracking events and customizing data.

There are several reasons why you might want to use Google Analytics 4 (GA4) eCommerce Tracking with Google Tag Manager (GTM) for your X-Cart store:

Simplified tracking implementation: Using GTM to manage your tracking implementation can simplify the process of adding tracking code to your X-Cart store. Instead of adding the GA4 tracking code directly to your store’s pages, you can set up a GTM container and add the tracking code to it, making it easier to manage and update your tracking implementation.

Custom event tracking: GTM provides more flexibility in terms of tracking events and can allow you to set up custom event tracking that goes beyond the default tracking capabilities of GA4. This can be particularly useful for tracking user interactions on your X-Cart store, such as clicks on buttons or form submissions.

Custom data tracking: GTM can also allow you to customize the data that is sent to GA4, giving you more control over the eCommerce data that you track. For example, you can use GTM to track additional eCommerce data, such as product categories or shipping costs, that is not included in the default tracking data provided by X-Cart.

Testing and debugging: GTM provides a testing and debugging environment that can help you ensure that your tracking implementation is working correctly. You can use the preview and debug mode in GTM to test your tags and make sure that your eCommerce data is being sent to GA4 as expected.

To set up GA4 eCommerce Tracking with GTM for X-Cart store, you will need to follow these steps:

  1. Set up a GA4 property and enable eCommerce tracking in the property settings.

2. Set up a data layer in your X-Cart store. The data layer should include eCommerce data for each order, including the transaction ID, order total, currency, and items purchased.

3. Create a GTM container and add the GA4 tracking code to it. You can find the tracking code in your GA4 property under “Measurement Protocol.”

4. Set up a tag in GTM to send eCommerce data to GA4. The tag should use a custom event trigger that fires when an order is completed on your X-Cart store.

5. Configure the tag to send the eCommerce data from the data layer to GA4. The tag should use variables to extract the eCommerce data from the data layer and pass it to the GA4 tracking code.

6. Test the implementation to make sure the eCommerce data is being sent to GA4 correctly.

By following these steps, you will be able to track eCommerce data for your X-Cart store in GA4 using GTM.

eCommerce Tracking for X-Cart Store

Integrate online store with GA4 eCommerce Tracking for X-Cart Store with Google Tag Manager

Warning: If you do n’t know about javascript or do n’t have developing knowledge then do n’t try to Track Google Analytic 4 (GA4) eCommerce Purcahse Tracking for X-Cart Store for Weebly that can broke your site, Cart and other functionality 

Disclaimer: Google tag manager belongs to Google property 

For Contact: mappchero@gmail.com

I am available for Hire on Freelancer: Freelancer.com

I am available for Hire on Upwork: Upwork.com

I am available for Hire on Peopleperhour: Peopleperhour.com

I am available for Hire on Guru: Guru.com

GA4 eCommerce Purchase Event Parameters and Setup

Standard

GA4 Custom Data layer eCommerce Purchase Event Parameters and Setup using Google Tag Manager

Setting up the GA4 eCommerce Purchase event with the appropriate parameters is important because it allows you to track key metrics related to your eCommerce transactions, such as revenue, average order value, and conversion rate. By implementing this event, you can gain insights into how your customers are interacting with your website and where they are dropping off in the purchase process.

Here are some reasons why you need to set up the GA4 eCommerce Purchase event:

Track revenue: The value parameter in the GA4 eCommerce Purchase event allows you to track the total revenue generated from your eCommerce transactions. This metric is important for measuring the overall success of your eCommerce business.

Measure conversion rate: By tracking the number of eCommerce purchases, you can calculate your conversion rate – the percentage of visitors who make a purchase on your website. This metric can help you identify areas for improvement in your purchase process and increase your overall conversion rate.

Understand customer behavior: The items, item_quantity, and item_category parameters in the GA4 eCommerce Purchase event provide insights into which products are most popular, which categories are driving the most revenue, and how much customers are buying at a time. This data can help you optimize your product offerings and marketing strategies.

Evaluate marketing campaigns: The affiliation and coupon parameters in the GA4 eCommerce Purchase event allow you to track the performance of specific marketing campaigns and promotions. By measuring the impact of these campaigns on your eCommerce revenue, you can make informed decisions about where to invest your marketing budget.

Overall, setting up the GA4 eCommerce Purchase event with the appropriate parameters is essential for understanding the performance of your eCommerce business and making data-driven decisions to improve it.

To set up the GA4 eCommerce Purchase event, you will need to define the appropriate event parameters and implement them in your tracking code or tag manager. Here are the parameters you should consider:

event_name: This parameter should be set to “purchase” to indicate that a purchase has occurred.

transaction_id: A unique identifier for the transaction, such as an order number.

value: The total value of the transaction, including tax and shipping.

currency: The currency in which the transaction was made, such as USD or EUR.

items: An array of items included in the transaction, including their names, SKUs, and prices.

item_quantity: The quantity of each item included in the transaction.

item_category: The category of each item, such as electronics or clothing.

coupon: The coupon code used for the purchase.

affiliation: The store or website where the purchase was made.

To set up the GA4 eCommerce Purchase event, follow these steps:

Log in to your Google Analytics account and create a new GA4 property for your website.

In the “Events” section of your GA4 property, click “Create event”.

Set the event name to “purchase” and add the relevant parameters, such as transaction_id, value, currency, and items.

If you are using a tag manager, create a new tag and select the “GA4 Configuration” tag type.

Add the relevant parameters to the tag, and set the trigger to fire when a purchase is completed.

Save and publish your tag to begin tracking eCommerce purchases in GA4.

eCommerce Purchase Event Parameters

Google Analytics 4 Ecommerce Tracking (GTM) with eCommerce Purchase Event Parameters using Google Tag Manager

Warning: If you do n’t know about javascript or do n’t have developing knowledge then do n’t try to GA4 eCommerce Purchase Event Parameters and Setup that can broke your site, Cart and other functionality 

Disclaimer: Google tag manager belongs to Google property 

For Contact: mappchero@gmail.com

I am available for Hire on Freelancer: Freelancer.com

I am available for Hire on Upwork: Upwork.com

I am available for Hire on Peopleperhour: Peopleperhour.com

I am available for Hire on Guru: Guru.com

Google analytics 4 Migration for SaaS Application

Standard

Google Analytics 4 (GA4) is the latest version of Google’s analytics platform, which provides powerful insights into user behavior, user acquisition, and user retention. Implementing Google Analytics 4 for a SaaS (Software as a Service) application can help you gain a deeper understanding of how users interact with your software and identify areas for improvement.

GA4 includes several features that are specifically designed for SaaS applications, such as event tracking, user properties, and enhanced measurement. With event tracking, you can track user actions such as sign-ups, logins, upgrades, and cancellations, and gain insights into how users interact with your application. User properties allow you to track information such as age, gender, and interests, which can help you better understand your audience and personalize your marketing efforts. Enhanced measurement automatically tracks more user interactions, such as clicks on outbound links and file downloads, providing a more comprehensive view of user behavior.

Additionally, GA4 allows you to set up conversion tracking to measure the effectiveness of your marketing campaigns. By tracking conversions such as sign-ups, upgrades, and renewals, you can identify which campaigns are driving the most revenue for your SaaS business.

Implementing Google Analytics 4 for a SaaS application can provide valuable insights into user behavior, user acquisition, and user retention. Here are the steps you can follow to implement Google Analytics 4 for your SaaS application:

Create a Google Analytics 4 property: The first step is to create a new Google Analytics 4 property for your SaaS application in the Google Analytics console.

Install the tracking code: Once you have created the property, you need to install the tracking code on your website. This tracking code is a piece of JavaScript that collects data about user behavior on your website and sends it to your Google Analytics account.

Set up event tracking: With Google Analytics 4, you can track user behavior as events. You can set up event tracking for user actions such as sign-ups, logins, upgrades, and cancellations. This will help you understand how users interact with your application and identify areas where you can improve user experience.

Set up user properties: Google Analytics 4 allows you to track user properties such as age, gender, and interests. You can use this information to better understand your audience and personalize your marketing efforts.

Enable Enhanced Measurement: Enhanced Measurement is a feature in Google Analytics 4 that allows you to track more user interactions automatically. This includes clicks on outbound links, file downloads, and video engagement. By enabling Enhanced Measurement, you can get a more comprehensive view of how users interact with your SaaS application.

Set up conversion tracking: Finally, you should set up conversion tracking to measure the effectiveness of your marketing campaigns. You can track conversions such as sign-ups, upgrades, and renewals to understand which campaigns are driving the most revenue for your SaaS business.

Overall, implementing Google Analytics 4 for your SaaS application can provide valuable insights that can help you improve user experience, increase user retention, and drive revenue growth.

Make the switch to Google Analytics 4 for SaaS Application

Moving to Google Analytics 4 for SaaS using Google Tag Manager

Warning: If you do n’t know about javascript or do n’t have developing knowledge then do n’t try to Google analytics 4 (GA4) Migration for SaaS Application that can broke your site, Cart and other functionality 

Disclaimer: Google tag manager belongs to Google property 

For Contact: mappchero@gmail.com

I am available for Hire on Freelancer: Freelancer.com

I am available for Hire on Upwork: Upwork.com

I am available for Hire on Peopleperhour: Peopleperhour.com

I am available for Hire on Guru: Guru.com

Track Custom Events With Google Analytics 4

Standard

Track Custom Events With Google Analytics 4 refers to the process of measuring and collecting data about specific user interactions with a website or app that go beyond the standard pageviews and sessions. Custom events can include actions such as clicking a button, filling out a form, or making a purchase. The data collected from custom events can provide valuable insights into user behavior, helping website and app owners improve their user experience and meet their business goals. Google Analytics 4 is the latest version of Google’s web analytics service and offers features that make it easier to track custom events.

Tracking custom events with Google Analytics 4 using Google Tag Manager (GTM) is a more advanced method, but offers more flexibility and control over the implementation. The process typically involves the following steps:

Set up a Google Analytics 4 property: You will need to have a Google Analytics 4 property set up for your website or app. If you don’t already have one, you can create a new property in your Google Analytics account.

Implement the Global Site Tag (gtag.js) on your website: You will need to implement the Global Site Tag (gtag.js) on your website in order to send data to Google Analytics 4. This code should be added to every page on your website.

Set up Google Tag Manager: You will need to set up Google Tag Manager on your website. This involves creating a GTM account and adding the GTM container code to your website.

Define the custom event: In order to track a custom event, you will need to define what the event is and what data you want to collect. This includes specifying the event name, any associated event parameters, and the value of the event.

Create a GTM tag for the custom event: You will need to create a GTM tag that sends the custom event data to Google Analytics 4. You can do this by using a predefined tag template in GTM, or by creating a custom tag using the Google Analytics 4 tag type.

Fire the custom event tag: You will then need to configure the custom event tag to fire when the custom event occurs. This can be done using GTM triggers, which determine when the tag should be executed.

Verify the custom event data: You can verify that your custom event data is being collected by checking the Real-time or DebugView report in your Google Analytics 4 property. You can also create custom reports in Google Analytics 4 to see the data collected from your custom events over time.

Disclaimer: Google tag manager belongs to Google property 

For Contact: mappchero@gmail.com

I am available for Hire on Freelancer: Freelancer.com

I am available for Hire on Upwork: Upwork.com

I am available for Hire on Peopleperhour: Peopleperhour.com

I am available for Hire on Guru: Guru.com

Track Ecommerce Transactions with Google Analytics 4 (GA4) for Weebly

Standard

Tracking ecommerce with Google Analytics 4 (GA4) for Weebly using Google Tag Manager is a process of setting up and implementing tracking code and tags to track ecommerce-related events on a Weebly website. By using Google Tag Manager, website owners can easily implement GA4 tracking on their site without requiring any manual coding.

The process involves setting up a GA4 property and adding the GA4 tracking code to the Weebly site. After that, Enhanced Ecommerce tracking needs to be enabled, which allows tracking of ecommerce events like product views, add-to-carts, and purchases. Google Tag Manager is then used to set up tags, triggers, and variables to capture ecommerce events and data, which are then sent to GA4.

By setting up ecommerce tracking with GA4 and Google Tag Manager, website owners can gain valuable insights into their ecommerce performance, including data related to sales, revenue, conversion rates, and more. This data can be used to optimize the ecommerce experience, improve marketing strategies, and increase sales and revenue.

There are several benefits to tracking ecommerce transactions with Google Analytics 4 (GA4) for Weebly:

Better understanding of customer behavior: By tracking ecommerce transactions, you can gain insights into how customers are interacting with your online store. You can see which products are selling the most, how customers are moving through the sales funnel, and where they may be dropping off. This information can be used to optimize your ecommerce experience and increase sales and revenue.

Measure marketing effectiveness: By tracking ecommerce transactions, you can see which marketing channels are driving the most revenue. You can also see which campaigns are performing well and which ones need to be optimized. This information can help you make data-driven decisions about where to invest your marketing dollars and which strategies to prioritize.

Identify opportunities for growth: By tracking ecommerce transactions, you can identify areas where you can improve the customer experience, such as optimizing product pages, streamlining the checkout process, or offering more payment options. You can also identify new products to offer based on customer demand and preferences.

Personalize the shopping experience: By tracking ecommerce transactions, you can gather data on customer preferences and behaviors, which can be used to personalize the shopping experience. For example, you can recommend related products based on their purchase history or offer personalized discounts to incentivize repeat purchases.

Evaluate overall performance: By tracking ecommerce transactions, you can evaluate the overall performance of your online store. You can see how much revenue you are generating, what your conversion rate is, and how many customers are returning to make additional purchases. This information can be used to set goals and track progress over time.

To track ecommerce transactions with Google Analytics 4 (GA4) for Weebly using Google Tag Manager, you need to follow the steps below:

1. Set up GA4 Property: The first step is to create a GA4 property in Google Analytics. If you already have one set up, skip this step. To create a new property, follow the steps provided in the Google Analytics documentation.

2. Add Tracking Code to Weebly Site: Once you have created your GA4 property, you need to add the tracking code to your Weebly site. To do this, follow these steps:

a. Log in to your Weebly account and navigate to the “Settings” tab.

b. Click on the “SEO” option.

c. Paste the GA4 tracking code into the “Header Code” section.

d. Click “Save” to save the changes.

3. Set up Enhanced Ecommerce: The next step is to set up Enhanced Ecommerce tracking in GA4. To do this, follow these steps:

a. Navigate to your GA4 property and click on “Data Streams” from the left-hand menu.

b. Select the data stream for your Weebly site and click on “Tagging” from the left-hand menu.

c. Click on “Configure Tagging” and then click on “Enhanced Ecommerce”.

d. Turn on the toggle switch for “Enable Enhanced Ecommerce Reporting”.

e. Click “Save” to save the changes.

4. Set up Ecommerce Events in Google Tag Manager: The next step is to set up ecommerce events in Google Tag Manager. To do this, follow these steps:

a. Log in to your Google Tag Manager account and navigate to your container.

b. Click on “Tags” from the left-hand menu and then click on “New”.

c. Select “Google Analytics: GA4 Configuration” as the tag type.

d. Enter your GA4 Measurement ID in the “Measurement ID” field.

e. Turn on the toggle switch for “Enable Enhanced Ecommerce”.

f. Click “Save” to save the tag.

g. Click on “Triggers” from the left-hand menu and then click on “New”.

h. Select “Custom Event” as the trigger type.

i. Enter the event name (e.g. “Purchase”) in the “Event Name” field.

j. Click “Save” to save the trigger.

5. Set up Ecommerce Variables in Google Tag Manager: The final step is to set up ecommerce variables in Google Tag Manager. To do this, follow these steps:

a. Click on “Variables” from the left-hand menu and then click on “Configure”.

b. Turn on the toggle switch for “Ecommerce”.

c. Click “Save” to save the variable.

d. Click on “Tags” from the left-hand menu and select the tag you created earlier.

e. Under “Event Parameters”, select the appropriate ecommerce variables (e.g. transaction ID, product ID, price) from the drop-down menus.

f. Click “Save” to save the changes.

Once you have completed these steps, you will be able to track ecommerce transactions in GA4 for your Weebly site using Google Tag Manager. You can view this data in the “Ecommerce” section of your GA4 property.

 Install Google Analytics 4 (GA4) in Weebly

Set up Ecommerce Tracking Google Analytics 4 using Google Tag Manager

Warning: If you do n’t know about javascript or do n’t have developing knowledge then do n’t try to Track Ecommerce Purchase Transactions with Google Analytics 4 (GA4) for Weebly that can broke your site, Cart and other functionality 

Disclaimer: Google tag manager belongs to Google property 

For Contact: mappchero@gmail.com

I am available for Hire on Freelancer: Freelancer.com

I am available for Hire on Upwork: Upwork.com

I am available for Hire on Peopleperhour: Peopleperhour.com

I am available for Hire on Guru: Guru.com

Implement Google Analytics 4 on Bubble.io APP

Standard

Integrate Google Analytics 4 eCommerce Tracking on Bubble.io APP using Google Tag Manager

Google Analytics 4 is a web analytics platform from Google that helps website and app owners track user behavior, demographics, and other important metrics. It is the latest version of Google Analytics, and it provides a more advanced set of features than the previous version, including improved data tracking, machine learning-powered insights, and a more comprehensive view of user behavior across multiple devices and platforms.

When integrated with a Bubble.io app, Google Analytics 4 can provide valuable insights into how users interact with the app. This can include data on user demographics, user engagement, user retention, and user behavior within the app. By analyzing this data, app owners can make informed decisions about how to improve the app and provide a better experience for their users.

To implement Google Analytics 4 on a Bubble.io app, the app owner needs to create a Google Analytics 4 property and obtain a measurement ID, which is used to identify the property in the tracking code. The owner then installs a plugin for Google Analytics on the app and adds the measurement ID to the plugin settings. The owner can then use Bubble’s built-in event tracking capabilities to track user interactions in the app and analyze the data in the Google Analytics dashboard.

To implement Google Analytics 4 on a Bubble.io app, follow these steps:

  1. Create a Google Analytics 4 property:
    • Go to the Google Analytics website and create a new property for your app.
    • Follow the prompts to set up your property and obtain your measurement ID.
    • Install the Google Analytics plugin on your Bubble.io app

2. In the Bubble.io editor, navigate to the “Plugins” tab on the left-hand menu.

    • Search for “Google Analytics” in the search bar and select the “Google Analytics” plugin by Bubble.
    • Click “Install” to add the plugin to your app.
    • Add your measurement ID to the plugin settings:

3. In the Bubble.io editor, open the “Google Analytics” plugin settings.

    • Paste your measurement ID into the “Measurement ID” field.
    • Click “Save” to apply the changes.
    • Track events in your app:

4.  In order to track events in your app, you can use Bubble’s built-in event tracking capabilities.

    • To track an event, use the “Google Analytics – Track Event” action in your workflows.
    • Configure the action with the appropriate event parameters, such as category, action, and label.
      Verify tracking:

5. To verify that your tracking is working correctly, navigate to the “Realtime” section of your Google Analytics dashboard.

Trigger an event in your app and verify that it appears in the Realtime report within a few seconds.
That’s it! You have successfully implemented Google Analytics 4 on your Bubble.io app.

Implement Google Analytics 4 on Bubble.io app

Tagging and Reporting with Google Analytics 4 Bubble.io app using Google Tag Manager

Warning: If you do n’t know about javascript or do n’t have developing knowledge then do n’t try to Implement Google Analytics 4 on Bubble.io APP that can broke your site, Cart and other functionality 

Disclaimer: Google tag manager belongs to Google property 

For Contact: mappchero@gmail.com

I am available for Hire on Freelancer: Freelancer.com

I am available for Hire on Upwork: Upwork.com

I am available for Hire on Peopleperhour: Peopleperhour.com

I am available for Hire on Guru: Guru.com