Google Analytics 4 (GA4) eCommerce for Drupal without a pre-built plugin

Standard

Drupal eCommerce Tracking in Google Analytics 4 (GA4) without a pre-built plugin using Google Tag Manager

Google Analytics 4 (GA4) eCommerce Tracking can be implemented on Drupal without a pre-built plugin by adding the GA4 tracking code to the website’s code and using the Google Analytics Enhanced Measurement plugin to collect eCommerce data. This involves setting up custom events and parameters to track product views, clicks, and purchases, as well as enabling Enhanced Measurement for more accurate tracking of eCommerce actions. It may also involve creating custom reports and configuring data exports in Google Analytics.

Google Analytics 4 (GA4) is the latest version of Google’s web analytics platform. It offers eCommerce tracking features to help businesses measure and analyze their online sales performance.

To set up GA4 eCommerce tracking on Drupal without a pre-built plugin, you would need to manually add the GA4 tracking code to your website’s source code. You can use Drupal’s hook system to add custom code to your website.

Once the tracking code is installed, you would need to set up eCommerce tracking in the GA4 admin console, which involves configuring various settings and parameters to track eCommerce events and user behavior on your website.

To implement Google Analytics 4 (GA4) eCommerce tracking on Drupal using Google Tag Manager (GTM) without a plugin, you would need to do the following:

  1. Set up a GA4 property in your Google Analytics account.

2. Set up GA4 Enhanced eCommerce tracking in your GA4 property.

3. Install the GTM container code on your Drupal site.

4. Create custom dataLayer variables in GTM to capture the necessary eCommerce data, such as product names, prices, and quantities.

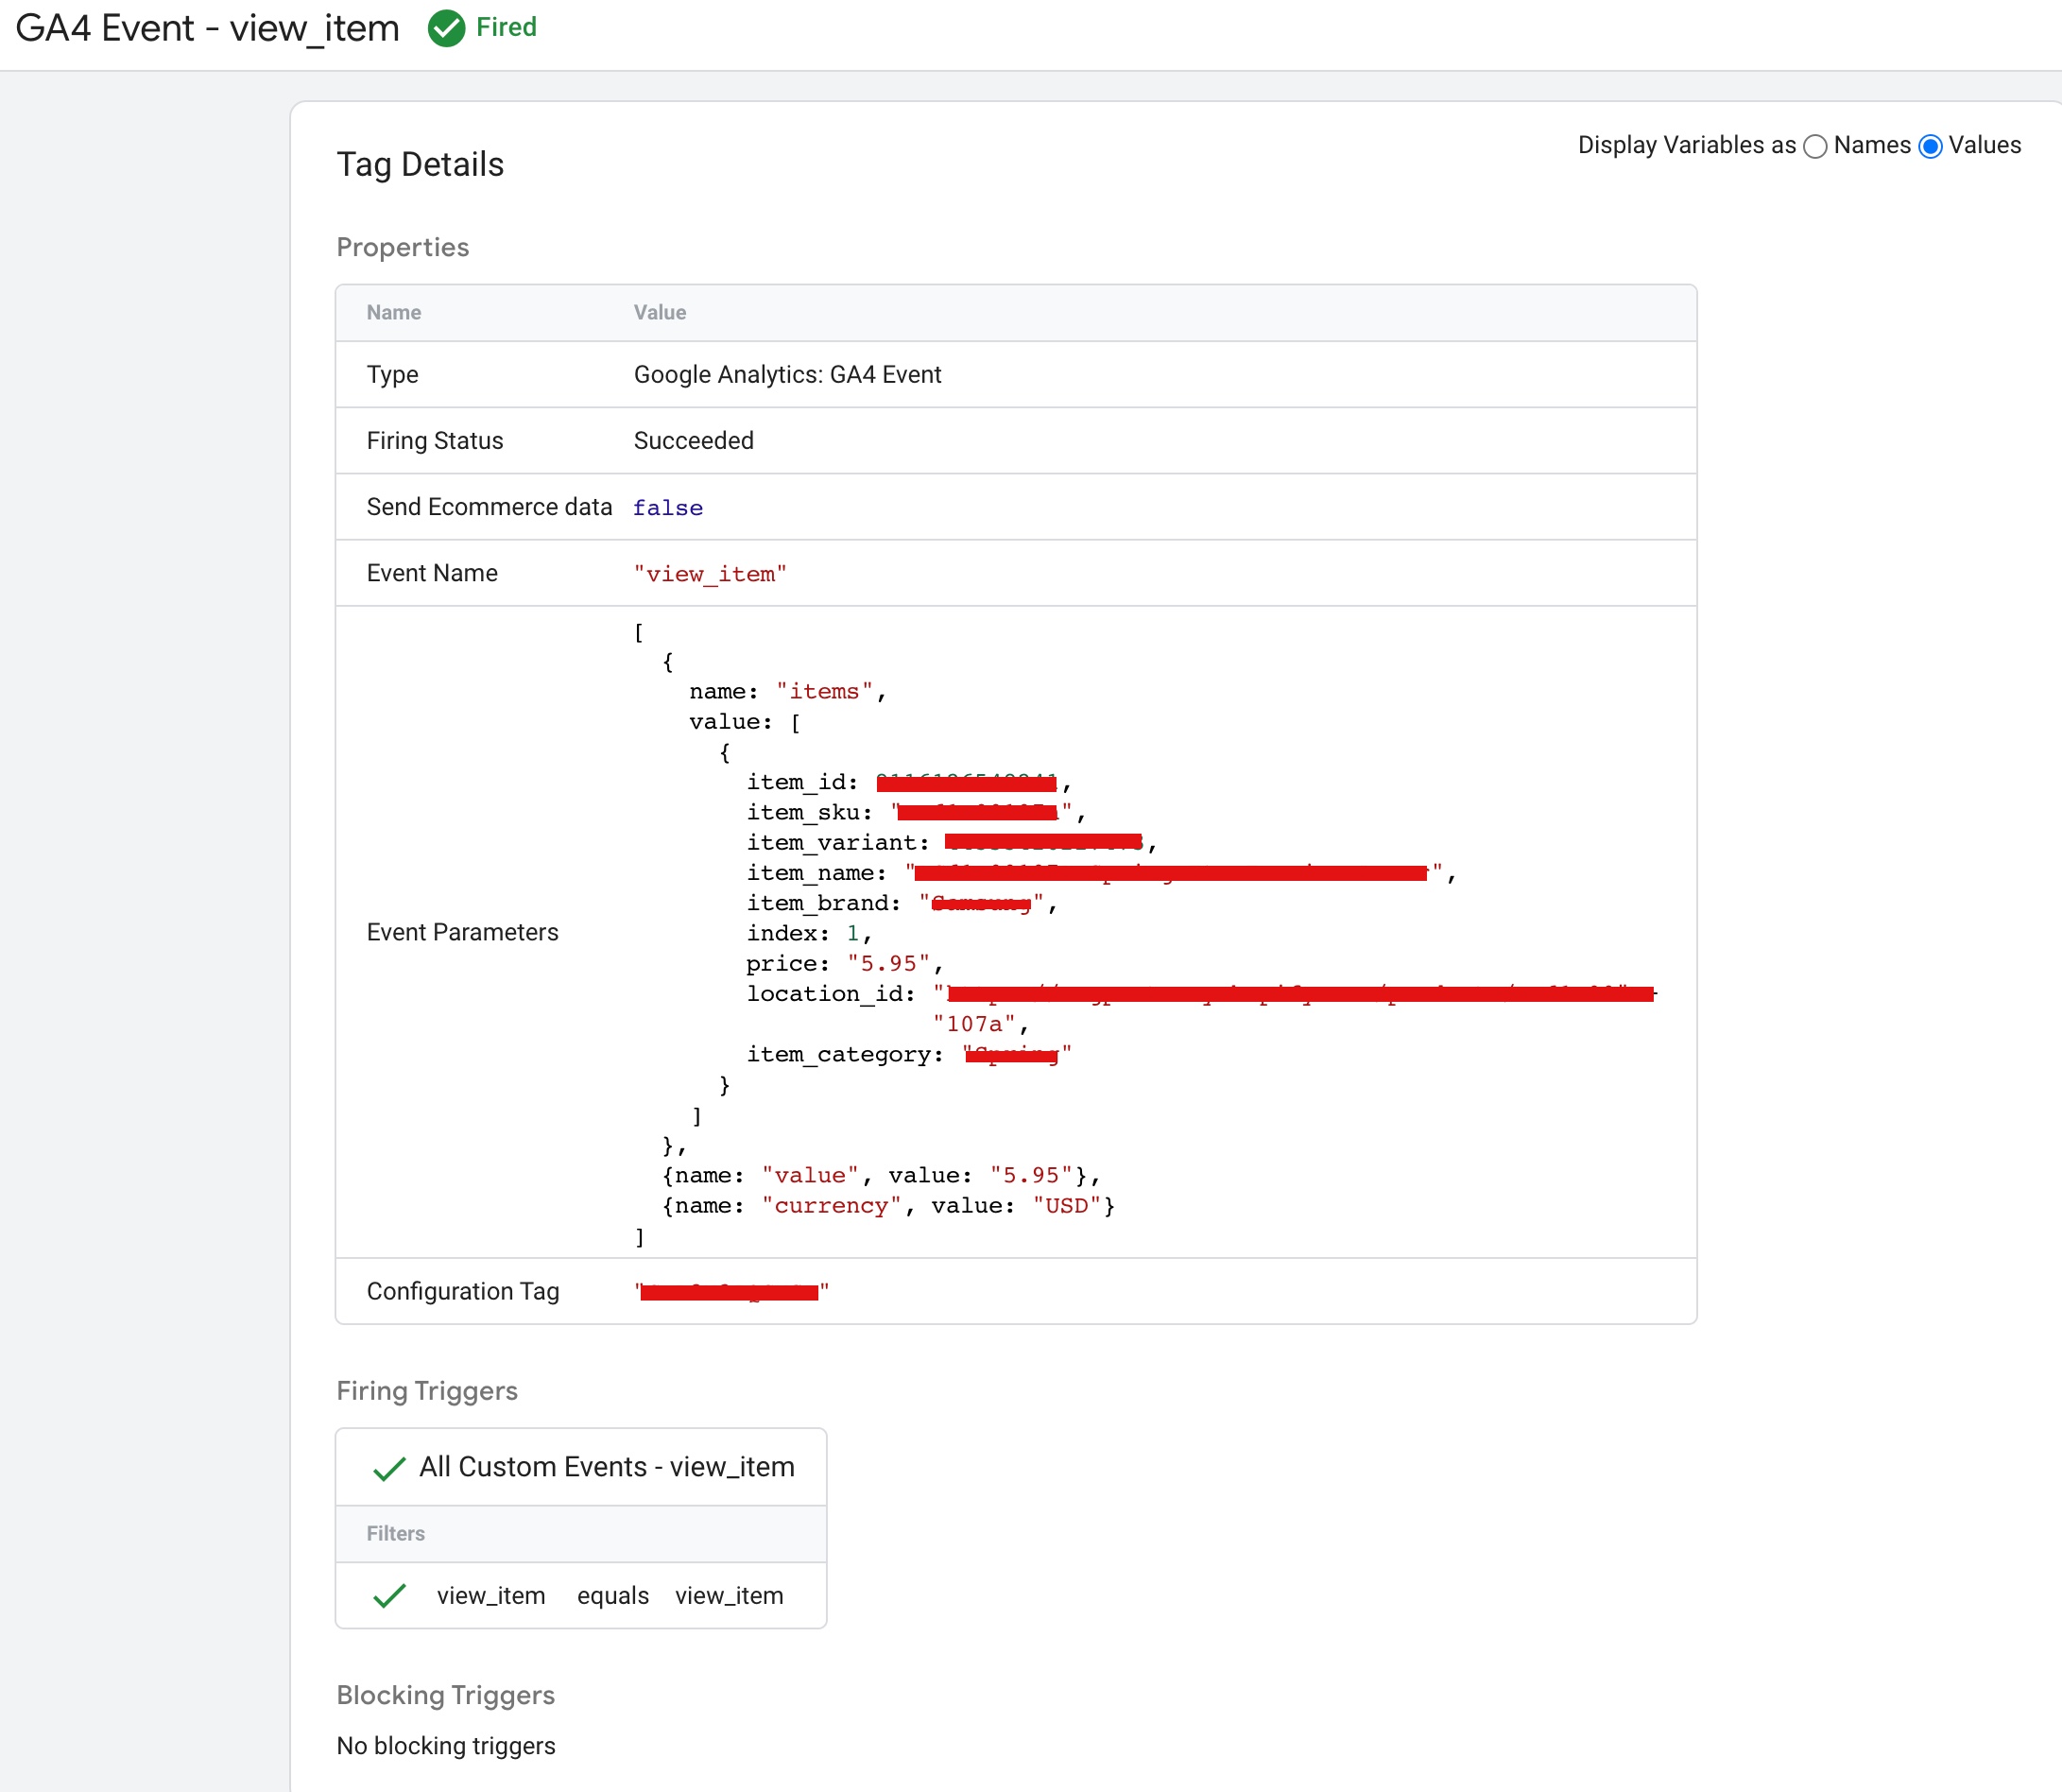
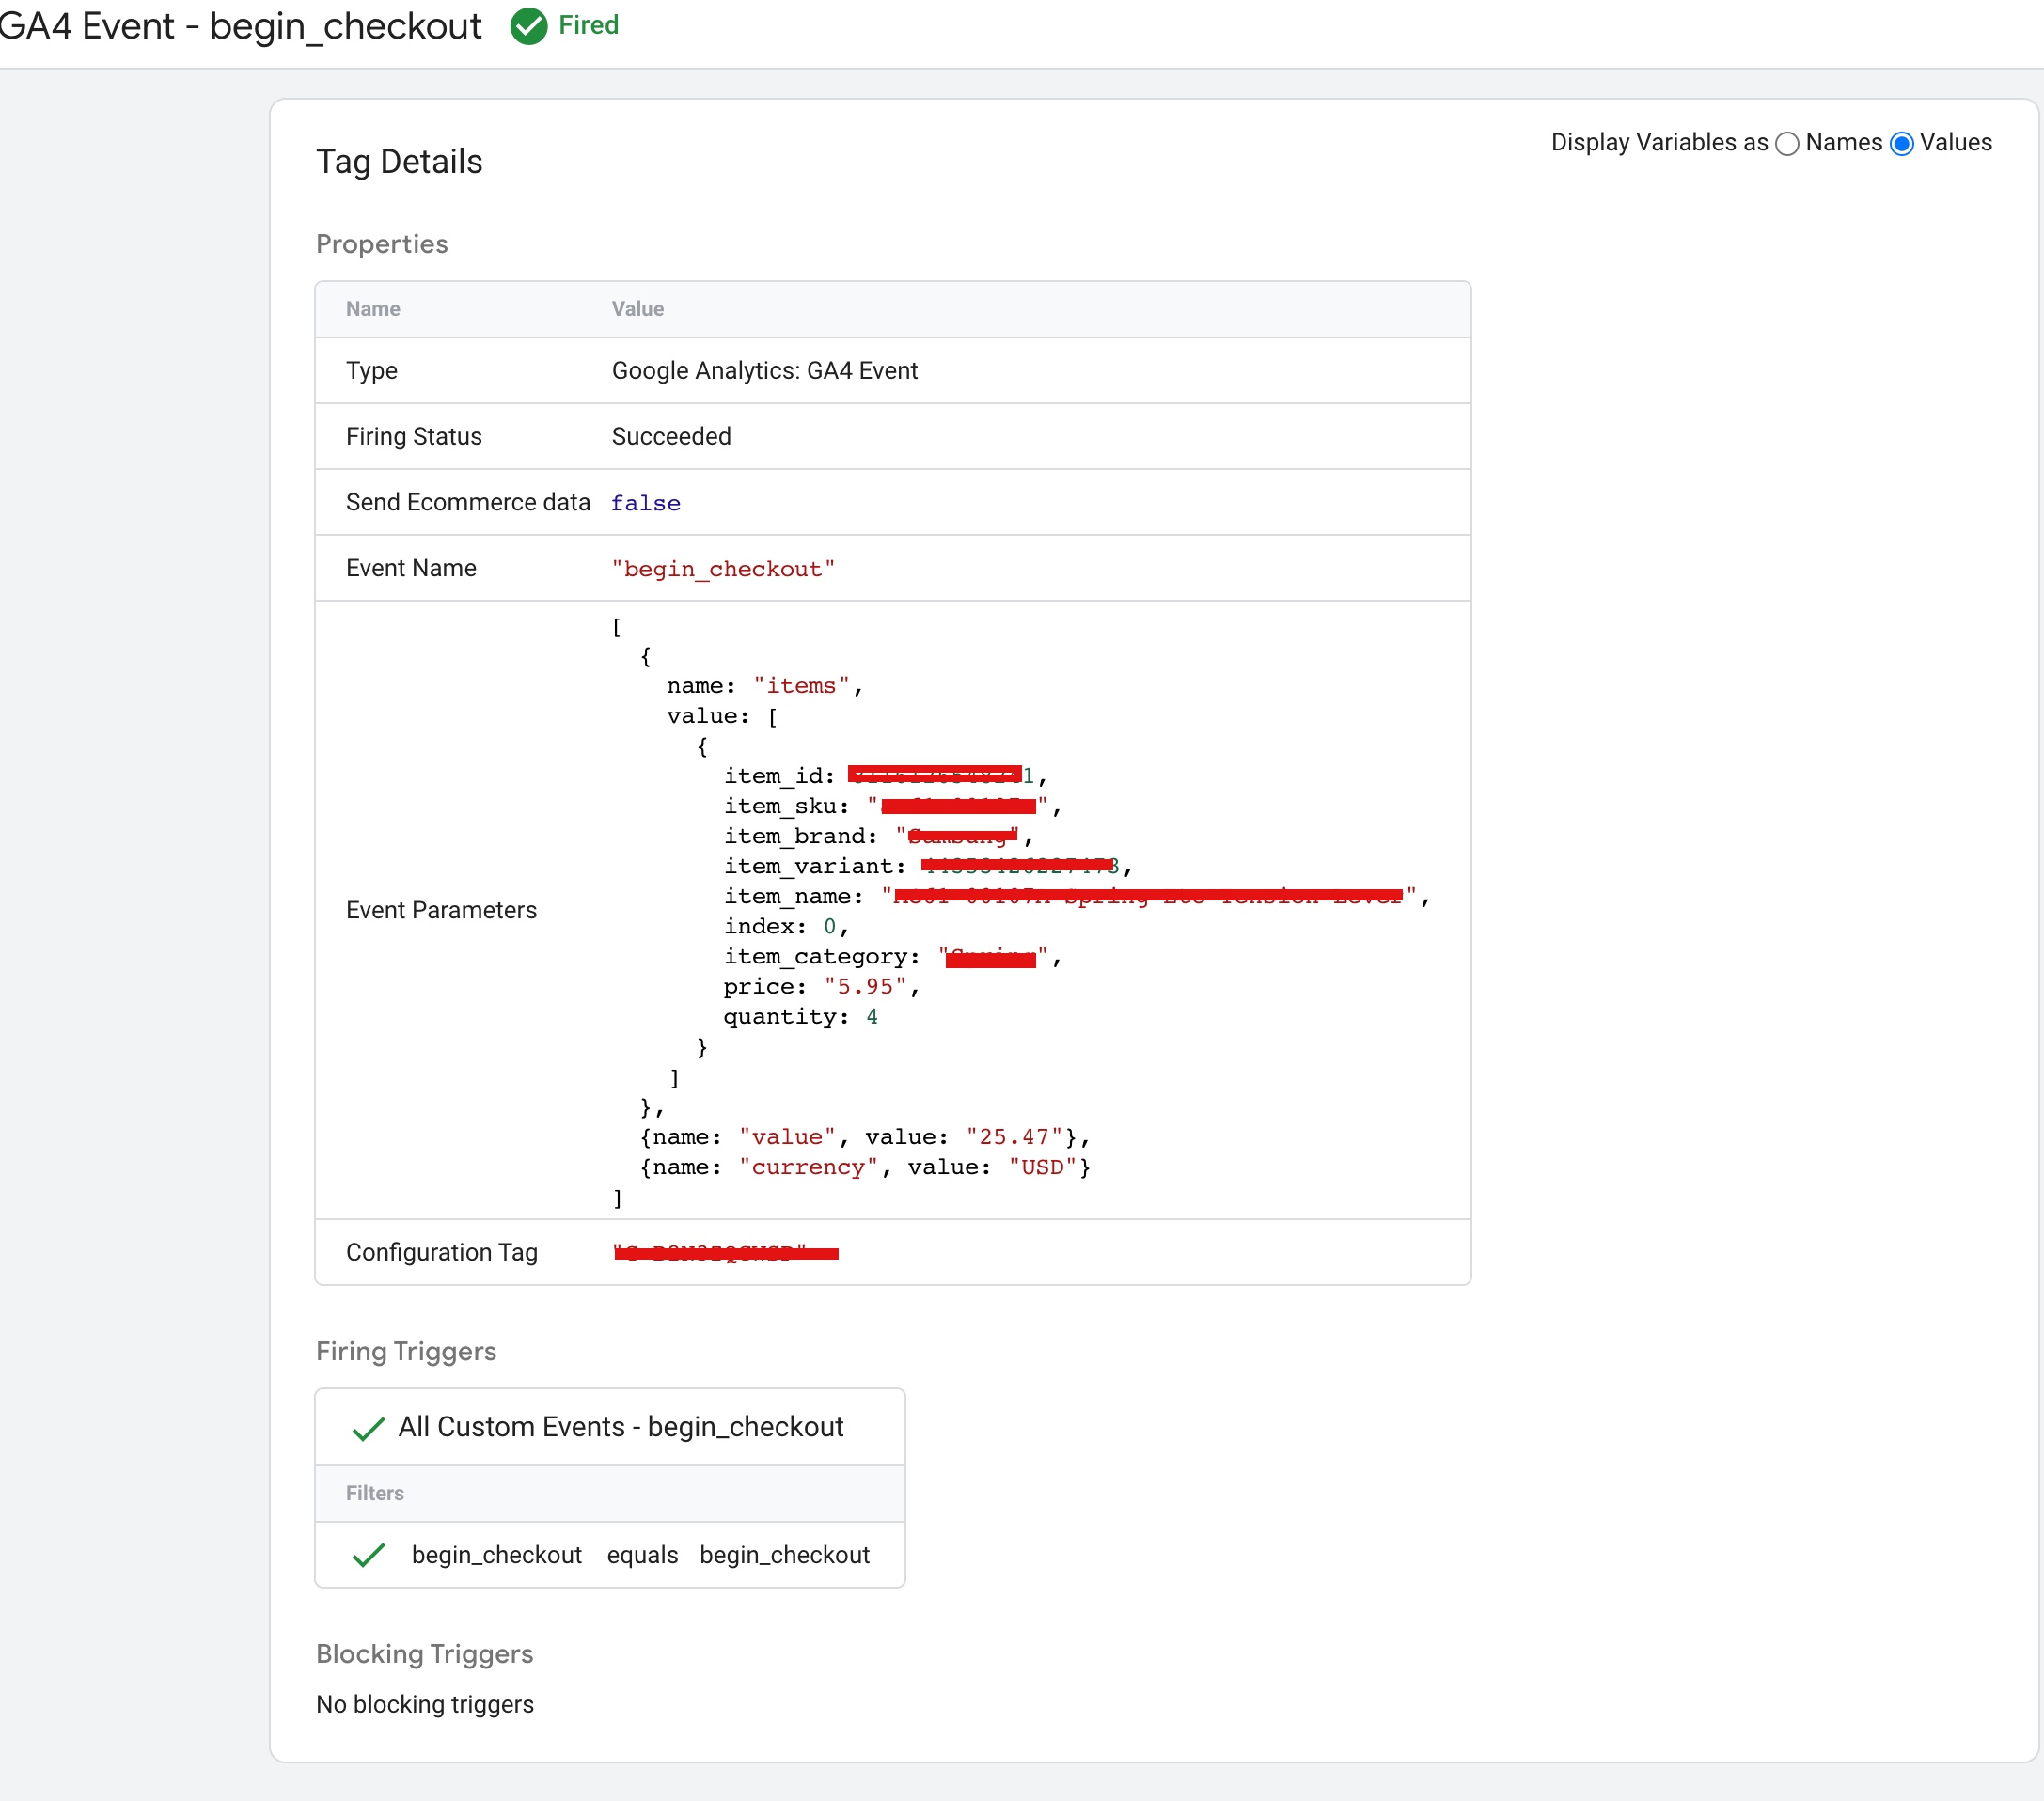
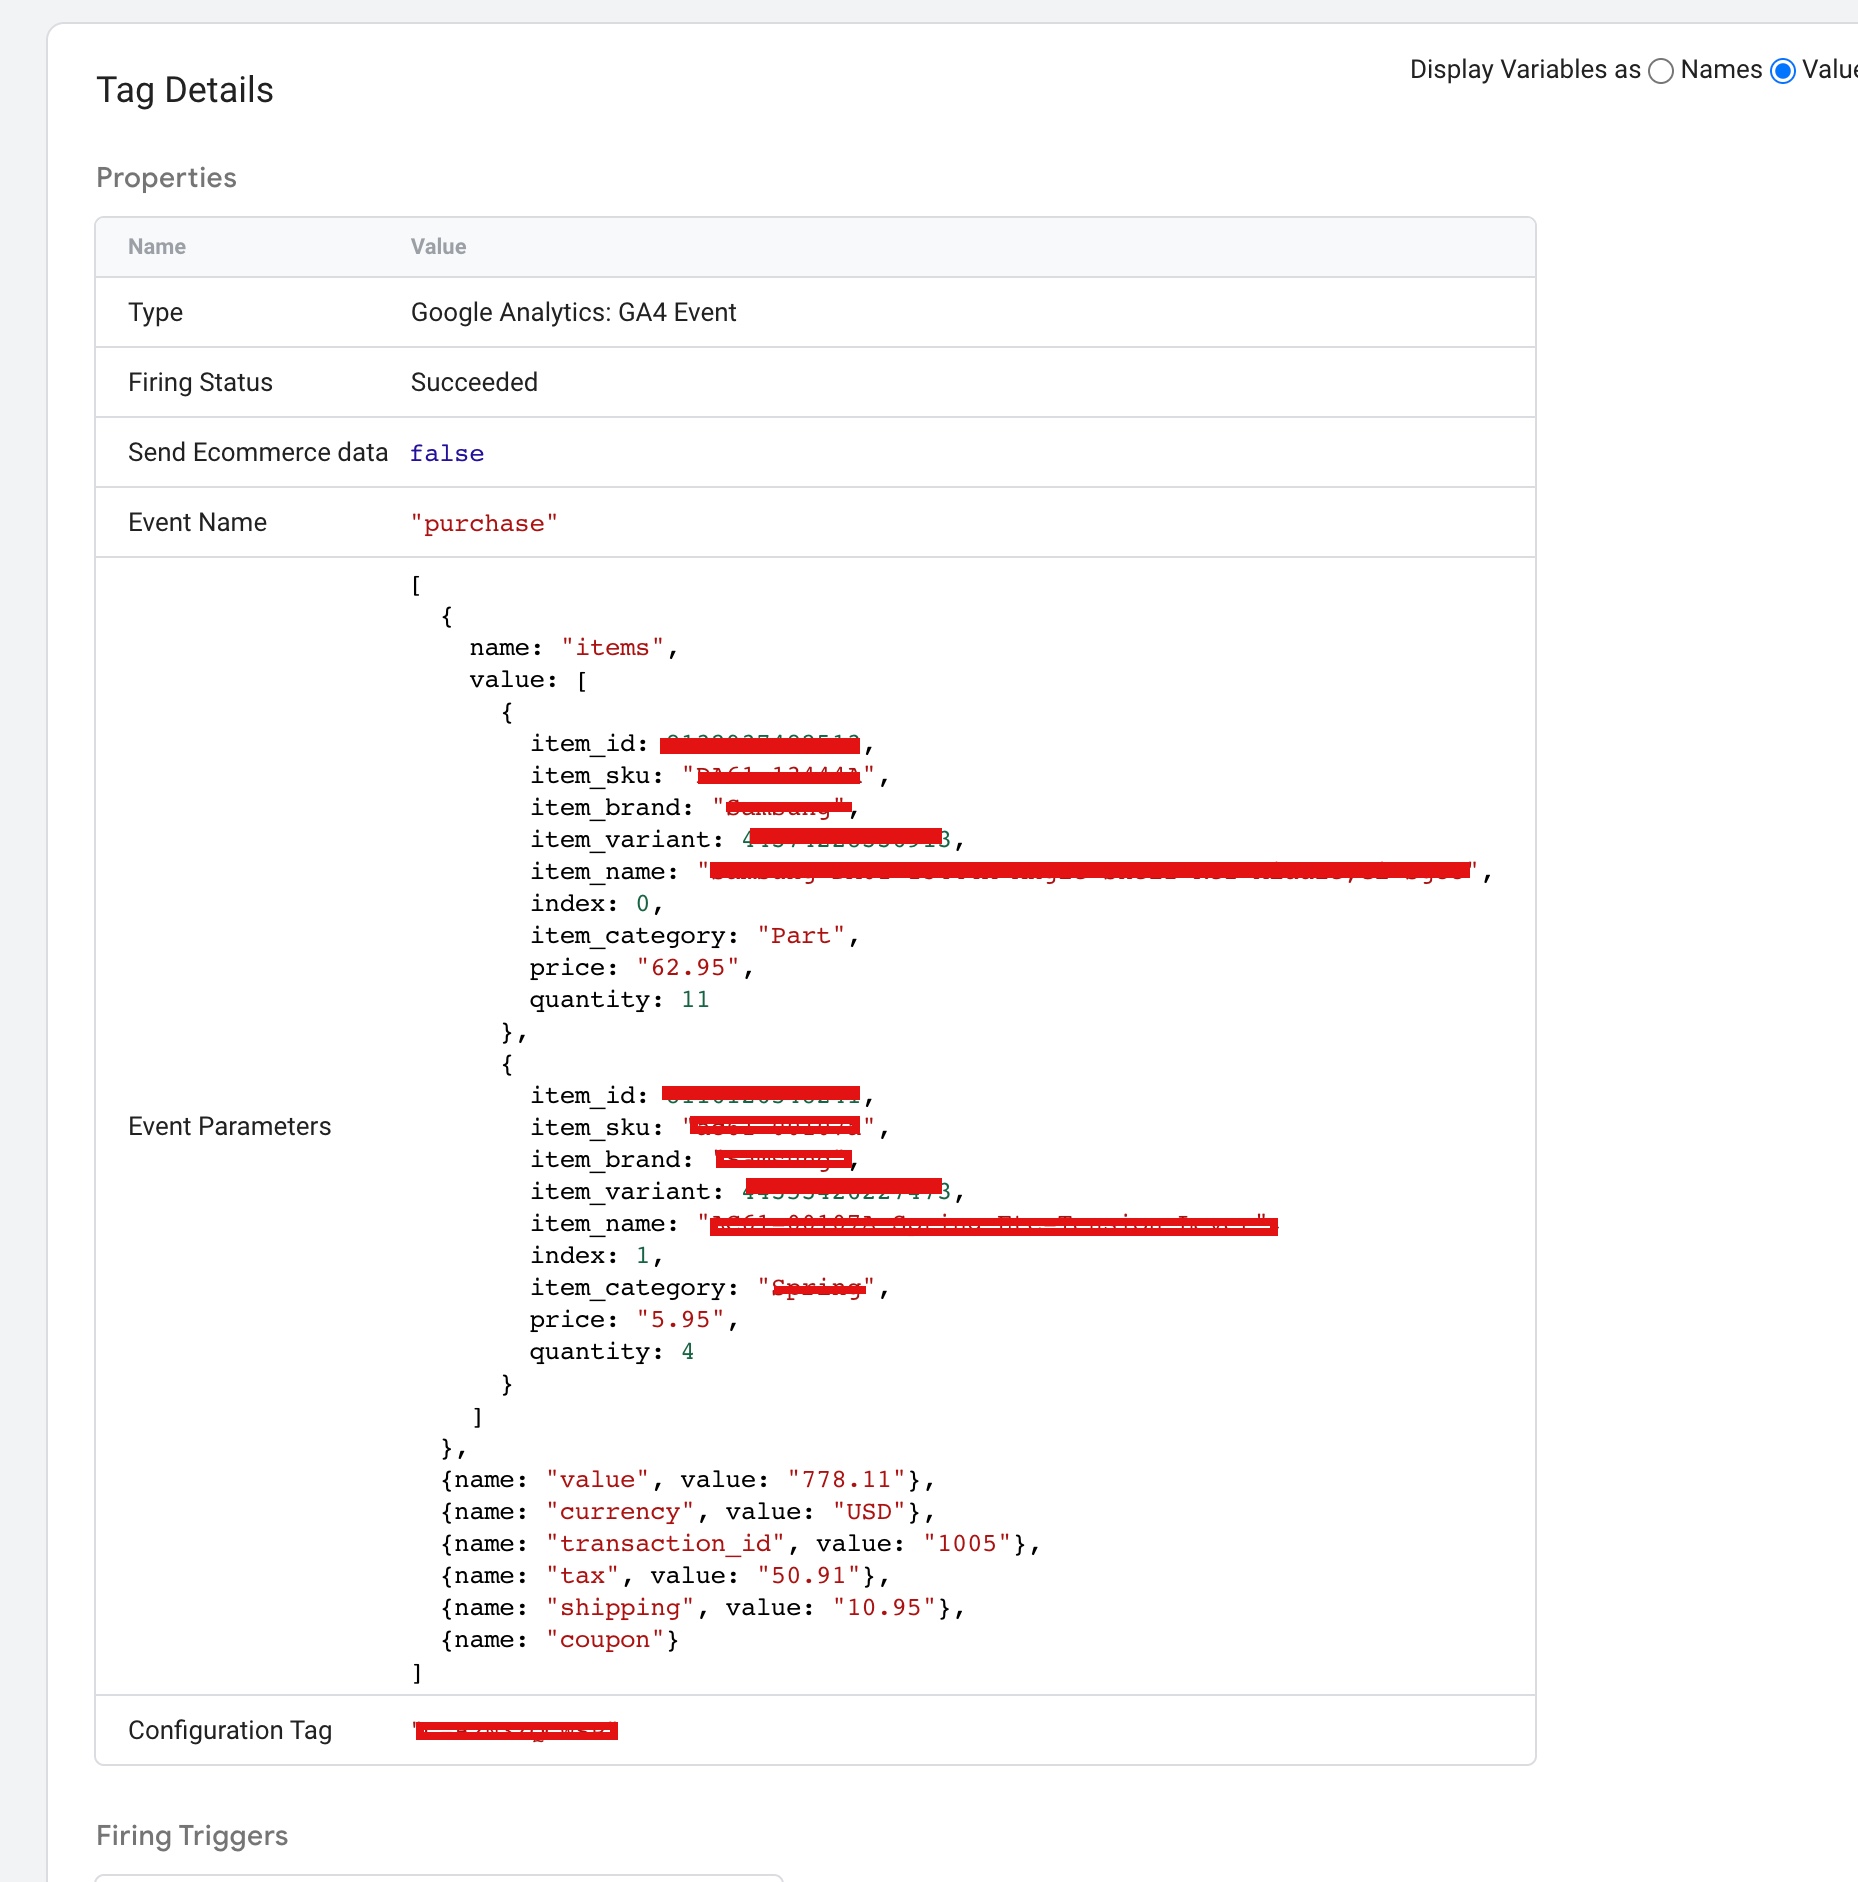
5. Create a GTM tag to send the eCommerce data to GA4. Use the “GA4 Event” tag type, and configure the tag to send the appropriate eCommerce parameters and values.

6. Create a GTM trigger to fire the GA4 eCommerce tag when an eCommerce transaction occurs on your site.

7. Test the GA4 eCommerce tracking implementation to ensure it is working correctly.

Set up Google Analytics 4 (GA4) on Drupal

Implement Google Analytics 4 for E-commerce on Drupal without pre-built plugin using Google Tag Manager

Warning: If you do n’t know about javascript or do n’t have developing knowledge then do n’t try to Google Analytics 4 (GA4) eCommerce for Drupal without a pre-built plugin without Plugin or Plugins that can broke your site, Cart and other functionality 

Disclaimer: Google tag manager belongs to Google property 

For Contact: mappchero@gmail.com

I am available for Hire on Freelancer: Freelancer.com

I am available for Hire on Upwork: Upwork.com

I am available for Hire on Peopleperhour: Peopleperhour.com

I am available for Hire on Guru: Guru.com

Tracking Ruby on Rails GA4 eCommerce Purchases without Plugin

Standard

Setup Ruby on Rails Google Analytics 4 (GA4) with Google Tag Manager without Plugin

Google Analytics 4 eCommerce Tracking on Ruby on Rails without a plugin refers to the process of implementing eCommerce tracking in a Ruby on Rails application using Google Analytics 4 without relying on third-party plugins or libraries.

This can be accomplished by using the Google Analytics Measurement Protocol API to send data directly to Google Analytics. To do this, developers must create HTTP requests with the appropriate parameters and send them to the Measurement Protocol endpoint.

Alternatively, Google Tag Manager can be used to implement eCommerce tracking without relying on plugins. This involves setting up a Google Tag Manager container, adding the Google Analytics 4 tag, and configuring ecommerce tracking parameters and triggers. Developers must also add data layer variables to pages and push ecommerce data to the data layer on relevant pages.

To implement Google Analytics 4 eCommerce tracking on Ruby on Rails without a plugin using Google Tag Manager, you can follow these steps:

  1. Set up a Google Tag Manager container and add the Google Analytics 4 tag to it.

2. In the Google Analytics 4 tag, enable the ecommerce tracking feature and set up your product and transaction parameters.

3. In your Ruby on Rails application, add the Google Tag Manager container code to your pages.

4. Add data layer variables to your pages that capture the necessary ecommerce data, such as product IDs, transaction IDs, and total transaction value.

5. Push the ecommerce data to the data layer on relevant pages, such as product detail pages and checkout pages.

6. Use Google Tag Manager to create triggers that fire the Google Analytics 4 tag when ecommerce events occur.

7. Test your implementation by placing test orders and verifying that the ecommerce data is being tracked correctly in Google Analytics.

Setup Ruby on Rails Google Analytics 4 (GA4)

Ruby on Rails Google Analytics 4 eCommerce Tracking Purchases without Plugin with Google Tag Manager

Warning: If you do n’t know about javascript or do n’t have developing knowledge then do n’t try to Setup Ruby on Rails Google Analytics 4 (GA4) with Google Tag Manager without Plugin or Plugins that can broke your site, Cart and other functionality 

Disclaimer: Google tag manager belongs to Google property 

For Contact: mappchero@gmail.com

I am available for Hire on Freelancer: Freelancer.com

I am available for Hire on Upwork: Upwork.com

I am available for Hire on Peopleperhour: Peopleperhour.com

I am available for Hire on Guru: Guru.com

Google Analytics 4 eCommerce Tracking on osCommerce without pre-built plugin

Standard

Google Analytics 4 (GA4) eCommerce Tracking with osCommerce without pre-built plugin

Google Analytics 4 (GA4) eCommerce Tracking on osCommerce without pre-built plugin is the process of setting up eCommerce tracking in Google Analytics 4 (GA4) for an osCommerce website by manually modifying the website’s code and implementing the necessary data layer variables, events, and Google Tag Manager container.

The eCommerce tracking allows you to track and analyze user behavior and interactions with products and purchases on your website, enabling you to make informed business decisions. While using a pre-built plugin or module can simplify the process of setting up eCommerce tracking, implementing it manually provides you with more flexibility and customization options, allowing you to tailor the tracking to meet your specific needs. However, this process requires significant development skills and may be time-consuming.

To implement Google Analytics 4 eCommerce tracking on osCommerce without using a pre-built plugin, you can follow these general steps:

  1. Identify the relevant eCommerce actions that you want to track, such as product detail views, add to cart events, and purchase transactions.

2. Modify your osCommerce website’s code to include the necessary data layer variables and events for each eCommerce action.

3. Use the dataLayer.push() method to send the appropriate data to the data layer when each eCommerce action occurs.

4. Implement Google Tag Manager on your osCommerce website.

5. Create a Google Tag Manager container for your website and configure it to track eCommerce events.

6. Create custom tags in Google Tag Manager that use the appropriate data layer variables as triggers and parameters to track the eCommerce actions you have identified.

7. Use the Google Analytics 4 measurement protocol to send eCommerce data to Google Analytics 4 from your osCommerce website.

6. Verify that your tracking is working correctly by testing each eCommerce action and confirming that the data is being recorded accurately in Google Analytics 4.

Note that this process can be complex and requires significant development skills. Using a pre-built plugin or module that includes Google Analytics 4 eCommerce tracking functionality can simplify the process and ensure that your tracking is implemented correctly.

Adding Google Analytics 4 (GA4) to osCommerce

Switch Google Analytics 4 (GA4) eCommerce Tracking with osCommerce without pre-built plugin

Warning: If you do n’t know about javascript or do n’t have developing knowledge then do n’t try to Google Analytics 4 eCommerce Tracking on osCommerce without pre-built plugin or Plugins that can broke your site, Cart and other functionality 

Disclaimer: Google tag manager belongs to Google property 

For Contact: mappchero@gmail.com

I am available for Hire on Freelancer: Freelancer.com

I am available for Hire on Upwork: Upwork.com

I am available for Hire on Peopleperhour: Peopleperhour.com

I am available for Hire on Guru: Guru.com

Google Analytics 4 (GA4) eCommerce Tracking on Volusion without Third-Party Modules or Plugins

Standard

Google Analytics 4 (GA4) Volusion eCommerce Tracking without Module with data layer using Google Tag Manager

Google Analytics 4 (GA4) Volusion eCommerce Tracking without Module refers to the process of tracking eCommerce events on a Volusion store using GA4 without relying on any third-party modules or plugins. Instead, this method involves manually adding the necessary tracking code to the website and using data layer variables to send eCommerce data to Google Analytics 4. This approach requires a good understanding of web development and GA4 tracking implementation, as well as access to the backend code of the Volusion store. By using this method, merchants can track and analyze a range of eCommerce data, including transaction IDs, product IDs, product names, prices, and quantities, to gain insights into customer behavior and improve their eCommerce strategy.

To track eCommerce events on Volusion using the data layer and Google Tag Manager (GTM) in Google Analytics 4 (GA4), you can use the following steps:

  1. Add the following data layer variables to the “Confirmation” page of your Volusion store, where the purchase is completed:

2. Set up a GA4 tag in GTM for your website.

3. In the GA4 tag, select the “Event” parameter and set its value to purchase.

4. Add an “E-commerce – Purchase” parameter to the GA4 tag and configure it to collect the relevant data for the purchase event. The parameter should include fields such as transaction ID, product ID, product name, price, quantity, etc.

6. In the “E-commerce – Purchase” parameter of the GA4 tag, replace the static data with the Custom JavaScript variable you created in step 4.

7. Add a trigger for the GA4 tag that fires on the “Confirmation” page of your Volusion store, where the purchase is completed.

8. In the “E-commerce – Purchase” parameter of the GA4 tag, replace the static data with the Custom JavaScript variable you created in step 5.

9. Publish your GTM container.

Once these steps are completed, GTM will retrieve the relevant eCommerce data from the data layer on the “Confirmation” page of your Volusion store and send it to GA4 as a purchase event. You can then view the eCommerce data in the GA4 interface and analyze it to gain insights about your customers and products.

Volusion Google analytics 4 (GA4) eCommerce tracking

Connect Google Analytics 4 (GA4) eCommerce Tracking On Volusion without any third-party modules or plugins

Warning: If you do n’t know about javascript or do n’t have developing knowledge then do n’t try to Google Analytics 4 (GA4) eCommerce Tracking on Volusion without Third-Party Modules or Plugins that can broke your site, Cart and other functionality 

Disclaimer: Google tag manager belongs to Google property 

For Contact: mappchero@gmail.com

I am available for Hire on Freelancer: Freelancer.com

I am available for Hire on Upwork: Upwork.com

I am available for Hire on Peopleperhour: Peopleperhour.com

I am available for Hire on Guru: Guru.com

Prestashop Google Analytics 4 (GA4) eCommerce Tracking without addons/Modules/Plug in

Standard

Prestashop eCommerce Tracking in Google Analytics 4 (GA4) without addons using Google Tag Manager

To track Prestashop eCommerce events in Google Analytics 4 using data layer variables and Google Tag Manager (GTM) without using modules or plugins, you can set up a custom GTM container that captures data layer variables from your Prestashop site and uses them to send relevant events to GA4 using the dataLayer.push() method.

You will need to create data layer variables for capturing information on product details, add-to-cart actions, and purchase transactions, and use them in your GTM tags to send the appropriate events and parameters to GA4. Make sure to include your GA4 Measurement ID in your GTM container to ensure that your events are sent to the correct property.

You can then set up triggers to fire your tags on relevant eCommerce events, such as clicks on product detail pages, add-to-cart button clicks, and successful purchases. By setting up your tracking with data layer variables and GTM, you can more easily customize and adjust your tracking without needing to modify your Prestashop theme’s code.

Here are the steps to set up Google Analytics 4 (GA4) Prestashop eCommerce Tracking without using modules or plugins, and with data layer variables and Google Tag Manager (GTM):

  1. Create a GA4 property and obtain your Measurement ID.

2. Create a custom GTM container for your Prestashop site.

3. Set up data layer variables in your Prestashop site for capturing information on product details, add-to-cart actions, and purchase transactions.

4. Add your data layer variables to your GTM container.

5. Set up tags in your GTM container to send the appropriate eCommerce events and parameters to GA4 using the dataLayer.push() method. Use your data layer variables in your tags to capture the relevant information.

6. Create triggers in your GTM container to fire your tags on relevant eCommerce events, such as clicks on product detail pages, add-to-cart button clicks, and successful purchases.

7. Publish your GTM container and verify that your eCommerce tracking is working correctly in GA4.
Customize and adjust your tracking as needed by modifying your data layer variables and GTM tags.

Google Analytics 4 (GA4) with PrestaShop

Prestashop without Addon Google Analytics 4 (GA4) eCommerce Tracking using Google Tag Manager

Warning: If you do n’t know about javascript or do n’t have developing knowledge then do n’t try to Prestashop Google Analytics 4 (GA4) eCommerce Tracking without addons that can broke your site, Cart and other functionality 

Disclaimer: Google tag manager belongs to Google property 

For Contact: mappchero@gmail.com

I am available for Hire on Freelancer: Freelancer.com

I am available for Hire on Upwork: Upwork.com

I am available for Hire on Peopleperhour: Peopleperhour.com

I am available for Hire on Guru: Guru.com

OpenCart Google Analytics 4 (GA4) eCommerce Tracking without Extension

Standard

Install Google Analytics 4 (GA4) for OpenCart eCommerce Tracking without Extension using Google Tag Manager

OpenCart GA4 ecommerce tracking can be implemented without an extension by using Google Tag Manager (GTM) and the purchase data layer. The purchase data layer is a JavaScript object that contains information about the products purchased and the transaction details.

Here are the steps to set up OpenCart GA4 ecommerce tracking without an extension using GTM:

  1. Create a Google Tag Manager (GTM) account if you don’t already have one.

2. Install the GTM code on your OpenCart website. This can typically be done by copying and pasting the code into the header of your site’s pages.

3. Create a purchase data layer in OpenCart to store transaction details. This can be done by adding a purchase data layer script to your site’s thank-you or confirmation pages. The purchase data layer script should include information about the products purchased, the transaction details, and any other relevant data.

4. Create a GTM tag for GA4 ecommerce tracking. Choose “Google Analytics: GA4 Configuration” as the tag type and configure the tag with your GA4 tracking ID.

5. In the tag configuration, select “Use Data Layer” and map the purchase data layer variables to the appropriate GA4 ecommerce tracking fields.

6. Preview and publish the GTM container to make sure that the purchase data layer and GA4 ecommerce tracking are working correctly.

By using GTM and the purchase data layer, you can implement GA4 ecommerce tracking on your OpenCart website without using an extension.

Benefits opencart GA4 ecommerce tracking without extension using Google Tag Manager

There are several benefits to implementing OpenCart GA4 ecommerce tracking without an extension using Google Tag Manager (GTM) and the purchase data layer:

  1. Cost savings: Implementing GA4 ecommerce tracking without an extension is a cost-effective solution for OpenCart users who want to track their e-commerce data and insights.

2. Customization: By using GTM and the purchase data layer, you can customize your GA4 ecommerce tracking to match your specific needs and requirements.

3. Easy setup: Setting up GA4 ecommerce tracking without an extension is a straightforward process that can be completed in a short amount of time.

4. Increased flexibility: GTM gives you the flexibility to manage your GA4 ecommerce tracking, as well as other tags on your website, in one central location.

5. Improved data accuracy: By using the purchase data layer, you can ensure that the transaction data being sent to GA4 is accurate and complete.

6. Better insights: GA4 provides rich insights and analysis that can help you make informed decisions to improve your e-commerce business.

In conclusion, implementing OpenCart GA4 ecommerce tracking without an extension using GTM and the purchase data layer provides a cost-effective, flexible, and accurate solution for tracking e-commerce data and insights.

Google Analytics 4 Opencart eCommerce Tracking

Google Analytics 4 (GA4) Ecommerce Tracking for OpenCart without Extension using Google Tag Manager

Warning: If you do n’t know about javascript or do n’t have developing knowledge then do n’t try to OpenCart Google Analytics 4 (GA4) eCommerce Tracking without Extension that can broke your site, Cart and other functionality 

Disclaimer: Google tag manager belongs to Google property 

For Contact: mappchero@gmail.com

I am available for Hire on Freelancer: Freelancer.com

I am available for Hire on Upwork: Upwork.com

I am available for Hire on Peopleperhour: Peopleperhour.com

I am available for Hire on Guru: Guru.com


Implementation Google Analytics 4 (GA4) eCommerce Tracking on Magento 2 without Module

Standard

Setup  Google Analytics 4 (GA4) Magento 2 eCommerce Tracking without Module / Plugin using Google Tag Manager

Magento 2 GA4 ecommerce tracking without a module or plugin can be implemented using the data layer and Google Tag Manager (GTM). The data layer is a JavaScript object that contains information about the page and its content, including ecommerce data such as product information and transaction details.

Here are the steps to set up Magento 2 GA4 ecommerce tracking without a module or plugin using the data layer and GTM:

  1. Create a Google Tag Manager (GTM) account if you don’t already have one.

2. Install the GTM code on your Magento 2 website. This can typically be done by copying and pasting the code into the header of your site’s pages.

3. Create a data layer in Magento 2 to store ecommerce data. This can be done by adding a data layer script to your site’s pages. The data layer script should include information about the products on the page, transaction details, and any other relevant data.

4. Create a GTM tag for GA4 ecommerce tracking. Choose “Google Analytics: GA4 Configuration” as the tag type and configure the tag with your GA4 tracking ID.

5. In the tag configuration, select “Use Data Layer” and map the data layer variables to the appropriate GA4 ecommerce tracking fields.

6. Preview and publish the GTM container to make sure that the data layer and GA4 ecommerce tracking are working correctly.

By using the data layer and GTM, you can implement GA4 ecommerce tracking on your Magento 2 website without using a module or plugin. This setup will allow you to track ecommerce data and insights in GA4, giving you a better understanding of your site’s performance and allowing you to make data-driven decisions to improve your e-commerce business.

Magento 2 Google Analytics 4 Ecommerce tracking

Magento 2 Google Analytic (GA4) Purchase eCommerce tracking without Module using Google Tag Manager

Warning: If you do n’t know about javascript or do n’t have developing knowledge then do n’t try to Google Analytics 4 (GA4) eCommerce Tracking on Magento 2 without Module that can broke your site, Cart and other functionality 

Disclaimer: Google tag manager belongs to Google property 

For Contact: mappchero@gmail.com

I am available for Hire on Freelancer: Freelancer.com

I am available for Hire on Upwork: Upwork.com

I am available for Hire on Peopleperhour: Peopleperhour.com

I am available for Hire on Guru: Guru.com


Google Analytics 4 (GA4) WooCommerce Ecommerce Tracking without Plugin

Standard

Implement Google Analytics 4 (GA4) WooCommerce eCommerce Tracking without Plugin using Google Tag Manager

WooCommerce GA4 ecommerce tracking without a plugin with a data layer using Google Tag Manager (GTM) refers to a method of implementing ecommerce tracking for a WooCommerce website using Google Analytics (GA) 4 and GTM, without relying on a WooCommerce plugin for tracking. Instead, a data layer is used to send transaction data from the WooCommerce website to GA4 through GTM.

The data layer is a JavaScript object that holds information about the website and user interactions, such as transaction data. The data layer is used to pass the transaction information from the WooCommerce website to GTM, which then sends the data to GA4. This allows you to have more control over the tracking tags and triggers and provides more accuracy and reliability in the tracking data.

GTM is used to manage the tracking tags and triggers that are used to send the transaction data to GA4. With GTM, you can easily set up and manage the ecommerce tracking for your WooCommerce website, without having to make changes to the website’s code.

To implement ecommerce tracking in Google Analytics (GA) 4 for a WooCommerce website without using a plugin, you can use Google Tag Manager (GTM) and a data layer to set up ecommerce tracking. Here’s how you can do it:

  1. Set up a GTM account: If you don’t already have a GTM account, you’ll need to create one.

2. Create a GTM container: In the GTM account, create a container for your WooCommerce website. This container will hold all of the tracking tags, triggers, and variables for your website.

3. Add the GTM code to your website: Next, add the GTM code to your WooCommerce website. This code should be added to every page of your website, typically in the header section.

4. Set up a data layer: A data layer is a JavaScript object that holds information about the website and user interactions. On your WooCommerce website, you’ll need to set up a data layer that includes information about the transaction, such as the transaction id, revenue, and items purchased.

5. Create a trigger in GTM: In GTM, create a trigger that fires when a customer completes a purchase on your WooCommerce website. This trigger should be set to fire on the Thank You page that is displayed after a purchase is completed.

7. Create a GA4 tag in GTM: In GTM, create a GA4 tag for ecommerce tracking. This tag should be set to fire when the trigger you created in the previous step is triggered. The tag should use the information in the data layer to populate the transaction details in GA4.

In conclusion, using GA4 ecommerce tracking with a data layer and GTM can provide a more accurate, efficient, and customizable tracking solution for your WooCommerce website.

WooCommerce GA4 eCommerce Tracking

Tracking eCommerce Purchases with Google Analytics 4 (GA4) for WooCommerce without Plugin with Google Tag Manager

Warning: If you do n’t know about javascript or do n’t have developing knowledge then do n’t try to Google Analytics 4 (GA4) WooCommerce Ecommerce Tracking without Plugin that can broke your site, Cart and other functionality 

Disclaimer: Google tag manager belongs to Google property 

For Contact: mappchero@gmail.com

I am available for Hire on Freelancer: Freelancer.com

I am available for Hire on Upwork: Upwork.com

I am available for Hire on Peopleperhour: Peopleperhour.com

I am available for Hire on Guru: Guru.com

Google Analytics 4 (GA4) E-commerce Tracking on Volusion using Google Tag Manager

Standard

Install Google Analytics 4 (GA4) E-commerce Tracking on Volusion using Google Tag Manager

Ecommerce tracking for Google Analytics 4 on Volusion is a feature that allows you to track and analyze data related to your online store’s sales and transactions. This information can help you gain insights into your customer behavior and purchase patterns, which can inform decisions about marketing, product offerings, and other aspects of your business. To set up ecommerce tracking for Google Analytics 4 on Volusion, you will need to add a tracking code to your store and configure settings related to transactions and product data.

Volusion Google Analytics 4 (GA4) e-commerce tracking is important because it helps merchants understand and improve their online store’s performance. With e-commerce tracking, merchants can:

  1. Track customer behavior: GA4 provides insights into how customers interact with your store, including what products they view, what pages they visit, and how long they spend on your site.

2. Measure marketing effectiveness: GA4 e-commerce tracking allows merchants to track the impact of their marketing campaigns and optimize their strategies for better results.

3. Improve customer experience: With e-commerce tracking, merchants can identify areas of their store that need improvement, such as slow page load times or confusing navigation, and make changes to improve the customer experience.

5. Increase sales: By tracking customer behavior and identifying areas for improvement, merchants can make data-driven decisions to increase sales and improve their online store’s performance.

There are several benefits to integrating Google Analytics 4 with your Volusion site:

  1. Understanding customer behavior: Google Analytics 4 provides data on how customers interact with your site, including the pages they visit, the products they view, and the amount of time they spend on your site. This information can help you gain insights into customer behavior and make informed decisions about your marketing and product offerings.

2. Measuring the success of marketing campaigns: By tracking data on site traffic, conversions, and revenue, Google Analytics 4 can help you measure the success of your marketing campaigns and identify areas for improvement.

3. Optimizing site design and user experience: Google Analytics 4 provides data on site speed, bounce rate, and other metrics that can help you identify areas for improvement in your site’s design and user experience.

4. Improving conversion rates: By tracking data on the actions that customers take on your site, you can identify barriers to conversion and take steps to remove them.

5. Making data-driven decisions: Google Analytics 4 provides a wealth of data that can inform decisions about your business, from product offerings to marketing strategies. With the ability to track and analyze key metrics, you can make data-driven decisions that drive growth and success for your business.

Here’s a high-level overview of the steps to set up Google Analytics 4 ecommerce tracking on your Volusion site:

  1. Create a Google Analytics 4 property for your website.

2. Obtain the GA4 tracking code from your Google Analytics account and add it to your Volusion site.

3. Enable ecommerce tracking in Google Analytics 4: Go to the “Data Streams” section of your GA4 property, select your Volusion site,

4. Configure your Volusion site to send transaction data to Google Analytics 4. This can be done by adding some custom code to your Volusion checkout page.

5. Add code to your Volusion site to send transaction data to Google Analytics 4. You can do this by adding code to the thank-you page that is displayed after a customer makes a purchase.

6. Test your ecommerce tracking by making a test purchase on your site and then verifying that the transaction data appears in your GA4 reports.

 GA4 Enhanced eCommerce Tracking

Google Analytics 4 (GA4) eCommerce Javascript for Volusion using Google Tag Manager

Warning: If you do n’t know about javascript or do n’t have developing knowledge then do n’t try to E-commerce Tracking GA4 on Volusion using Google Tag Manager without module that can broke your site, Cart and other functionality 

Disclaimer: Google tag manager belongs to Google property 

For Contact: mappchero@gmail.com

I am available for Hire on Freelancer: Freelancer.com

I am available for Hire on Upwork: Upwork.com

I am available for Hire on Peopleperhour: Peopleperhour.com

I am available for Hire on Guru: Guru.com


Quick and Easy Fix For Your GA4 Migration for E-commerce Store

Standard

Migrating to GA4 Before UA Stops Working for E-commerce Store using Google Tag Manager

GA4 migration for an e-commerce site refers to the process of moving from an older version of Google Analytics (e.g., Universal Analytics) to the latest version, Google Analytics 4 (GA4). This migration involves updating the tracking code on the website, enabling e-commerce tracking in GA4, and configuring the GA4 property to collect the desired data. The goal of the migration is to benefit from the new features and enhancements in GA4, such as enhanced e-commerce tracking, machine learning-powered insights, and a more flexible and scalable data collection architecture. The migration process can be complex, so it’s recommended to plan carefully and test the new setup thoroughly before making it live.

Google Analytics 4 (GA4) is the latest version of Google Analytics and is a major update from Universal Analytics. If you’re planning to migrate from Universal Analytics to GA4 for your e-commerce site, here are some of the key steps you should consider:

  1. Create a GA4 property: You can do this from your Google Analytics account.

2. Verify your GA4 property: This is to ensure that data is being collected correctly.

3. Install GA4 tracking code: The tracking code is different from Universal Analytics, so make sure to install the correct tracking code on your e-commerce site.

4. Set up e-commerce tracking: GA4 has a built-in e-commerce tracking feature that you can enable. This will allow you to track important metrics such as revenue, transaction, and product data.

5. Import data from Universal Analytics: You can use Google Analytics’ data import feature to bring over any data from your Universal Analytics account.

6. Test and Validate: Verify that the data being collected in GA4 is accurate by cross-referencing it with the data from your Universal Analytics account.

There are several reasons why an e-commerce site might need to migrate to Google Analytics 4 (GA4):

  1. Improved e-commerce tracking: GA4 includes built-in e-commerce tracking capabilities, which provide more accurate and granular data on online transactions and customer behavior on the site.

2. Advanced analytics and insights: GA4 uses machine learning to provide insights and recommendations based on your data, allowing you to make data-driven decisions to improve your online business.

3. Better privacy protection: GA4 is designed with privacy in mind, allowing you to collect data while respecting the privacy of your customers.

4. Increased flexibility and scalability: GA4 provides a more flexible and scalable data collection architecture, allowing you to collect and process data from a variety of sources, including apps, websites, and IoT devices.

6. Future-proofing: GA4 is the latest and most advanced version of Google Analytics, and will likely be the platform of choice for future development and innovation.

“view_item_list is an event in Google Analytics 4 (GA4) that represents a user viewing a list of items, such as products, on an e-commerce site. 

Migrate Ecommerce Site All UA Events to GA4

Google Analytics 4 (GA4) for Your Ecommerce Site using Google Tag Manager

“select_item” is an event in Google Analytics 4 (GA4) that represents a user selecting an item, such as a product, on an e-commerce site. 

Make the switch to Google Analytics 4

Migration of Universal Analytics to Google Analytics 4 (GA4) eCommerce Store

“view_item” is an event in Google Analytics 4 (GA4) that represents a user viewing a single item, such as a product, on an e-commerce site.

Migrate Universal Analytics events to Google Analytics 4 (GA4)

Upgrade to Google Analytics 4 (GA4) eCommerce Store using Google Tag Manager

“begin_checkout” is an event in Google Analytics 4 (GA4) that represents a user beginning the checkout process on an e-commerce site.

Migrating from Universal Analytics to Google Analytics 4 (GA4)

Migrate Universal Analytics (GA3) data to Google Analytics 4 (GA4) using Google Tag Manager

“add_shipping_info” is an event in Google Analytics 4 (GA4) that represents a user adding shipping information to the checkout process on an e-commerce site.

migrate Universal Analytics data to GA4

Switch From Universal Analytics to Google Analytics 4 using Google Tag Manager

“add_payment_info” is an event in Google Analytics 4 (GA4) that represents a user adding payment information to the checkout process on an e-commerce site.

Switch to Google Analytics 4 (GA4)

Prepare For Migration To Google Analytics 4 (GA4) using Google Tag Manager

“purchase” is an event in Google Analytics 4 (GA4) that represents a successful transaction on an e-commerce site.

Moving from Universal Analytics to Google Analytics 4

Transitioning from Universal Analytics to Google Analytics 4 (GA4) using Google Tag Manager

Warning: If you do n’t know about javascript or do n’t have developing knowledge then do n’t try toGA4 Migration for E-commerce Store using Google Tag Manager without module that can broke your site, Cart and other functionality 

Disclaimer: Google tag manager belongs to Google property 

For Contact: mappchero@gmail.com

I am available for Hire on Freelancer: Freelancer.com

I am available for Hire on Upwork: Upwork.com

I am available for Hire on Peopleperhour: Peopleperhour.com

I am available for Hire on Guru: Guru.com