WooCommerce Google Ads Dynamic Remarketing Tag in Google Tag Manager

Standard

WooCommerce Google Ads Dynamic Remarketing Tag is a feature that allows online businesses to track and target website visitors who have interacted with their products or services, and show them personalized ads on the Google Display Network.

To set up the WooCommerce Google Ads Dynamic Remarketing Tag, you will need to have a WooCommerce store, a Google Ads account, and a Google Analytics account. You will also need to have the WooCommerce Google Ads integration plugin installed on your WooCommerce store, which will automatically add the necessary code snippets to your website.

The first step in setting up the WooCommerce Google Ads Dynamic Remarketing Tag is to create a Google Ads account and link it to your Google Analytics account. Once you have linked your accounts, you can create a new remarketing tag by navigating to the “Audience Manager” section of your Google Ads account.

To create the remarketing tag, you will need to choose the type of tag you want to use (in this case, the “Google Ads remarketing tag” option), and then select the appropriate settings for your website. You can choose to track specific pages or actions on your website, such as product pages or add-to-cart events.

Once you have created the remarketing tag, you will need to add it to your website by inserting the code snippet into the header of your website. This can be done manually by editing the code of your website, or by using a plugin such as the WooCommerce Google Ads integration plugin.

Once the tag is installed on your website, it will start tracking the behavior of your website visitors who have interacted with your products or services. The tag will place a cookie in the user’s browser, which can be used to track their activity and show them personalized ads on the Google Display Network.

To create a dynamic remarketing campaign, you will need to create a new campaign in your Google Ads account and select the “Dynamic remarketing” option. You will then need to choose the appropriate settings for your campaign, such as the type of ad format and the targeting options.

One of the key benefits of the WooCommerce Google Ads Dynamic Remarketing Tag is that it allows you to show personalized ads to users who have already shown interest in your products or services. For example, if a user visits a specific product page on your website but doesn’t make a purchase, you can show them an ad that features that same product or similar products.

This type of personalized targeting can be very effective in driving conversions and increasing sales on your website. By showing relevant ads to users who have already shown interest in your products, you can increase the likelihood that they will return to your site and make a purchase.

In addition to dynamic remarketing, the WooCommerce Google Ads integration plugin also supports other types of Google Ads campaigns, such as Google Shopping and Google AdWords. This allows you to easily manage all of your Google Ads campaigns from within your WooCommerce store, and track their performance using Google Analytics.

Overall, the WooCommerce Google Ads Dynamic Remarketing Tag is a powerful tool for online businesses that want to increase conversions and drive sales on their website. By tracking and targeting users who have already shown interest in your products or services, you can create personalized ads that are more likely to convert and drive sales.

WooCommerce ga4 eCommerce Tracking using Google Tag Manager

Standard

WooCommerce is a popular e-commerce platform that enables online store owners to manage their business operations, products, orders, and customers. Google Analytics 4 (GA4) is the latest version of Google Analytics, and it provides a more comprehensive view of user behavior across different platforms and devices.

GA4 allows store owners to track customer interactions, product views, and purchases on their WooCommerce stores. This tracking provides valuable insights into customer behavior and can help store owners make informed decisions to improve their marketing strategies and optimize their store’s performance.

To set up GA4 eCommerce tracking on a WooCommerce store, store owners need to follow these steps:

Set up GA4 tracking on your WooCommerce store: Before setting up GA4 eCommerce tracking, you need to set up GA4 tracking on your WooCommerce store. You can do this by creating a new GA4 property in your Google Analytics account and then integrating it with your WooCommerce store using a plugin or by adding the tracking code manually to your website’s header or footer.

Enable Enhanced eCommerce tracking in GA4: Once you have set up GA4 tracking on your WooCommerce store, you need to enable Enhanced eCommerce tracking in GA4. Enhanced eCommerce tracking allows you to track customer behavior on your store, such as product views, add to cart events, and purchases.

Add the GA4 tracking code to your WooCommerce store: You need to add the GA4 tracking code to your WooCommerce store to enable eCommerce tracking. This code should be added to your website’s header or footer.

Enable eCommerce tracking in your WooCommerce store: After adding the GA4 tracking code to your WooCommerce store, you need to enable eCommerce tracking in your store. This can be done using a plugin or by adding the tracking code manually to your website’s header or footer.

Set up conversion tracking in GA4: Conversion tracking allows you to track the number of conversions on your WooCommerce store, such as the number of completed purchases. To set up conversion tracking in GA4, you need to create a conversion event in your GA4 account and then add the event code to your WooCommerce store.

Once you have completed these steps, you can start tracking customer behavior on your WooCommerce store using GA4. Some of the key metrics you can track using GA4 eCommerce tracking include:

Product views: GA4 eCommerce tracking allows you to track the number of times a product has been viewed on your WooCommerce store. This metric can help you understand which products are popular among your customers and which products may need more attention.

Add to cart events: Add to cart events track the number of times a customer has added a product to their cart. This metric can help you understand which products are most likely to be purchased by your customers.

Cart abandonment rate: Cart abandonment rate tracks the number of times a customer has added a product to their cart but did not complete the purchase. This metric can help you identify any potential issues with your checkout process and help you optimize it for better conversions.

Revenue: GA4 eCommerce tracking allows you to track the revenue generated by your WooCommerce store. This metric can help you understand the overall performance of your store and make informed decisions about your marketing and sales strategies.

Customer lifetime value: Customer lifetime value (CLTV) tracks the total amount of revenue generated by a customer over their lifetime on your WooCommerce store. This metric can help you identify your most valuable customers and tailor your marketing strategies to better engage and retain them.

In conclusion, GA4 eCommerce tracking is a powerful tool for online store owners using WooCommerce. By tracking customer behavior on your store, you can gain valuable insights into your customers’ preferences and behavior and use this information to optimize your store’s performance and improve your marketing strategies. With the help of the above-mentioned steps, store owners

Drupal Google Ads Dynamic Remarketing Tag using Google Tag Manager

Standard

The Drupal Google Ads Dynamic Remarketing Tag is a powerful tool that allows Drupal site owners to track visitor behavior and target them with personalized ads based on their actions. This can help to increase conversions and sales, as well as build brand awareness and loyalty. Here’s how it works:

Dynamic remarketing involves placing a cookie in the browser of a visitor to your Drupal site, which allows you to track their behavior and serve them personalized ads later on. This can be done through the Google Ads platform, which provides a remarketing tag code that needs to be added to your Drupal site. Once the tag code is in place, you can begin tracking visitor behavior and targeting them with specific ads that are tailored to their interests and actions on your site.

The first step to setting up the Drupal Google Ads Dynamic Remarketing Tag is to create a Google Ads account if you don’t already have one. Once you have an account, you’ll need to create a dynamic remarketing campaign in Google Ads. This involves selecting the business type and product categories you want to target, as well as setting up your ad groups and targeting options.

Once your campaign is set up, you’ll be provided with a remarketing tag code that needs to be added to your Drupal site. This can be done using a custom module or by editing your Drupal theme’s template files. The tag code should be added to every page of your site that you want to track for dynamic remarketing.

Once you’ve added the Drupal Google Ads Dynamic Remarketing Tag code to your site, you can start tracking visitors and serving up personalized ads on the Google Display Network. Be sure to monitor your campaign performance regularly and make adjustments as needed to optimize your results.

Some tips for using the Drupal Google Ads Dynamic Remarketing Tag effectively include:

  1. Set clear goals and objectives for your campaign. What do you hope to achieve with dynamic remarketing, and how will you measure success?

2. Use segmentation and targeting to personalize your ads. Make sure your ads are relevant and engaging to your target audience.

3. Test and optimize your ad creative and messaging. Experiment with different ad formats, headlines, and calls to action to find what works best.

4. Monitor your campaign performance regularly and adjust as needed. Use data and analytics to track your progress and make informed decisions about how to optimize your campaign.

Overall, the Drupal Google Ads Dynamic Remarketing Tag can be a powerful tool for increasing conversions and sales on your site. By tracking visitor behavior and serving up personalized ads, you can build brand awareness, loyalty, and engagement with your target audience. Just be sure to set clear goals and objectives, use segmentation and targeting to personalize your ads, test and optimize your ad creative and messaging, and monitor your campaign performance regularly

Drupal GA4 eCommerce Tracking using Google Tag Manager

Standard

Drupal is a powerful content management system (CMS) that allows website owners to create and manage their online presence with ease. One important aspect of any website is the ability to track user behavior and gather insights about how visitors interact with the site. This is where Google Analytics comes in, and specifically, GA4 eCommerce tracking. In this article, we will discuss how to set up GA4 eCommerce tracking on a Drupal site in detail.

Step 1: Create a Google Analytics 4 property and obtain your Measurement ID

The first step in setting up GA4 eCommerce tracking is to create a Google Analytics 4 property and obtain your Measurement ID. To do this, go to the Google Analytics website and create a new account if you don’t already have one. Then, navigate to the Admin section and create a new property for your Drupal site. Once you’ve created the property, you’ll be given a Measurement ID, which you’ll need later on.

Step 2: Install the Google Tag Manager (GTM) module on your Drupal site

Next, you’ll need to install the Google Tag Manager (GTM) module on your Drupal site. This module makes it easy to manage your Google Analytics tracking tags and other marketing tags on your site. To install the module, go to the Drupal website and download the GTM module. Then, install and enable the module on your site.

Step 3: Configure the GTM module and add your Measurement ID to it

Once you’ve installed the GTM module, you’ll need to configure it and add your Measurement ID to it. To do this, go to the GTM module configuration page in Drupal and enter your Measurement ID. This will connect your Drupal site to your GA4 property.

Step 4: Create a new GTM container and add the GA4 tracking tag to it

The next step is to create a new GTM container and add the GA4 tracking tag to it. A container is a collection of tags, triggers, and variables that work together to track user behavior on your site. To create a new container, go to the Google Tag Manager website and click on the “Create Account” button. Then, select “Web” as your container type and follow the prompts to set up your container. Once your container is set up, add the GA4 tracking tag to it.

Step 5: Configure the GA4 tracking tag to fire on the pages where you want to track eCommerce transactions

After you’ve added the GA4 tracking tag to your container, you’ll need to configure it to fire on the pages where you want to track eCommerce transactions. To do this, go to the “Tags” section of your container and select the GA4 tracking tag. Then, configure the tag to fire on the relevant pages of your Drupal site.

Step 6: Set up the required eCommerce data layer variables

To capture information about eCommerce transactions on your Drupal site, you’ll need to set up the required eCommerce data layer variables. A data layer is a JavaScript object that contains information about the user’s interaction with your site. To set up the eCommerce data layer variables, you’ll need to add JavaScript code to your site’s header or footer. This code should define the variables that you want to track, such as product ID, name, price, and quantity.

Step 7: Add the eCommerce data layer

Finally, you’ll need to add the eCommerce data layer to your GTM container. To do this, go to the “Variables” section of your container and create a new variable for each eCommerce data layer variable that you want to track. Then, configure these variables to capture the data from your Drupal site’s data layer.

Conclusion:

In conclusion, setting up GA4 eCommerce tracking on your Drupal site requires a bit of technical knowledge,

Lightspeed Commerce Google Ads Dynamic Remarketing Tags

Standard

Lightspeed Commerce is a cloud-based e-commerce platform that provides merchants with the tools to build and manage their online stores. Google Ads dynamic remarketing tags are an advanced feature of Google Ads that enable advertisers to track and target users who have previously interacted with their website or products.

When a user visits an e-commerce website powered by Lightspeed Commerce, the Google Ads dynamic remarketing tag is triggered. This tag sends information about the user’s behavior on the site, such as the pages they visited, the products they viewed, and the items they added to their cart. This information is then used by Google Ads to display targeted ads to the user across the Google Display Network.

Dynamic remarketing is an effective way to re-engage with users who have already shown an interest in a merchant’s products. By showing targeted ads to users who have already interacted with their website, merchants can increase the chances of converting them into customers. Dynamic remarketing is especially useful for merchants who have a high volume of website traffic but a low conversion rate.

To implement Google Ads dynamic remarketing tags with Lightspeed Commerce, merchants need to have a Google Ads account and a Google Merchant Center account. They also need to install the Google Ads conversion tracking tag on their website. The conversion tracking tag is a small piece of code that tracks user behavior on the site and sends information back to Google Ads.

Once the conversion tracking tag is installed, merchants can set up their dynamic remarketing campaign. They can choose which products or pages to include in the campaign, set a budget, and create ads using Google Ads templates or their own custom designs. Google Ads then uses the information collected by the conversion tracking tag to target users who have interacted with the merchant’s website.

Dynamic remarketing campaigns can be customized in a variety of ways to target specific user segments. For example, merchants can create campaigns that target users who abandoned their cart or users who visited a specific product page. They can also create campaigns that target users who have made a purchase in the past and encourage them to make another purchase.

One of the benefits of using dynamic remarketing with Lightspeed Commerce is that merchants can track the performance of their campaigns in real-time. Google Ads provides detailed reports that show how many impressions, clicks, and conversions each ad received. Merchants can use this information to optimize their campaigns and improve their ROI.

Another benefit of using dynamic remarketing with Lightspeed Commerce is that it can help merchants save time and money on their advertising campaigns. By targeting users who have already shown an interest in their products, merchants can reduce the amount of money they spend on advertising to users who are unlikely to convert. This can help them to achieve a higher ROI and make more effective use of their advertising budget.

In conclusion, Lightspeed Commerce Google Ads dynamic remarketing tags are an advanced feature that enable merchants to re-engage with users who have previously interacted with their website or products. By using the conversion tracking tag and creating dynamic remarketing campaigns, merchants can show targeted ads to users who have already shown an interest in their products, increasing the chances of converting them into customers. Dynamic remarketing campaigns can be customized in a variety of ways to target specific user segments, and Google Ads provides detailed reports that show the performance of each ad. Overall, dynamic remarketing can help merchants save time and money on their advertising campaigns while improving their ROI.

Lightspeed Commerce GA4 eCommerce Tracking

Standard

Lightspeed Commerce is a popular eCommerce platform that enables businesses to create online stores and sell products or services online. Google Analytics 4 (GA4) eCommerce tracking is a powerful feature that allows businesses to track and measure their eCommerce transactions and other key metrics. In this article, we will discuss the benefits of GA4 eCommerce tracking for Lightspeed Commerce, how to set it up, and how to use it to gain insights into your eCommerce business.

Benefits of GA4 eCommerce Tracking for Lightspeed Commerce

GA4 eCommerce tracking offers several benefits for Lightspeed Commerce businesses. Here are some of the key benefits:

Measure eCommerce transactions: GA4 eCommerce tracking enables businesses to measure and track eCommerce transactions, such as product purchases, revenue, and other key metrics. This helps businesses to understand their sales performance and make data-driven decisions to optimize their eCommerce strategies.

Analyze customer behavior: GA4 eCommerce tracking provides businesses with valuable insights into customer behavior on their online stores. This includes information on how customers navigate through the website, what products they view, and how they interact with the checkout process. By analyzing this data, businesses can identify areas for improvement in their eCommerce experience and optimize their website to improve the customer experience.

Identify high-performing products: GA4 eCommerce tracking enables businesses to identify their high-performing products and product categories. This helps businesses to understand which products are driving the most revenue and which product categories are most popular among their customers. By analyzing this data, businesses can optimize their product offerings and marketing strategies to drive sales.

Optimize marketing campaigns: GA4 eCommerce tracking allows businesses to track the effectiveness of their marketing campaigns. Businesses can analyze how different marketing channels, such as social media, email, or search engines, drive traffic and sales to their online store. By understanding which marketing channels are most effective, businesses can optimize their marketing budgets and focus on the channels that deliver the best results.

How to Set Up GA4 eCommerce Tracking for Lightspeed Commerce

Setting up GA4 eCommerce tracking for Lightspeed Commerce involves several steps. Here’s a step-by-step guide:

Step 1: Create a Google Analytics 4 property

The first step is to create a Google Analytics 4 property in your Google Analytics account. This will give you a unique tracking code that you can use to track eCommerce transactions on your Lightspeed Commerce website.

Step 2: Install the GA4 tracking code

The next step is to install the GA4 tracking code on your Lightspeed Commerce website. You can find the tracking code in the GA4 admin panel. Copy the tracking code and paste it into the header of your website code, just before the closing tag.

Step 3: Enable Enhanced eCommerce tracking

In your GA4 property settings, you need to enable Enhanced eCommerce tracking. This will enable GA4 to track eCommerce transactions and other key metrics on your website.

Step 4: Set up your eCommerce data layer

The eCommerce data layer is a set of JavaScript variables that pass eCommerce data to Google Analytics. You need to add the data layer to your Lightspeed Commerce website code. The data layer should contain information about the products, transactions, and other eCommerce data that you want to track.

Step 5: Set up eCommerce events

Finally, you need to set up eCommerce events in your GA4 property. These events include product view, add to cart, checkout, and purchase. You need to configure these events in the GA4 admin panel, and then add the relevant event codes to your Lightspeed Commerce website code.

How to Use GA4 eCommerce Tracking for Lightspeed Commerce

Once you have set up GA4 eCommerce tracking for your Lightspeed Commerce website, you can use it to gain valuable insights into your eCommerce business. Here are some of the key reports and metrics you can

OpenCart Google Ads Dynamic Remarketing Tag using Google Tag Manager

Standard

Google Ads Dynamic Remarketing is a powerful advertising tool that allows online businesses to reach out to users who have previously visited their website. By using this advertising feature, businesses can display personalized ads to these users, showcasing products and services they have previously shown interest in. OpenCart, a popular e-commerce platform, allows users to add Google Ads Dynamic Remarketing Tag to their online store, making it easier to retarget their visitors with targeted ads.

In this article, we will explain how to add the Google Ads Dynamic Remarketing Tag to your OpenCart online store and how it can benefit your business.

What is Google Ads Dynamic Remarketing Tag?

Google Ads Dynamic Remarketing Tag is a snippet of code that needs to be added to your website to track user behavior and capture information about the products or services they are interested in. The information captured includes product ID, product name, product category, and other relevant information.

Once the tag is installed on your website, it starts tracking the user’s behavior and creates an audience list of users who have shown interest in your products or services. This list can be used to display personalized ads to these users when they browse other websites that are part of the Google Display Network.

Adding Google Ads Dynamic Remarketing Tag to OpenCart

To add the Google Ads Dynamic Remarketing Tag to your OpenCart online store, follow these steps:

Step 1: Log in to your Google Ads account and navigate to the Shared Library section.

Step 2: Click on the “Audience manager” option and then select “Audiences.”

Step 3: Click on the “Set up remarketing” button, and then select “Web.”

Step 4: You will be presented with a code snippet. Copy the code to your clipboard.

Step 5: Log in to your OpenCart store, and navigate to the “Extensions” section.

Step 6: Click on “Analytics” and select “Google Analytics” from the list.

Step 7: Paste the code snippet you copied earlier into the “Code” field.

Step 8: Save the changes, and you’re done.

Benefits of Google Ads Dynamic Remarketing Tag

There are several benefits to adding the Google Ads Dynamic Remarketing Tag to your OpenCart online store. Some of these include:

Retargeting visitors: The tag allows you to retarget visitors who have shown interest in your products or services, even after they have left your website. This increases the chances of them returning to your website to make a purchase.

Personalized ads: With the audience list created by the tag, you can display personalized ads to users, showcasing the products or services they have previously shown interest in. This makes the ads more relevant to the user, increasing the chances of them clicking on the ad and returning to your website.

Increased conversions: By displaying personalized ads to users who have previously shown interest in your products or services, you are increasing the chances of converting them into customers. This can lead to increased sales and revenue for your business.

Better ROI: Google Ads Dynamic Remarketing Tag allows you to display targeted ads to users who are more likely to make a purchase, increasing your ROI. You are not wasting advertising spend on users who are less likely to convert, leading to a better return on investment.

In conclusion, adding the Google Ads Dynamic Remarketing Tag to your OpenCart online store can help increase conversions, improve ROI, and personalize ads for users who have shown interest in your products or services. By following the steps outlined in this article, you can easily add the tag to your website and start retargeting visitors with personalized ads.

The “view_item_list” event in dynamic remarketing for OpenCart refers to when a user views a list of products on your website. This event can be tracked using a tracking code or pixel that is installed on your website, and can be used to create personalized ads that are targeted to users who have viewed specific products or product categories.

Google Remarketing Tag and Conversion Tracking for OpenCart

Google Ads Dynamic Remarketing Tag Feed for OpenCart using Google Tag Manager

The “view_item” event is a specific type of event that can be tracked by the Google Ads Dynamic Remarketing Tag in OpenCart. This event is triggered when a user views a specific item on your website, such as a product page.

Dynamic Remarketing Code for OpenCart

OpenCart Google Ads Dynamic Remarketing Tag using Google Tag Manager

The “add_to_cart” event in dynamic remarketing tags for OpenCart refers to when a user adds a product to their cart on your website. This event can be tracked using a tracking code or pixel that is installed on your website, and can be used to create personalized ads that are targeted to users who have added specific products to their cart.

 Remarketing Tag on openCart

Add Google Remarketing code on openCart using Google Tag Manager

When a user completes a purchase on your website, the tracking code will capture this event and send the information to your dynamic remarketing platform. The platform can then use this information to measure the performance of your campaigns and optimize your targeting and bidding strategies to drive higher returns on ad spend.

Google Ads Dynamic Remarketing Tag Setup for OpenCart

Google Dynamic Remarketing Tag for OpenCart using Google Tag Manager

Warning: If you don’t know about javascript or don’t have developing knowledge then don’t try toOpenCart Google Ads Dynamic Remarketing Tag  that can break your site, Cart and other functionality 

Disclaimer: Google tag manager belongs to Google property 

For Contact: mappchero@gmail.com

I am available for Hire on Freelancer: Freelancer.com

I am available for Hire on Upwork: Upwork.com

I am available for Hire on Peopleperhour: Peopleperhour.com

I am available for Hire on Guru: Guru.com

Opencart GA4 eCommerce Tracking using Google Tag Manager

Standard

Opencart is a popular open-source eCommerce platform that allows businesses to create and manage their online stores. One of the essential components of any eCommerce business is tracking their website’s performance using Google Analytics (GA). In this article, we will explain how to set up GA4 eCommerce tracking in Opencart to help you get started with tracking your website’s performance.

Google Analytics 4 (GA4) is a newer version of Google Analytics that provides advanced tracking features for eCommerce businesses. It offers features such as cross-device tracking, machine learning, and advanced reporting capabilities. To set up GA4 eCommerce tracking in Opencart, you will need to follow these steps:

Step 1: Create a Google Analytics 4 property

The first step is to create a new GA4 property in your Google Analytics account. To do this, you need to log in to your Google Analytics account and navigate to the “Admin” section. From there, click on “Create Property” and select “Google Analytics 4” from the dropdown menu.

Next, enter the required information such as property name, industry category, and time zone. Once you have completed this step, you will have created a new GA4 property.

Step 2: Install the GA4 tracking code

To install the GA4 tracking code on your Opencart store, you will need to follow these steps:

Navigate to your Opencart store’s admin dashboard and go to “Extensions” > “Analytics.”
Click on “Edit” for “Google Analytics” and select “GA4” as the tracking type.
Enter your GA4 measurement ID, which can be found in your Google Analytics account under “Admin” > “Property Settings.”
Save the changes and you’re done!

Step 3: Set up eCommerce tracking in GA4

Once you have installed the GA4 tracking code on your Opencart store, you will need to set up eCommerce tracking in GA4. To do this, you will need to follow these steps:

Go to your GA4 property in your Google Analytics account and click on “Ecommerce Settings.”
Turn on “Enable Enhanced Ecommerce Reporting” and “Enable Ecommerce Reporting.”
Set up your eCommerce data streams by clicking on “Create Data Stream” and selecting “Web” as the source.
Follow the prompts to complete the setup process, and you’re done!

Step 4: Test your tracking setup

After you have set up your GA4 eCommerce tracking in Opencart, it’s essential to test your tracking setup to ensure that everything is working correctly. To do this, you can perform the following steps:

Go to your Opencart store and add a product to your cart.
Go to the checkout page and complete the purchase process.
Once the purchase is complete, go to your GA4 property in your Google Analytics account and navigate to “Conversions” > “Ecommerce.”
Verify that the data is being tracked correctly, including the number of transactions, revenue, and other relevant metrics.

Conclusion

GA4 eCommerce tracking in Opencart is a simple and effective way to track your website’s performance and gain insights into your customers’ behavior. By following the steps outlined above, you can set up GA4 eCommerce tracking on your Opencart store and start tracking your website’s performance in no time. Remember to test your tracking setup regularly to ensure that it’s working correctly and providing accurate data.

In eCommerce tracking, the ‘event’ and ‘view_item_list‘ are used together to track when a user views a list of products on the website. This tracking information can be used to analyze user behavior, optimize product pages, and make data-driven decisions.

Opencart for Google Analytics 4 Ecommerce tracking

Opencart Google Analytics 4 eCommerce Tracking using Google Tag Manager

The “select_item” event in eCommerce tracking for OpenCart typically refers to when a user selects a specific item on a product listing or category page. This event can be tracked using various analytics tools such as Google Analytics 4 (GA4), Piwik, or OpenCart’s built-in analytics system.

Google Analytics 4 (GA4) Enhanced Ecommerce for OpenCart

Google Analytics 4 eCommerce Tracking for Opencart using Google Tag Manager

To implement tracking for the “view_item” event in OpenCart, you can use a data layer to capture the necessary information such as the product ID, name, and price. This data can then be sent to your analytics tool using a custom JavaScript function or plugin. In Google Analytics, you can set up a custom event that fires when a user views a product page, and then use this data to analyze user behavior and optimize your website.

Tracking OpenCart Transactions with Google Analytics 4 (GA4)

OpenCart Google Analytics 4 (GA4) eCommerce Integration using Google Tag Manager

The “add_to_cart” event in eCommerce tracking for OpenCart refers to when a user adds a product to their shopping cart on an online store built with the OpenCart eCommerce platform. This event is typically tracked using tools like Google Analytics or Facebook Pixel, and it provides valuable insights into user behavior and conversion rates.

When a user clicks the “add to cart” button on an OpenCart store, an eCommerce tracking script sends a message to the tracking tool that the “add_to_cart” event has occurred. This message typically includes information such as the product name, SKU, quantity, and price.

Install Google Analytics 4 (GA4) on OpenCart

Setup Ecommerce Tracking For GA4 (Google Analytic 4) for OpenCart using Google Tag Manager

When a user clicks the “view cart” button on an OpenCart store, an eCommerce tracking script sends a message to the tracking tool that the “view_cart” event has occurred. This message typically includes information such as the products in the cart, the total cart value, and any discounts or promotions that may be applied.

Set up a purchase event for OpenCart

Google Analytics 4 (GA4) Transition & Migration eCommerce Tracking for OpenCart using Google Tag Manager

When a user clicks the “remove” button on an item in their cart on an OpenCart store, an eCommerce tracking script sends a message to the tracking tool that the “remove_from_cart” event has occurred. This message typically includes information such as the product name, SKU, and quantity.

GA4 Event Tracking for OpenCart

Opencart for Google Analytics 4 (GA4) Ecommerce Tracking using Google Tag Manager

By tracking the “begin_checkout” event, online store owners can better understand how many users are starting the checkout process, how long they are spending on the checkout page, and at which point in the checkout process users are abandoning their carts. This data can then be used to optimize the checkout process, improve user experience, and create targeted remarketing campaigns to win back potential customers who have abandoned their carts. Additionally, this data can help store owners identify issues with payment options, shipping rates, or other factors that may be contributing to cart abandonment.

Google Analytics 4 Integration for OpenCart

GA4 Event Tracking for Purchases for OpenCart using Google Tag Manager

When a user adds their shipping information on an OpenCart store, an eCommerce tracking script sends a message to the tracking tool that the “add_shipping_info” event has occurred. This message typically includes information such as the shipping address, shipping method, and shipping cost.

GA4 eCommerce Setup for OpenCart

Setting Up Google Analytics 4 (GA4) eCommerce Tracking for OpenCart using Google Tag Manager

When a user adds their payment information on an OpenCart store, an eCommerce tracking script sends a message to the tracking tool that the “add_payment_info” event has occurred. This message typically includes information such as the payment method, card type, and payment amount.

GA4 Enhanced for OpenCart

Google Analytics 4 (GA4) Enhanced Ecommerce for OpenCart using Google Tag Manager

When a user completes a purchase on an OpenCart store, an eCommerce tracking script sends a message to the tracking tool that the “purchase” event has occurred. This message typically includes information such as the products purchased, the order total, the transaction ID, and any shipping or tax information.

Set up GA4 eCommerce for OpenCart

Opencart Analytics 4 (GA4) Purchase Enhance Ecommerce using Google Tag Manager

Warning: If you don’t know about javascript or don’t have developing knowledge then don’t try toOpencart GA4 Enhanced eCommerce Tracking using Google Tag Manager that can break your site, Cart and other functionality 

Disclaimer: Google tag manager belongs to Google property 

For Contact: mappchero@gmail.com

I am available for Hire on Freelancer: Freelancer.com

I am available for Hire on Upwork: Upwork.com

I am available for Hire on Peopleperhour: Peopleperhour.com

I am available for Hire on Guru: Guru.com

Magento 2 Google Ads Dynamic Remarketing Tag

Standard

Magento 2 is an open-source e-commerce platform that offers a range of features and functionalities for online businesses. One such feature is the integration of Google Ads Dynamic Remarketing Tag, which allows businesses to advertise their products to potential customers who have already visited their website.

Dynamic Remarketing Tag is a code snippet that is added to the website’s source code to track user behavior on the site. The data collected is then used to show personalized ads to the user when they browse other websites or search on Google. These ads show products that the user has previously viewed, making them more likely to revisit the website and complete their purchase.

Here’s a step-by-step guide on how to set up Google Ads Dynamic Remarketing Tag on Magento 2:

Step 1: Create a Google Ads account

If you don’t have a Google Ads account, you’ll need to create one. Go to the Google Ads website and sign up for an account. Once you’ve created an account, you’ll need to create a new remarketing tag for your website.

Step 2: Create a remarketing tag

To create a remarketing tag, click on the ‘Tools’ tab in your Google Ads account and select ‘Audience Manager’ from the drop-down menu. Click on the ‘Data sources’ tab and select ‘Website visitors.’ Click on the ‘Tag setup’ button and select ‘Google Tag Manager.’ Copy the code snippet that appears on the screen.

Step 3: Install Google Tag Manager on Magento 2

Google Tag Manager is a tool that allows you to manage multiple tracking tags on your website. Install Google Tag Manager on Magento 2 by following these steps:

a) Sign in to your Magento 2 admin panel
b) Go to ‘Stores’ and select ‘Configuration’
c) Click on ‘Sales’ and select ‘Google API’
d) Click on ‘Google Tag Manager’ and enter your Google Tag Manager ID
e) Click on ‘Save Config’

Step 4: Add the remarketing tag to Google Tag Manager

To add the remarketing tag to Google Tag Manager, follow these steps:

a) Sign in to your Google Tag Manager account
b) Click on ‘Tags’ and select ‘New’
c) Select ‘Google Ads Remarketing’ from the ‘Tag Configuration’ section
d) Enter your Google Ads Conversion ID and Remarketing ID
e) Paste the code snippet you copied in Step 2 into the ‘Tag Configuration’ section
f) Click on ‘Save’

Step 5: Set up a remarketing campaign in Google Ads

To set up a remarketing campaign in Google Ads, follow these steps:

a) Sign in to your Google Ads account
b) Click on ‘Campaigns’ and select ‘New Campaign’
c) Select ‘Display’ as your campaign type and ‘Standard Display Campaign’ as your campaign subtype
d) Choose your campaign settings, such as budget, target audience, and ad format
e) Click on ‘Create campaign’

Step 6: Add your ad creatives

To create your ad creatives, follow these steps:

a) Click on ‘Ads & Extensions’ and select ‘Ad gallery’
b) Choose a display ad template or create your own ad
c) Enter your ad copy and upload your images
d) Click on ‘Create’

Step 7: Add your remarketing tag to your website

To add your remarketing tag to your website, follow these steps:

a) Sign in to your Magento 2 admin panel
b) Go to ‘Stores’ and select ‘Configuration’
c) Click on ‘Sales’ and select ‘Google API’
d) Click on ‘Google Ads Remarketing’ and select ‘Yes’ for ‘Enable’
e) Paste the remarketing tag code snippet into the ‘

In Magento 2, ‘event’ and ‘view_item’ are used in conjunction to track when a user views a specific product on the website.

In Magento 2, the ‘event’ ‘view_item_list‘ is used to track when a user views a list of products on the website, such as a category page or search results page. This tracking information can be used to create personalized recommendations and retargeting campaigns.

Dynamic Remarketing Setup for Google Ads for Magento 2

Dynamic Remarketing Tag in Magento 2 using Google Tag Manager

An event in Google Analytics is a user’s interaction with a website that can be tracked, such as clicking a button or viewing a page. ‘view_item‘ is an event that is used to track when a user views a specific item on an e-commerce website. When a user views a product page on a Magento 2 website, the ‘view_item‘ event is triggered and the data is sent to Google Analytics.

Magento 2 Google Ads Dynamic Remarketing Tag

Magento 2 Google Ads Dynamic Remarketing Tag using Google Tag Manager

In Magento 2, the ‘event’ and ‘add_to_cart‘ are used together to track when a user adds a product to their cart. This tracking information can be used to create personalized recommendations, retargeting campaigns, and abandoned cart emails.

Google Ads Remarketing For Magento 2

Add Google Remarketing tag in Magento 2 using Google Tag Manager

In Magento 2, the ‘event’ and ‘purchase‘ are used together to track when a user completes a purchase on the website. This tracking information can be used to create dynamic remarketing campaigns, which show personalized ads to users who have already visited your website and made a purchase.

Enable Google Remarketing Tag in Magento 2

Google Ads (AdWords) Dynamic Remarketing for Magento 2 using Google Tag Manager

Warning: If you don’t know about javascript or don’t have developing knowledge then don’t try to Magento 2 Google Ads Dynamic Remarketing Tag using Google Tag Manager that can break your site, Cart and other functionality 

Disclaimer: Google tag manager belongs to Google property 

For Contact: mappchero@gmail.com

I am available for Hire on Freelancer: Freelancer.com

I am available for Hire on Upwork: Upwork.com

I am available for Hire on Peopleperhour: Peopleperhour.com

I am available for Hire on Guru: Guru.com

Magento 2 GA4 eCommerce Tracking using Google Tag Manager

Standard

Magento 2 is a popular e-commerce platform used by many online retailers. GA4 (Google Analytics 4) is the latest version of Google Analytics, which offers improved tracking capabilities for e-commerce sites. By integrating Magento 2 with GA4, e-commerce site owners can gain valuable insights into their customers’ behavior, which can help them make data-driven decisions to improve their business.

Magento 2 GA4 eCommerce Tracking:

Magento 2 GA4 e-commerce tracking allows online retailers to track customer behavior on their website, including product views, add to cart, checkout, and purchase. With this data, e-commerce store owners can gain insights into their customers’ behavior, such as which products are the most popular, which pages have the highest bounce rate, and what the customer journey looks like from start to finish. By analyzing this data, they can optimize their site to improve the user experience, increase conversions, and boost revenue.

To enable Magento 2 GA4 e-commerce tracking, you will need to follow these steps:

Step 1: Create a GA4 Property and set up an Enhanced Ecommerce data stream

To get started with Magento 2 GA4 e-commerce tracking, you will need to create a GA4 property in your Google Analytics account and set up an Enhanced Ecommerce data stream. This will allow you to track all the e-commerce events on your website, such as product views, add to cart, checkout, and purchase.

Step 2: Configure Magento 2 integration with GA4

Next, you will need to configure the integration between Magento 2 and GA4. To do this, you can use the Google Tag Manager (GTM) extension for Magento 2, which allows you to add GA4 tracking code to your website. You can also use a custom code integration if you prefer.

Step 3: Set up Enhanced Ecommerce tracking in GTM

After configuring the integration between Magento 2 and GA4, you will need to set up Enhanced Ecommerce tracking in GTM. This involves setting up data layer variables, triggers, and tags that will capture the e-commerce events on your website and send them to GA4.

Step 4: Test and verify tracking

Finally, you will need to test and verify that your Magento 2 GA4 e-commerce tracking is working correctly. You can use the Google Analytics Debugger or the Real-Time reports in GA4 to check that the tracking is working as expected.

Benefits of Magento 2 GA4 eCommerce Tracking:

Magento 2 GA4 e-commerce tracking offers many benefits for online retailers, including:

Better insights into customer behavior: By tracking e-commerce events on your website, you can gain valuable insights into your customers’ behavior, such as which products they are interested in, how long they spend on your site, and what pages they visit.

Improved user experience: By analyzing customer behavior, you can identify pain points in the customer journey and optimize your site to improve the user experience.

Increased conversions: By optimizing your site for the user experience, you can increase conversions and revenue.

Customizable reporting: With GA4, you can create custom reports and dashboards that focus on the metrics that matter most to your business.

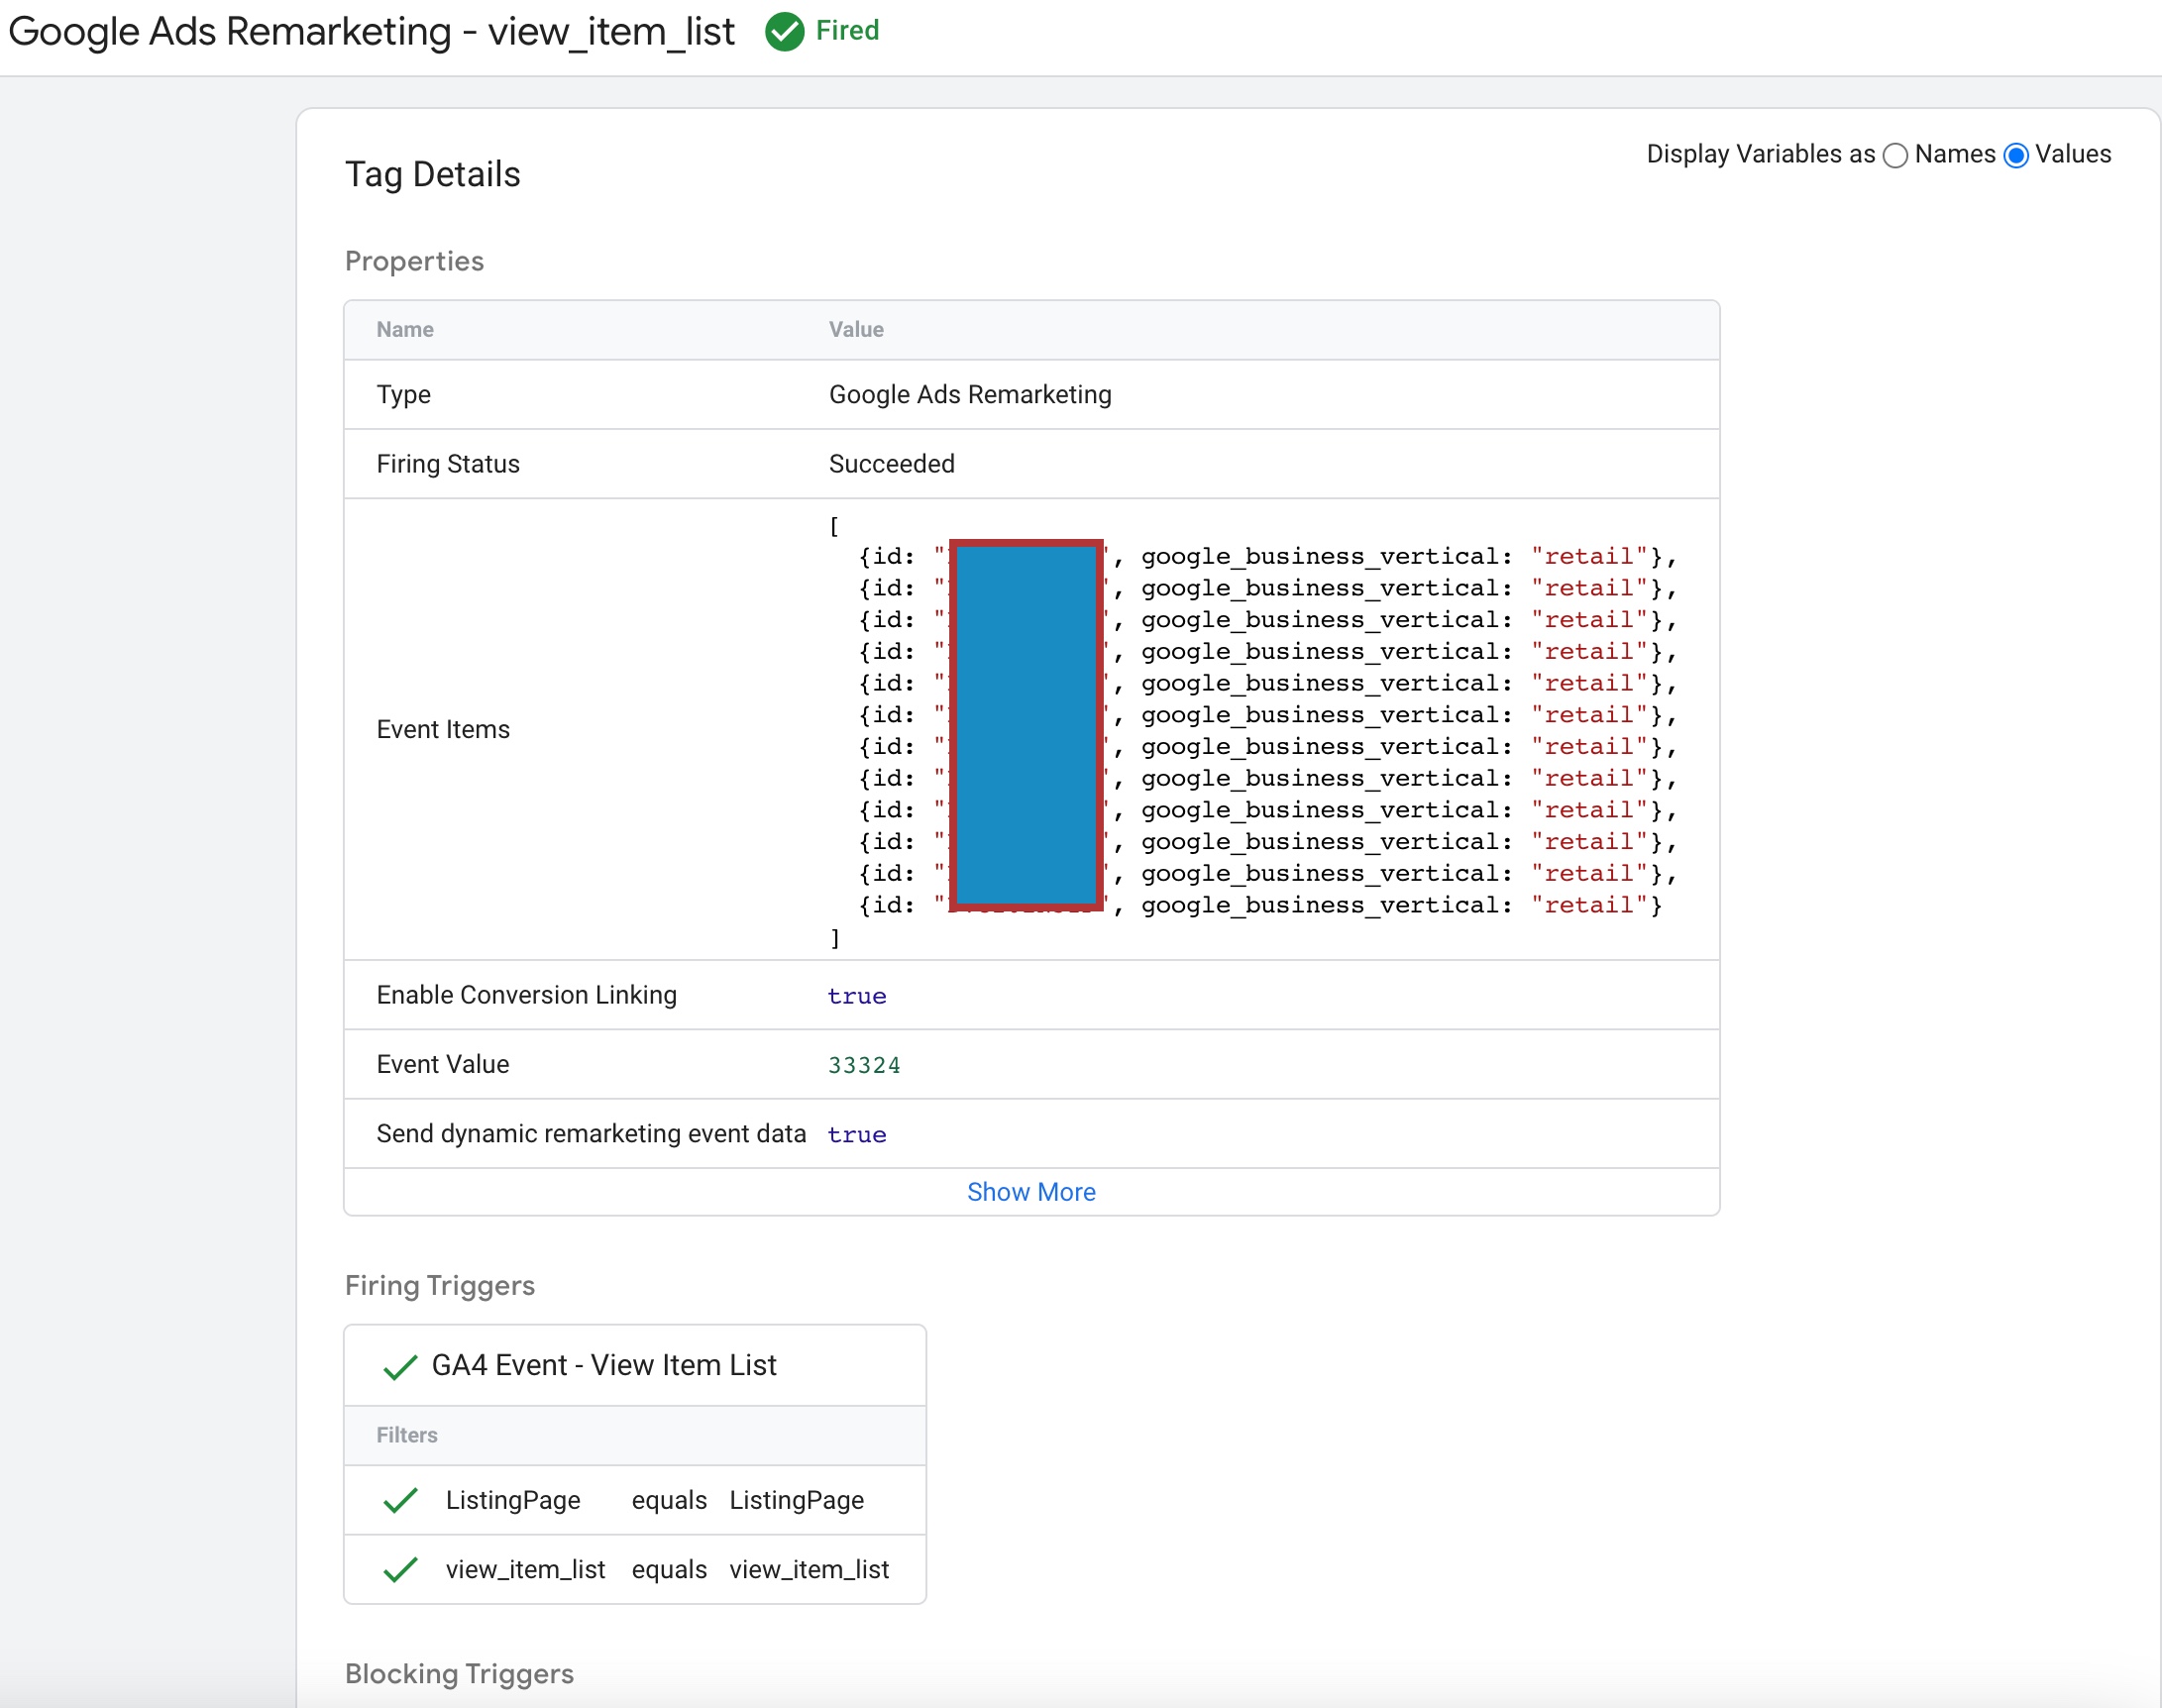
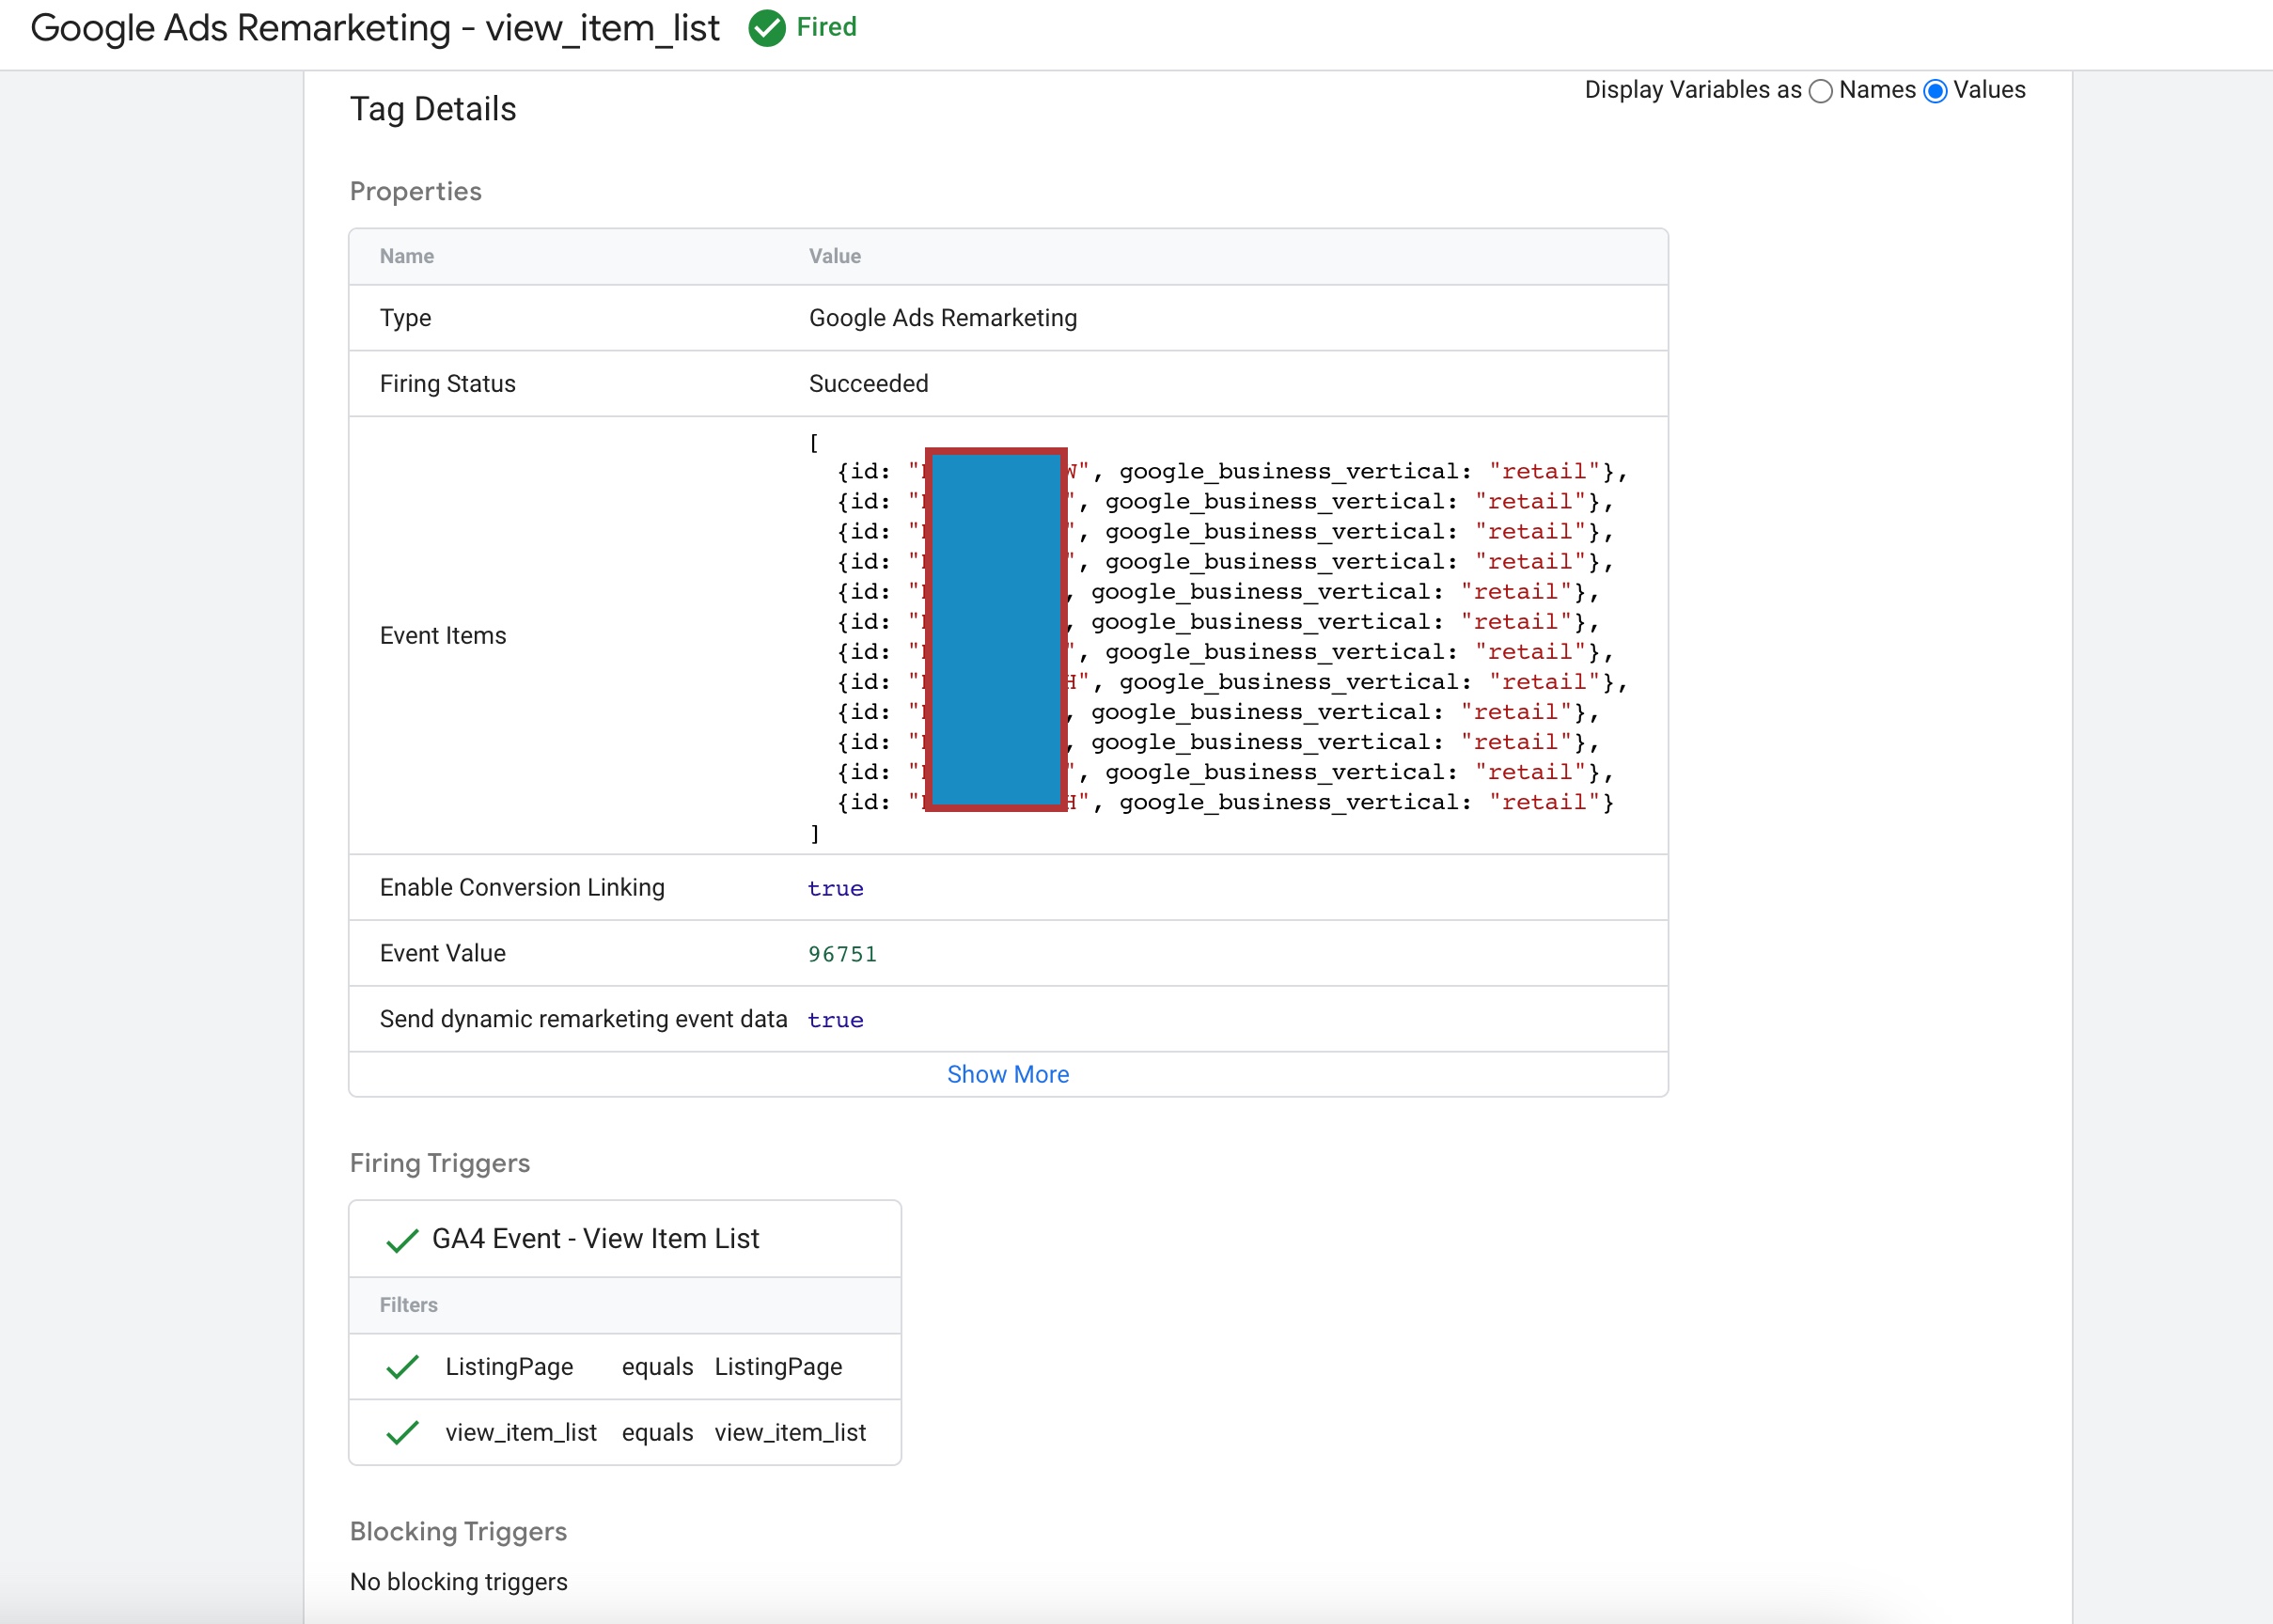
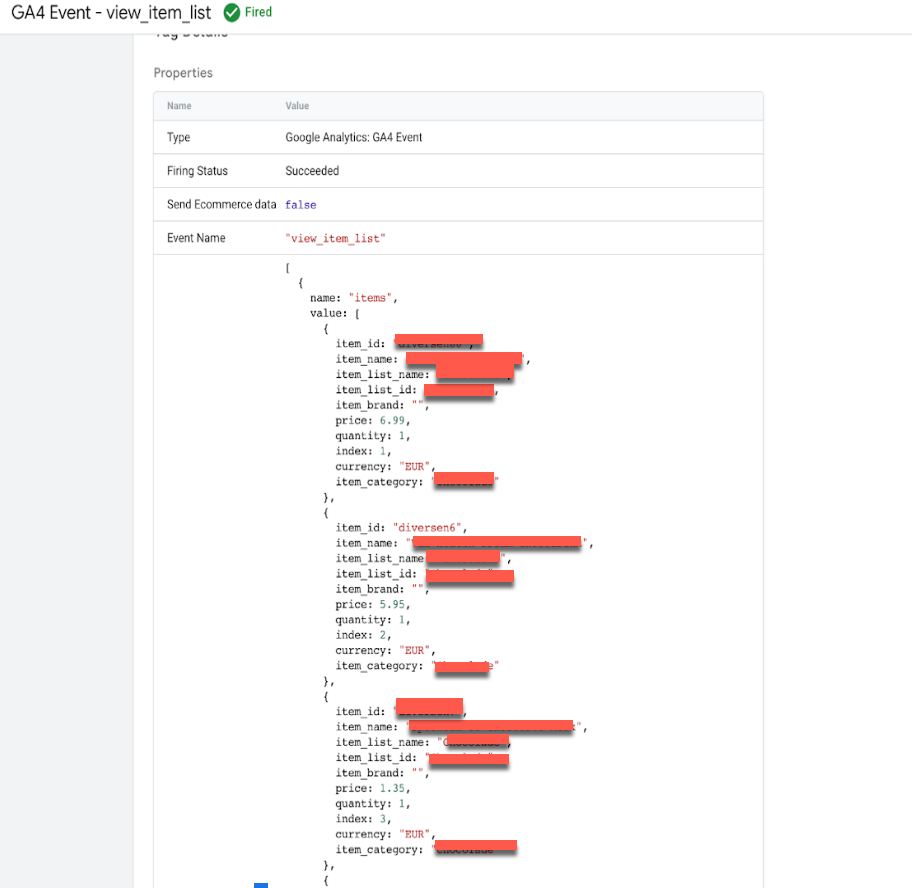
In Magento 2, an event is a notification that is triggered when a specific action or set of actions take place. The view_item_list event is triggered when a list of items is viewed, for example, a list of products in a category page.

Magento 2 GA4 eCommerce Tracking

Magento 2 Google Analytics 4 Enhanced Ecommerce tracking using Google Tag Manager

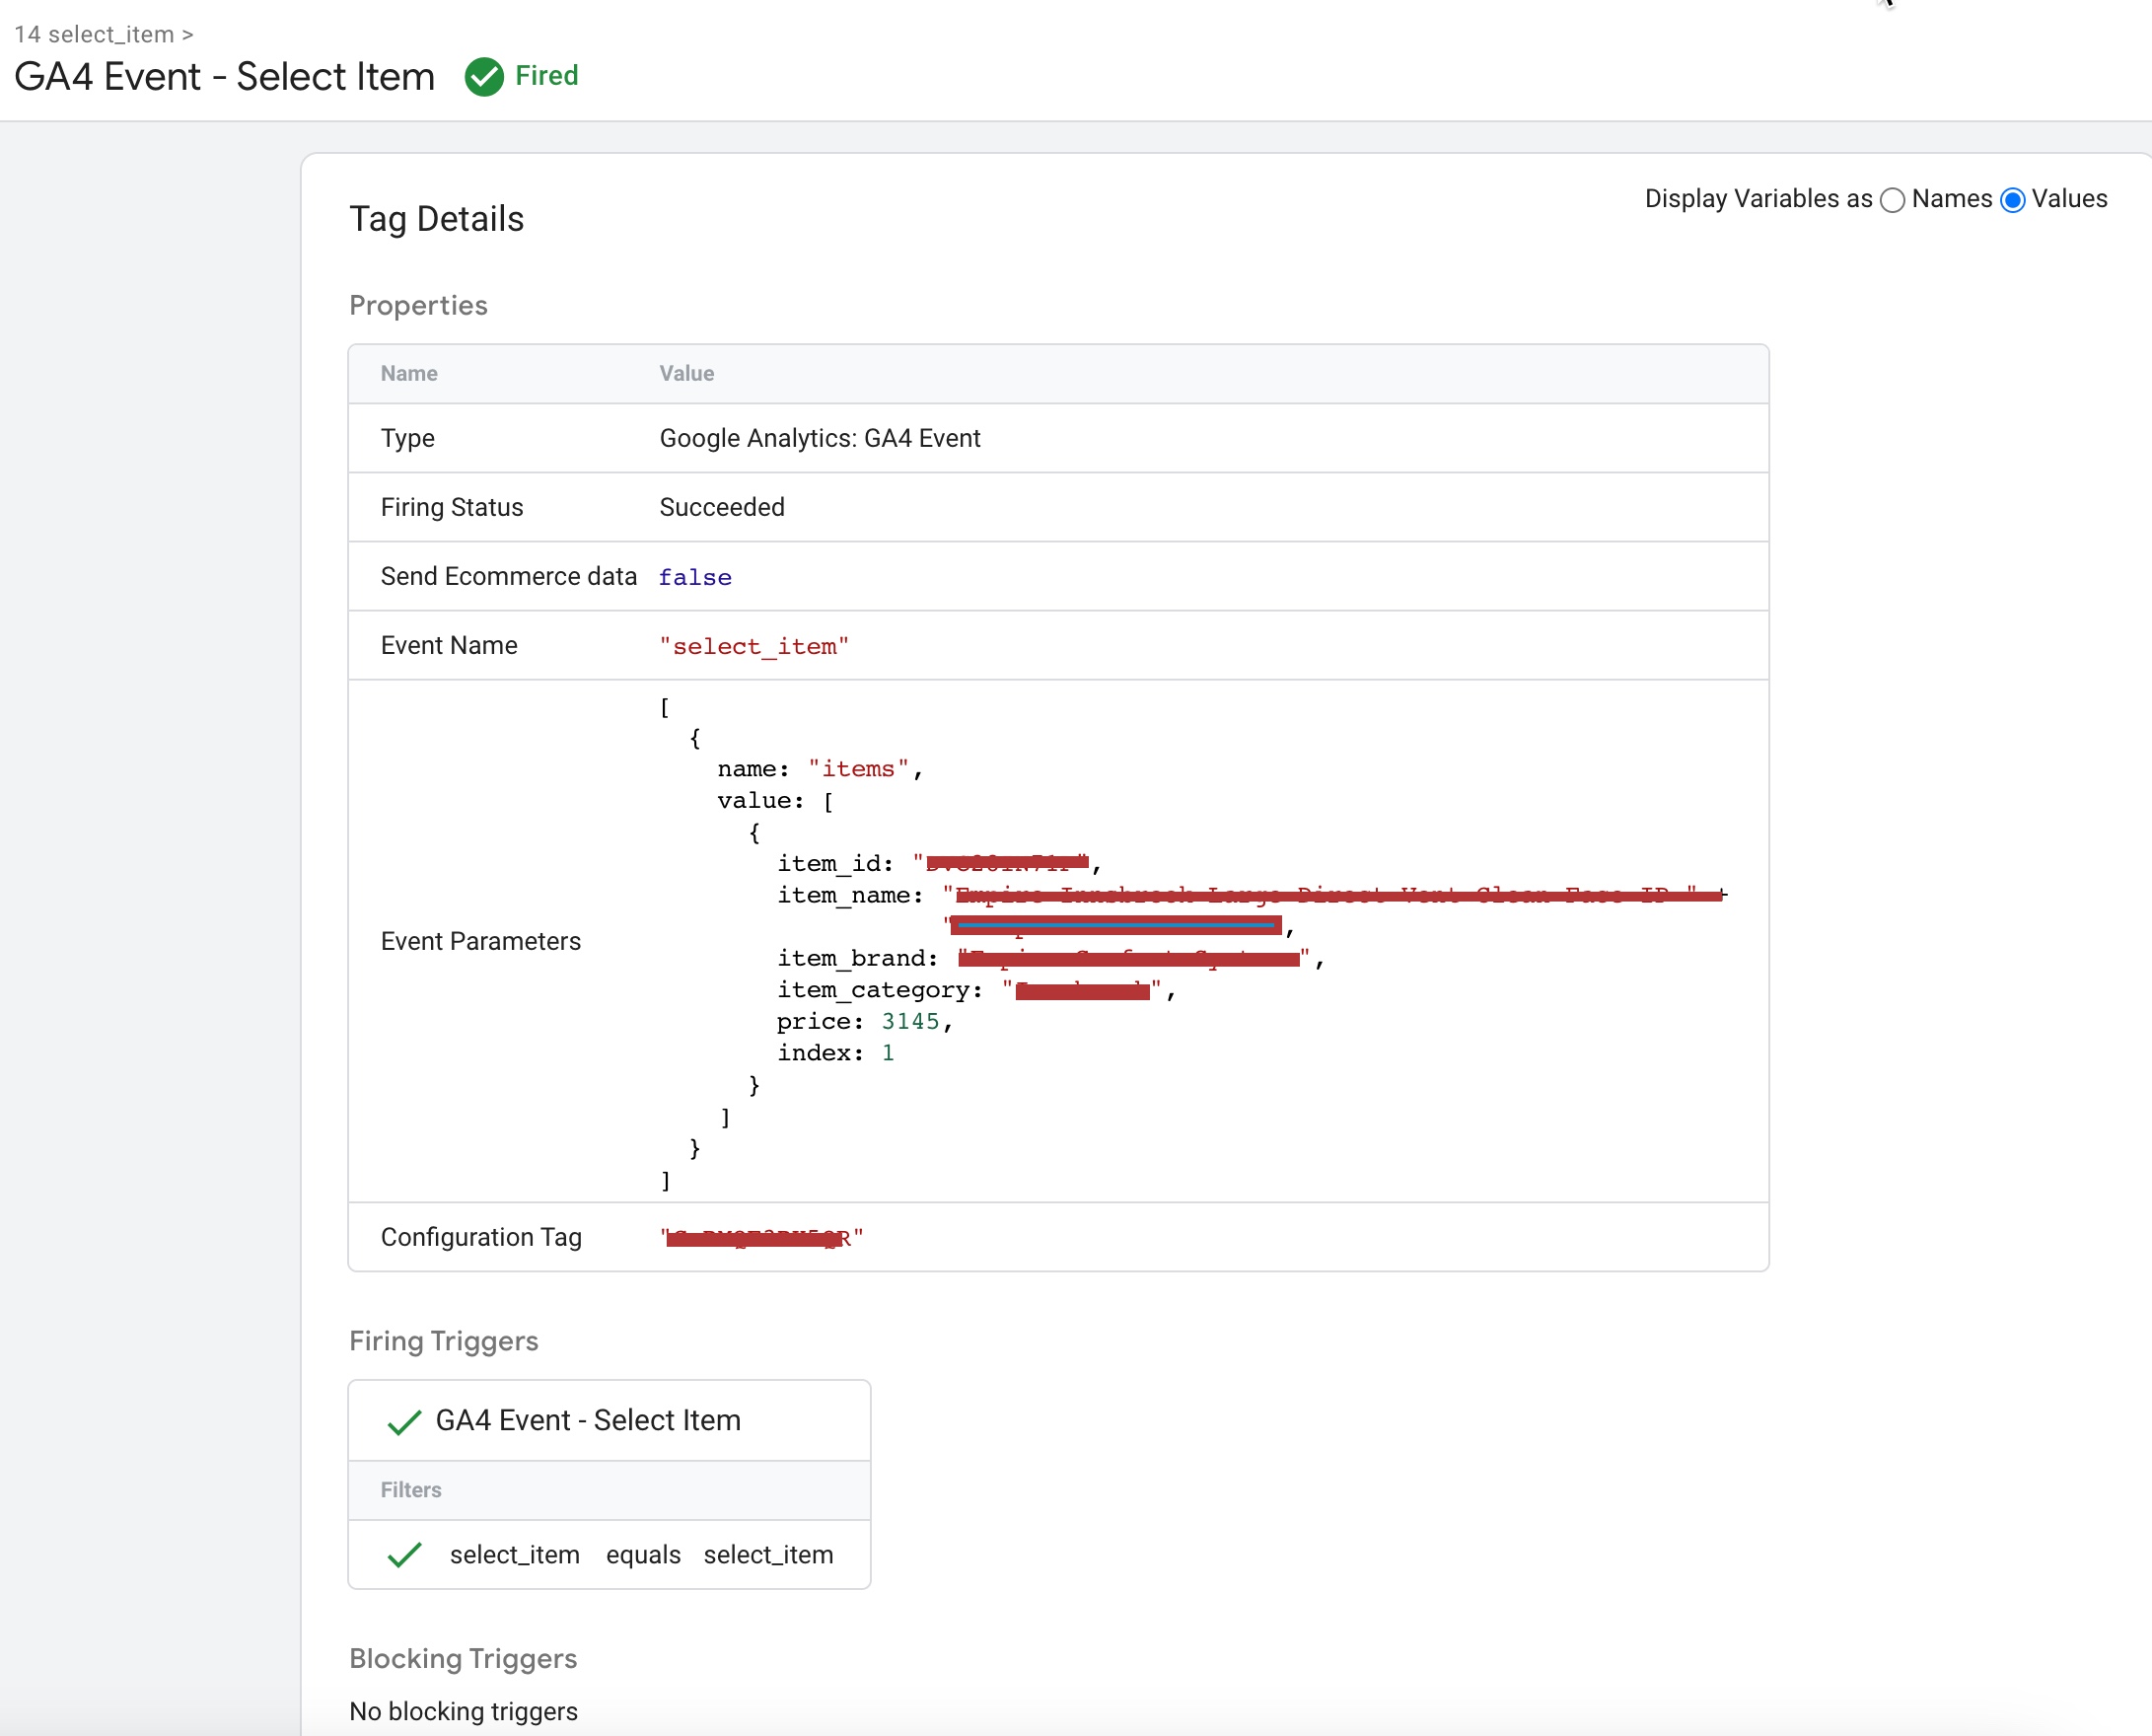
In Magento 2, the select_item event is triggered when a specific item is selected or clicked on, for example, when a product is added to the cart. To send a select_item event, you can create an instance of the event manager and then dispatch the event with the relevant data, such as the selected item’s ID or SKU.

Magento 2 GA4 eCommerce Tracking

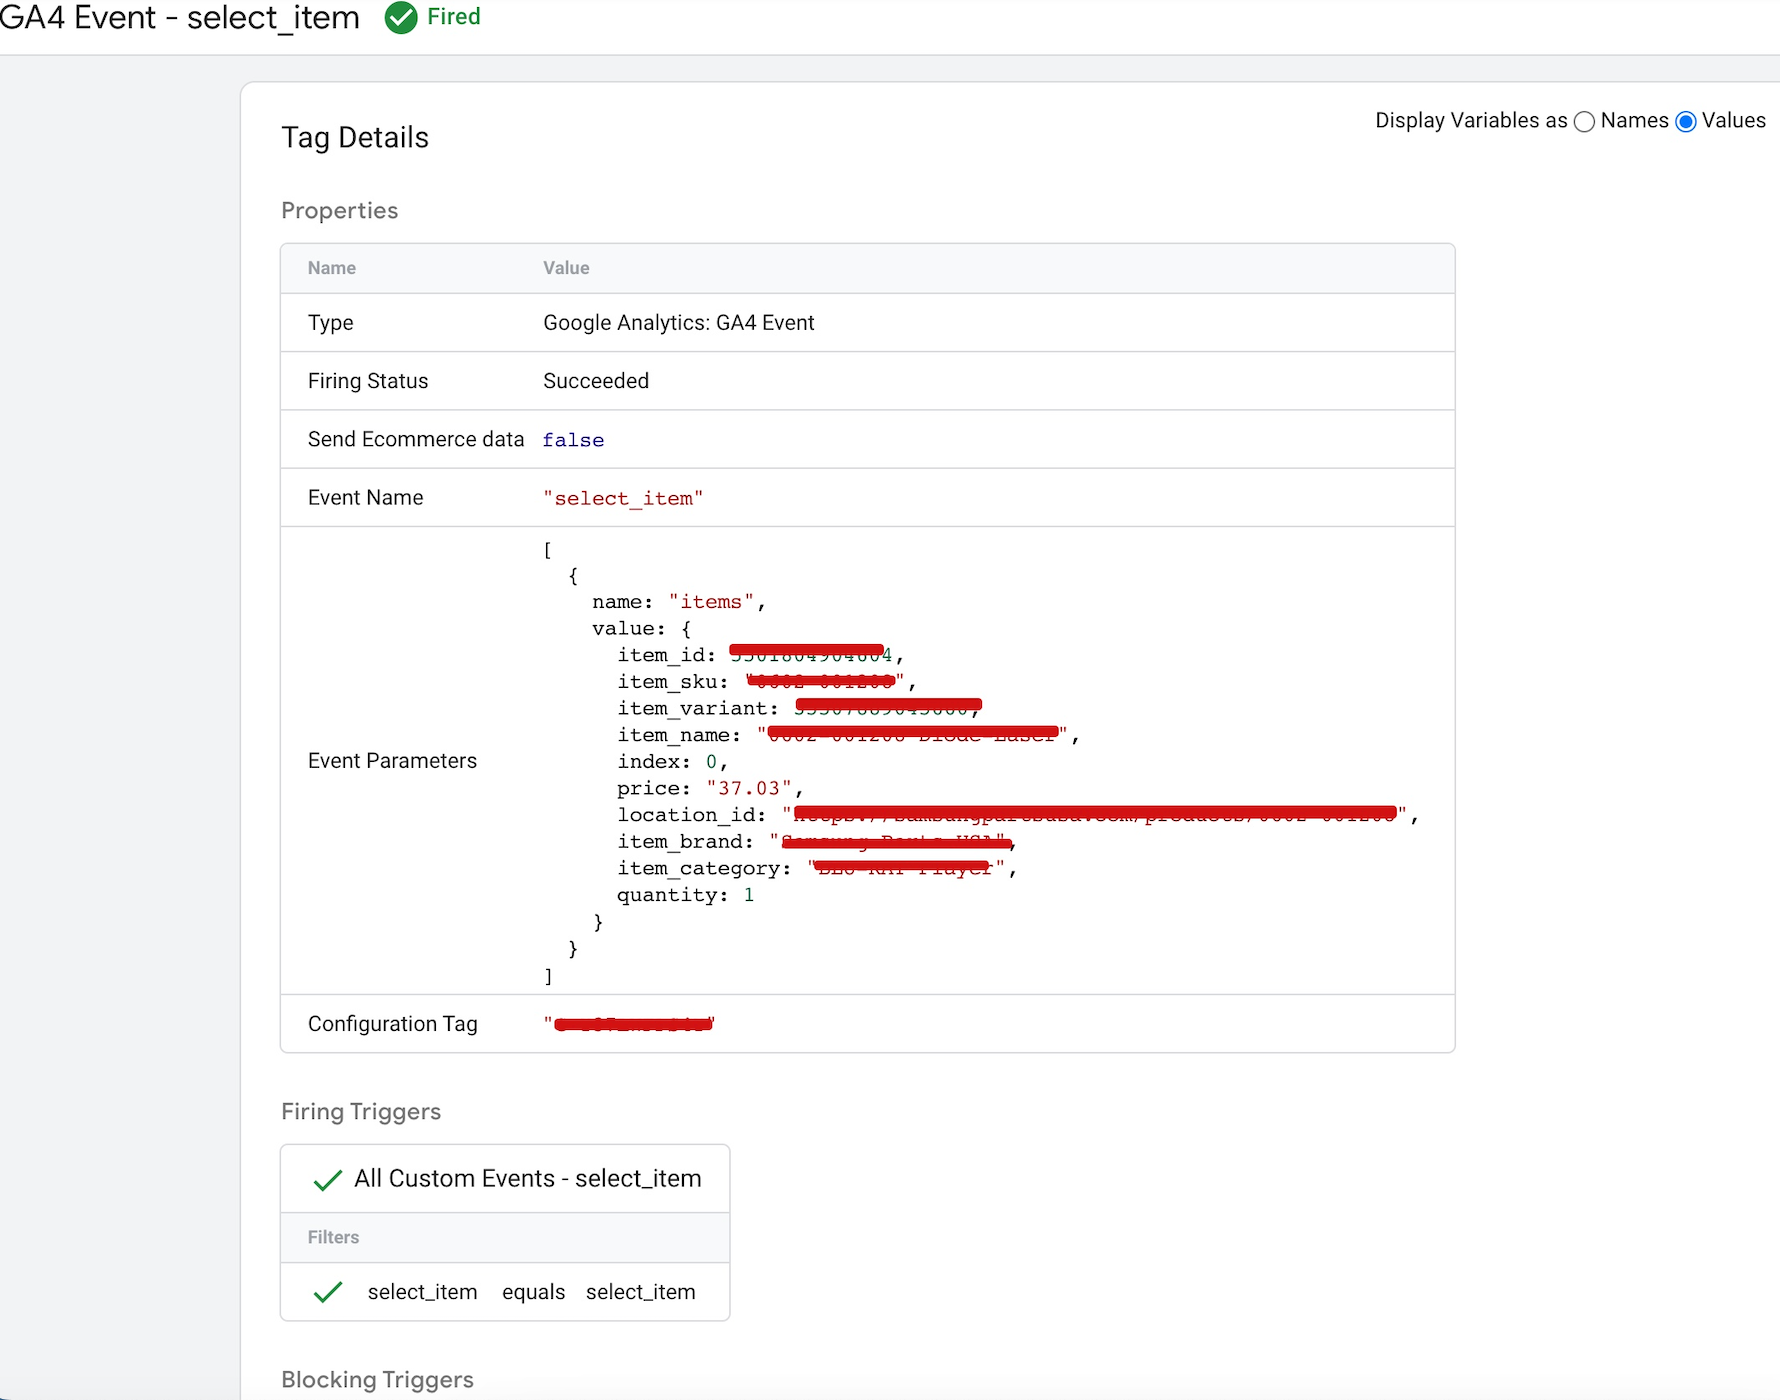
Connect Google Analytics 4 to Magento 2 using Google Tag Manager

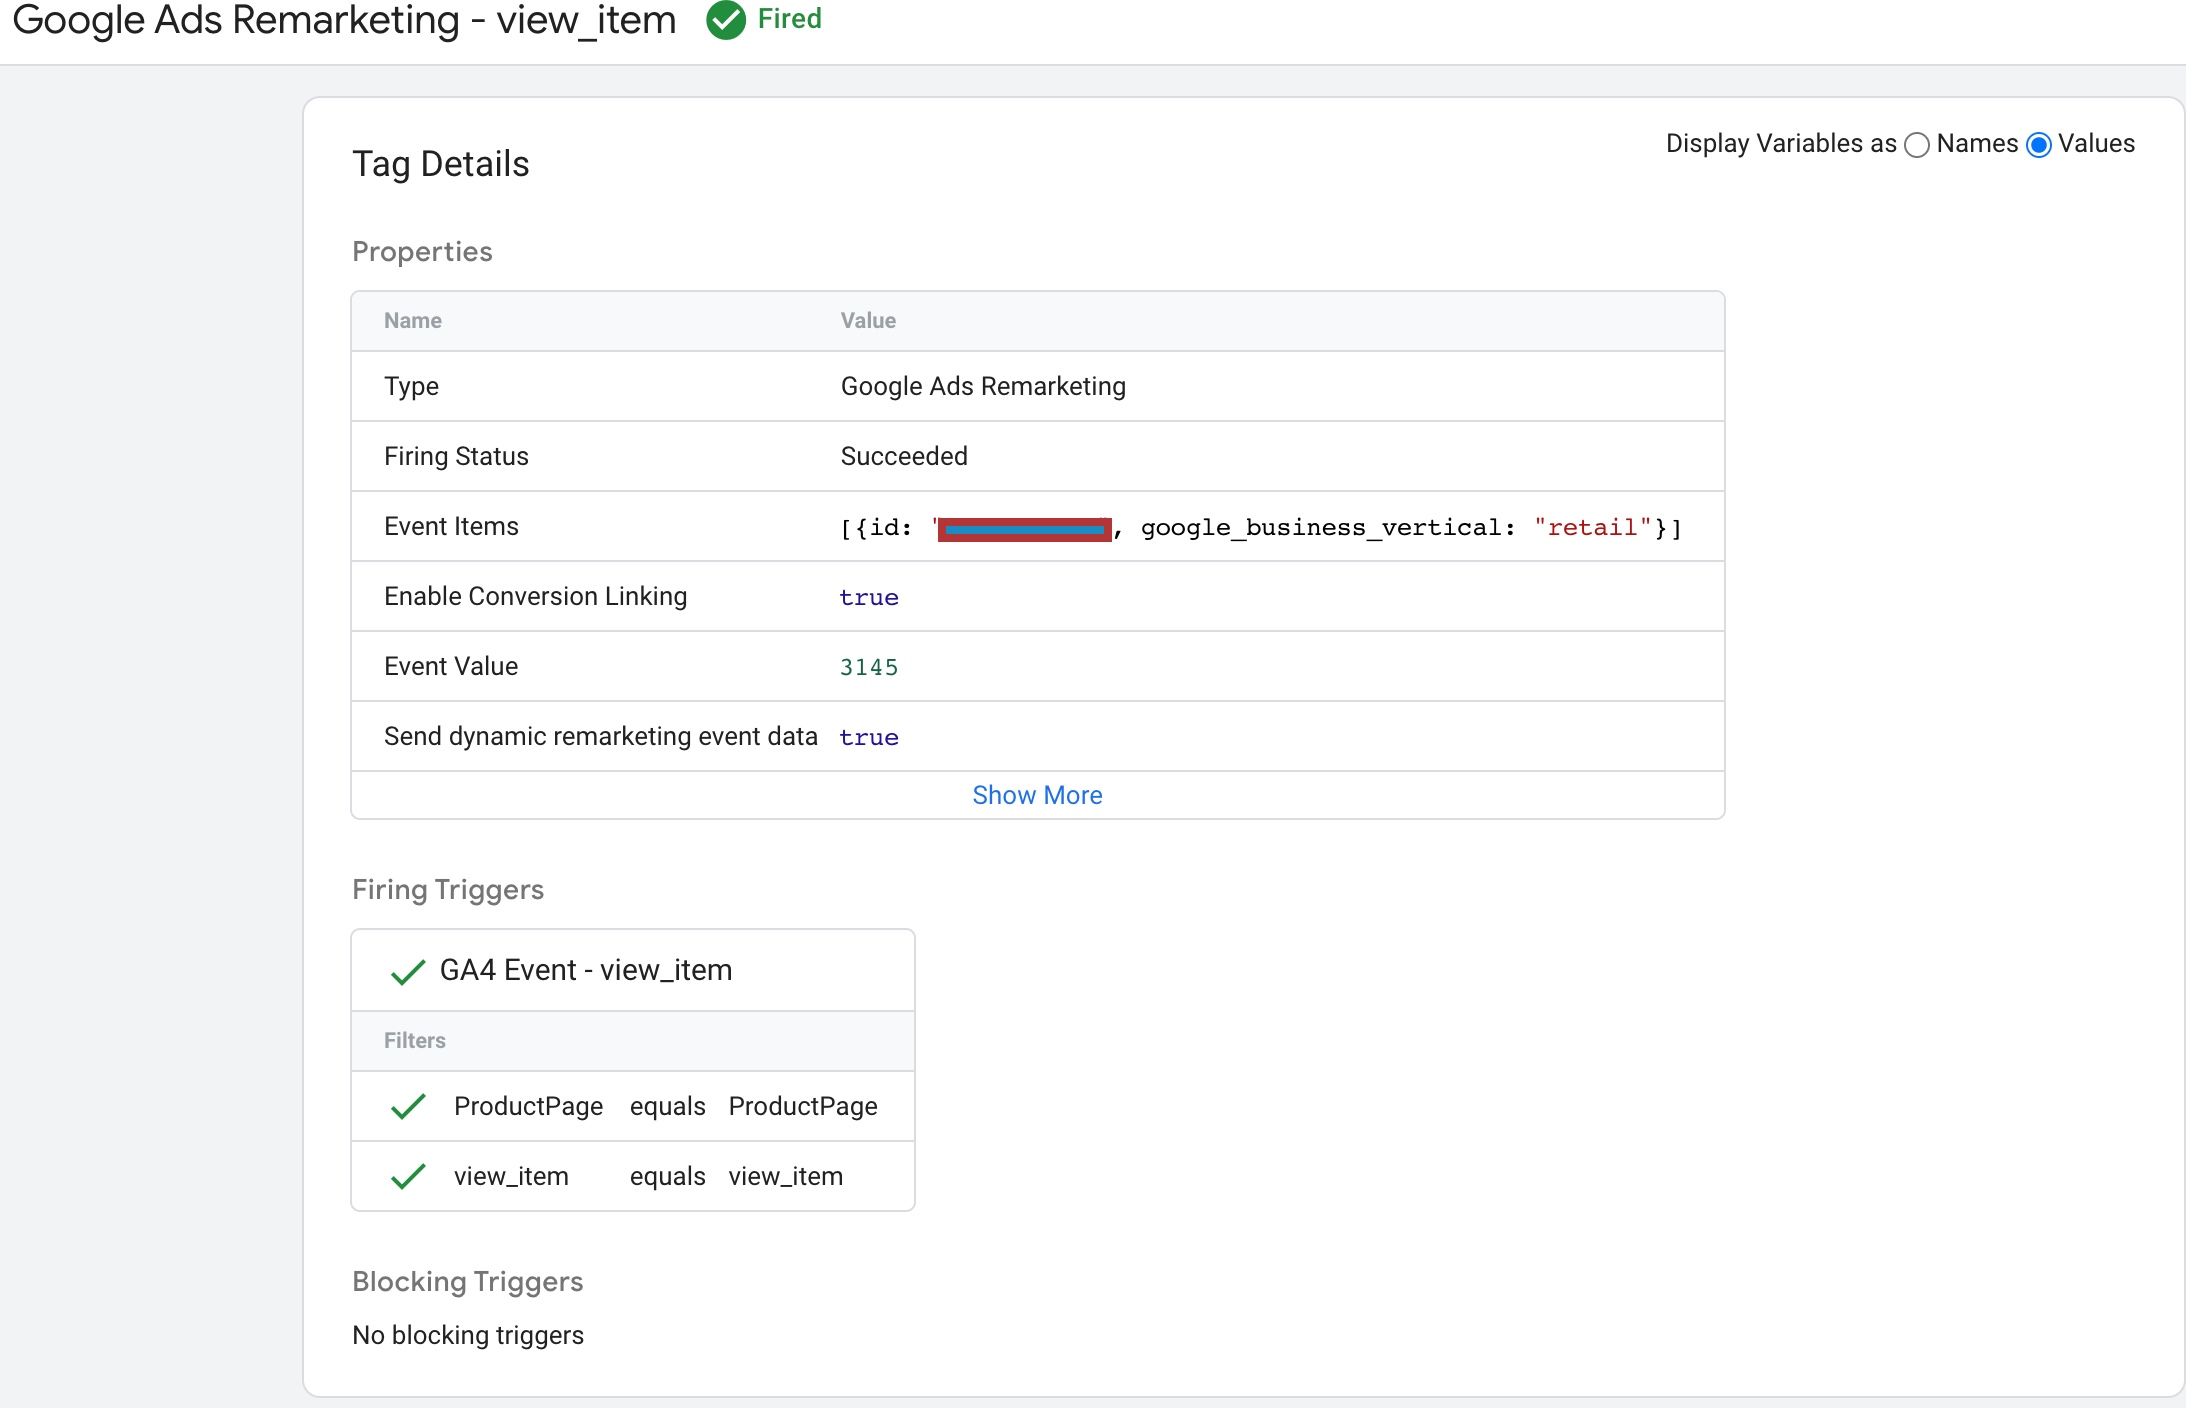
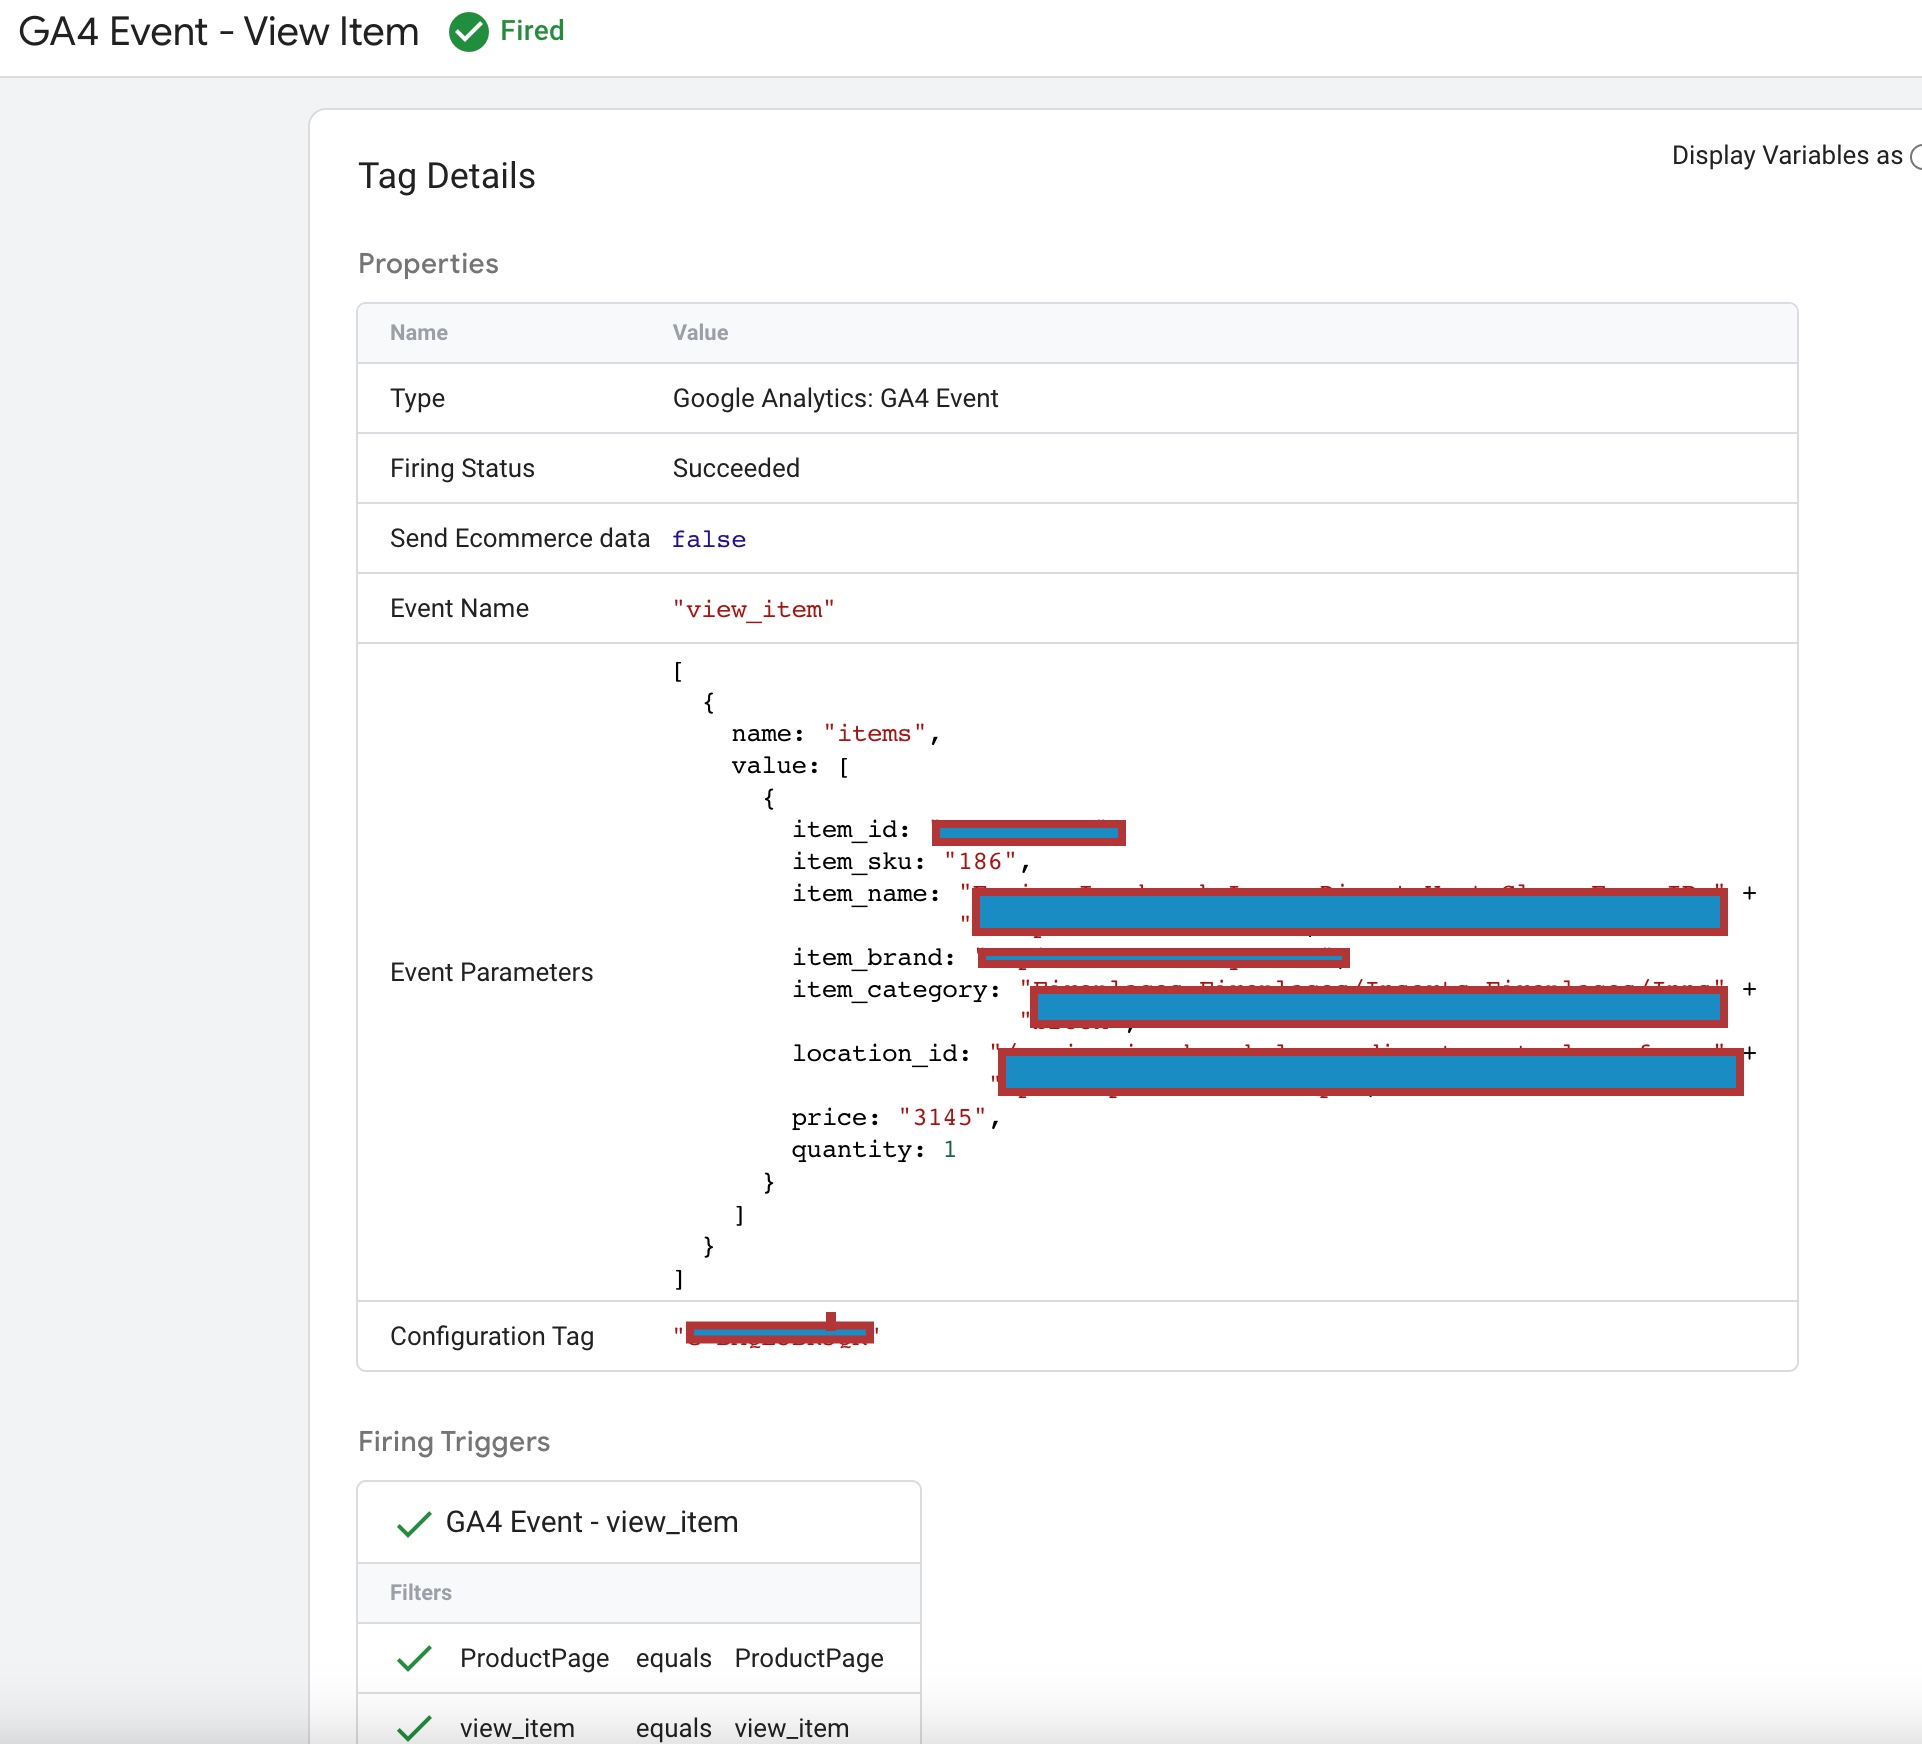
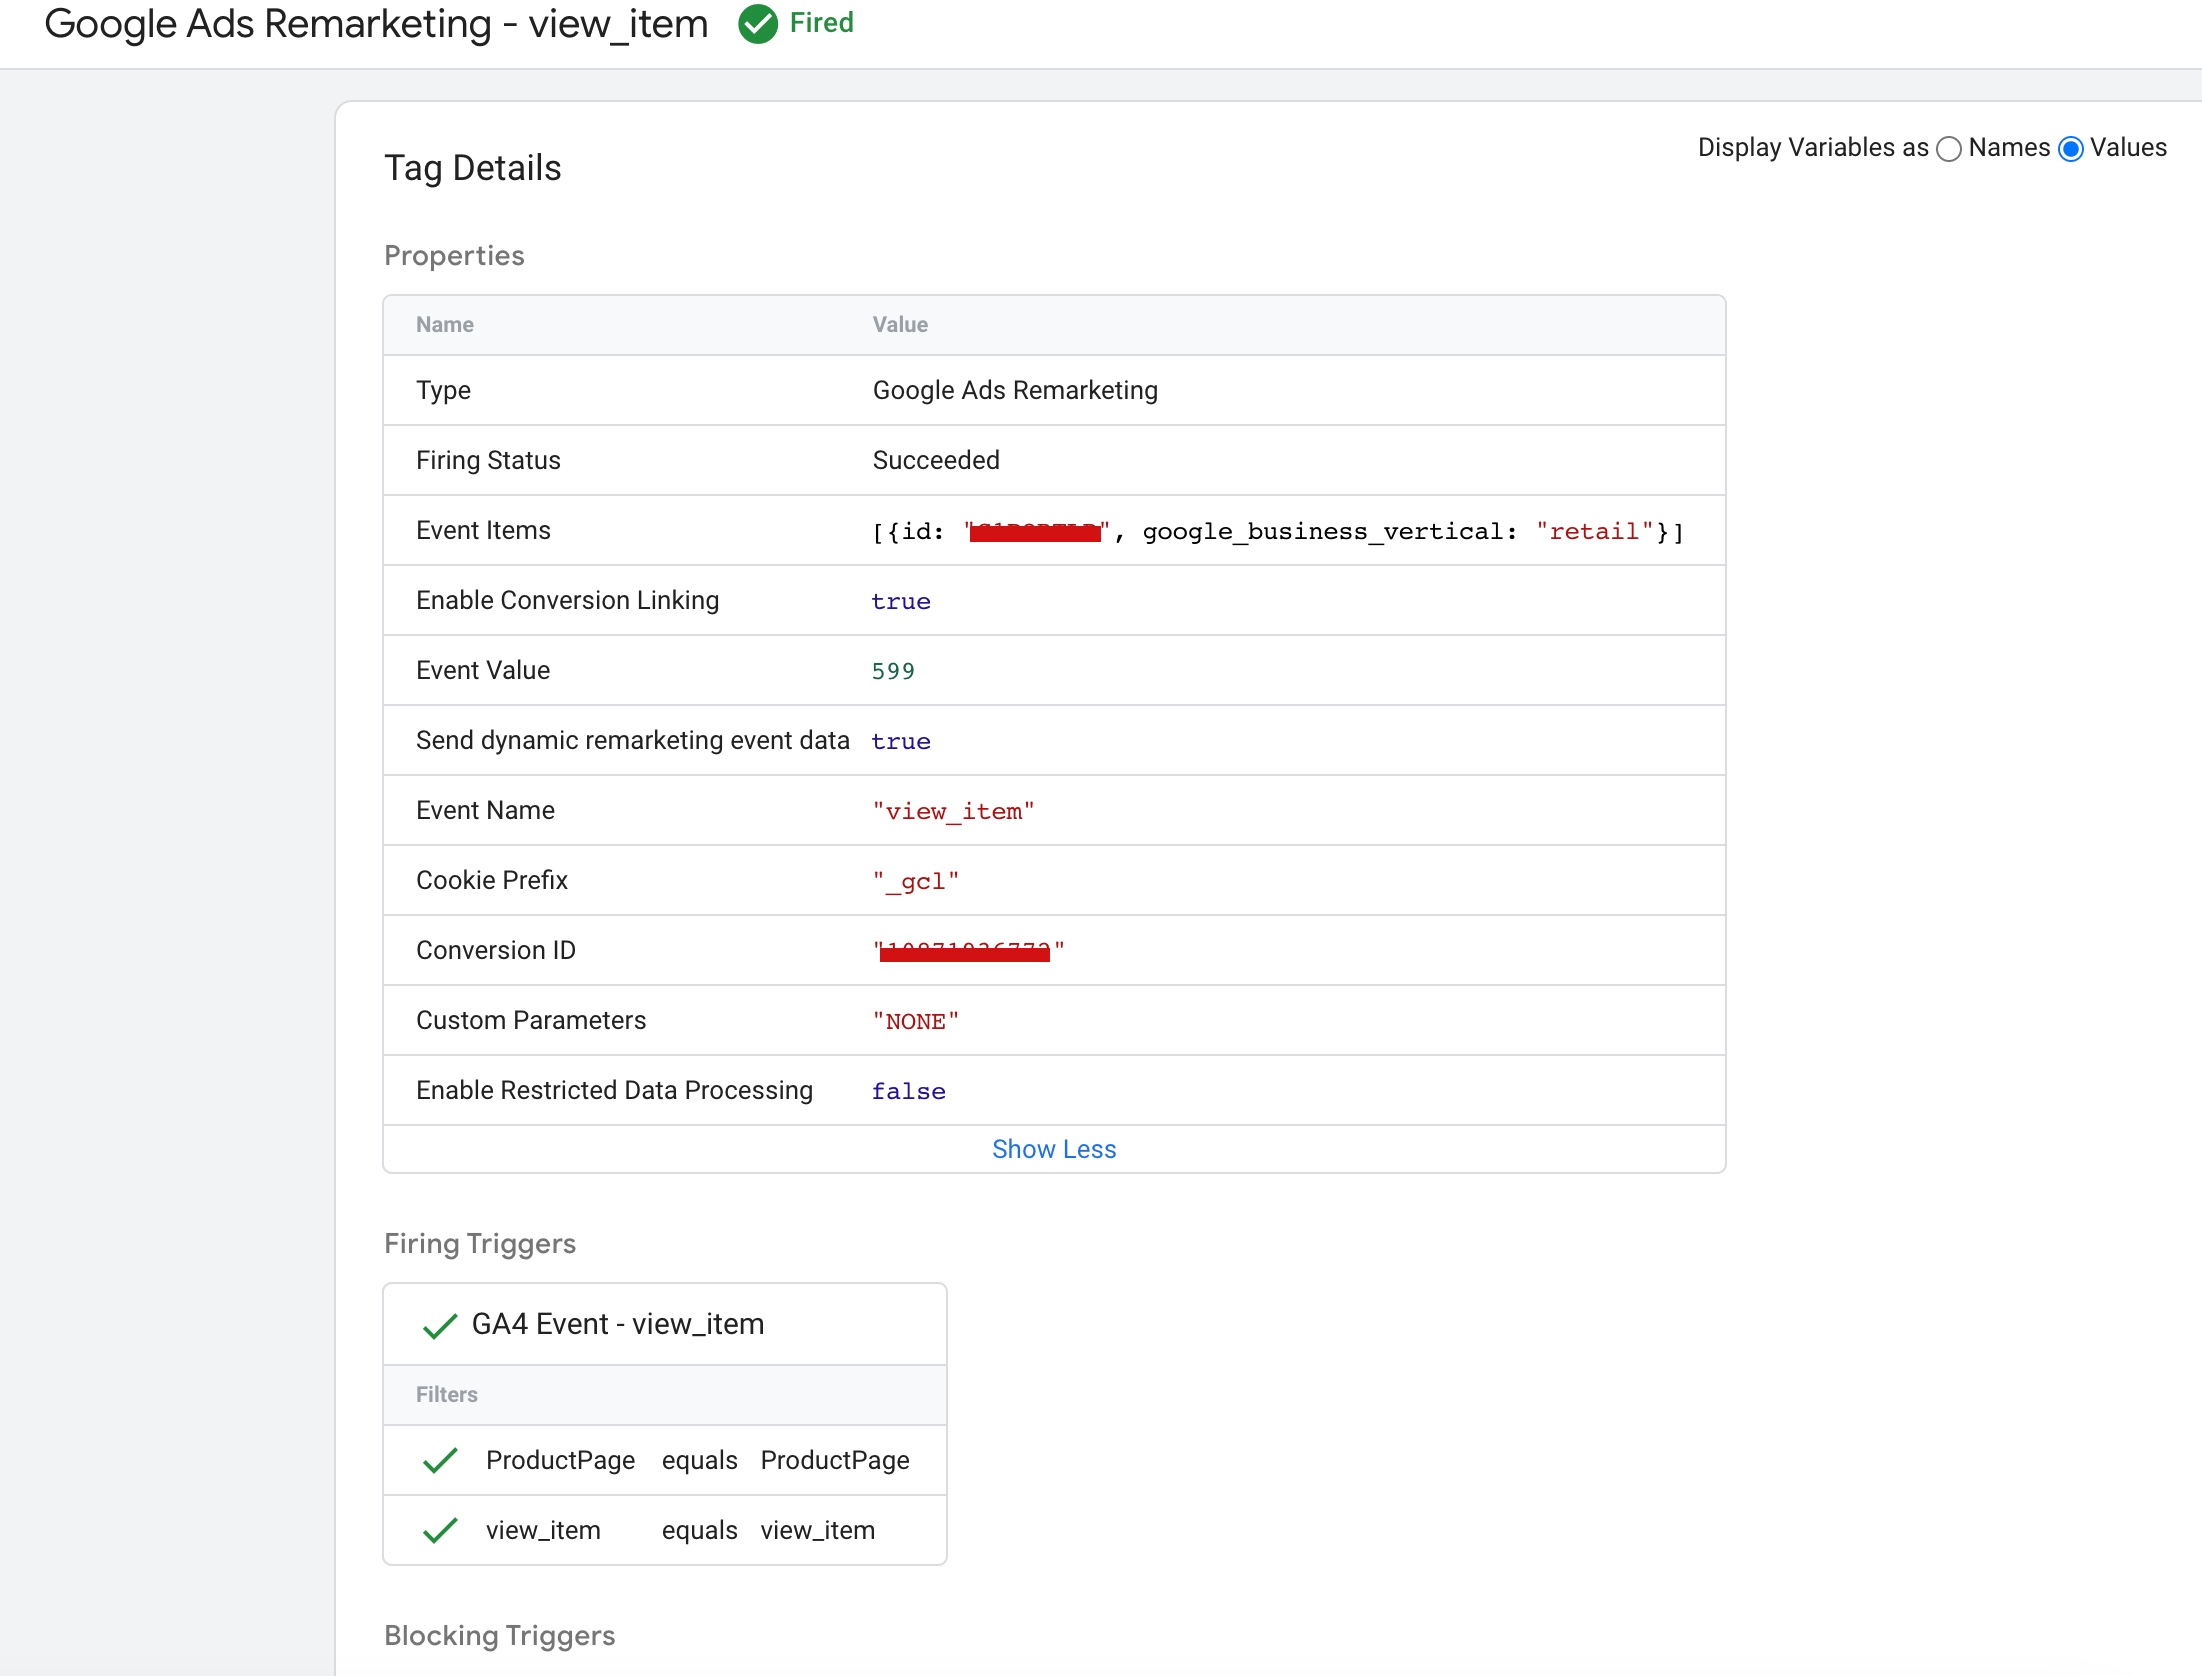
In Magento 2, the view_item event is triggered when a specific item is viewed, for example, when a product page is loaded. To send a view_item event, you can create an instance of the event manager and then dispatch the event with the relevant data, such as the viewed item’s ID or SKU.

Magento 2 Google Analytics 4 for Google Tag Manager

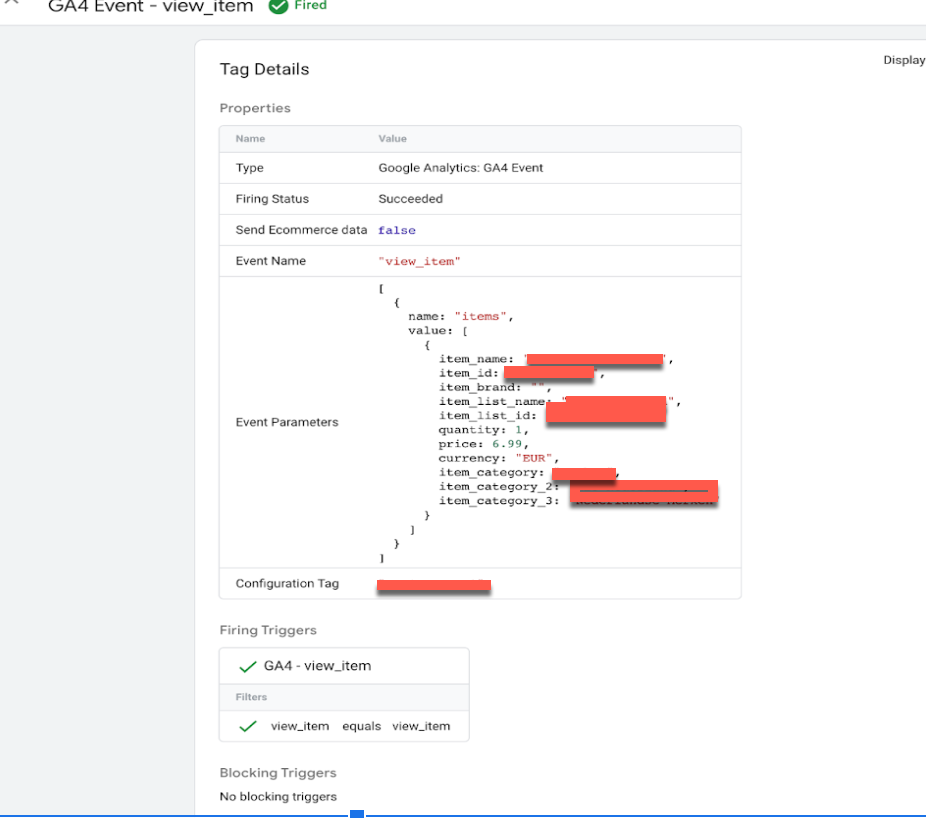
Magento 2 GA4 eCommerce Tracking via Google Tag Manager

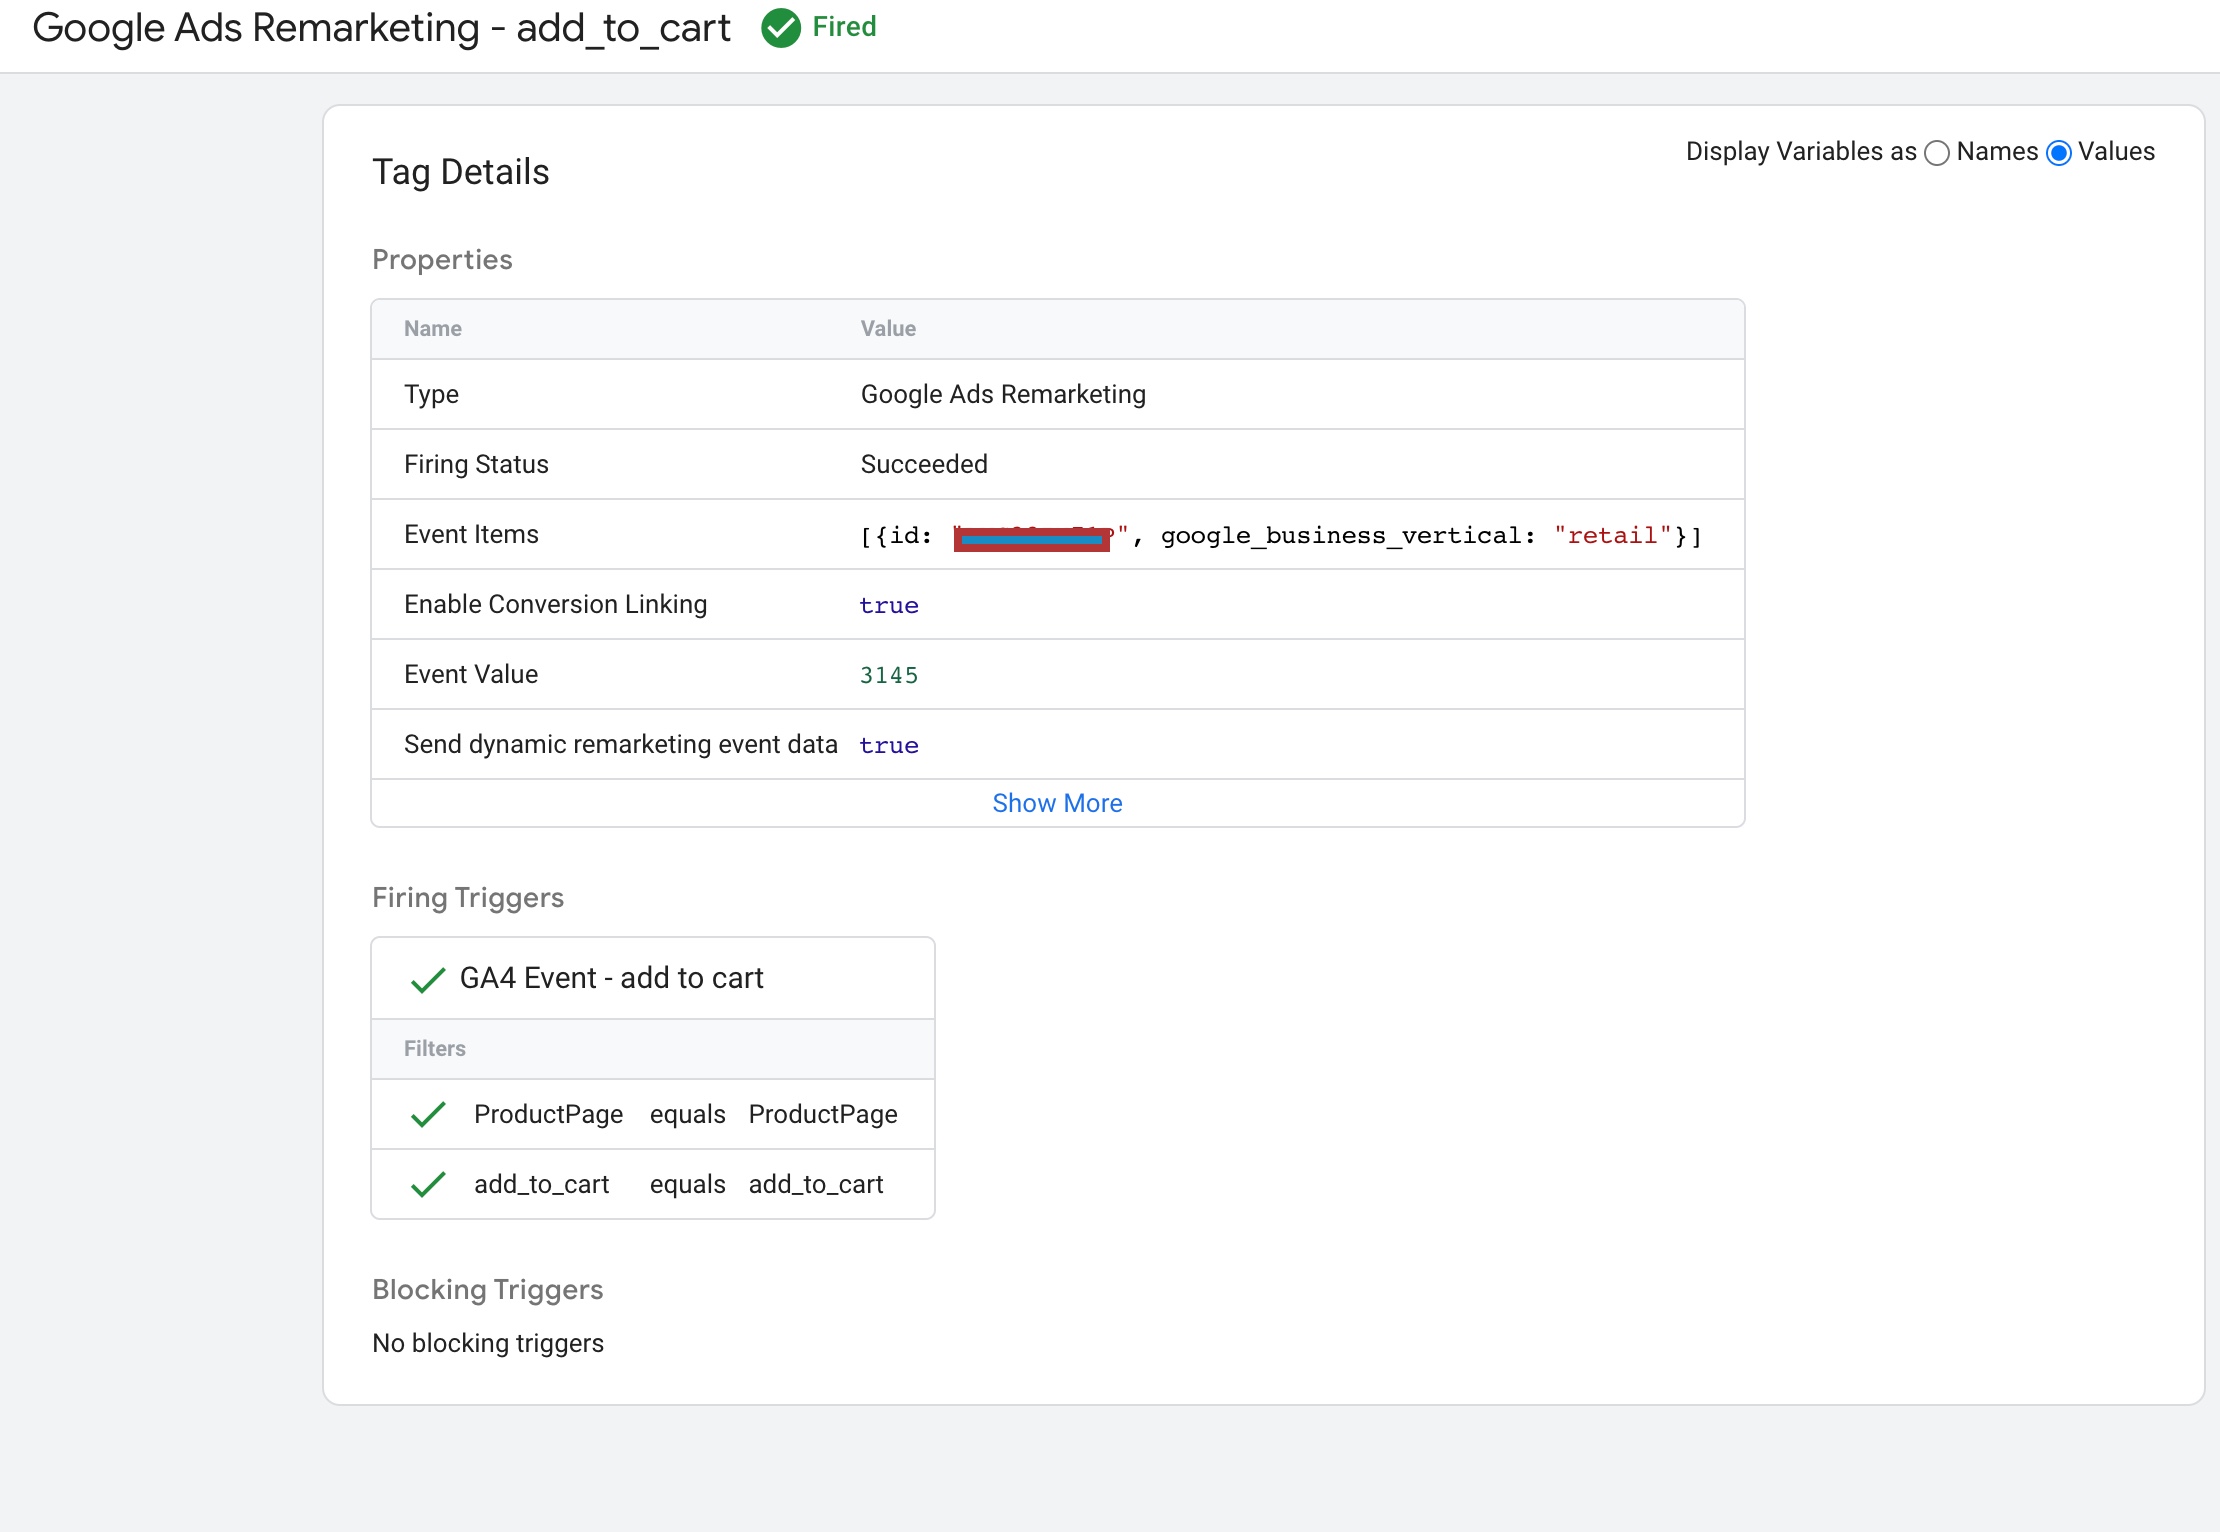
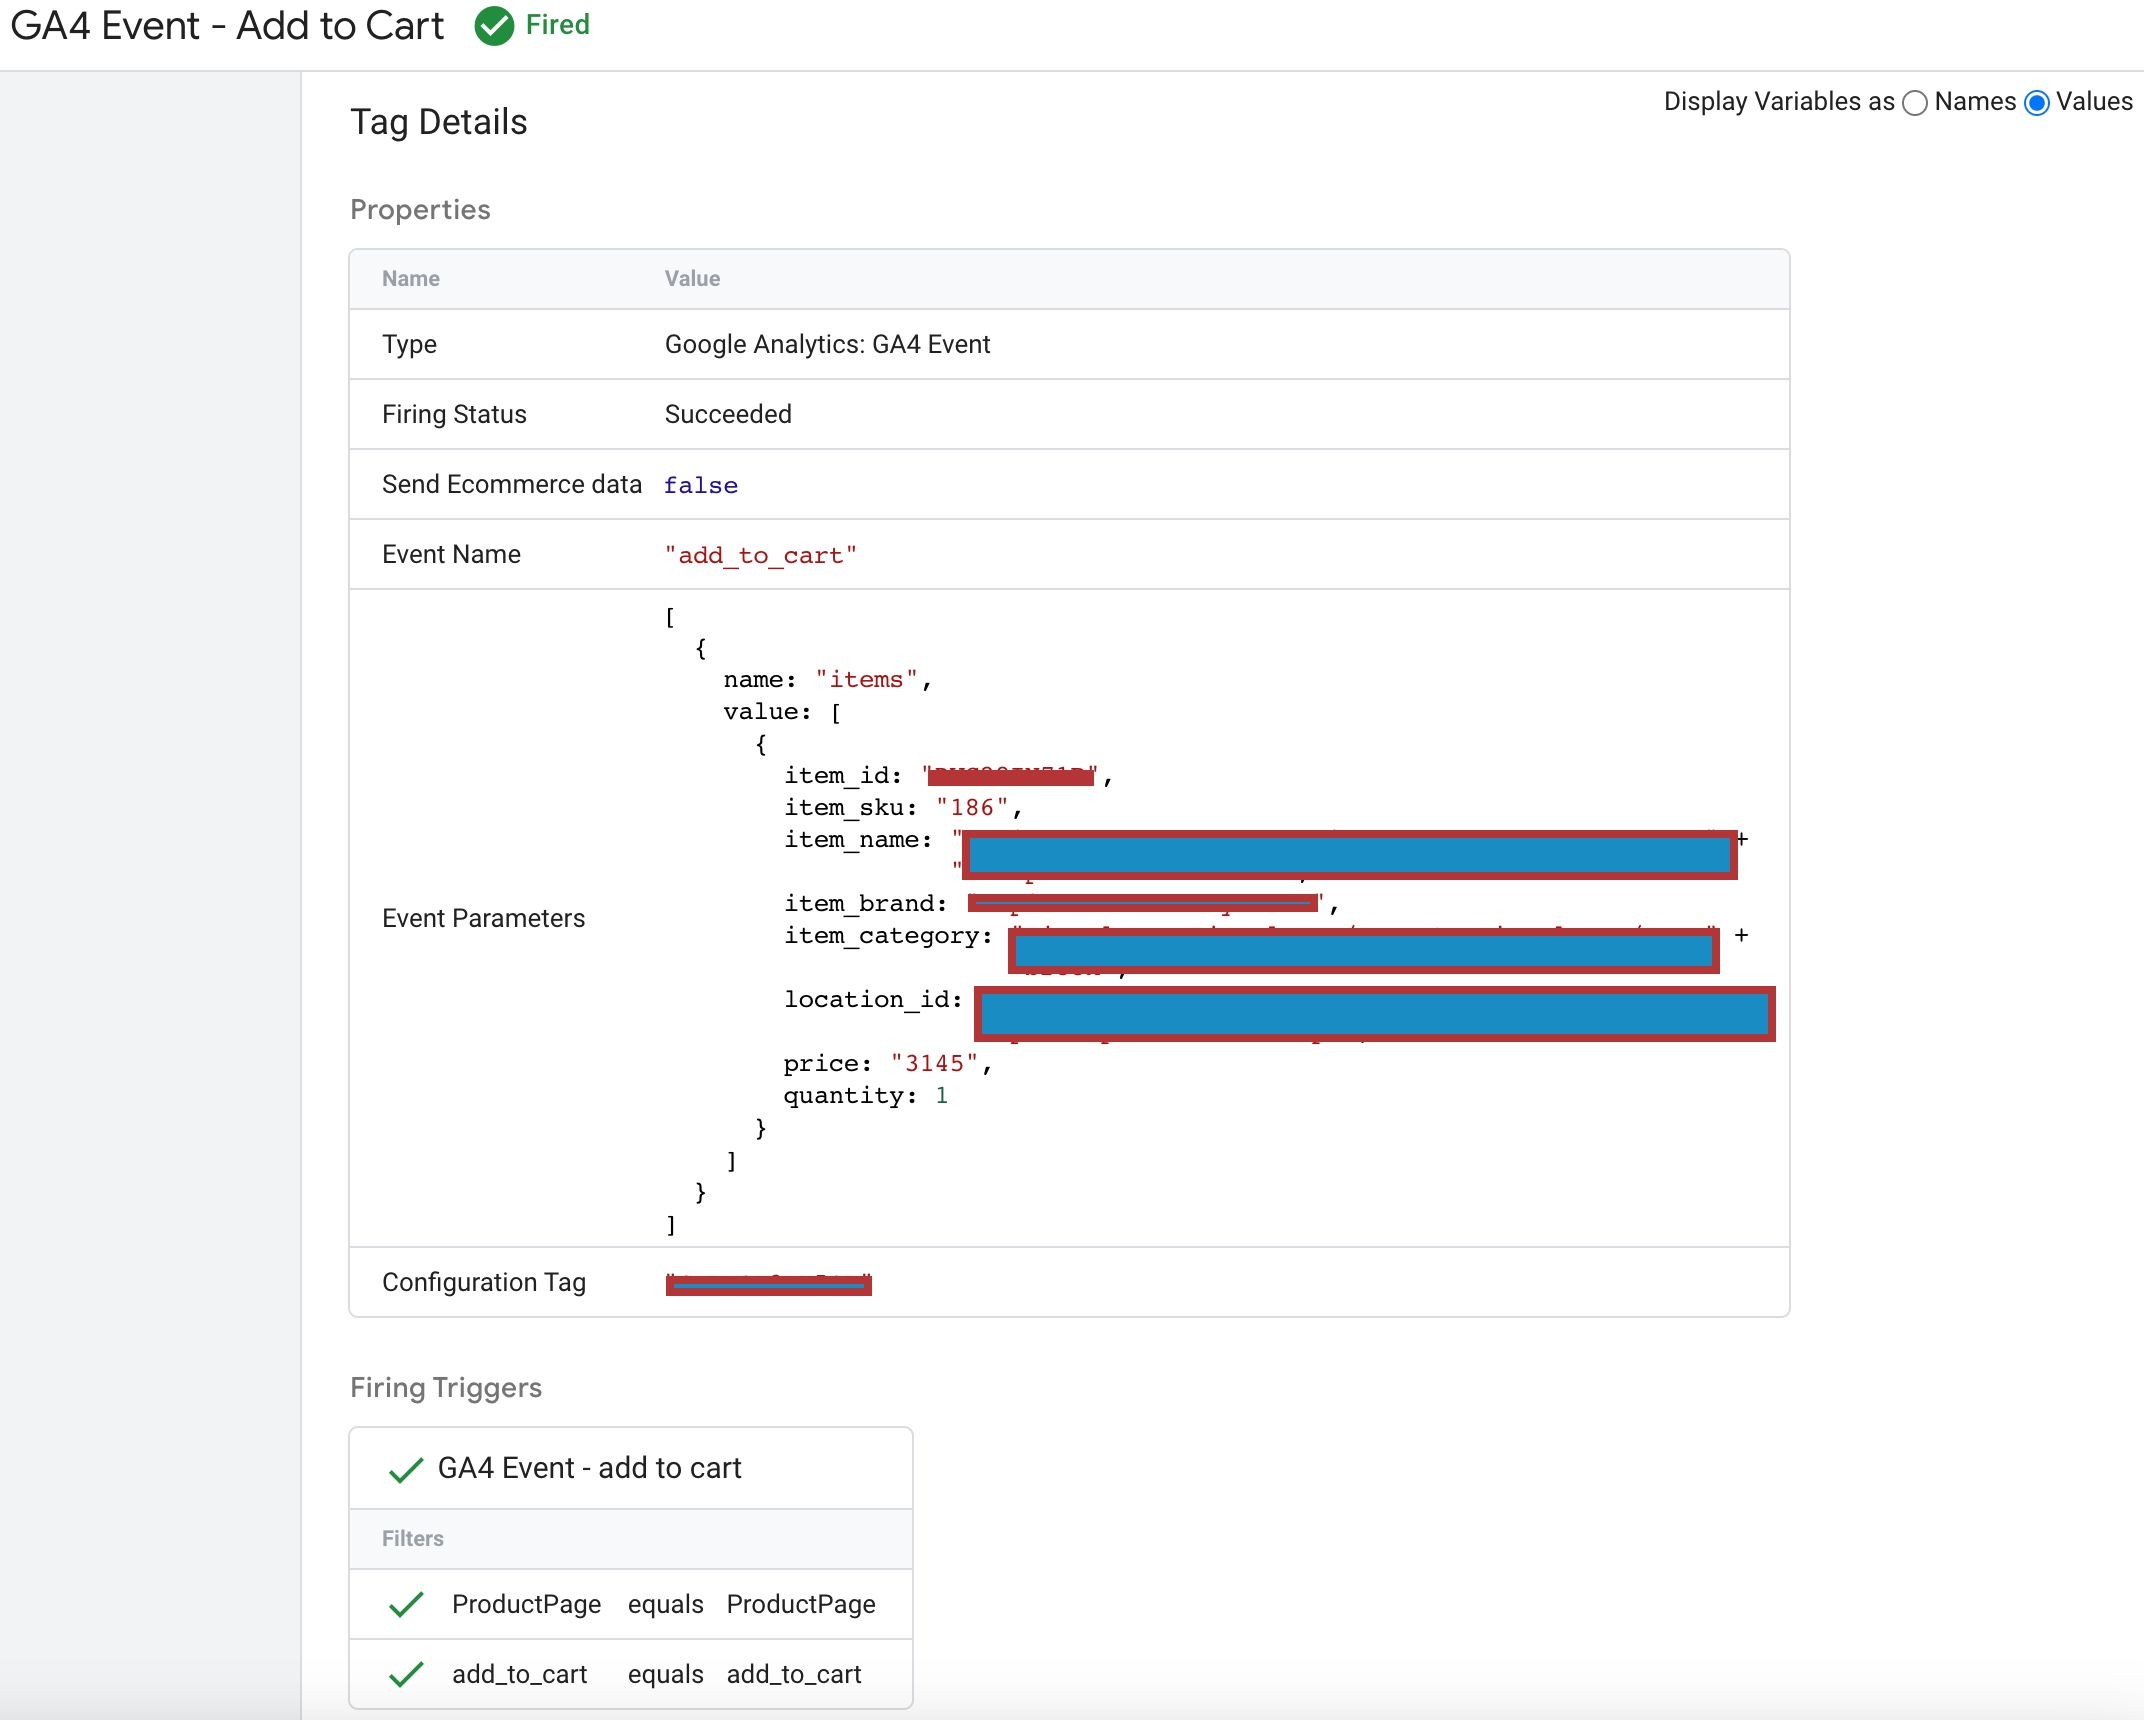
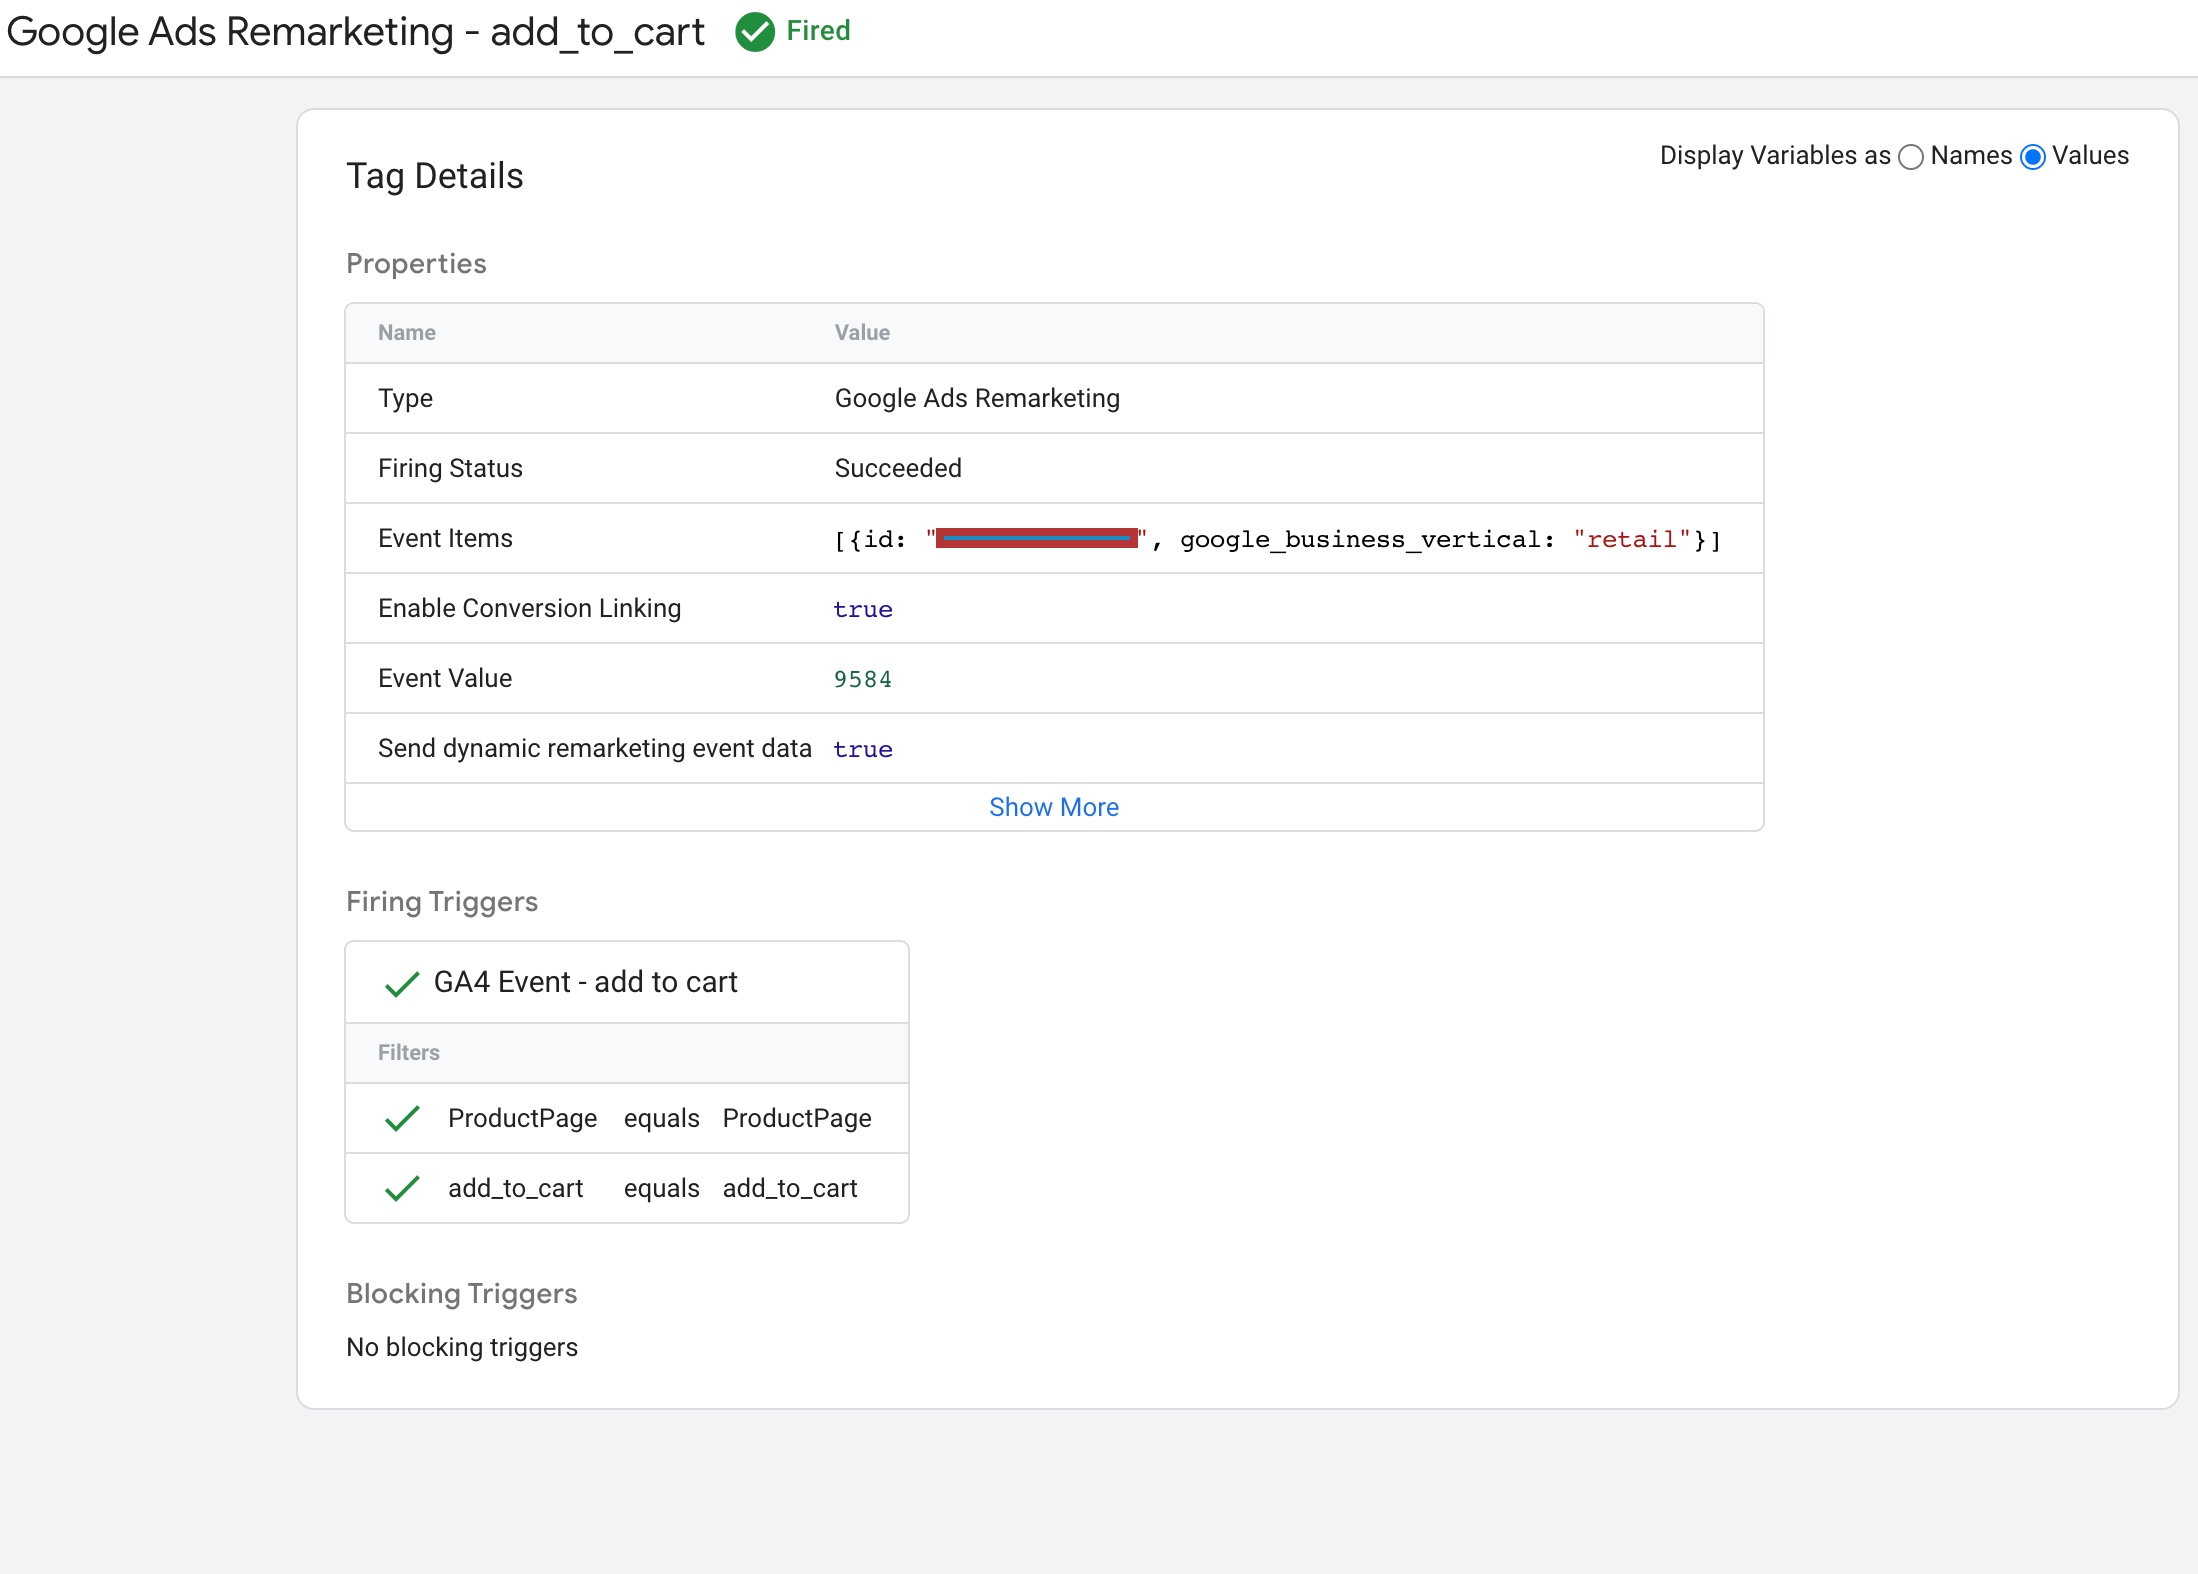
In Magento 2, the add_to_cart event is triggered when a specific item is added to the cart. To send an add_to_cart event, you can create an instance of the event manager and then dispatch the event with the relevant data, such as the added item’s ID or SKU.

Magento 2 GA4 eCommerce Tracking

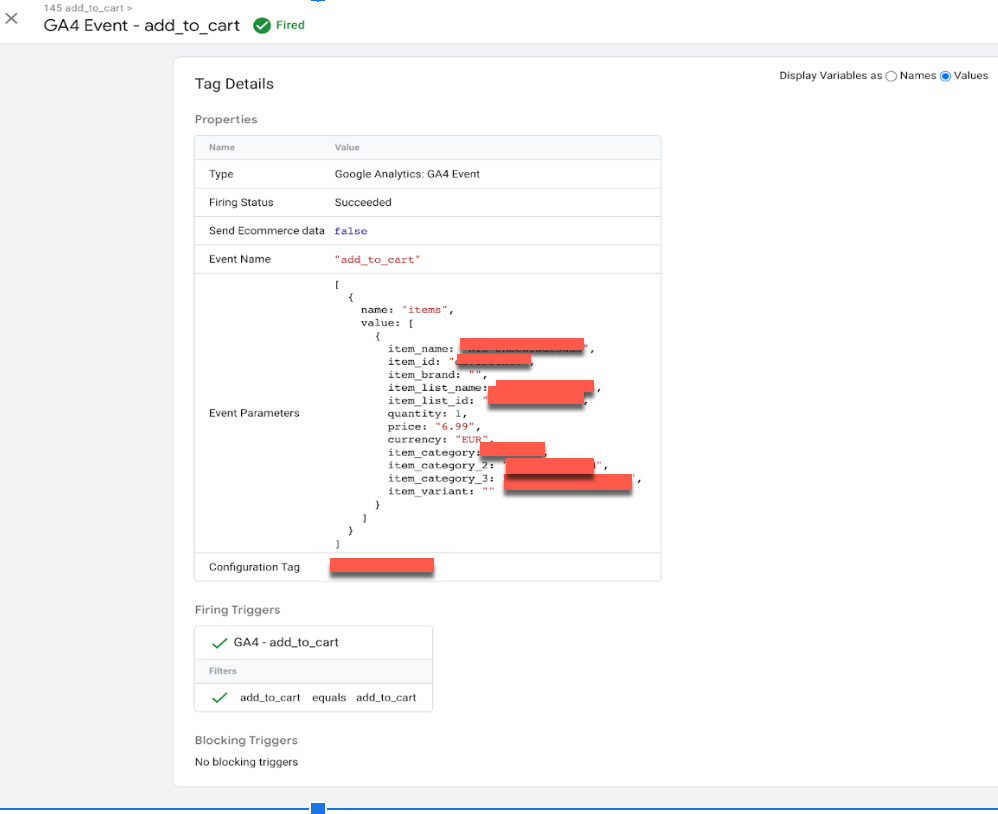
Setup Magento Google Analytics 2 (GA4) Ecommerce Tracking using Google Tag Manager

In Magento 2, the add_to_wishlist event is triggered when a customer adds a product to their wishlist. To send an add_to_wishlist event, you can create an instance of the event manager and then dispatch the event with the relevant data, such as the product ID or SKU.

magento 2 google analytics 4 (GA4) ecommerce tracking

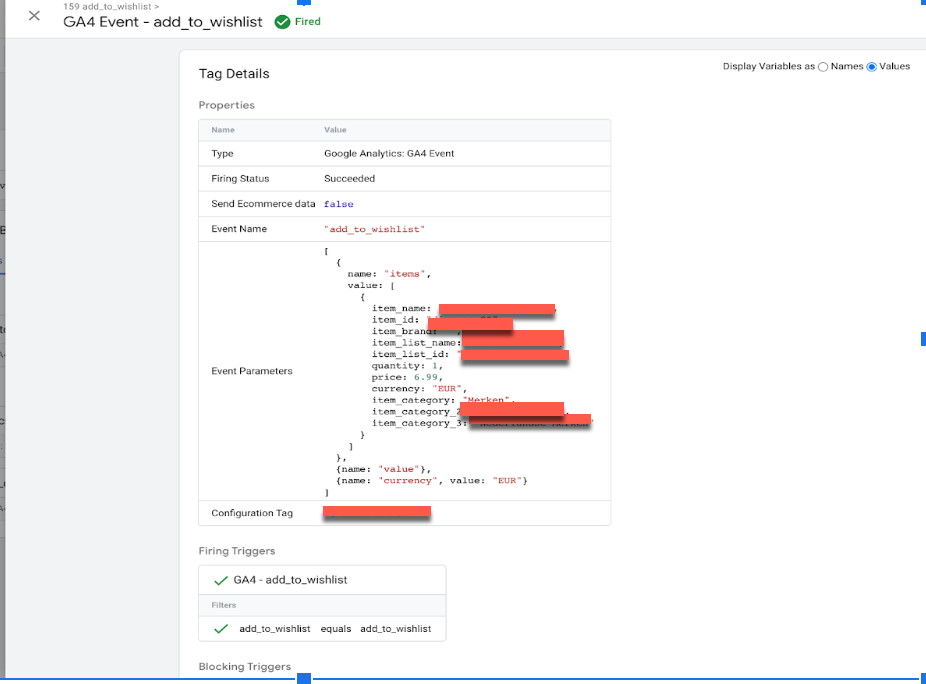
Implement Google Analytics 4 (GA4) on Magento 2 using Google Tag Manager

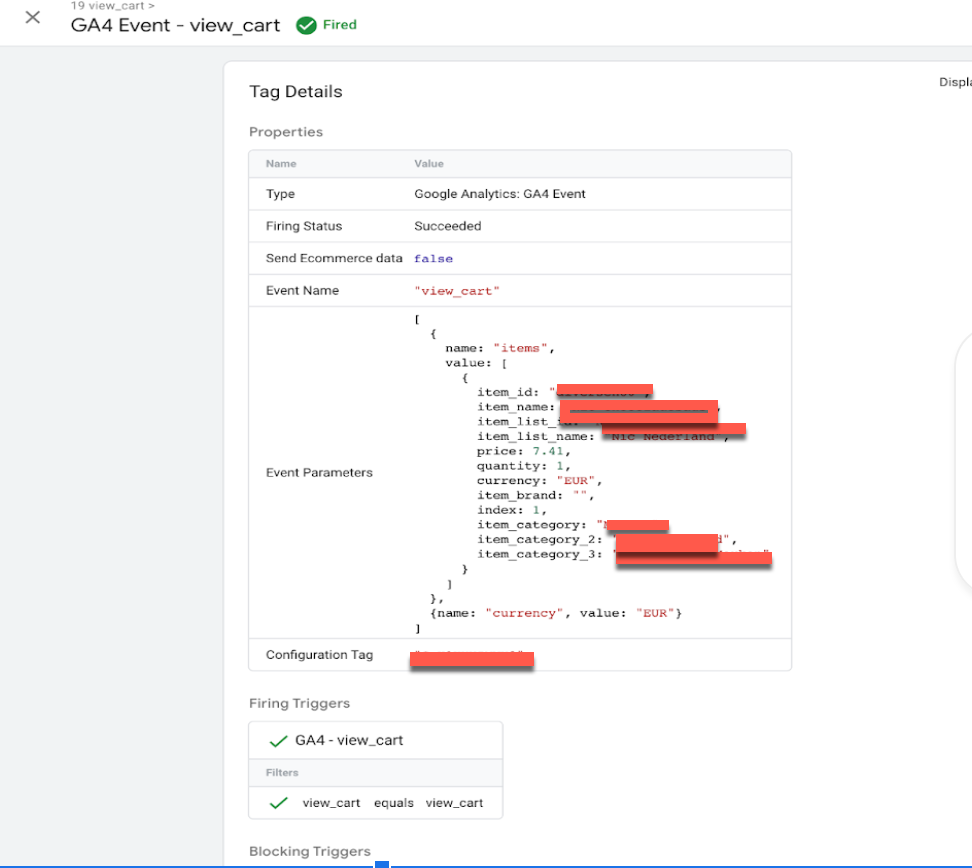
In Magento 2, the view_cart event is triggered when the shopping cart is viewed by the customer. To send a view_cart event, you can create an instance of the event manager and then dispatch the event with the relevant data, such as the contents of the cart.

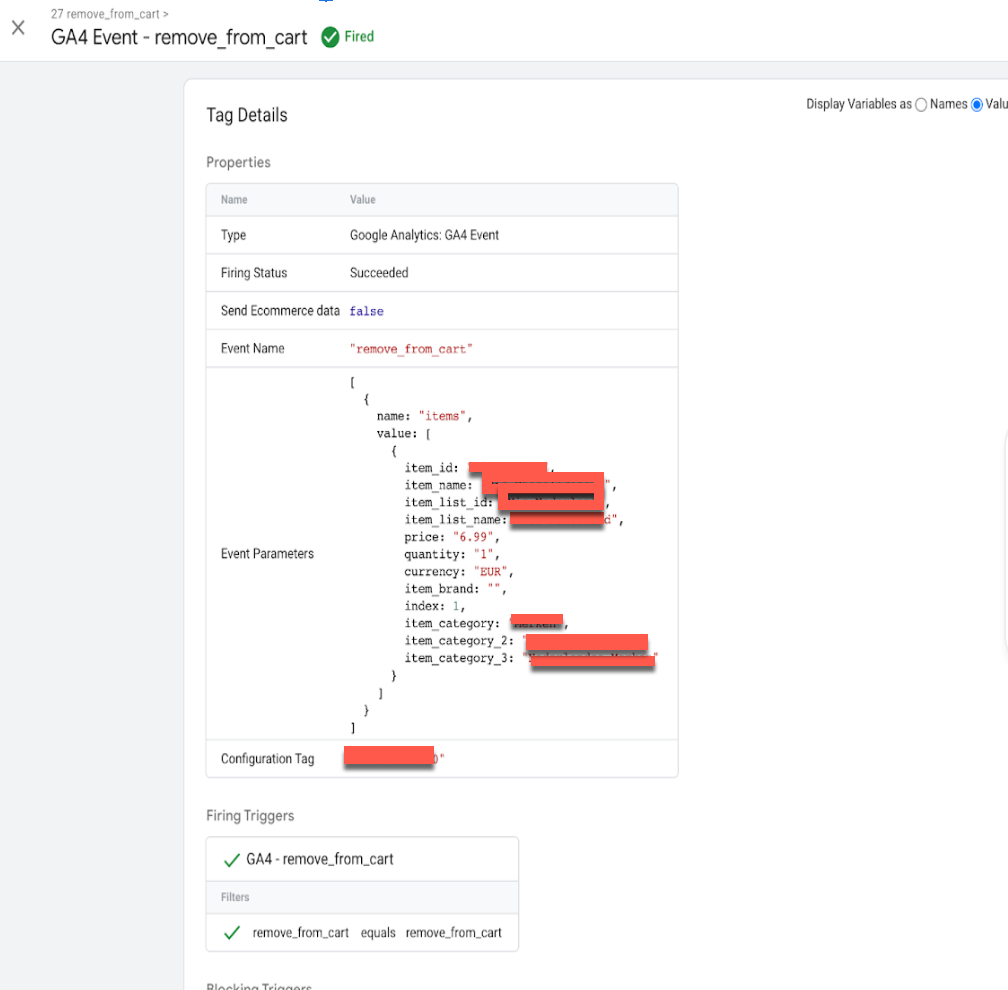
In Magento 2, the remove_from_cart event is triggered when a specific item is removed from the shopping cart. To send a remove_from_cart event, you can create an instance of the event manager and then dispatch the event with the relevant data, such as the removed item’s ID or SKU.

 GA4 Integration For Magento 2

Magento 2 Migrate from Google Universal Analytics to GA4 using Google Tag Manager

In Magento 2, the begin_checkout event is triggered when a customer begins the checkout process, for example, when they click the “Checkout” button. To send a begin_checkout event, you can create an instance of the event manager and then dispatch the event with the relevant data, such as the contents of the cart.

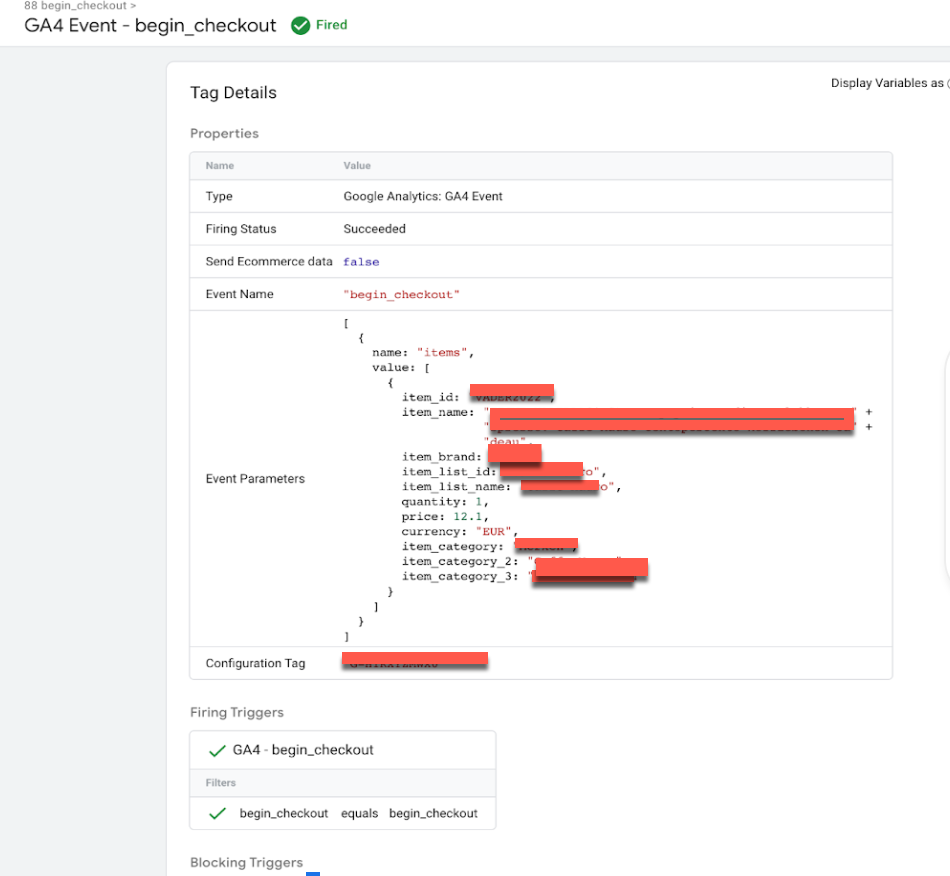
In Magento 2, the add_shipping_info event is triggered when a customer provides their shipping information during the checkout process. To send an add_shipping_info event, you can create an instance of the event manager and then dispatch the event with the relevant data, such as the customer’s shipping address and shipping method.

Magento 2 Google Analytics 4 (GA4) Enhanced eCommerce

Magento 2 google analytics 4 (GA4) eCommerce Tracking using Google Tag Manager

In Magento 2, the add_payment_info event is triggered when a customer provides their payment information during the checkout process. To send an add_payment_info event, you can create an instance of the event manager and then dispatch the event with the relevant data, such as the customer’s payment method and payment details.

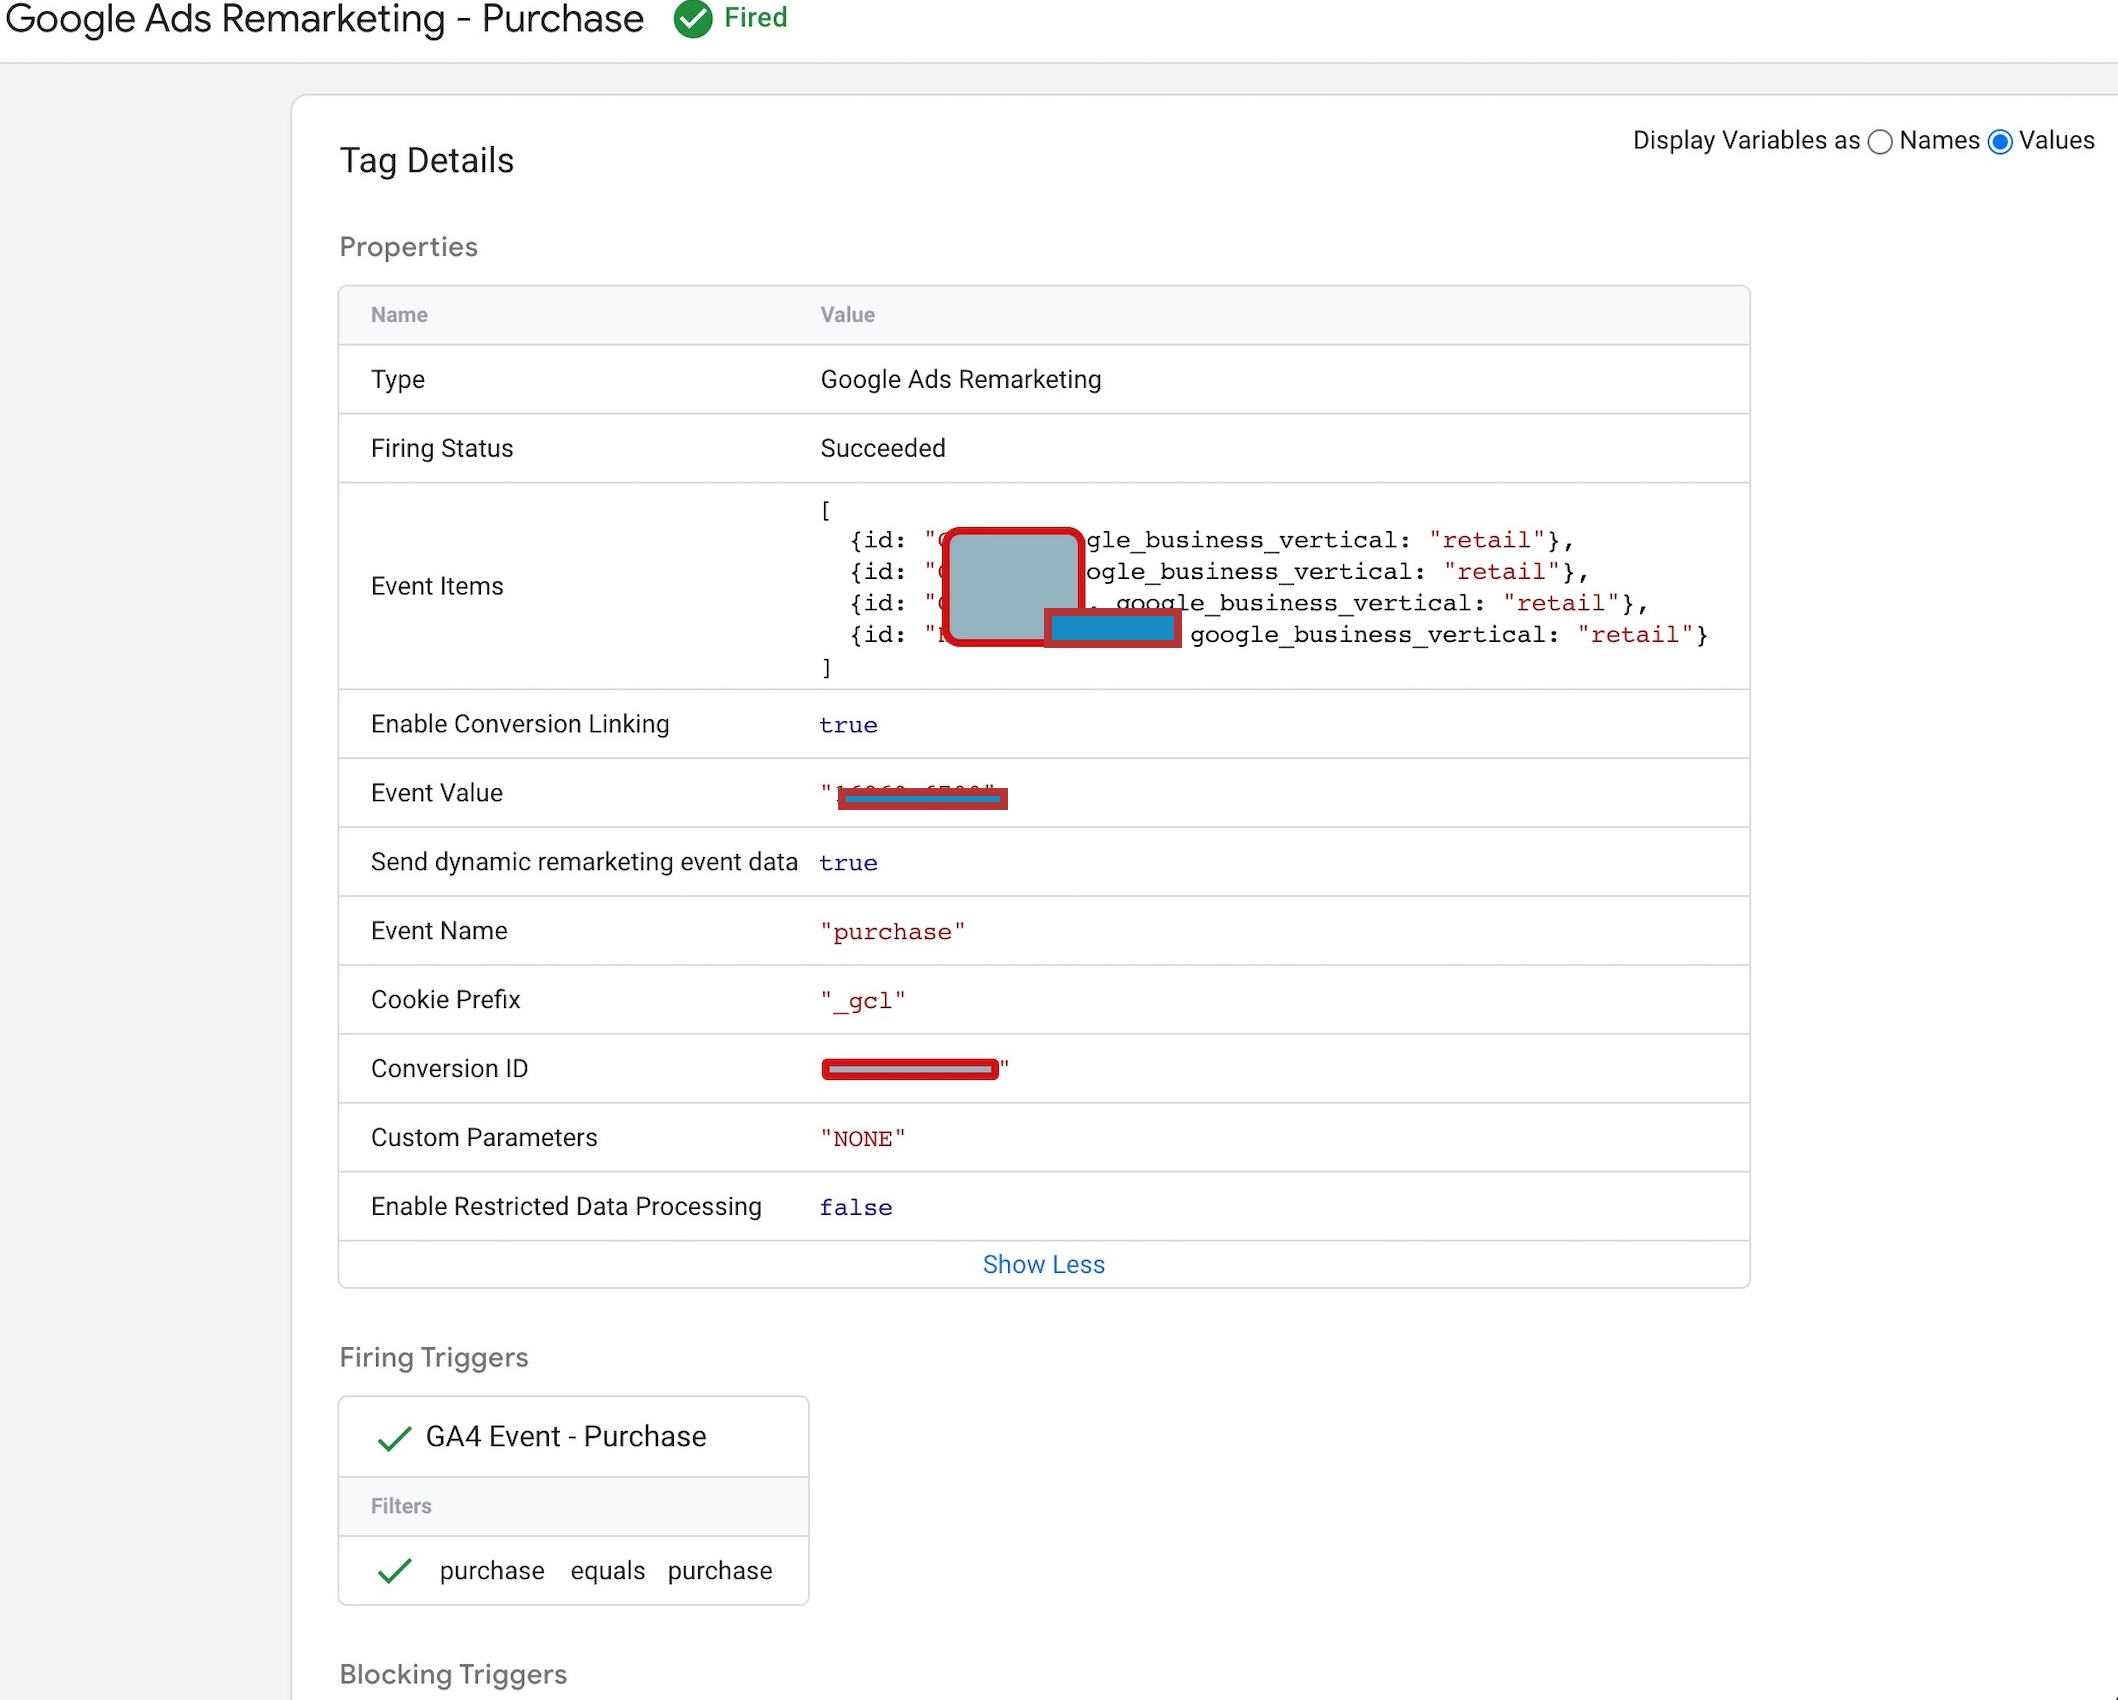
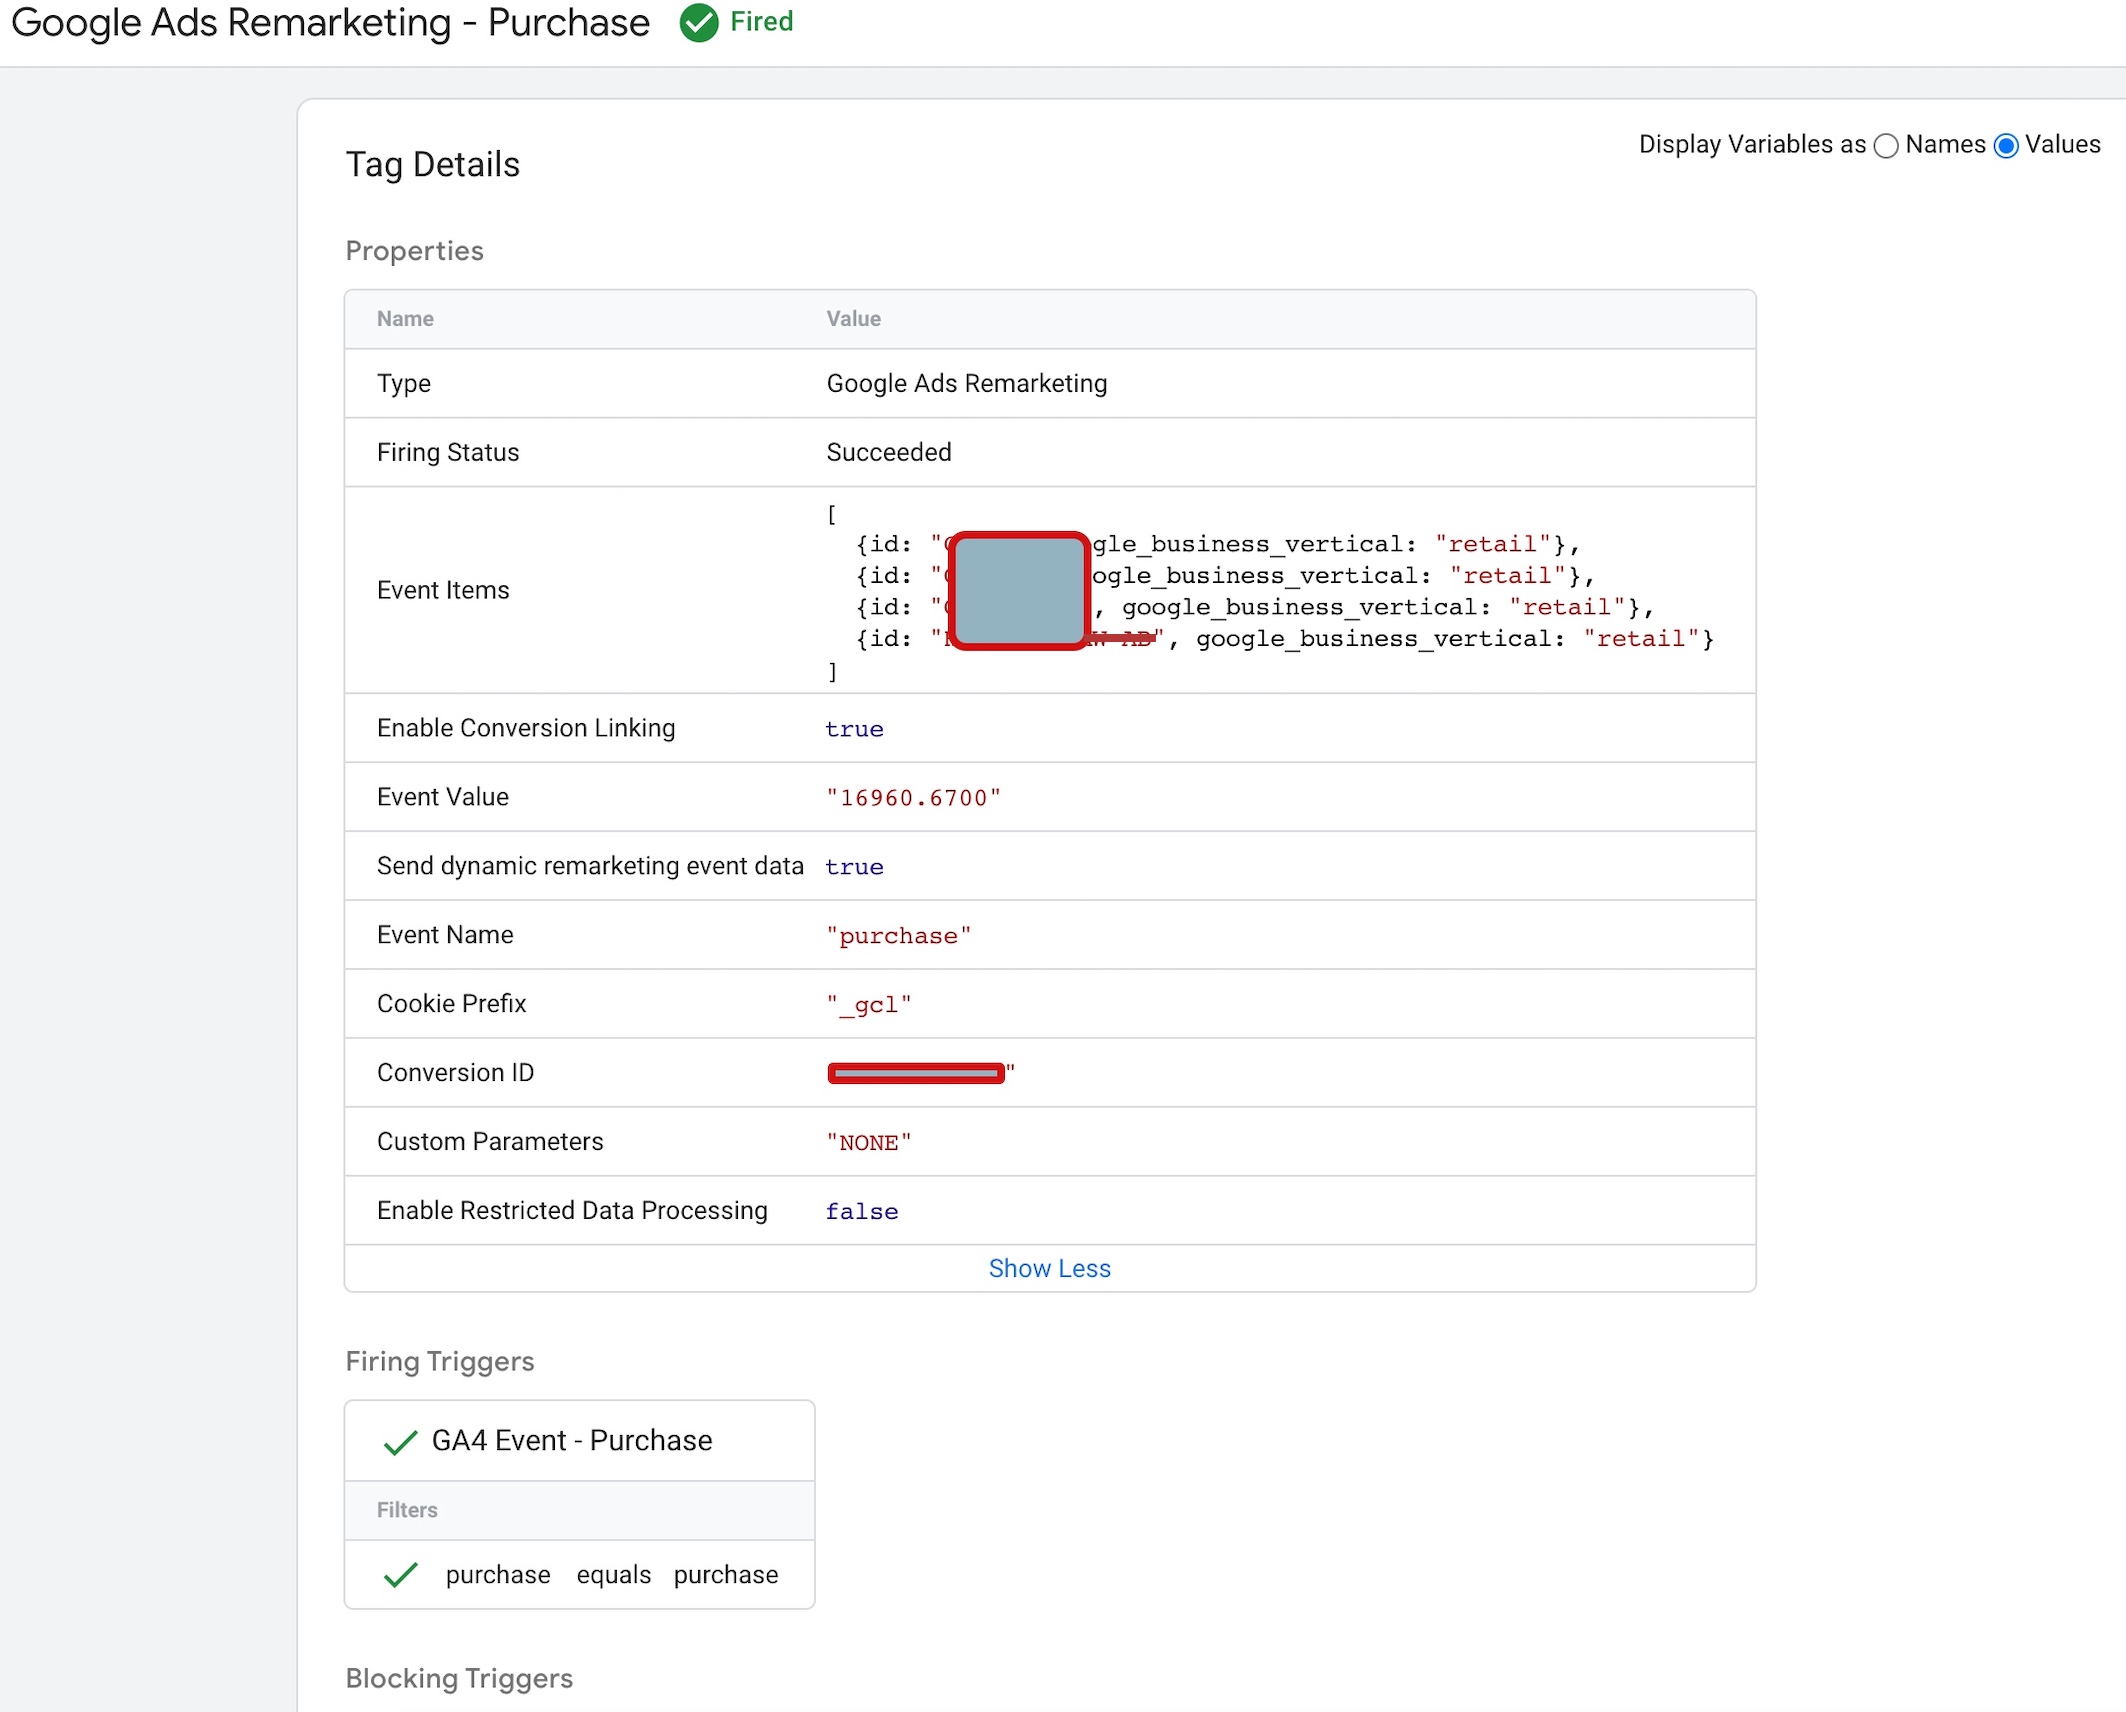
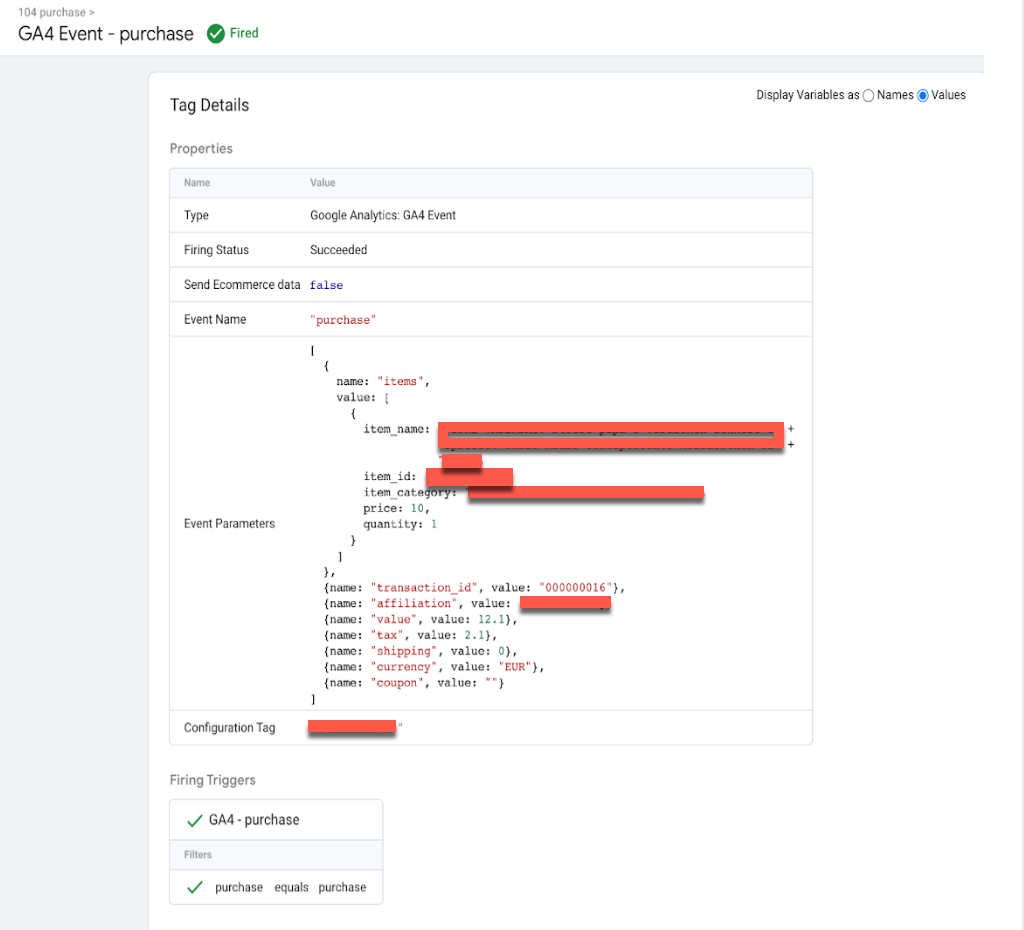
In Magento 2, the purchase event is triggered when a customer completes a purchase, for example, when the order is placed and payment is processed. To send a purchase event, you can create an instance of the event manager and then dispatch the event with the relevant data, such as the order ID and the purchased items.

Google Analytics 4 in Magento 2

GA4 Integration For Magento 2 Enhanced Ecommerce Tracking using Google Tag Manager

Warning: If you don’t know about javascript or don’t have developing knowledge then don’t try to Magento 2 GA4 eCommerce Tracking using Google Tag Manager that can break your site, Cart and other functionality 

Disclaimer: Google tag manager belongs to Google property 

For Contact: mappchero@gmail.com

I am available for Hire on Freelancer: Freelancer.com

I am available for Hire on Upwork: Upwork.com

I am available for Hire on Peopleperhour: Peopleperhour.com

I am available for Hire on Guru: Guru.com