nopCommerce Google Analytic (GA4) Enhanced Ecommerce tracking

Standard

nopCommerce Google Analytic (GA4) Enhanced Ecommerce Tracking using Google Tag Manager

Google Analytics 4 (GA4) ecommerce tracking in nopCommerce allows you to track important ecommerce data such as product impressions, product clicks, add to cart events, and purchase transactions. This data can be used to gain insights into customer behavior and purchase patterns, which can help you optimize your ecommerce strategy and improve the user experience on your website.

nopCommerce is an open-source ecommerce platform that allows you to track ecommerce data in Google Analytics 4 (GA4) using enhanced ecommerce tracking. To set up GA4 enhanced ecommerce tracking in nopCommerce, you will need to:

  1. Create a GA4 property in your Google Analytics account and get the tracking code.

2. Install and configure the GA4 tracking code with data layer in your nopCommerce site.

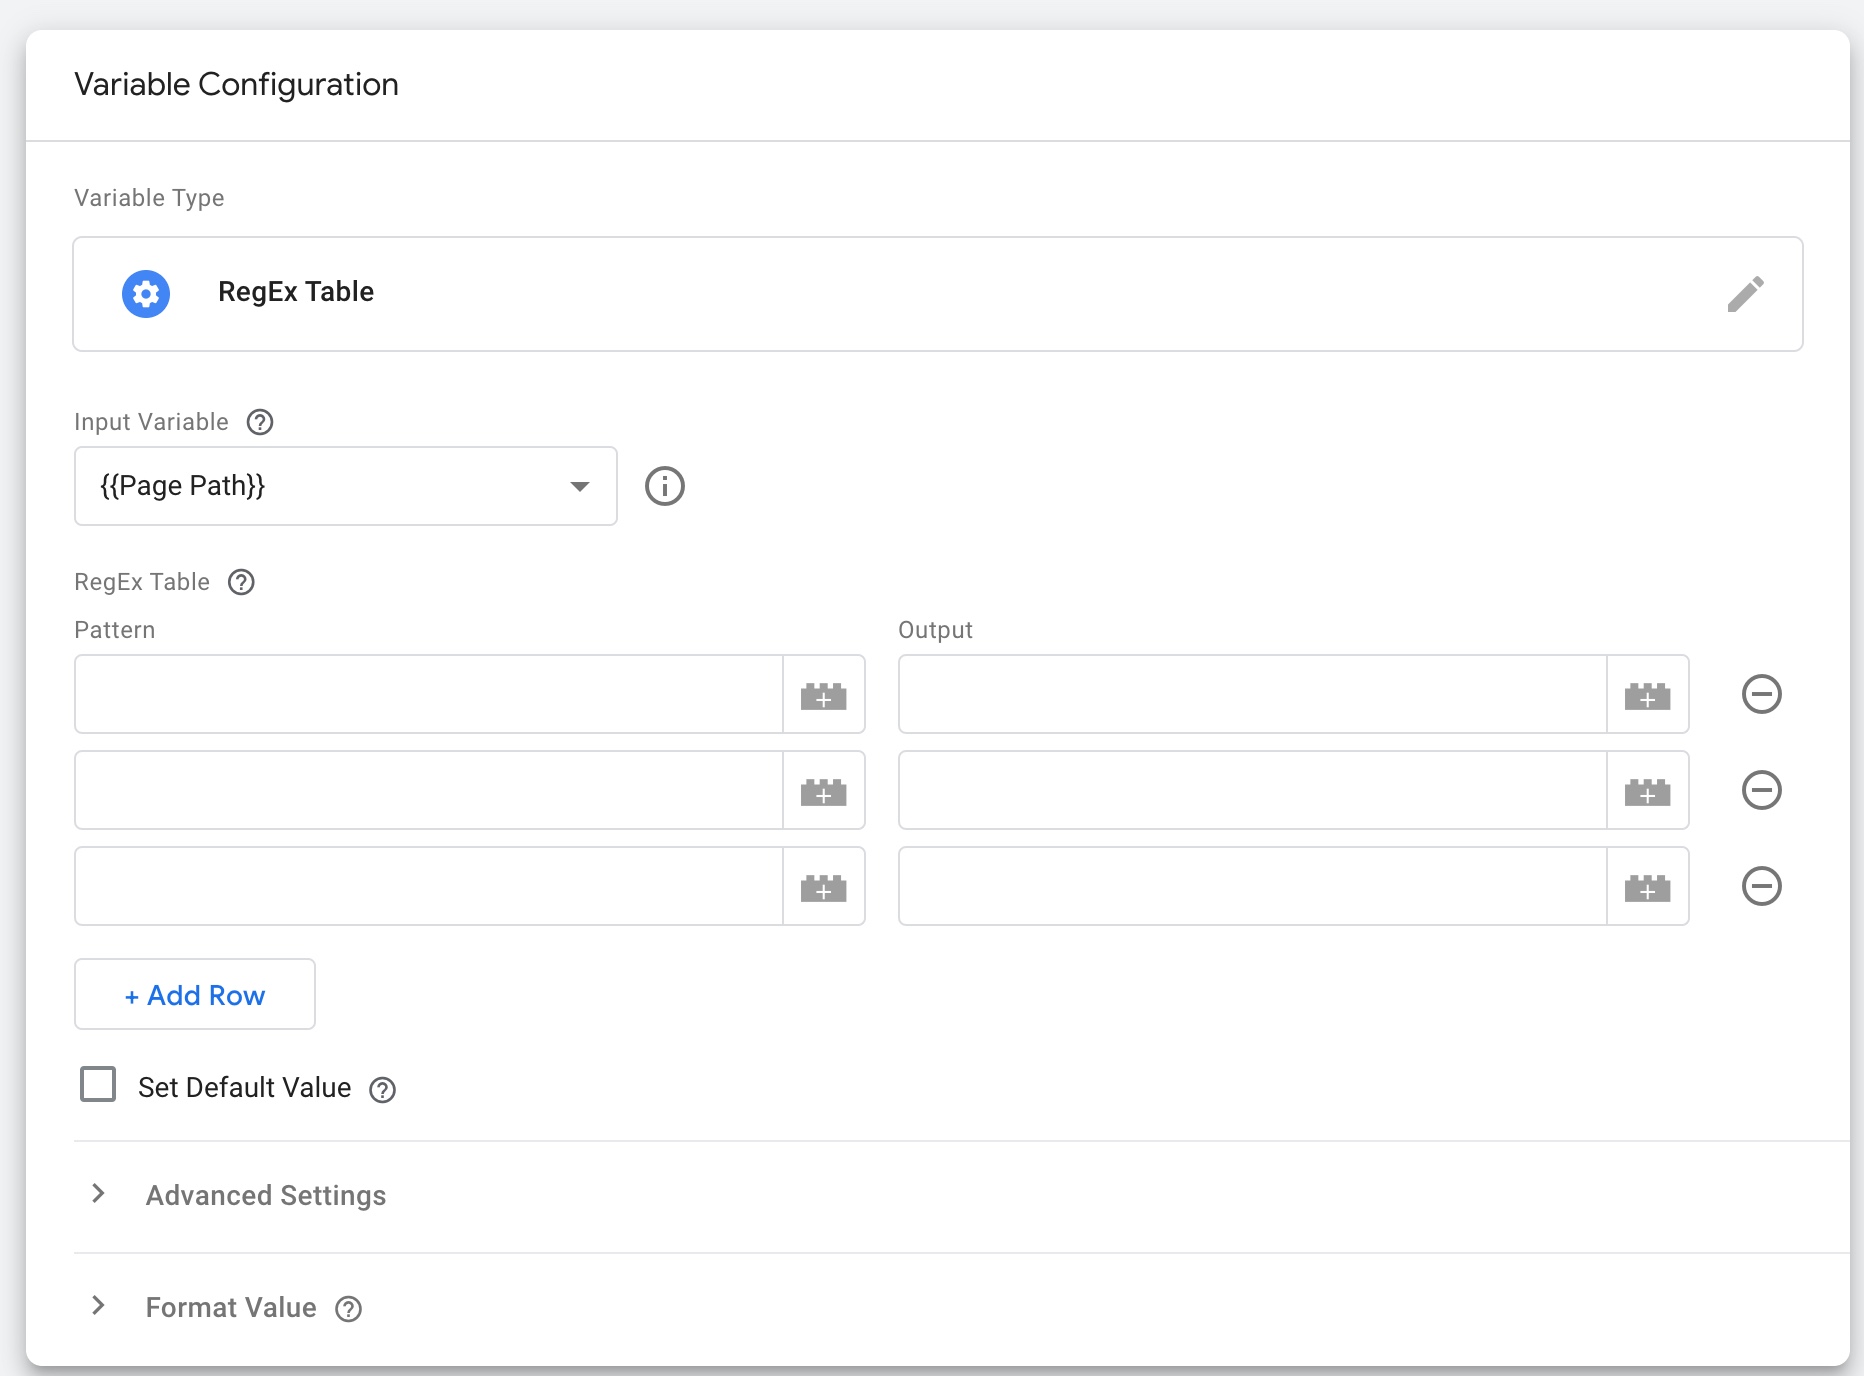
3. Create a data layer object that contains the ecommerce data, including information about products, transactions, and user behavior.

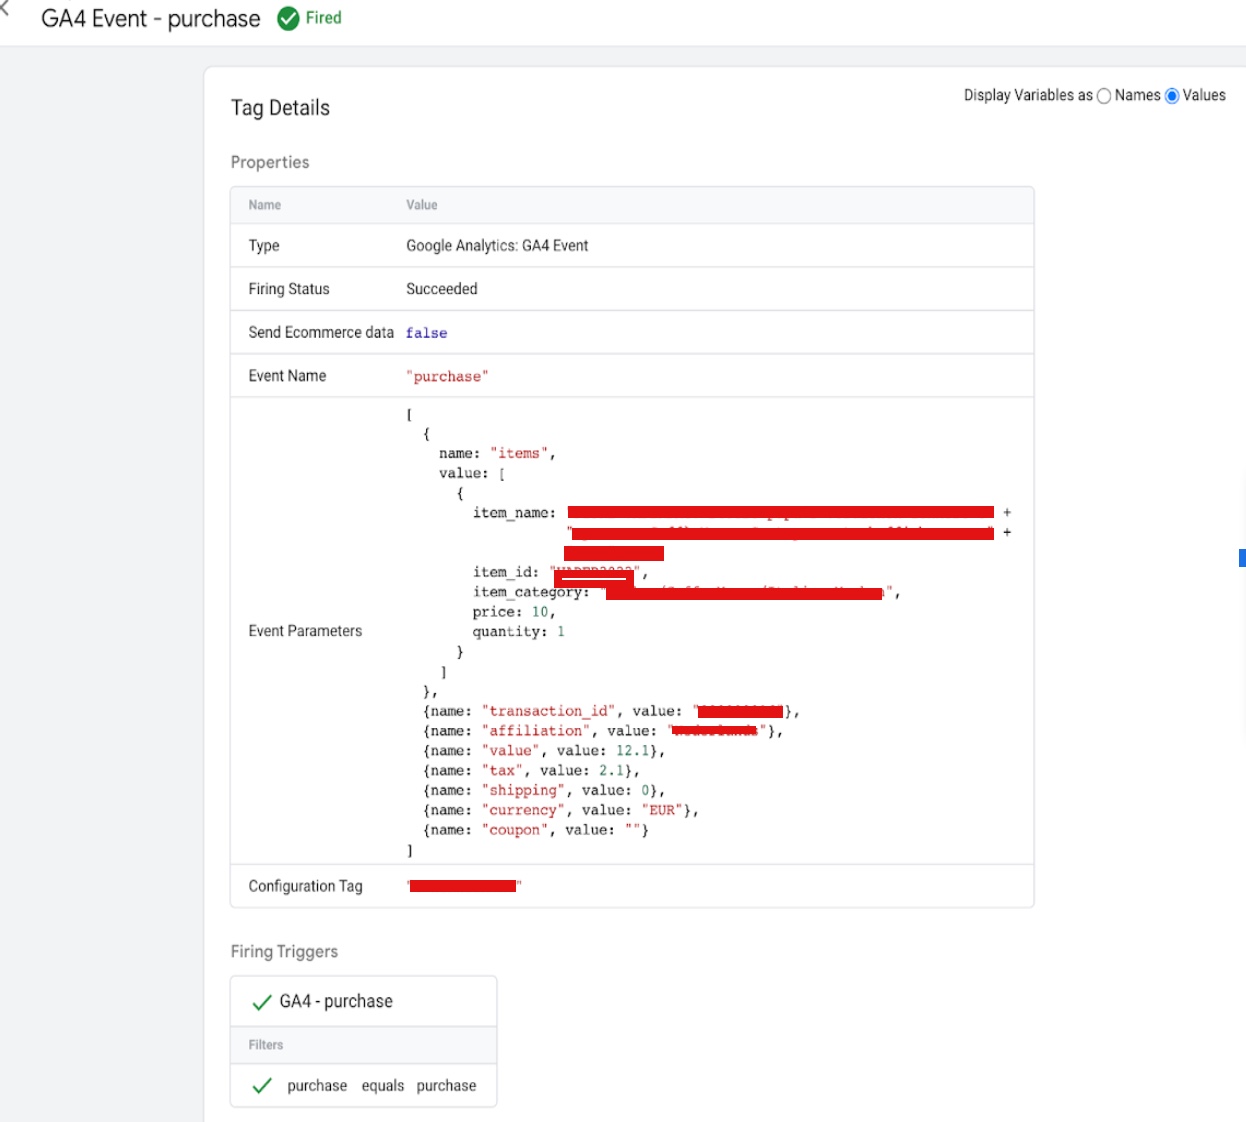
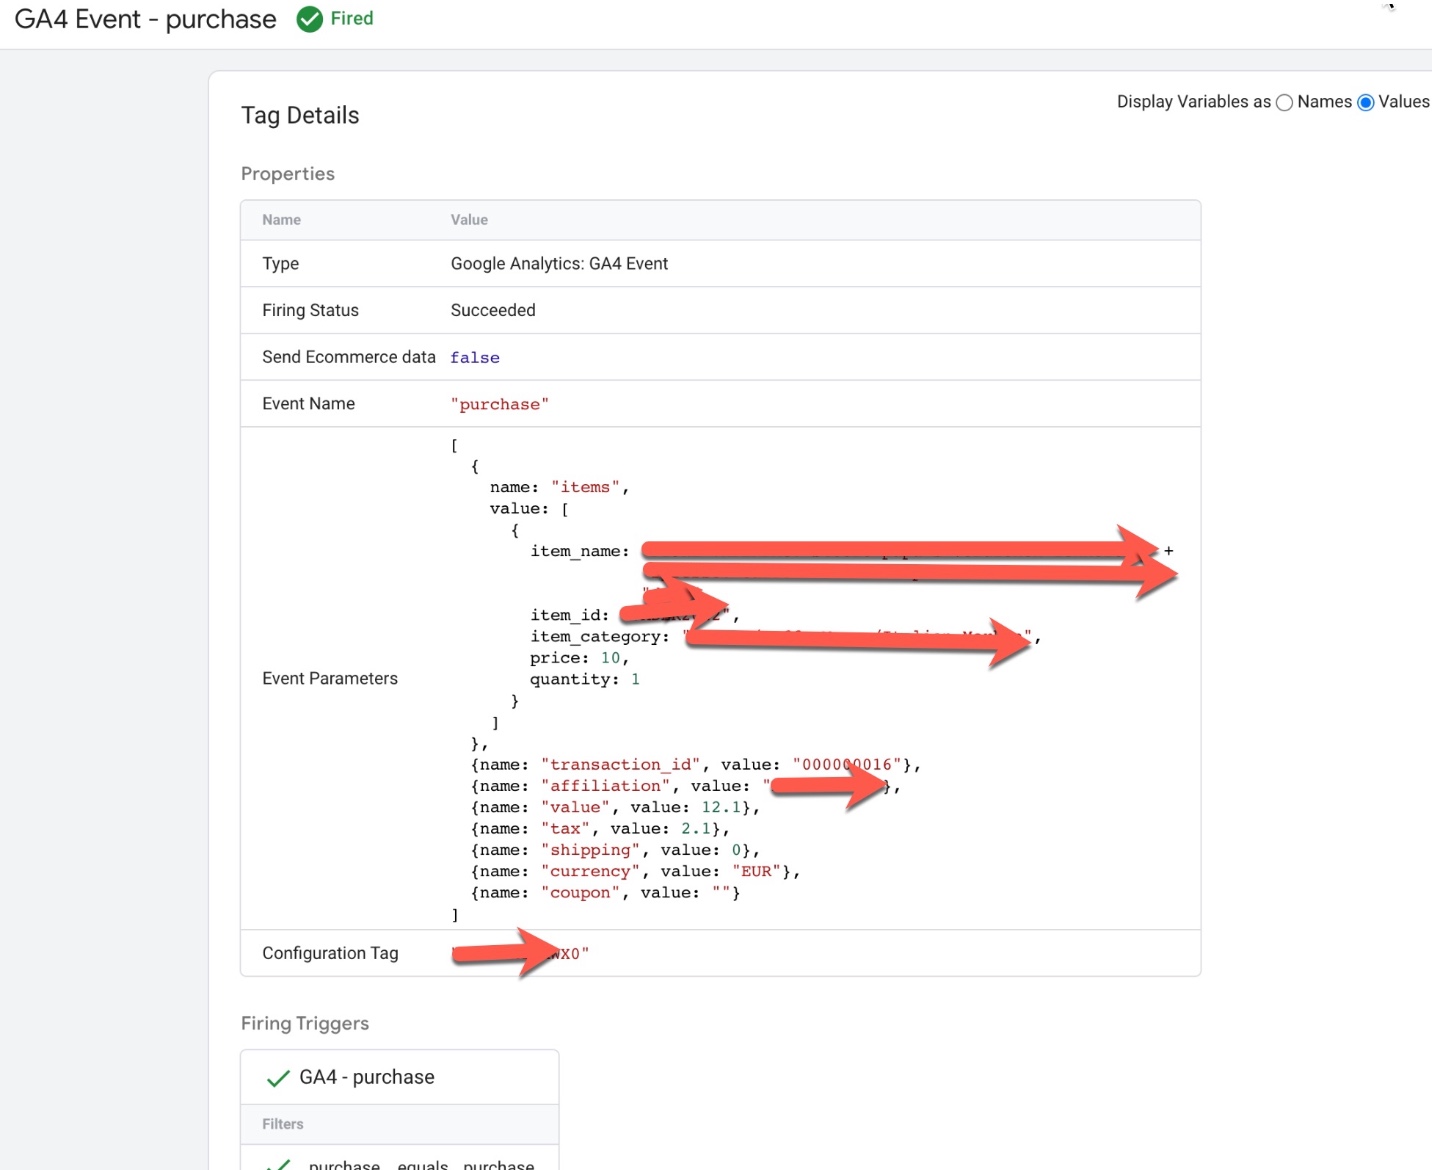
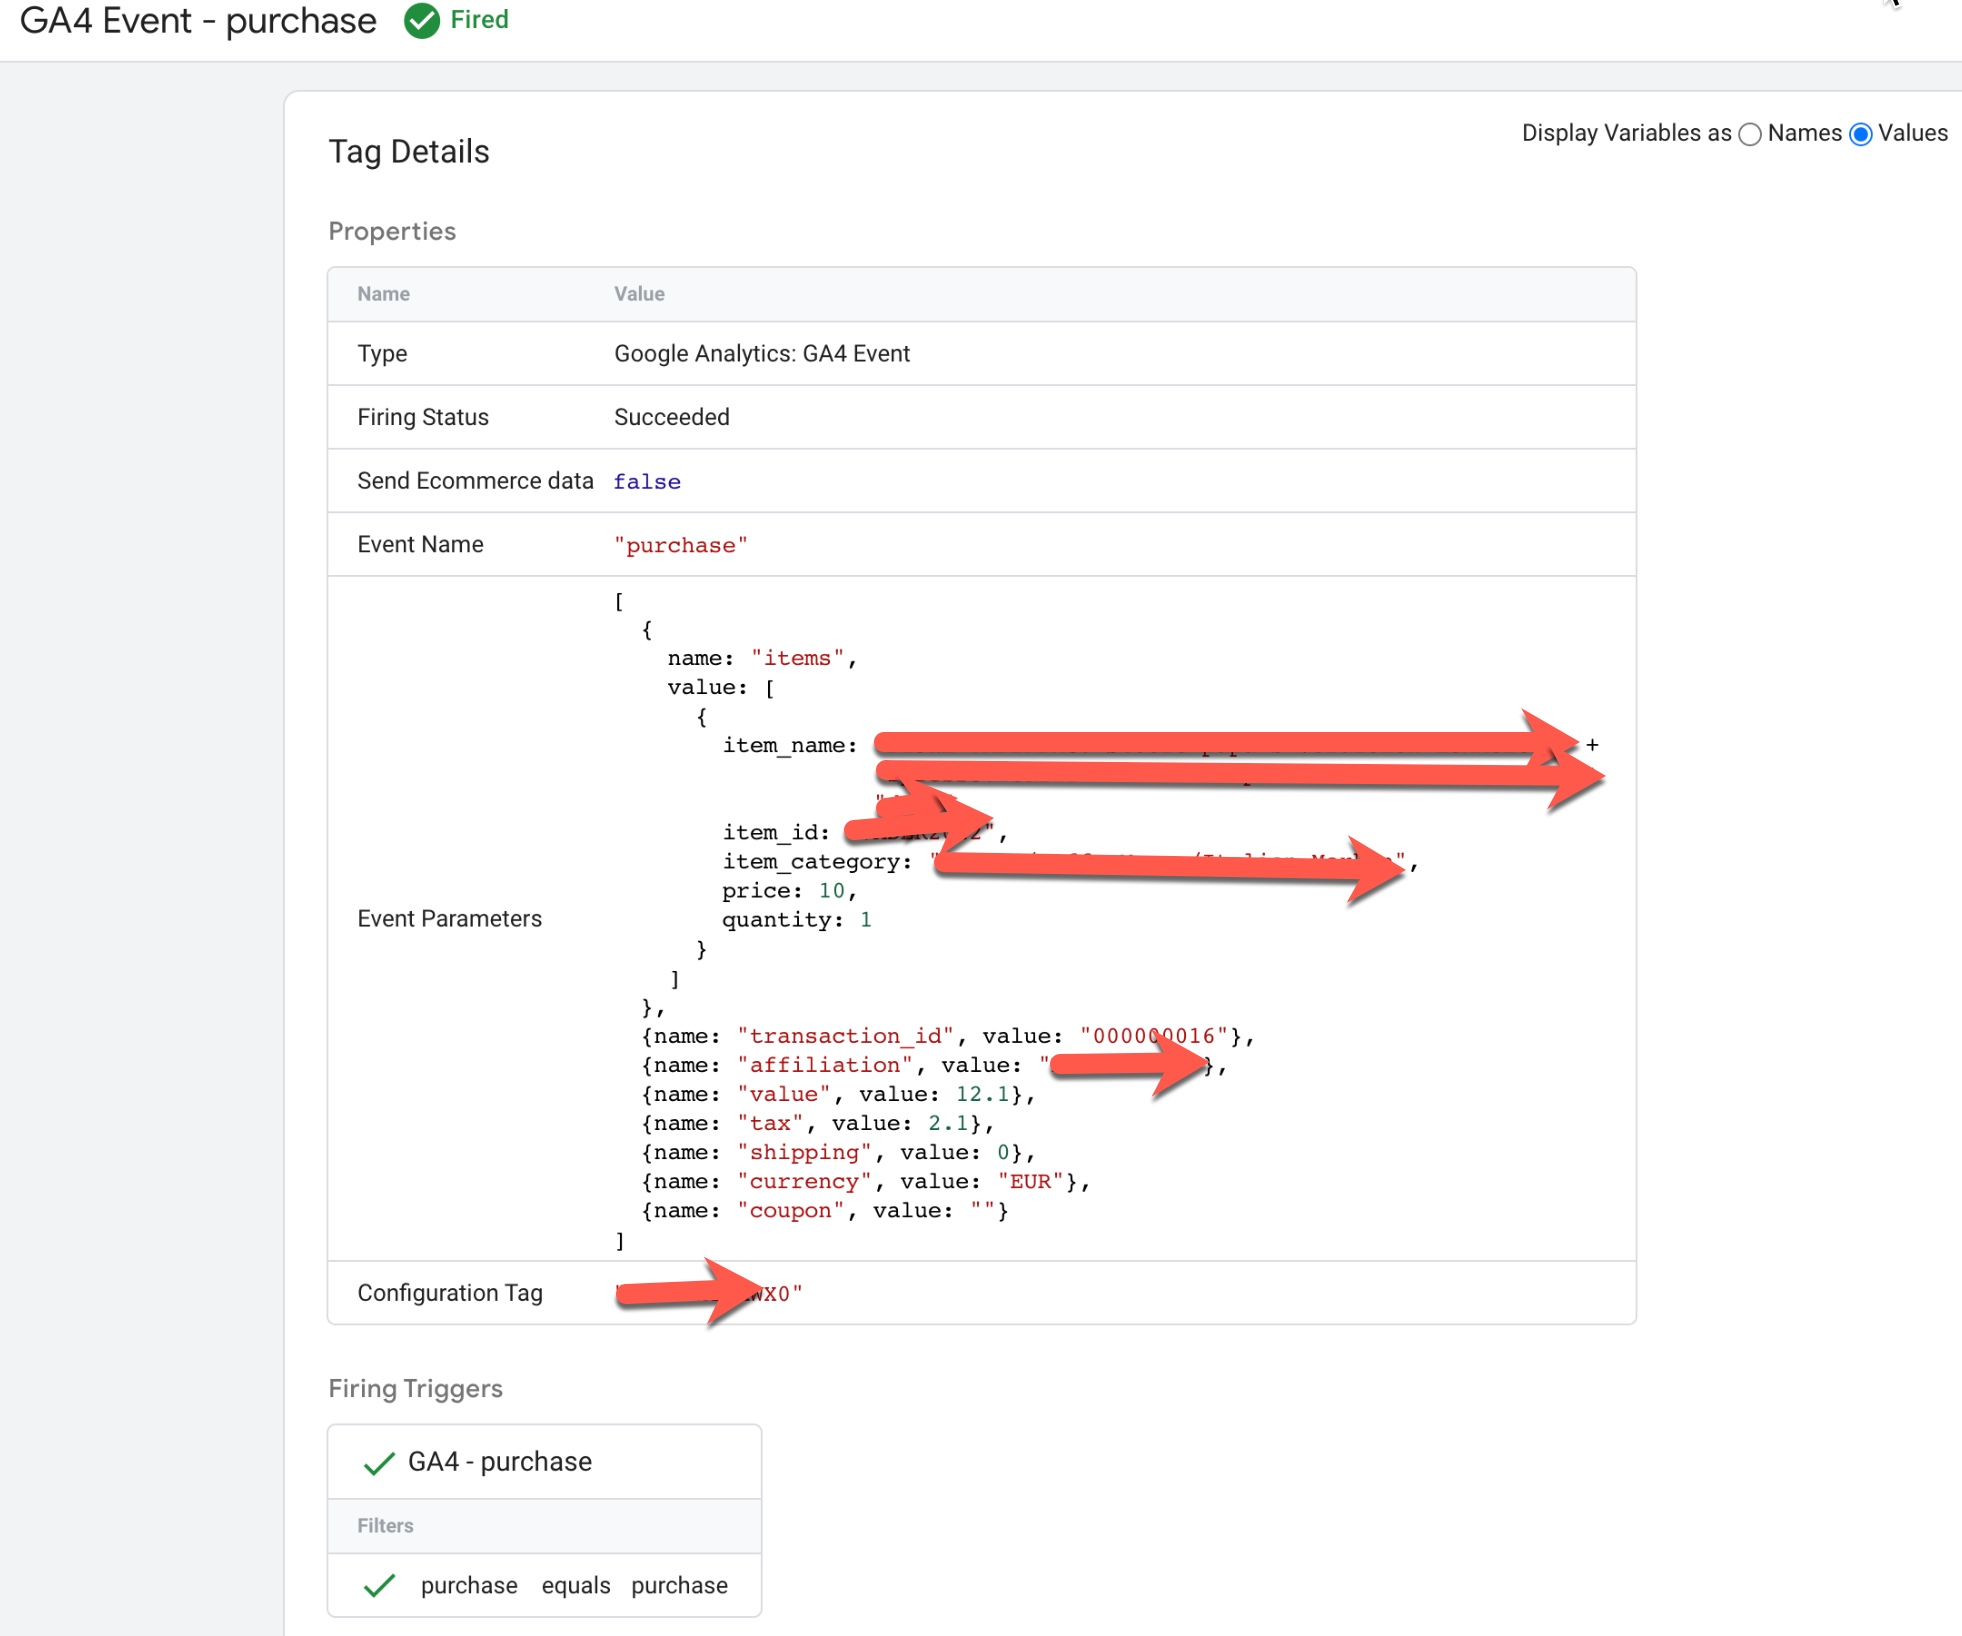
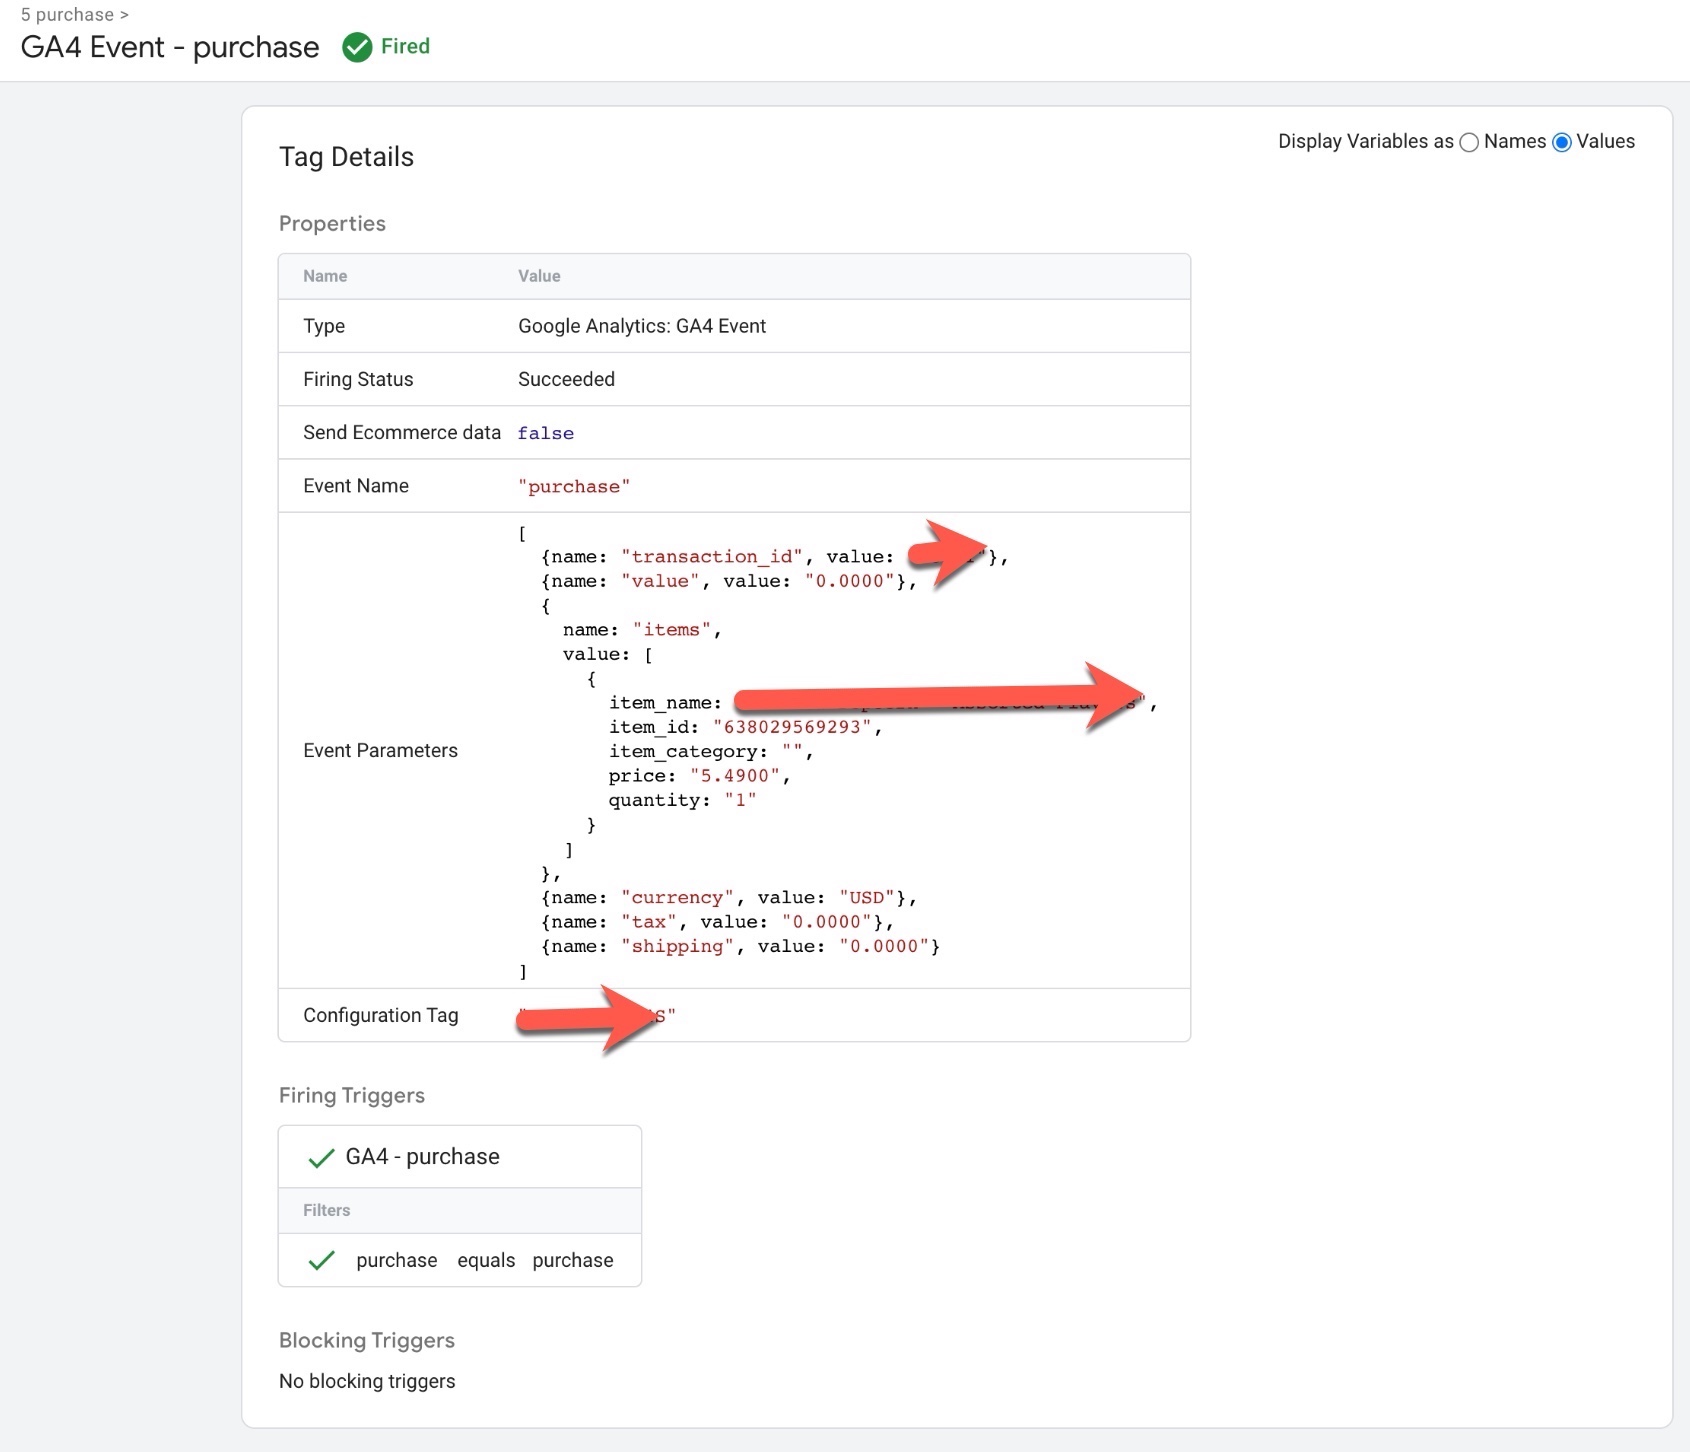
4. Map the nopCommerce events such as “add to cart”, “remove from cart”, “purchase” and other ecommerce events to GA4 events using the data layer variables.

5. Add the data layer object to the appropriate pages on your website, such as the product detail page, cart page, and checkout page.

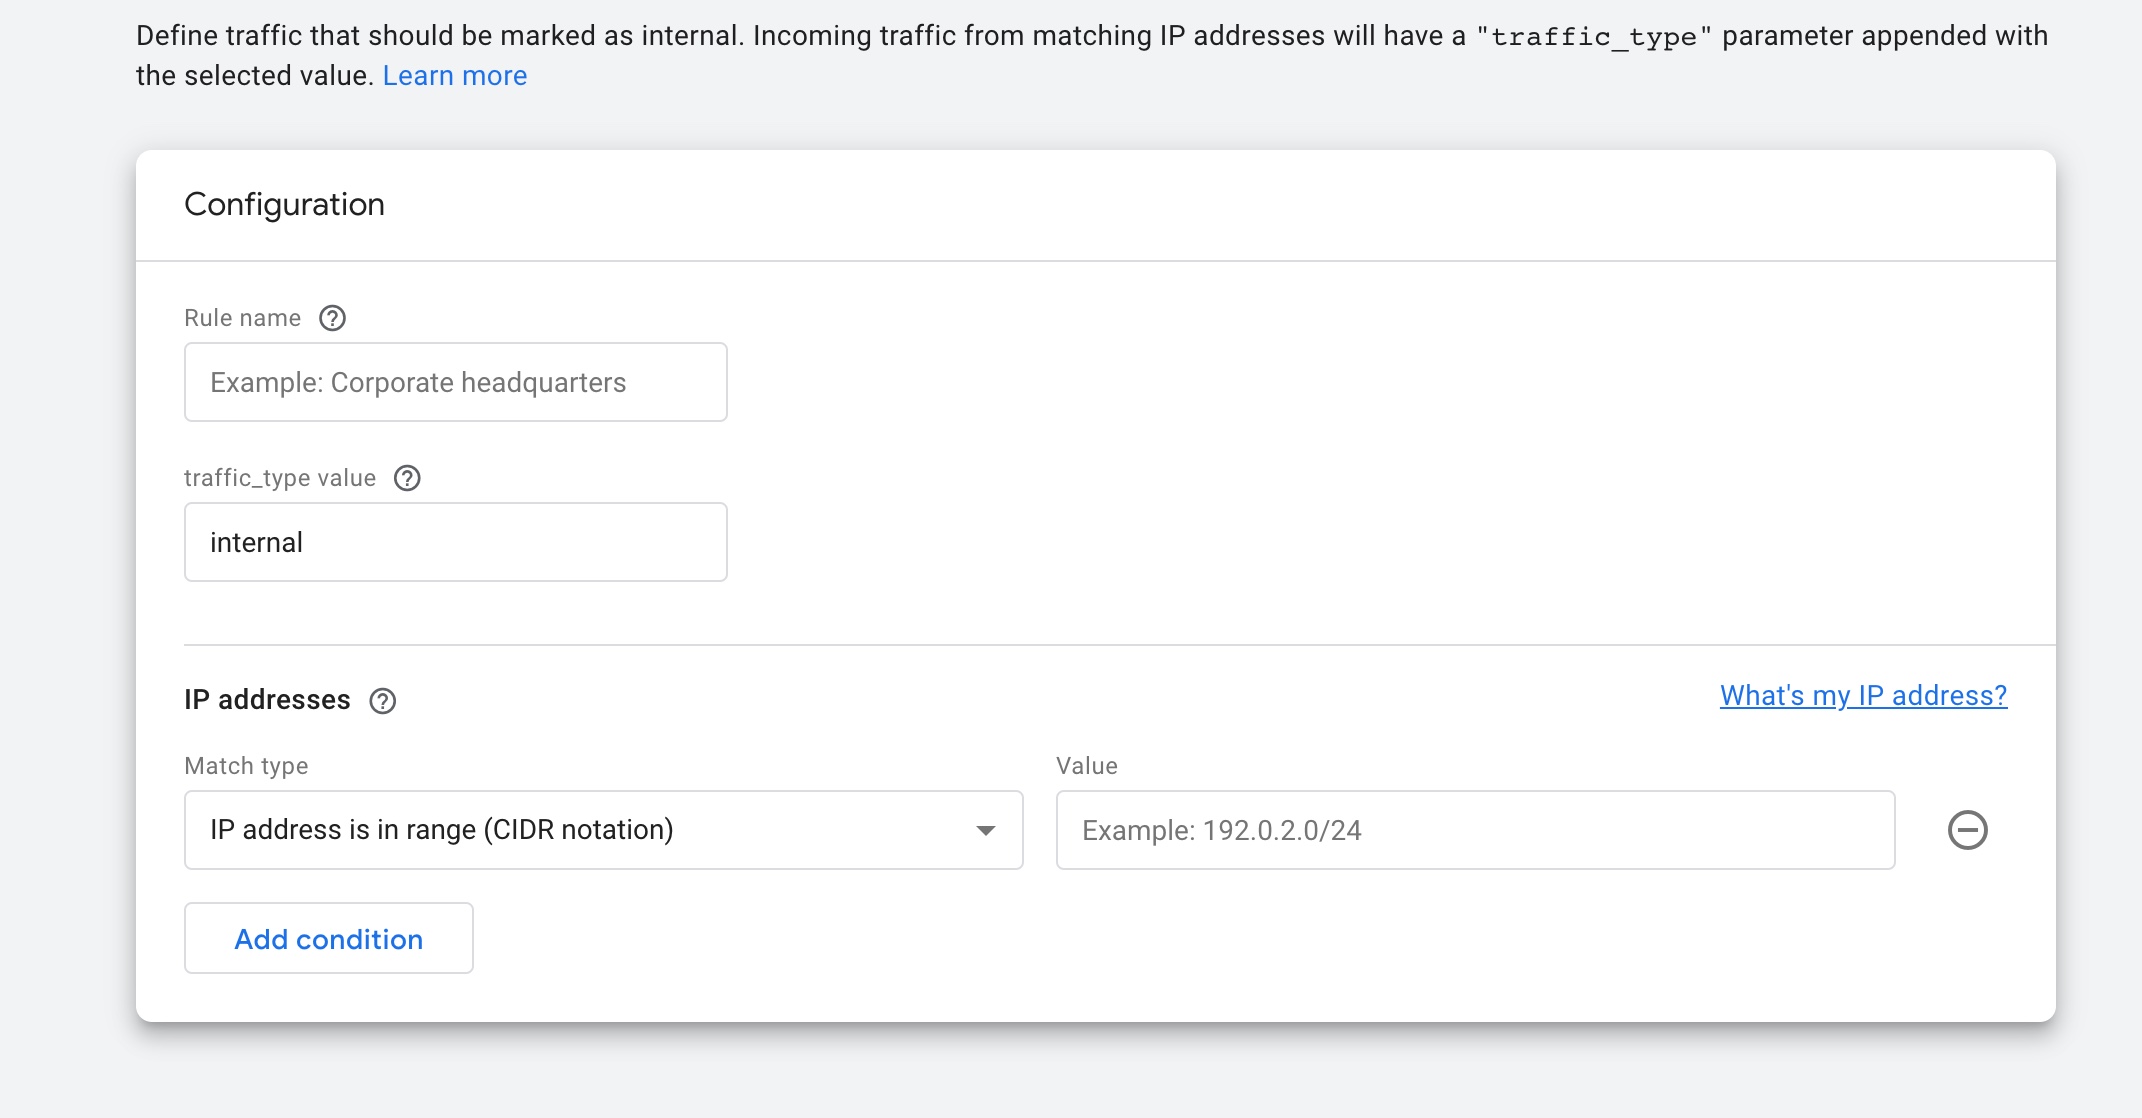
6. Enable ecommerce tracking in your GA4 property settings.

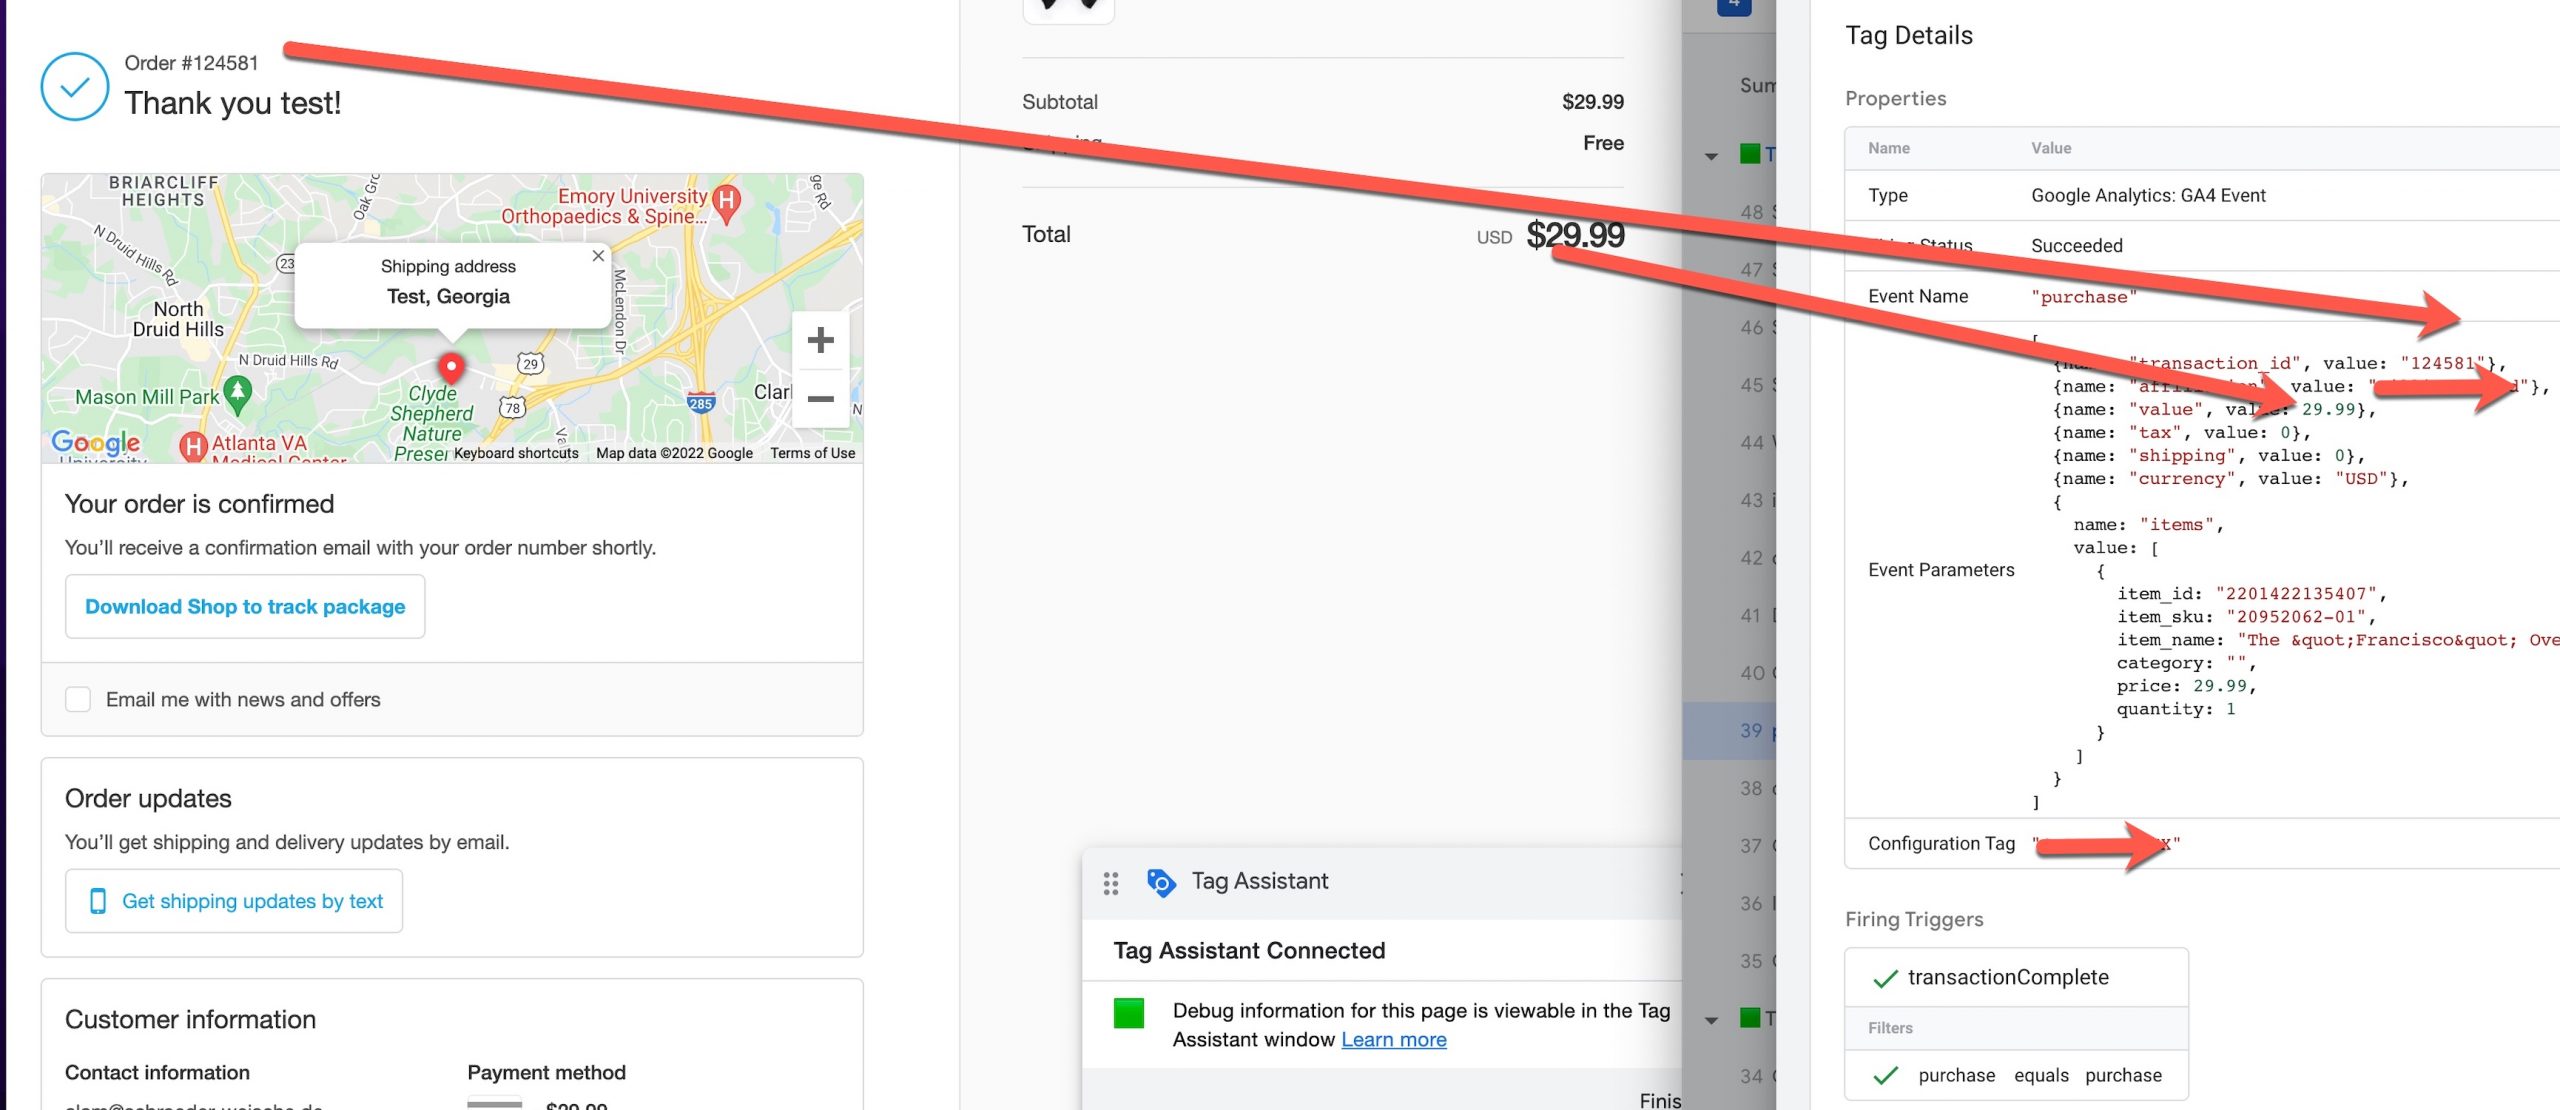
7. Verify your ecommerce data is being tracked correctly by checking the GA4 real-time report and ecommerce reports.

Implementing GA4 enhanced ecommerce tracking using the data layer in nopCommerce can be a bit more complex than using the GA4 Data layer .

It requires more technical knowledge, but it also provides more flexibility and control over the data that is being sent to GA4. Additionally, it also requires you to write custom code to handle the data layer events and adding the data layer object to the pages.

It’s worth noting that setting up GA4 ecommerce tracking in nopCommerce may require some technical knowledge and experience in working with GA4 and nopCommerce. But once it’s set up, it will provide you with detailed insights into customer behavior and purchase patterns, which can help you optimize your ecommerce strategy and improve the user experience on your website.

Google Analytics 4 (GA4) with Enhanced eCommerce

Google Analytics 4 (GA4) nopCommerce with Enhanced eCommerce using Google Tag Manager

Warning: If you do n’t know about javascript or do n’t have developing knowledge then do n’t try to nopCommerce Google Analytic (GA4) Enhanced Ecommerce tracking without module that can broke your site, Cart and other functionality 

Disclaimer: Google tag manager belongs to Google property 

For Contact: mappchero@gmail.com

I am available for Hire on Freelancer: Freelancer.com

I am available for Hire on Upwork: Upwork.com

I am available for Hire on Peopleperhour: Peopleperhour.com

I am available for Hire on Guru: Guru.com

Google Analytic 4 (GA4) Enhanced Ecommerce Data Layer for Drupal eCommerce

Standard

Advanced Google Analytics 4 (GA4) Enhanced Ecommerce Integration with Google Tag Manager using dataLayer Drupal eCommerce

Google Analytics 4 (GA4) is the latest version of Google Analytics and it includes new features such as enhanced ecommerce data tracking. The enhanced ecommerce data layer for Drupal eCommerce is a way to integrate GA4 with your Drupal eCommerce website, allowing you to track detailed ecommerce data such as product impressions, product clicks, add to cart events, and purchase transactions. This data can be used to gain insights into customer behavior, improve the user experience, and optimize your ecommerce strategy. To implement GA4 enhanced ecommerce data layer in Drupal eCommerce, you need to use the GA4 data layer which will provide you the GA4 tracking code to be inserted in your website and also provide the necessary data layer events to be mapped with GA4 events.

The enhanced ecommerce data layer for Drupal eCommerce requires certain variables to be set in order to properly track ecommerce data in GA4. These variables include:

  • ecommerce‘: This is the main object that contains all the ecommerce data.
  • ecommerce.purchase‘: This object contains information about a purchase transaction, including the transaction ID, revenue, tax, shipping, and coupon code.
  • ‘ecommerce.add’: This object contains information about an add to cart event, including the product ID, name, price, and quantity.
  • ecommerce.remove‘: This object contains information about a remove from cart event, including the product ID.
  • ‘ecommerce.detail’: This object contains information about a product detail view event, including the product ID and name.
  • ‘ecommerce.impressions’: This object contains information about product impressions, including the product ID, name, category, and list.
  • ‘ecommerce.promoClick’: This object contains information about a promo click event, including the promo ID and name.
  • ecommerce.promoView‘: This object contains information about a promo view event, including the promo ID and name.

These variables are to be configured in GA4 Data Layer  for Drupal eCommerce, and once the GA4 data Layer is configured correctly, it will automatically send the ecommerce data to GA4 when the corresponding events occur on the website.

Google Analytics 4 Ecommerce Tracking Drupal eCommerce

Google Analytics 4 Drupal eCommerce Enhanced Ecommerce tracking (GA4) using Google Tag Manager

Warning: If you do n’t know about javascript or do n’t have developing knowledge then do n’t try to Google Analytic 4 (GA4) Enhanced Ecommerce Data Layer for Drupal eCommerce without module that can broke your site, Cart and other functionality 

Disclaimer: Google tag manager belongs to Google property 

For Contact: mappchero@gmail.com

I am available for Hire on Freelancer: Freelancer.com

I am available for Hire on Upwork: Upwork.com

I am available for Hire on Peopleperhour: Peopleperhour.com

I am available for Hire on Guru: Guru.com

Google Tag Manager Lookup Table Regular Expression

Standard

Google Tag Manager (GTM) Lookup Table is a built-in feature that allows you to map one set of values to another using regular expressions. This can be useful for situations where you want to simplify complex data, standardize data, or map data from one format to another.

Here are the steps to set up a Lookup Table using regular expressions in Google Tag Manager:

  1. In GTM, go to the Variables tab and create a new variable of the type Lookup Table.
  2. In the Lookup Table variable, create a new row for each mapping you want to make.
  3. In the Input column, enter the regular expression that will match the original value.
  4. In the Output column, enter the value that you want to map to the original value.
  5. In the Triggers or Tag, set the variable you want to map as the Input variable, and the Lookup Table variable as the output variable.
  6. Publish the container.

Regular expressions are a powerful tool that allows you to match complex patterns of characters in a string, making it possible to use GTM Lookup Table for a wide range of use cases.

^product– matches any string that starts with “product-“
[0-9]{3} matches any 3 digits
^(?!.*error).*$ matches any string that doesn’t contain the word “error”

It is important to note that you need to have a good understanding of regular expressions and their syntax to be able to use them effectively in GTM Lookup Table.

Also, it’s recommended to test the regular expressions before using them in production to ensure they are working as expected.

Using Regex (Regular Expressions) Lookup Google Tag Manager

RegEx Lookup Table Variable In Google Tag Manager

Warning: If you do n’t know about javascript or do n’t have developing knowledge then do n’t try to Google Tag Manager Lookup Table Regular Expression without Plugin that can broke your site, Cart and other functionality 

Disclaimer: Google tag manager belongs to Google property 

For Contact: mappchero@gmail.com

I am available for Hire on Freelancer: Freelancer.com

I am available for Hire on Upwork: Upwork.com

I am available for Hire on Peopleperhour: Peopleperhour.com

I am available for Hire on Guru: Guru.com

Dynamic Google Ads Conversion Value Tracking with Google Tag Manager

Standard

Google Tag Manager (GTM) allows you to track conversions on your website dynamically, without having to manually add tracking code to each page. With GTM, you can create a conversion tracking tag and then use triggers to fire the tag on specific pages or when certain events occur. This allows you to track conversions for specific forms, button clicks, or other actions on your website without having to manually add tracking code for each one. To set up dynamic conversion tracking with GTM, you’ll need to have a Google Ads account and have GTM installed on your website. You can then create a conversion tracking tag in GTM and set up triggers to fire the tag on the appropriate pages or events.

Dynamic Google Ads conversion value tracking with Google Tag Manager (GTM) allows you to track the monetary value of a conversion, rather than just tracking the number of conversions. This can be useful for tracking conversions such as purchases or lead forms where the value of the conversion is different for each one. To set up dynamic conversion value tracking with GTM, you’ll need to have a Google Ads account and have GTM installed on your website.

Here are the steps to set up dynamic Google Ads conversion value tracking:

  1. In GTM, create a new tag for conversion tracking and set the “Track Type” to “Value”.
  2. Create a variable in GTM to store the value of the conversion. This can be done by creating a “Data Layer Variable” or “JavaScript Variable” depending on how the value is being passed to GTM.
  3. In the conversion tracking tag, set the “Value” field to the variable you created in step 2.
  4. Create a trigger in GTM to fire the conversion tracking tag on the appropriate pages or events.
  5. Publish the container.

You can set the value dynamically by passing the variable to GTM via the dataLayer or through Javascript

Dynamic Conversion Values in Google Tag Manager

Setup Google Ads Dynamic Conversion Tracking with Data Layer using Google Tag Manager

Please note that : You need to make sure that the variable you are passing to GTM is in the correct format, such as a numeric value and not a string.

Warning: If you do n’t know about javascript or do n’t have developing knowledge then do n’t try to Dynamic Google Ads Conversion Value Tracking with Google Tag Manager without Plugin that can broke your site, Cart and other functionality 

Disclaimer: Google tag manager belongs to Google property 

For Contact: mappchero@gmail.com

I am available for Hire on Freelancer: Freelancer.com

I am available for Hire on Upwork: Upwork.com

I am available for Hire on Peopleperhour: Peopleperhour.com

I am available for Hire on Guru: Guru.com

Google Analytics 4 (GA4) Ecommerce Tracking with PrestaShop

Standard

Google Analytics 4 (GA4) Enhanced Ecommerce PrestaShop for Google Tag Manager

Google Analytics 4 (GA4) Enhanced Ecommerce tracking allows you to track customer interactions with your online store such as product views, add-to-carts, and purchases. This feature can be used to gain insights into customer behavior and improve the performance of your online store.

To enable Enhanced Ecommerce tracking in GA4 with PrestaShop, you will need to install the Google Tag Manager and connect it to your GA4 property. Additionally, you will need to add the Enhanced Ecommerce tracking code to your PrestaShop website. This can be done by adding the code to the theme template files or by using the Data Layer custom Code 

The Data Layer is a JavaScript object that stores information about a customer’s interactions with your website. This information can then be passed to Google Analytics for tracking and analysis. By using the Data Layer, you can track more detailed information about customer interactions with your online store, such as product details, promotions, and checkout steps.

Once you have set up Enhanced Ecommerce tracking with the Data Layer, you will be able to see detailed reports in your GA4 account on customer behavior, such as product views, add-to-carts, and purchases. This will help you understand customer behavior and make data-driven decisions to improve your online store’s performance.

Enhanced ecommerce tracking in PrestaShop can be accomplished by adding the necessary code snippets to the site’s template files. The data layer code is a JavaScript object that contains information about the user’s shopping activity, such as product details, transaction data, and more. This information can then be passed to Google Analytics (GA4) to track ecommerce events and create detailed reports. You can find more information on how to set up Enhanced Ecommerce tracking in the PrestaShop documentation.

To track a purchase event using the data layer in PrestaShop with GA4, you would need to add the following code snippet to the “Order Confirmation” page

<script>
dataLayer.push({
  event: "purchase",
  ecommerce: {
    'transaction_id': '{{ order.id }}',
    'affiliation': '{{ shop.name }}',
    'value': '{{ order.total_paid }}',
    'tax': '{{ order.total_tax }}',
    'shipping': '{{ order.total_shipping }}',
    'coupon': '{{ order.gift_message }}',
    'items': [
      {% for product in order.products %}
      {
        'item_name': '{{ product.name }}',
        'item_id': '{{ product.reference }}',
        'price': '{{ product.price }}',
        'quantity': '{{ product.quantity }}',
        'item_brand': '{{ product.manufacturer_name }}',
        'item_category': '{{ product.category_name }}'
      },
      {% endfor %}
    ]
  });
</script>

The above code will push the purchase event and its associated information, such as the transaction ID, affiliation, value, tax, shipping, and coupon details, to GA4. Additionally, the code will push the product details such as name, ID, price, quantity, brand, and category to GA4.

You should also have GA4 tracking code implemented on your site for this event to be tracked by GA4.

Please note that the above code is an example, you may need to adjust it according to your website structure.

Google Analytics 4 (GA4) Ecommerce Tracking with PrestaShop

Advanced Google Analytics (GA4) Enhanced Ecommerce PrestaShop using Google Tag Manager

Warning: If you do n’t know about javascript or do n’t have developing knowledge then do n’t try to Google Analytics 4 (GA4) Ecommerce Tracking with PrestaShop without Plugin that can broke your site, Cart and other functionality 

Disclaimer: Google tag manager belongs to Google property 

For Contact: mappchero@gmail.com

I am available for Hire on Freelancer: Freelancer.com

I am available for Hire on Upwork: Upwork.com

I am available for Hire on Peopleperhour: Peopleperhour.com

I am available for Hire on Guru: Guru.com

Way To Filter Out Internal IP Traffic In GA4 Include IP Filtering

Standard

Who Else Wants To Know The Mystery Behind Is There Any Other Way To Filter Out Internal Traffic In GA4 Include IP Filtering

An IP address filter in Google Analytics (GA4) is a feature that allows you to include or exclude certain IP addresses from your GA4 data. This can be useful if you want to exclude traffic from your own office or exclude traffic from known bots and spiders.

For example, if you have a website that is only accessible from a specific IP range, you can set up an IP filter to exclude all other IP addresses, so you only see data from that specific IP range in your GA4 reports. Similarly, you can use an IP filter to exclude traffic from known bots and spiders, which can skew your data and make it difficult to get accurate insights.

To set up IP filters in Google Analytics 4, you will need to follow these steps:

  1. Log in to your Google Analytics account and navigate to the “Admin” section.

2. In the “Property” column, click on “Data Streams” and select the stream for which you want to set up the IP filter.

3. Click on the “Configure Data Stream” button and then select the “Data Processing” tab.

4. Under “IP Filter,” select “Exclude” or “Include” depending on whether you want to exclude or include certain IP addresses.

5. Enter the IP addresses you want to include or exclude, separated by commas. You can also use wildcards (*) to include or exclude ranges of IP addresses.

6. Click “Save” to apply the changes.

7. It’s important to note that IP filters will only apply to data collected after the filter is set up, and it does not affect historical data.

GA4 Include IP Filtering

Way to Filter out Internal Traffic in GA4 IP Filtering

Warning: If you do n’t know about javascript or do n’t have developing knowledge then do n’t try to Way To Filter Out Internal IP Traffic In GA4 Include IP Filtering Woocommerce without Plugin that can broke your site, Cart and other functionality 

Disclaimer: Google tag manager belongs to Google property 

For Contact: mappchero@gmail.com

I am available for Hire on Freelancer: Freelancer.com

I am available for Hire on Upwork: Upwork.com

I am available for Hire on Peopleperhour: Peopleperhour.com

I am available for Hire on Guru: Guru.com

Measure Purchase ecommerce in GA4 (Google Analytics 4) Woocommerce without a Plugin

Standard

Google Analytics 4 WooCommerce Integration without a Plugin using Google Tag Manager

In Google Analytics 4 (GA4), measuring purchase ecommerce data for a WooCommerce website can be done by setting up ecommerce tracking in GA4 and then using the data in the ecommerce reports. To set up ecommerce tracking in GA4 for a WooCommerce website, you will need to:

  1. Create a GA4 property in your Google Analytics account and install the GA4 tracking code on your website.

2. Enable ecommerce tracking in the GA4 property by going to the “Data Stream” settings and turning on ecommerce tracking for your website.

3. Use the WooCommerce without plugin to send purchase data to GA4 when a customer completes a purchase on your website. This can usually be done by adding some code to the WooCommerce “thank you” page or by using a without plugin that is designed to work with GA4.

4. Verify that ecommerce data is being tracked correctly in GA4 by checking the “Ecommerce” reports in the GA4 property.

5. Use the ecommerce reports in GA4 to analyze purchase data, such as revenue, quantity, average order value, and more.

6. You can also set up segments to breakdown the data by product, category, or even by specific campaigns, to better understand the customer’s behavior.

A data layer is a concept used in web analytics and marketing that refers to a collection of information about a website’s visitors and their interactions with the site. In the context of a WooCommerce purchase event, a data layer would contain information such as the items purchased, the total cost of the transaction, and any promotional codes used. This information can be used to track and analyze customer behavior, and to optimize the e-commerce experience for users.

A data layer for a WooCommerce GA4 purchase event might look something like this:

dataLayer.push({
  event: "purchase",
  ecommerce: {
      transaction_id: "123456789",
      affiliation: "Google Merchandise Store",
      value: 50.00,
      tax: 5.00,
      shipping: 5.00,
      currency: "EUR",
      coupon: "Coupon_Code",
      items: [
       {
        item_id: "P001",
        item_name: "Product1",
        item_brand: "brand 1",
        item_category: "Category1",
        price: 9.99,
        quantity: 1
      },
      {
        item_id: "P002",
        item_name: "Product2",
        item_brand: "brand 1",
        item_category: "Category2",
        price: 20.99,
        quantity: 1
      }]
  }
});

This example is showing that the event is a purchase, the transaction_id is 123456789, the value amount is $50.00, the products that are purchased has sku, name, category, price and quantity. The coupon field is empty, the shipping amount is $5.00 and the ttax amount is $5.00

Purchase ecommerce in  GA4 (Google Analytics 4) Woocommerce

WordPress WooCommerce Enhanced Ecommerce GA4 (Google Analytics 4) Tracking using Google Tag Manager

Warning: If you do n’t know about javascript or do n’t have developing knowledge then do n’t try to Set Up Measure Purchase ecommerce in GA4 (Google Analytics 4) Woocommerce without Plugin that can broke your site, Cart and other functionality 

Disclaimer: Google tag manager belongs to Google property 

For Contact: mappchero@gmail.com

I am available for Hire on Freelancer: Freelancer.com

I am available for Hire on Upwork: Upwork.com

I am available for Hire on Peopleperhour: Peopleperhour.com

I am available for Hire on Guru: Guru.com

Set Up Ecommerce Magento 2 GA4 (Google Analytics 4) Using Google Tag Manager

Standard

When you connect Google Analytics 4 (GA4) to your Magento 2 store, GA4 will automatically collect data on e-commerce transactions, including purchase events. The purchase event in GA4 is triggered when a user completes a purchase on your store and it’s considered a conversion event.

When a purchase is made, Magento sends the following information to GA4:

  • Product information (name, SKU, etc.)
  • Quantity
  • Revenue
  • Tax
  • Shipping costs
  • Coupon code

This information is used to populate the e-commerce reports in GA4, which provide insights into sales performance, user behavior, and revenue.

In addition, you can also set up custom purchase events in GA4 to track specific information about the purchase, such as the shipping method or payment method used.

To set up a custom purchase event in GA4, you will need to use the GA4 measurement API and the dataLayer. The dataLayer is a JavaScript object that allows you to pass information from your website or application to GA4.

The purchase event in GA4 can be tracked by triggering the ‘purchase’ event and passing the relevant information about the purchase to the dataLayer.

It is important to note that you will need to have the GA4 tracking code installed on your Magento store, and to have implemented the GA4 e-commerce tracking code on your “Thank you” page, where the purchase is confirmed.

When a purchase is made, Magento sends the following information to GA4:

  • Product information (name, SKU, etc.)
  • Quantity
  • Revenue
  • Tax
  • Shipping costs
  • Coupon code

This information is used to populate the e-commerce reports in GA4, which provide insights into sales performance, user behavior, and revenue.

In addition, you can also set up custom purchase events in GA4 to track specific information about the purchase, such as the shipping method or payment method used.

To set up a custom purchase event in GA4, you will need to use the GA4 measurement API and the dataLayer. The dataLayer is a JavaScript object that allows you to pass information from your website or application to GA4.

The purchase event in GA4 can be tracked by triggering the ‘purchase’ event and passing the relevant information about the purchase to the dataLayer.

It is important to note that you will need to have the GA4 tracking code installed on your Magento 2 store, and to have implemented the GA4 e-commerce tracking code on your “Thank you” page, where the purchase is confirmed.

Magento 2 Google Analytics 4 (GA4)

Set Up Magento 2 GA4 (Google Analytics 4) Using Google Tag Manager

Warning: If you do n’t know about javascript or do n’t have developing knowledge then do n’t try to Set Up Ecommerce Magento 2 GA4 (Google Analytics 4) Using Google Tag Manager that can broke your site, Cart and other functionality 

Disclaimer: Google tag manager belongs to Google property 

For Contact: mappchero@gmail.com

I am available for Hire on Freelancer: Freelancer.com

I am available for Hire on Upwork: Upwork.com

I am available for Hire on Peopleperhour: Peopleperhour.com

I am available for Hire on Guru: Guru.com

Google Analytics (GA4) Ecommerce Tracking For Shopify using Google Tag Manager

Standard

Google Analytics 4 (GA4) is the latest version of Google Analytics that provides more advanced features for tracking user behavior on your website. GA4 also has built-in integration with Shopify, which allows you to easily track e-commerce transactions on your online store.

To set up GA4 tracking on your Shopify store, you will need to create a GA4 property and then connect it to your Shopify store. Once the connection is established, GA4 will automatically collect data on user behavior and e-commerce transactions on your store.

You can track various e-commerce events such as product views, add to cart, and purchase transactions. GA4 will also automatically create e-commerce reports that provide insights into user behavior and sales performance on your store.

You can also set up custom events in GA4 to track specific actions on your store, such as button clicks, form submissions, and more. This will allow you to track user interactions that are not automatically tracked by GA4 and Shopify.

It is important to note that you will need to have the GA4 tracking code installed on your Shopify store, and to have implemented the GA4 e-commerce tracking code on your “Thank you” page, where the purchase is confirmed.

When you connect Google Analytics 4 (GA4) to your Shopify store, GA4 will automatically collect data on e-commerce transactions, including purchase events. The purchase event in GA4 is triggered when a user completes a purchase on your store and it’s considered a conversion event.

When a purchase is made, Shopify sends the following information to GA4:

  • Product information (name, SKU, etc.)
  • Quantity
  • Revenue
  • Tax
  • Shipping costs
  • Coupon code

This information is used to populate the e-commerce reports in GA4, which provide insights into sales performance, user behavior, and revenue.

In addition, you can also set up custom purchase events in GA4 to track specific information about the purchase, such as the shipping method or payment method used.

To set up a custom purchase event in GA4, you will need to use the GA4 measurement API and the dataLayer. The dataLayer is a JavaScript object that allows you to pass information from your website or application to GA4.

The purchase event in GA4 can be tracked by triggering the ‘purchase’ event and passing the relevant information about the purchase to the dataLayer.


GA4 Ecommerce Tracking For Shopify

Setting up Ecommerce Google Analytics 4 (GA4) on Shopify using Google Tag Manager

Warning: If you do n’t know about javascript or do n’t have developing knowledge then do n’t try to Google Analytics (GA4) Ecommerce Tracking For Shopify that can broke your site, Cart and other functionality 

Disclaimer: Google tag manager belongs to Google property 

For Contact: mappchero@gmail.com

I am available for Hire on Freelancer: Freelancer.com

I am available for Hire on Upwork: Upwork.com

I am available for Hire on Peopleperhour: Peopleperhour.com

I am available for Hire on Guru: Guru.com

GA4 ecommerce (Google Tag Manager) Send GA4 Purchase events

Standard

To send GA4 purchase events using Google Tag Manager (GTM), you will need to set up an GA4 property, create a GA4 ecommerce tag in GTM, and configure triggers to fire the tag when a purchase event occurs on your website.

Here are the specific steps for sending GA4 purchase events using GTM:

  1. Set up an GA4 property and get the GA4 measurement ID.
  2. Create a new GA4 ecommerce tag in GTM.
  3. Configure the tag to send data to the GA4 property using the measurement ID.
  4. Set up the triggers in GTM to fire the tag when a purchase event occurs on your website, such as when a “thank you” page is loaded after a purchase is made.
  5. To make sure that your data is accurate, you should also set up variables in GTM to capture ecommerce data such as transaction id, revenue, and product data.
  6. In the GA4 ecommerce tag make sure to call the GA4 ecommerce purchase event method, this is what triggers the purchase event.
  7. Publish the container and verify that the purchase events are being sent to GA4.

When sending a purchase event to Google Analytics 4 (GA4) using the GA4 ecommerce tag in Google Tag Manager (GTM), you can include various parameters to provide more information about the purchase. The purchase event in GA4 requires the following parameters:

  • transaction_id: A unique identifier for the transaction
  • revenue: The total revenue for the transaction
  • currency: The currency of the revenue
  • items: An array of objects representing the items in the transaction, including the following properties: name, item_id, price, quantity.

Here’s an example of how you might set up the purchase event in GTM:

dataLayer.push({
  event: "purchase",
  ecommerce: {
  'transaction_id': '{{transactionId}}',
  'value': {{totalRevenue}},
  'currency': '{{currency}}',
  'items': [
    {
      'item_name': '{{itemName}}',
      'item_id': '{{itemId}}',
      'price': {{itemPrice}},
      'quantity': {{itemQuantity}}
    },
    {
      'item_name': '{{itemName2}}',
      'item_id': '{{itemId2}}',
      'price': {{itemPrice2}},
      'quantity': {{itemQuantity2}}
    }
  ]
});

In this example, the purchase event is set up to use variables in GTM to capture the transaction id, total revenue, currency, and item data. These variables can be set up in GTM to pull data from the data layer or from the website’s HTML.

GA4 eCommerce Purchase Event

Purchase Event Parameters in Google Analytics 4 (GA4) using Google Tag Manager

Warning: If you do n’t know about javascript or do n’t have developing knowledge then do n’t try to GA4 ecommerce (Google Tag Manager) Send GA4 Purchase events that can broke your site, Cart and other functionality 

Disclaimer: Google tag manager belongs to Google property  For Contact: mappchero@gmail.com

I am available for Hire on Freelancer: Freelancer.com

I am available for Hire on Upwork: Upwork.com

I am available for Hire on Peopleperhour: Peopleperhour.com

I am available for Hire on Guru: Guru.com